- Release notes
- Getting started
- Installation
- Configuration
- Integrations
- Authentication
- Working with Apps and Discovery Accelerators
- AppOne menus and dashboards
- AppOne setup
- TemplateOne 1.0.0 menus and dashboards
- TemplateOne 1.0.0 setup
- TemplateOne menus and dashboards
- TemplateOne 2021.4.0 setup
- Purchase to Pay Discovery Accelerator menus and dashboards
- Purchase to Pay Discovery Accelerator Setup
- Order to Cash Discovery Accelerator menus and dashboards
- Order to Cash Discovery Accelerator Setup
- Basic Connector for AppOne
- SAP Connectors
- Introduction to SAP Connector
- SAP input
- Checking the data in the SAP Connector
- Adding process specific tags to the SAP Connector for AppOne
- Adding process specific Due dates to the SAP Connector for AppOne
- Adding automation estimates to the SAP Connector for AppOne
- Adding attributes to the SAP Connector for AppOne
- Adding activities to the SAP Connector for AppOne
- Adding entities to the SAP Connector for AppOne
- SAP Order to Cash Connector for AppOne
- SAP Purchase to Pay Connector for AppOne
- SAP Connector for Purchase to Pay Discovery Accelerator
- SAP Connector for Order-to-Cash Discovery Accelerator
- Superadmin
- Dashboards and charts
- Tables and table items
- Application integrity
- How to ....
- Rebrand and restyle Apps and Discovery Accelerators
- Use sharding in your applications
- Create an anonymized dataset
- Set up automated data refreshes
- Use an access matrix to enable role-based access to data
- Working with SQL connectors
- Introduction to SQL connectors
- Setting up a SQL connector
- CData Sync extractions
- Running a SQL connector
- Editing transformations
- Releasing a SQL Connector
- Scheduling data extraction
- Structure of transformations
- Using SQL connectors for released apps
- Generating a cache with scripts
- Setting up a local test environment
- Separate development and production environments
- Useful resources
Introduction
This page describes how to use an access matrix to enable role-based access to data for end-users.
Part 1: Define the access matrix file
The access matrix defines which users have access to which part of the data used in discovery accelerators, apps or processes.
The end user's email will be checked in the access matrix. Access is granted based on the relations between the user's email address and the attribute used to identify the discovery accelerators, apps or processes defined in the access matrix file.
See the illustration below for an example matrix file.
The Access Matrix file must at least contain the Email field and the field that is used to identify the data that the user is allowed to see. In this example, the Company code visibility attribute is used to identify the process data.
The email formatting can be with or without capital letters. In the accelerator or app, the format will be checked and adapted if needed. See Part 4.
In this example the Company code visibility is used as the column to filter the data. This column can contain multiple values, so that the data is filtered in a way that users can only see the company codes they are allowed to. Company codes are separated by commas, in the same column.
Part 2: Upload the access mfatrix File
To use the access matrix file in your discovery accelerator, app or process, you must upload it to the Superadmin Server data tab. See The Server data Tab.
See the illustration below for an example.
In the above example the access matrix for Purchase-to-Pay Discovery Accelerator is used, but this can be used in the same way for any other discovery accelerator or app. You can maintain multiple files, or add more columns to the original Excel file.
For application level restrictions see Authentication.
Part 3: Create the tables used to access the access matrix
To access the access matrix from your discovery accelerator or app you must create the following
tables:
- a System table that displays the current user;
- a connection string table to access the access matrix in the Server data tab.
See illustration below for an example.
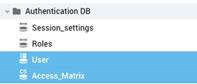
In this example the following tables are used:
UserAccess Matrix.
User Table
Follow these steps to create a System table to show the current user.
| Step | Action |
|---|---|
| 1 | Open the accelerator or app in your development environment and go to the Data tab. |
| 2 | Right-click in the table list and select New table -> System table.... |
| 3 | Double-click on the new table and select Current user as the Table scope. Click on OK. |
| 4 | Press F2 and rename the new table to User. |
The User table is a System table that displays the current user. Access to data is checked based on email.
Access_Matrix Table
The Access Matrix table uses a connection string to the access matrix file in the Superadmin Server data tab. Follow these steps to create a connection string table to load the access matrix file.
| Step | Action |
|---|---|
| 1 | Right-click in the table list and select New table -> Connection string.... |
| 2 | Right-click on the new table and select Advanced - > Options. |
| 3 | In the Table Options dialog, click on the drop-down list of the Table scope field in the Advanced section and change the scope to Server. |
| 4 | Double-click on the new table and add the connection string to the access matrix file that you uploaded to the Server data tab. Click on OK. |
| 5 | Press F2 and rename the new table to Access_Matrix. |
See the illustration below.
Part 4: Create expressions to check what data a user is allowed to see
This part consists of the following steps
Step 1: Correct the input format;
Step 2: Match the login user to the access matrix;
Step 3: Create a fallback for cache generation;
Step 4: Filter the data.
Step 1: Correct the input format
To ensure the email formatting is similar between the access matrix and the end-users found in Active Directory, you must create an expression to strip the email formatting. Follow these steps to create the expression.
| Step | Action |
|---|---|
| 1 | Click on the Access_matrix table. |
| 2 | Right-click in the table item list and select New expression.... |
| 3 | Enter Email in the Name field and select Per record as the Type. |
| 4 | Enter the expression: trim(lower(Email_input)) |
| 5 | Click on OK. |
See the illustration below.
Step 2: Match the login user to the access matrix
You must create a lookup expression in the User table that returns the company codes (or other data attributes) the user is allowed to see.
| Step | Action |
|---|---|
| 1 | Click on the User table. |
| 2 | Right click in the table item list and select New expression.... |
| 3 | Enter Company code visibility lookup in the Name field and select Lookup as the Type. |
| 4 | Select Access_Matrix as the Input table |
| 5 | Enter the expression: any(records.Company_code_visibility_input) |
| 6 | Right-click in the Settings panel and select Add level. |
| 7 | Click on ... and select the Email expression. |
| 8 | Right click on the Email expression** and select Set as expression level. |
| 9 | Click on OK. |
See the illustration below.
If a user is allowed to see everything, ALL is returned. If a user is not defined in the access matrix, the lookup will return NULL, to ensure that new users will not see any data.
Step 3: Create a fallback for cache generation
This is a necessary step to ensure that during cache generation all data is taken to generate the cache. To avoid the access matrix returning NULL during cache generation and filtering all the data, you need to set a fallback.
To ensure the cache is generated for the entire dataset, the ALL can be used as a fallback. This means no filtering is applied when the cache is being generated. The data is only filtered for the specific user after cache generation. This logic is built on that the email field is a mandatory field when creating new users, so it will not be empty for other users. During cache generation the email field is empty, so no filter is applied.
Follow these steps to create an expression to have a fallback for.
| Step | Action |
|---|---|
| 1 | Click on the User table. |
| 2 | Right-click in the table item list and select New expression.... |
| 3 | Enter Company code visibility in the Name field and select Per record as the Type. |
| 4 | Enter the expression: if ( Email = NULL , "ALL" , Company_code_visibility_lookup ) |
| 5 | Click on OK. |
See the illustration below.
If a user has assigned 'ALL', the user is allowed to see all data. Otherwise, the data the user is allowed to see is determined by the company code (or any other attribute that you have specified).
Step 4: Filter the data
The expression must check whether the user has assigned "ALL". In this case, all data is shown to the user. Otherwise, the expression must extract the attribute and check whether this attribute is in the list.
Since the Company Codes from the access matrix are maintained on a single row, these also need to be split and trimmed to ensure a list is created for each company code (or any other attribute that you have specified). The trimming is used to remove any unwanted spaces in the text.
Follow these steps to create an expression to filter the data.
| Step | Action |
|---|---|
| 1 | Click on the Cases_data table. |
| 2 | Right-click in the table item list and select New expression.... |
| 3 | Enter Company code filter user in the Name field and select Per record as the Type. |
| 5 | Enter the expression to define the list of company codes: var list := trim(split(Company_code_visibility, ",")); |
| 8 | Enter the expression to if the user has assigned "ALL". if( "ALL" in list , TRUE , split(Company_code, " " ,0) in list ) |
| 9 | Click on OK. |
See the illustration below.
This expression is then used in the joins to filter out the data, to ensure only the granted data is shown. Below is an example join that shows the results for one specific company code for filtering case data, resulting in significant less cases.
It is advised to use filters for cases. However, this approach can also be used to filter events.
- Introduction
- Part 1: Define the access matrix file
- Part 2: Upload the access mfatrix File
- Part 3: Create the tables used to access the access matrix
- User Table
- Access_Matrix Table
- Part 4: Create expressions to check what data a user is allowed to see
- Step 1: Correct the input format
- Step 2: Match the login user to the access matrix
- Step 3: Create a fallback for cache generation
- Step 4: Filter the data