- Release notes
- Getting started
- Installation
- Configuration
- Integrations
- Authentication
- Working with Apps and Discovery Accelerators
- AppOne menus and dashboards
- AppOne setup
- TemplateOne 1.0.0 menus and dashboards
- TemplateOne 1.0.0 setup
- TemplateOne menus and dashboards
- TemplateOne 2021.4.0 setup
- Purchase to Pay Discovery Accelerator menus and dashboards
- Purchase to Pay Discovery Accelerator Setup
- Order to Cash Discovery Accelerator menus and dashboards
- Order to Cash Discovery Accelerator Setup
- Basic Connector for AppOne
- SAP Connectors
- Introduction to SAP Connector
- SAP input
- Checking the data in the SAP Connector
- Adding process specific tags to the SAP Connector for AppOne
- Adding process specific Due dates to the SAP Connector for AppOne
- Adding automation estimates to the SAP Connector for AppOne
- Adding attributes to the SAP Connector for AppOne
- Adding activities to the SAP Connector for AppOne
- Adding entities to the SAP Connector for AppOne
- SAP Order to Cash Connector for AppOne
- SAP Purchase to Pay Connector for AppOne
- SAP Connector for Purchase to Pay Discovery Accelerator
- SAP Connector for Order-to-Cash Discovery Accelerator
- Superadmin
- Dashboards and charts
- Tables and table items
- Application integrity
- How to ....
- Working with SQL connectors
- Introduction to SQL connectors
- Setting up a SQL connector
- CData Sync extractions
- Running a SQL connector
- Editing transformations
- Releasing a SQL Connector
- Scheduling data extraction
- Structure of transformations
- Using SQL connectors for released apps
- Generating a cache with scripts
- Setting up a local test environment
- Separate development and production environments
- Useful resources
Introduction
A Join table is a combined table based on a relationship between two tables, for example Invoice_number or Event_ID. Join tables are defined by a join expression and can be recognized by the Join table icon.
Join types
Below is an overview of the different join types.
Inner join
Select all records from Table A and Table B, where the join condition is met.
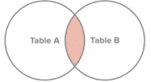
Syntax: TableA inner join TableB on TableA.ID=ratings.TableB.ID
Left Join
Select all records from Table A, along with records from Table B for which the join condition is met (if at all).
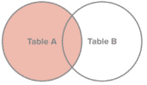
Syntax: TableA inner join TableB on TableA.ID=ratings.TableB.ID
Right Join
Select all records from Table B, along with records from Table A for which the join condition is met.
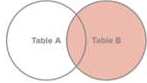
Syntax: TableA right join TableB on TableA.ID=ratings.TableB.ID
Full Join
Select all records from Table A and Table B, regardless of whether the join condition is met or not.
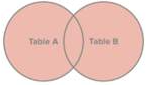
Syntax: TableA full join TableB on TableA.ID=ratings.TableB.ID
Union
As in SQL, different clauses are available
- Order by: The resulting table is ordered by the given attribute.
- Where: The resulting table is filtered by the given expression.
- Aliasing: By typing a string after the table name, it will be aliased to the string provided in the rest of the expression.
Creating a Join table
Follow these steps to create a join table.
| Step | Action |
|---|---|
| 1 | Open your app in your development environment and go to the Data tab. |
| 2 | Right click in the left panel and select New table - Join table…. |
A new table has been added to your list of tables in the Data tab. The join table does not contain any table items as a join expression must be defined first.
Follow these steps to define a join expression.
| Step | Action |
|---|---|
| 1 | Right click on the join table and select Edit…. |
| 2 | Enter a join expression. |
| 3 | Click on OK. |
See illustration below for an example of a leftjoin between a table called Invoices and another table called Events. The result panel shows the record count of both tables and the record count resulting out of the join.
After finalizing the join expression, the resulting items which are available in the table item list, are displayed in in the join table. The join table has two groups of items, which are the respective tables which are used for the join. See illustration below.
Creating attribute expressions
In a join table you can create expressions that use datasource attributes from both the original.
In the table item list, these expression are placed outside the original table groups. This means that the scope of the expression is on the join table and not on the individual tables. These groups help you as a developer to see in which table items are originally defined. See illustration below.
If you double click on an expression, the Edit Expression Attribute dialog opens. On the right of the general section of this dialog, Table also displays where the expression attribute was originally defined.
Availability of table items
To control in which tables a table item will be available, it is possible to set the following availability options.
- Public: The item is available in the current table, and in join tables using the current table.
- Private: The item is available in the current table, but not in join tables using the current table.
- Hidden: The item is not available at all.
See illustration below.
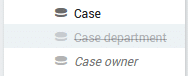
Public attributes are shown in bold, private attributes are shown in italic and hidden attributes are striked-through. See illustration below.
The availability of an attribute or control can be set per table. For example, if in the original table the datasource attribute is Public, in the join table the availability can be Private or Hidden.
If an item is not available in a certain table, then it cannot be used, for example, in expressions or charts.
Setting availability to private
Follow these steps to set the availability of a datasource attribute to Private.
| Step | Action |
|---|---|
| 1 | Go to the Data tab. |
| 2 | Select the table that contains the attribute you want to set to Private. |
| 3 | Right click on attribute in the table item list and select Availability - Private. |
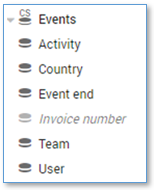
The attribute is now displayed Italic and is greyed out, which means it is Private. See illustration below for an example.
Setting availability to hidden
Follow these steps to set the availability of a datasource attribute to Hidden.
| Step | Action |
|---|---|
| 1 | Go to the Data tab. |
| 2 | Select the table that contains the attribute you want to set to Hidden. |
| 3 | Right click on attribute in the table item list and select Availability - Hidden. |
The attribute is not visible anymore in the table item list.
Hiding a table item ensures the item cannot be used anymore. If the item was still referenced before hiding it, you will create so called “ghosts”. See Maintain Application Integrity.
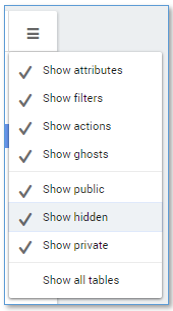
Click on the menu in the table item list to enable the option Show hidden. This enables you to see table items which are set to Hidden in a table, and to change their availability. See illustration below.
The Show hidden setting is remembered per user and is not set per application.
Filter table records
Join tables can also filter data records by using the where clause in the join expression. The where clause works the same as in SQL.
For example: Invoices leftjoin Events on Invoices.Invoice_number = Events.Invoice_number where Country = 'UK'.
Immediately after applying the change to the join table, the Table Item Mappings dialog shows up to map the new table items. This is necessary as the new set of table items might be different than original one. See illustration below.
Under Branches, the used tables are shown, under Table Items, the items from these tables.
Map table items
Follow these steps to inspect the mappings of the table items.
| Step | Action |
|---|---|
| 1 | Click on the Expand icon next to each option in the Table Item Mappings panel. |
| 2 | Verify the mapping is correct and click on OK. |
It is possible that all items were able to be mapped automatically. Depending on the change made to the join expression, some table items will not be mapped yet, and a decision must be made how to proceed. See illustration below for an example
Not all mappings were able to be automatically detected. In the Warning section at the top, the table items that do not have a correct mapping are listed.
Fixing incorrect mappings
Follow these steps to fix incorrect mappings.
- Map the tables in the Branches section as good as possible.
- Map multiple table items at once by mapping the paths marked with Incorrect and shown in red in the Table Items section.
- Expand the paths which still have problems and try to map items one by one.
- For items that cannot be mapped, choose Ghost and resolve those manually afterward
When the number of table items is small, you can start with step 3 as there are only a few mappings to correct anyway.