- リリース ノート
- 基本情報
- セットアップと構成
- オートメーション プロジェクト
- 依存関係
- ワークフローの種類
- 制御フロー
- ファイルの比較
- オートメーションのベスト プラクティス
- ソース管理との連携
- デバッグ
- ログ
- 診断ツール
- ワークフロー アナライザー
- ワークフロー アナライザーについて
- ST-DBP-002 - 多数の引数
- ST-DBP-003 - 空の catch ブロック
- ST-DBP-007 - 複数のフローチャートレイヤー
- ST-DPB-010 - [ワークフロー] または [テスト ケース] の複数のインスタンス
- ST-DBP-020 - 未定義の出力プロパティ
- ST-DBP-021 - ハードコードされたタイムアウト
- ST-DBP-023 - 空のワークフロー
- ST-DBP-024 - 永続性アクティビティの確認
- ST-DBP-025 - 変数のシリアル化の前提条件
- ST-DBP-026 - [待機] アクティビティの使用
- ST-DBP-027 - Persistence のベスト プラクティス
- ST-DBP-028 - 引数のシリアル化の前提条件
- ST-USG-005 - ハードコードされたアクティビティ引数
- ST-USG-009 - 未使用の変数
- ST-USG-010 - 未使用の依存関係
- ST-USG-014 - パッケージの制限
- ST-USG-017 - パラメーターの修飾子が無効
- ST-USG-020 - 最小ログ メッセージ
- ST-USG-024 - 未使用で保存されたままの値
- ST-USG-025 - 保存した値の誤用
- ST-USG-026 - アクティビティの制限
- ST-USG-027 - 必要なパッケージ
- ST-USG-028 - ファイル テンプレートの呼び出しの制限
- ST-USG-027 - 必須のタグ
- ST-USG-034 - Automation Hub URL
- 変数
- 引数
- インポートされた名前空間
- コード化されたオートメーション
- トリガーベースの有人オートメーション
- オブジェクト リポジトリ
- ScreenScrapeJavaSupport ツール
- 拡張機能
- Studio でのテスト
- トラブルシューティング

Studio ガイド
オートメーション プロジェクトについて
Studio では、以下の種類のプロジェクトを作成できます。
- プロセス - オートメーション プロセスを設計し、ロボットが実行できるようにパブリッシュします。
- ライブラリ - ワークフローを再利用可能なコンポーネントとして設計し、複数のプロセスに依存関係として追加可能なライブラリとしてプロジェクトをパブリッシュします。詳しくは、「ライブラリについて」をご覧ください。
- テスト オートメーション - テスト オートメーション プロジェクトを設計します。テスト オートメーションについて詳しくは、Studio でのテストに関するセクションをご覧ください。
- テンプレート - プロセスを設計し、共通の特性を共有する他のプロセスのベースとなるテンプレートとしてパブリッシュします。詳細については、「 プロジェクト テンプレート」をご覧ください。
新しい空のプロジェクトを作成するには、[ホーム] (Studio の Backstage ビュー) > [スタート] に移動して、[新しいプロジェクト] で作成するプロジェクトの種類を選択します。[テンプレートから新規作成] で、利用可能な既定のテンプレートの 1 つを選択して作成を開始するか、[テンプレート] タブに移動して、さまざまなソースから提供される多数のテンプレートを参照することもできます。
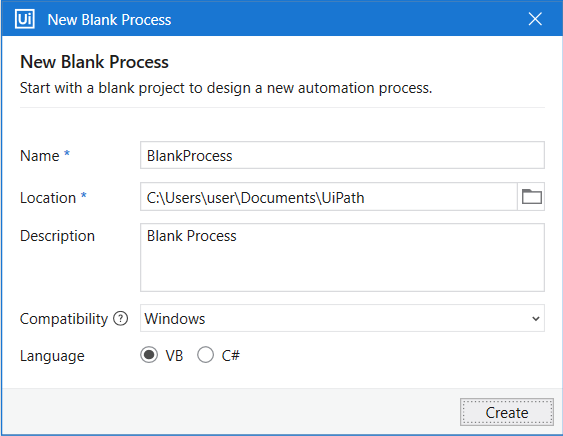
[新しいプロジェクト] ウィンドウで、プロジェクトごとに以下を設定します。
- 新しいプロジェクトの名前 (最大 128 文字) とこのプロジェクトの目的を要約した説明 (最大 500 文字) を入力します。
- プロジェクトを作成する場所を選択します。プロジェクトが作成される既定の場所は、
%USERPROFILE%\Documents\UiPathです。 - 対応 OS と言語を選択します。
注:
対応 OS と言語は、プロジェクトの作成後は変更できません。ただし、 Windows - レガシ プロジェクトを Windows 対応のプロジェクトに変換することは可能です。
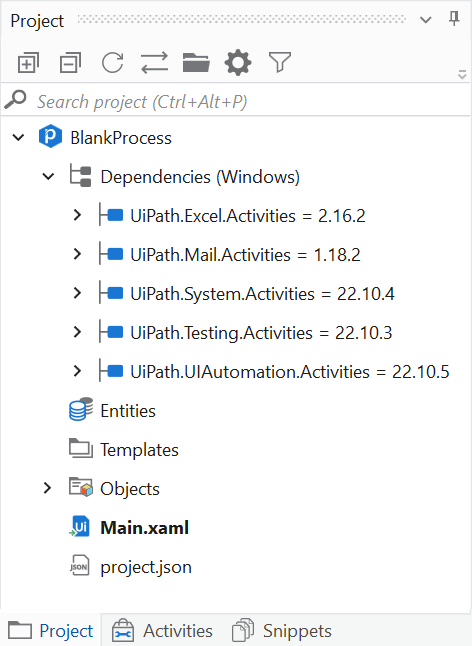
プロジェクト フォルダーには、既定で以下のファイルとサブフォルダーが含まれます。
- ファイル
Main.xaml- メイン ワークフローを保持するために既定で作成されます。また、プロジェクトに追加するほかのすべてのオートメーションの XAML ファイルは、プロジェクト フォルダーに保存されます。必要に応じて、別のファイルを Main に設定できます。すべてのファイルは、[ ワークフロー ファイルを呼び出し ] アクティビティを使用して、Main に設定されたファイルまたはプロジェクトのエントリ ポイントとしてマークされたファイルにリンクされている必要があります。テスト オートメーション プロジェクトの場合、Main.xamlファイルの代わりにTestCase.xamlファイルが既定で作成されます。注:Init.xamlという名前の XAML ファイルを含む Windows プロジェクトは実行できません。- プロジェクトのルート フォルダーに配置された XAML ファイルの名前を、他の XAML ファイルを含むサブフォルダーと同じにすることはできません。
project.jsonオートメーション プロジェクトに関する情報が含まれています。
- サブフォルダー
.entities- プロジェクト内で Data Service からインポートされるエンティティが使用されている場合に、そのエンティティに関するデータが含まれています。.local- ローカルにキャッシュされるプロジェクト データが含まれています。注:.localフォルダーは非表示です。Windows ファイル エクスプローラーの設定で、非表示の項目を表示可能にできます。.localフォルダーは、プロジェクト間で共有しないでください。
.objects- プロジェクト内でオブジェクト リポジトリに追加されたアイテムが使用されている場合に、そのアイテムに関するデータが含まれています。.project- プロジェクトに追加されたタグが含まれています。.screenshots- プロジェクト内で UI Automation アクティビティで生成されるスクリーンショットが使用されている場合に、そのスクリーンショットが含まれています。.settings- 実行時に使用される、アクティビティのプロジェクト設定が含まれています。.templates- プロジェクトに追加されたファイル テンプレートが含まれています。.tmh- プロジェクト内でテスト ケースが使用されている場合、そのテスト ケースに関するデータが含まれています。注:新しいバージョンの Studio で作成したプロジェクトは、古いバージョンの Studio では実行できない場合があります。詳しくは、「相互運用性」をご覧ください。
ファイル名に記号 ", <, >, |, :, *, ?, \, /,; を使用することはできません。これらの記号は、Microsoft Windows の制限やその他の特殊文字の制限によるものです。
Automation Cloud™ ロボット - 仮想マシンおよび Automation Cloud™ ロボット - サーバーレスでの Studio プロセスの実行は、開発を目的としたものではありません。
プロジェクトの対応 OS を設定する
新しいプロジェクトを作成するときには、プロジェクトを実行する環境に基づいて対応 OS を選択します。
- Windows - Windows でサポートされる .NET 8 を使用します。これは既定のオプションです。
- クロスプラットフォーム - クロスプラットフォームでサポートされる .NET 8 を使用します。
- Windows - レガシ - v2021.10 より前のリリースで使用されていた .NET Framework 4.6.1 を使用します。
重要:
- Windows プロセスとクロスプラットフォーム プロセスを実行するには、2021.10 以降の Orchestrator が必要です。
- 新しいプロジェクトで [ Windows - レガシ] オプションを利用できなくなりました。新しいプロジェクトを作成する際は、[ Windows ] または [ クロスプラットフォーム ] を選択することをお勧めします。また、 Windows - レガシ プロジェクトを Windows 対応のプロジェクトに変換 したり、ガバナンス ポリシーを使用して Windows - レガシ プロジェクトの作成オプションを復元したりすることができます。
それぞれの対応 OS の違いについては、以下の表をご覧ください。各対応 OS でのデザイン エクスペリエンスの詳細については、「オートメーションを設計する」をご覧ください。
| Windows - レガシ | Windows | クロスプラットフォーム | |
|---|---|---|---|
| プロセスの実行 | 32 ビット | 64 ビット | 64 ビット |
| 実行用にサポートされるプラットフォーム | Windows (64 ビット) | Windows (64 ビット) | Windows、Linux、macOS (64 ビット) |
| プロセスがパブリッシュ時にコンパイルされるか | コンパイルされません。パブリッシュされるパッケージにはプロジェクト ソース ファイルが含まれます。 | コンパイルされます。パブリッシュされるパッケージにはコンパイルされた DLL ファイルが含まれます。 | コンパイルされます。パブリッシュされるパッケージにはコンパイルされた DLL ファイルが含まれます。 |
パッケージ マネージャーからインストールできるのは、選択した対応 OS をサポートしているアクティビティ パッケージのみです。
各プロジェクトの対応 OS は、Studio のステータス バーの右側と [プロジェクト ] パネルの [依存関係 ] ノード>に表示されます。対応 OS は、[ホーム] (Studio の Backstage ビュー>) の [スタート] タブで [最近使った項目] リストを開くの各プロジェクトのエントリにも表示されます。
- 対応 OS が異なるプロジェクト間でのアクティビティのコピーと貼り付けはサポートされていません。
- Windows プロジェクトまたはクロスプラットフォーム プロジェクトを再度開いたと際、または再読み込みした際に Studio で検証エラーが検出されると、不足している参照を自動的にインポートするよう求めるメッセージが表示されます。
クロスプラットフォーム プロジェクトを設計する
クロスプラットフォーム プロジェクトでは、ユーザーの操作を必要としないオートメーションや Chrome を使用した Web ブラウザー操作のオートメーションを作成できます。クロスプラットフォーム オートメーションは、Windows オペレーティング システムおよび Linux や macOS などの Unix 系オペレーティング システムで実行できます。
クロスプラットフォームのサポートを使用して無人プロジェクトを作成するには、以下の手順を実行します。
- Studio で新しいプロジェクトを作成し、[対応 OS] で [ クロスプラットフォーム ] オプションを選択します。このオプションは、すべての種類のプロジェクトで利用できます。式に VB 言語を使用するプロセスの場合は、Studio と Studio Web のどちらででも作業できます。
- オートメーションを設計します。すべてのアクティビティ パッケージがクロスプラットフォーム プロジェクトに対応しているわけではないため、パッケージ マネージャーで選択できるのは一定のパッケージだけであることに注意してください。クロスプラットフォーム プロジェクトのデザイン エクスペリエンスについて詳しくは、こちらをご覧ください。 クロスプラットフォーム プロジェクトの既定の依存関係を以下に示します。
- Studio プロファイルの場合: UiPath.System.Activities、UiPath.Testing.Activities、UiPath.WebApi.Activities、および UiPath.UIAutomation.Activities
- StudioX プロファイルの場合: UiPath.System.Activities、Microsoft Office 365、Google Workspace、および UiPath.UIAutomation.Activities
- オートメーションをテストします。オートメーションのテストは、そのオートメーションを実行するマシンでリモート デバッグを使用して行うことをお勧めします。リモート デバッグは、Windows ロボット、Linux ロボット、macOS ロボットで動作します。
- オートメーションをテストしたら、プロジェクトを Orchestrator にパブリッシュします。無人ジョブを実行する手順は、Windows、macOS、Linux で同じです。
重要:
このバージョンの Studio は、v2022.4 以前の Studio で利用可能だった以前のクロスプラットフォーム アクティビティ パッケージには対応していません。v2022.10 より前のバージョンの Studio でクロスプラットフォーム プロジェクトを作成した場合は、そのプロジェクトを v2022.10 以降の Studio で編集する前に、インストール済みのパッケージを最新バージョンに更新してください。なお、一部のプロパティは編集できない場合があります。
Studio Web でプロジェクトを開く
Studio Web でプロジェクトを開く機能は、Enterprise および Community Edition の Studio の最新バージョンでのみサポートされています。
外出先でクロスプラットフォーム プロジェクトを任意のデバイスから設計する場合は、ブラウザーから直接、クラウドにプロジェクトを追加して Studio Web で編集できます。Studio Web は、Automation Cloud™ 内にあるオートメーション デザイナーです。プロジェクトをクラウドに追加すると変更が常に同期されるため、デスクトップと Web をシームレスに切り替えて、中断した場所から作業を再開できます。
- Studio Web では、式に C# 言語を使用するクロスプラットフォーム プロジェクトはサポートされていません。また、言語に関係なく (VB または C# のどちらを使用していても)、Windows プロジェクトはサポートされていません。C# のクロスプラットフォーム プロジェクトまたは Windows プロジェクトをクラウドに保存することはできますが、Studio Web で編集することはできません。
- フローチャート ワークフローを含むプロジェクトは、Studio Web で開くことはできません。
Studio でクラウド プロジェクトを管理する
Studio Web で使用するには、クロスプラットフォーム プロジェクトが以下の要件を満たしている必要があります。
- プロジェクトの種類がプロセスである。
- 式の言語が VB である。
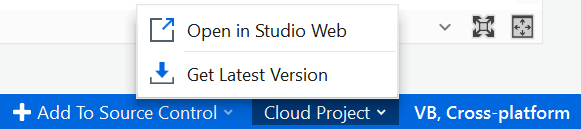
ローカル プロジェクトをクラウドに保存するには、Studio のリボンで [保存] を選択し、[クラウドに保存] を選択します。プロジェクトが Studio Web に保存されると、ステータス バーのラベルが「クラウド プロジェクト」に変わります。ラベルをクリックするとドロップダウン メニューが開き、プロジェクトを管理できるオプションが表示されます。
-
Studio Web で開く - プロジェクトを Studio Web で開きます。プロジェクトが Studio Web によってロックされている場合、エラーが表示され、プロジェクトは新しいタブで読み取り専用モードで開かれます。
-
クラウドに同期 - Studio Web で行った最新の変更を取得します。リモート プロジェクトとローカル プロジェクト間に違いがある場合、ローカル バージョンを上書きするかどうかを最初に確認する必要があります。
それ以外のオプションは Studio のリボンの [保存] にあります。
- 名前を付けて保存 - 現在のワークフロー ファイルを保存します。
- すべて保存 - プロジェクトに加えられたすべての変更を保存します。
- クラウドに同期 - デスクトップ版の Studio で行った最新の変更を Studio Web のプロジェクトに保存します。リモート プロジェクトに変更がある場合、変更を上書きするかどうかを最初に確認する必要があります。プロジェクトが Studio Web によってロックされている場合は、クラウドに同期できません。
注:
すでに Studio Web で開いているプロジェクトで [ Studio Web で開く] オプションを使用しようとすると、「 クラウドに保存できませんでした 。」というエラーが表示されます。
- コピーを保存 - 現在のプロジェクトを新しいプロジェクトとしてローカルに保存します。名前の編集、保存場所の選択、プロジェクトの説明の入力が行えます。
Studio Web のプロジェクト エクスプローラーにはすべてのプロジェクト ファイルとフォルダーが表示されますが、編集できるのは種類がシーケンスのワークフローのみです。
同様に、Studio Web で作成したプロジェクトの作業を Studio で続けることもできます。Studio Web の [プロジェクト] ページでプロジェクトの右側のメニューを開き、[デスクトップ版の Studio で開く] を選択します。
Studio と Studio Web 間での変更の同期方法
Studio でクラウド プロジェクトを保存して閉じると、プロジェクトが Studio Web によってロックされていなければ、変更はリモート プロジェクトにも保存されます。そのプロジェクトを Studio Web で開くと、プロジェクトが更新され、Studio でクラウドに保存した変更が反映されます。
クラウド プロジェクトを Studio で開くと、プロジェクトが更新され、Studio Web で行った変更が反映されます。既に Studio で開いているプロジェクトを更新して Studio Web での最新の変更を反映するには、Studio のステータス バーで [クラウド プロジェクト] > [最新バージョンを取得] を選択します。
どちらの場合も、ローカル プロジェクトとリモート プロジェクト間に違いがある場合は、操作を続行する前に確認を求めるメッセージが表示されます。
Studio Web でプロジェクトに大きな変更を加えると、Studio に対応しなくなる可能性があります。また、その逆も同様です。
クロスプラットフォーム プロジェクトを Windows プロジェクトに変換する
クロスプラットフォーム プロジェクトを Windows 対応のプロジェクトに変換すると、Windows プロジェクトでのみ利用可能なアクティビティ (デスクトップ UI Automation、Excel、フォーム アクティビティなど) を活用でき、Studio のデスクトップ オートメーションを使用して Studio Web プロジェクトを簡単に拡張できます。クロスプラットフォーム プロジェクトを Windows に変換するには、以下のいずれかを実行します。
- Studio の [プロジェクト] パネルでプロジェクトを右クリックし、メニューから [Windows に変換] を選択します。StudioX で、StudioX ウィンドウの上部にあるリボンから、[プロジェクト] > [Windows に変換] を選択します。
- Windows プロジェクトでのみ使用できるアクティビティをプロジェクトに追加します。[アクティビティ] パネルの [Windows] カテゴリには、 Windows プロジェクトでのみ利用できる、インストール可能なアクティビティが一覧表示されます。[アクティビティ] パネル、またはアクティビティを追加する検索バーからそのようなアクティビティをプロジェクトに追加すると、プロジェクトを Windows に変換するよう求めるメッセージが表示されます。
どちらの場合も、新しいウィンドウが表示され、以下の操作を実行できます。
- [新しいプロジェクトを作成する] を選択すると、Windows 対応のプロジェクトを使用して現在のプロジェクトのコピーが作成され、元のクロスプラットフォーム プロジェクトが保持されます。
- 既存のプロジェクトを更新して Windows 対応のプロジェクトに変換するには、[新しいプロジェクトを作成する] チェックボックスをオフにします (この操作は元に戻せません)。
プロジェクト言語を設定する
Studio プロファイルで新しいプロジェクトを作成するときには、式に使用する言語 (VB または C#) を選択できます。既定で選択される言語は VB ですが、[ホーム] (Studio の Backstage ビュー) > [設定] > [デザイン] で、C# を新しいプロジェクトの既定の言語に設定することもできます。StudioX プロファイルで作成されたプロジェクトは、式に VB.NET 言語を使用します。
同じプロジェクト内で VB と C# の両方の式を使用することはできません。C# ワークフローでの VB の式の使用もサポートされていません (逆も同様)。他のプロジェクトからのアクティビティのコピー アンド ペースト、ワークフローの呼び出しまたはインポートを行うときは、必ずプロジェクトと同じ言語を使用してください。
C# ライブラリを依存関係として VB プロジェクトにインストールできます (逆も同様)。ただし、ライブラリがインストールされているプロジェクトから、言語固有の式を使用してライブラリ プロジェクトの引数に定義されている既定値にアクセスすることはできません。
C# の制限事項
これらの制限は Windows - レガシ プロジェクトにのみ適用されます。このプロジェクトは、このリリースでは既定で利用できません。
- 現在の C# の実装は C# バージョン 5 を使用する C# コンパイラに基づいています。したがって、合体代入、null 条件演算子、null 合体演算子、文字列補間などの新機能の利用が制限されます。
- インクリメント付きの式を含むプロジェクトは無効です。
nameof()演算子を含む式は無効としてマークされ、C# の現在の実装では許可されません。- オプションの引数を使用したメソッド呼び出しを含む式には、オプションの引数の値を含める必要があります。
- C# プロジェクトのデザイン時と実行時のパフォーマンスは VB.NET プロジェクトに比べて低いため、実行時のパフォーマンスを重要視する場合は C# ではなく VB.NET の使用をお勧めします。
- C# を使用した Windows - レガシ プロジェクトを実行するたびに、コンパイルされた DLL ファイルが
%appdata%\Tempフォルダー内に作成されます。これはプロジェクトの実行後に自動的に削除されません。ストレージが問題になる場合は、以下によって対応できます。- Windows プロジェクトまたはクロスプラットフォーム プロジェクトで C# を使用する
- Windows - レガシ プロジェクトで VB を使用する
- 実行後に不要なファイルを手動で削除する
プロジェクト バージョンを設定する
セマンティック バージョン管理
セマンティック バージョン管理スキームは、Major.Minor.Patch[-Suffix] という形式です。ここで、
- Major は、メジャーバージョンです。
- Minor は、マイナーバージョンです。
- Patch は、パッチバージョンです。
- -Suffix (任意) は、パッチバージョンに続いて、ハイフンの後にドットで区切られた識別子が付加されます。これは、プレリリースバージョンを表します。
識別子は、ASCII 英文字とハイフンのみで指定してください。空欄にすることはできません。数値識別子は、0を先頭につけることはできません。また、ビルドのメタデータは、パッチバージョンまたはプレリリースバージョンの後にハイフンが続き、その後にプラス記号が付加された構成になることがあります (例: 1.0.0-alpha+1)。
新しいプロセスやライブラリの作成する場合、既定のスキームはセマンティックです。この設定は、[パブリッシュ] ウィンドウでバージョン番号に数字を追加すれば、変更できます。このプロジェクトのセマンティック バージョンは、project.json ファイルからも変更できます。バージョン番号 major.minor に、パッチ番号 0 が自動的に追加されます。
レガシーバージョン管理
プロジェクトにより生成されるレガシーのバージョン番号の形式は、「M.m.bbbb.rrrrr」です。それぞれの意味は次のとおりです。
- M はメジャーバージョンです。
- m はマイナーバージョンです。
- bbbb はビルドバージョンです。
- rrrrr はリビジョンバージョンです。
メジャーバージョンとマイナーバージョンは project.json ファイルでも編集できますが、ビルドバージョンとリビジョンバージョンはアルゴリズムに従って生成されます。ビルドの値は、2000年1月1日からの経過日数です。リビジョンの値は、現時点からリリース時までに経過した秒数です。この結果を2で割って、リビジョン番号が65535を超えないようにします。
[パブリッシュ] ウィンドウに候補として表示されるバージョン番号は、このプロジェクトの以前のバージョン管理スキームに基づいて生成されています。タイムスタンプは、4 桁のバージョン管理スキームを使用するプロジェクトを考慮に入れたものです。
プロジェクトを管理する
[プロジェクト] パネルでは、現在のプロジェクトの内容の確認とフィルター処理、フォルダーの追加、ファイルの場所を開く、依存関係の管理、プロジェクト設定の調整などの操作が行えます。
ファイル エクスプローラーから [プロジェクト] パネルに直接ファイルをコピーして貼り付けられます。同じ操作を、.xaml ワークフローなどの 1 つまたは複数のファイルに対し、ドラッグ アンド ドロップによって実行することも可能です。ショートカットの Ctrl + C と Ctrl + V、またはコンテキスト メニューのオプション [コピー] と [貼り付け] を使用して、ファイルまたはフォルダーをコピーしてパネル内に複製することもできます。
10 MB 未満の TXT、CS、VB、JSON (project.json ファイルを除く)、および XML ファイルをダブルクリックすると、構文の強調表示機能を備えたテキスト エディターを使用して Studio 内で編集できます。
| オプション | 説明 |
|---|
| すべて展開  | オートメーション プロジェクト内のすべてのノードを展開します。 |
| すべて折りたたみ  | オートメーション プロジェクト内のすべてのノードを折りたたみます。 |
| 更新  | プロジェクトを更新します。 |
| アクティブなドキュメントと同期 | デザイナー パネルでアクティブなプロジェクト要素にフォーカスします。 |
| すべてのファイルを表示 |
| project.jsonを含む、オートメーション プロジェクトに属するすべてのファイルを表示します。 |
| ファイル エクスプローラー  | マシン上のプロジェクトの場所を開きます。 |
| プロジェクト設定  | プロセスまたはライブラリについて [プロジェクト設定] ウィンドウを開きます。 |
| ファイルの種類でフィルター  |Studio で編集できる現在のプロジェクトのファイルを、ファイルの種類でフィルター処理します: [ワークフロー]、[ テスト ケース]、[ フォーム]、[ コード]、[ テキスト]、[ オブジェクト ] (既定では無効化)、[ 非表示のフォルダーを表示] (既定では無効化)。プロジェクト フォルダー内のすべてのファイルを表示するには、[ その他 ] を選択します (既定では無効化)。 |
プロジェクトのコンテキスト メニュー
[プロジェクト] パネルの任意の場所を右クリックすると、コンテキスト メニューが開きます。このコンテキスト メニューには、以下の表に示すオプションが表示されます。利用可能なオプションは、パネル内のどこを右クリックするかと、プロジェクトの種類、およびプロジェクトがソース管理に追加されるかどうかによって異なります。
| オプション | 説明 |
|---|---|
| プロジェクト フォルダーを開く | プロジェクトを含むローカル フォルダーを開きます。 |
| プロジェクト設定 | プロジェクト設定を調整するために [プロジェクト設定] ウィンドウを開きます。 |
| 追加 | プロジェクトに追加できる項目のリストを開きます。フォルダー、ファイル、 シーケンス 、 フローチャート 、 ステート マシン 、フォーム、ワークフロー、 グローバル ハンドラー 、またはテスト オートメーション プロジェクトの場合は テスト ケース です。 既定のテンプレート (シーケンス、フローチャート、ステート マシン) または ローカルのファイル テンプレートに基づいてワークフロー ファイルを作成するには、ワークフローを使用します。 |
| ファイルをインポート | ファイル エクスプローラーを開いて、プロジェクトにファイルをインポートします。既定では、ワークフロー ファイルのみが一覧表示されるように*.xaml フィルターが適用されますが、すべてのファイルを表示して他の種類のファイルもインポートできるようにフィルターを変更することもできます。インポートするファイルの名前が現在のプロジェクトにあるワークフローの名前と同じ場合は、インポートするファイルの名前に「インポート済み」と追加されます。 現在のプロジェクトと同じ言語を式に使用するワークフロー ファイルのみインポートできます。ワークフロー ファイルをインポートするときに、現在のプロジェクトの依存関係がソース プロジェクト ファイルの依存関係と比較されます (ある場合)。不一致がある場合は、[ワークフローをインポート] ウィンドウに、未解決のアクティビティを回避するために必要な変更に関する情報が表示されます。利用可能な依存関係の更新は既定で選択されており、[インポート] を選択するとインストールされます。
必要に応じて、参照として使用する project.json ファイルを指定し、パッケージのプレリリース バージョンを検索するかどうかを選択できます。 |
| Windows に変換 | Windows - レガシ プロジェクトおよびクロスプラットフォーム プロジェクトで、[Windows に変換] ウィンドウを開いて、プロジェクトを Windows 対応のプロジェクトに変換できます。 |
| ソース管理に追加 | Git の [init ]、[ Git にコピー]、[ TFS に追加 ]、または [SVN に追加] オプションを使用して、現在のプロジェクトをソース管理に追加します。このオプションは、プロジェクト ノードを右クリックした場合にのみ表示されます。 プロジェクトをソース管理に追加すると、コンテキスト メニューで追加のオプションを利用できます。「 Git のコンテキスト メニュー オプション 」と「 SVN と TFS のコンテキスト メニュー オプション」をご覧ください。 |
| 開く | 既定のプログラムを使用して、選択したファイルを開きます。 |
| ファイルの場所を開く | ファイルを含むローカル フォルダーを開きます。 |
| 名前を変更する | 選択したファイルまたはフォルダーの名前を変更できます。[名前の変更] ウィンドウが開きます。項目の名前の変更はすべての箇所で行われます。注: 新しいファイルのフル パスは 258 文字を超えてはなりません。 |
| コピー | 選択したファイルまたはフォルダーをクリップボードにコピーします。その後、それらをプロジェクト パネルまたは Windows のファイル エクスプローラーに貼り付けることができます。 |
| 貼り付け | クリップボードにコピーされたファイルまたはフォルダーを貼り付けます。 |
| 削除する | 選択した項目をローカル マシンからのみ削除します。 |
| 比較対象として選択 | 比較対象として使用中のファイルを選択します。 |
| 選択済みと比較 | [ファイルを比較 ] を使用して、現在のファイルと前に選択したファイルを比較します。 |
| 参照を検索する | プロジェクト内でファイルへのすべての参照を検索します。結果は、[参照を検索] パネルに表示されます。 |
| テキスト エディターで開く | 選択したテキスト ファイルを Studio 内のテキスト エディターで読み取り専用モードで開きます。 テキスト ファイルを編集モードで開くには、ファイルをダブルクリックします。10 MB 未満の TXT、CS、VB、JSON (project.json ファイルを除く)、および XML ファイルをダブルクリックすると、構文の強調表示機能を備えたテキスト エディターを使用して Studio 内で編集できます。 |
| ファイルをデバッグ | 選択した .xaml ファイルをデバッグします。 |
| メインに設定 | 選択した .xaml ファイルをプロジェクト定義の Main として設定します。つまり、プロジェクトの実行はそのファイルから開始されます。Main プロジェクト ファイルは 1 つしか設定できません。Main として設定されたファイルの名前は、[プロジェクト] パネルに太字で表示されます。 |
| アクティビティのレイアウト | ライブラリ プロジェクト内のファイルの [プロパティ] ウィンドウを開きます。ここでは、生成されるアクティビティのデザインをカスタマイズできます。 |
| グローバル ハンドラーとして設定 | .xaml ファイルをプロジェクトのグローバル例外ハンドラーとして設定します。これは、1 つのプロジェクト/プロセスにつき 1 つのワークフローに適用可能です。 |
| ハンドラーを削除 | .xaml ファイル内に存在するグローバル例外ハンドラーのタグを削除します。 |
| エントリ ポイントを有効化 | 選択したワークフロー ファイルをプロセスのエントリ ポイントとしてマークします。これにより、他のプロセスで [プロセスを呼び出し] アクティビティおよび [プロセスを並列実行] アクティビティを使用するとき、または Orchestrator からジョブを開始するときに最初に実行するワークフローとして、そのワークフロー ファイルを選択できるようになります。
|
| エントリ ポイントを無効化 | 選択したワークフロー ファイルがプロセスのエントリ ポイントとしてマークされなくなります。このオプションは、メインに設定されているワークフロー ファイルでは利用できません。 |
| 引数のプロパティ | [引数のプロパティ] ウィンドウを開き、引数の表示設定を行います。 このオプションは、メインに設定されている XAML ファイル、またはプロジェクトのエントリ ポイントとしてマークされている XAML ファイルに対してのみ使用できます。 |
| テンプレートとして抽出 | 選択したワークフローまたはテスト ケースをテンプレートとして保存し、プロジェクト内の他のファイルのベースとして使用できるようにします。ファイル テンプレートを使用すると、同じ構造のファイルを複数個作成しなければならない場合に時間を節約できます。新しいワークフローまたはテスト ケースを追加するときに、[テンプレート] プロジェクト フォルダー内にある同じ種類のテンプレートをベースとして使用できます。 |
| パブリッシュから除外/「パブリッシュ可能」として設定 | 選択した 1 つ以上のファイルを、パブリッシュから除外またはパブリッシュ可能としてマークします。
|
| 非公開にする/公開する | ライブラリ プロジェクト内の選択した 1 つ以上のファイルを、非公開または公開としてマークします。非公開のワークフロー ファイルはパブリッシュするパッケージに含まれます。ただし、再利用可能なコンポーネントは作成されず、そのライブラリが依存関係としてインストールされているプロジェクト内の [アクティビティ] パネルで利用することもできません。
|
| テスト ケースを作成する | 選択したワークフロー ファイルを呼び出すテスト ケースを作成します。 |
| テスト ケースに変換/ワークフローに変換 | 選択したワークフローをテスト ケースに、または選択したテスト ケースをワークフローに変換します。 |
| テスト ケースをインポートする | テスト ケースを下書きのテスト ケースとしてプロジェクトにインポートします。 |
| テスト データを追加 | [データ バリエーション ソースをインポート] ウィンドウを開いて、プロジェクトにテスト データを追加できます。このオプションは、テスト ケースでのみ利用できます。 |
| Test Manager にリンクする | [Test Manager にリンク] ウィンドウを開いて、選択したテスト ケースを Test Manager にリンクできます。 |
| テスト ケースを実行/テスト ケースをデバッグ | 選択した複数のテスト ケースを実行またはデバッグします。 |
 は、依存関係が不足しており、インストールする必要があることを示しています。
  は、ソース プロジェクトで新しいバージョンが使用されており、そのバージョンに更新する必要があることを示しています。
 Git のコンテキスト メニュー オプション
Git リポジトリに追加されたプロジェクトでは、[プロジェクト] パネルの各ファイルの横にファイルのステータスを示すアイコンが表示されます。
 ファイルがリポジトリと同期されています。
 ファイルが変更されました。
 ファイルが追加されました。
 ファイルは削除されました。
[プロジェクト] パネルでファイル ノードまたはプロジェクト ノードを右クリックして、Git によるプロジェクト管理に使用する Git 固有のコンテキスト メニューを開きます。
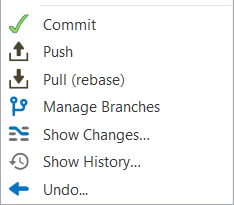
| オプション | 説明 |
|---|---|
| 確定 | 現在の変更をローカル Git リポジトリにコミットします。 |
| プッシュ | 現在のバージョンをリモートリポジトリにプッシュします。 |
| プル (リベース) | リモート ファイルをプルして、現在のブランチをリベースします。 |
| ブランチを管理 | [Git] ウィンドウを開きます。このウィンドウには、現在追加されているブランチのオプションが表示されます。 |
| 変更を表示 | ファイル差分検出ウィンドウを開きます。ファイルのローカル バージョンとリモート バージョンの変更を比較できます。 |
| 履歴を表示 | [履歴を表示] ウィンドウを開きます。こ同じファイルの 2 つのバージョンを比較できます。 |
| 元に戻す | [保留中の変更を元に戻す] ウィンドウを開きます。ただし、ファイルがリモート リポジトリに確定またはプッシュされていない場合にのみ表示されます。 |
| リポジトリ URL をコピー | プロジェクトのリポジトリ URL をクリップボードにコピーします。 |
SVN と TFS のコンテキスト メニュー オプション
SVN または TFS リポジトリに追加されたプロジェクトは、 [プロジェクト] パネル内の各ファイルの横にアイコンが表示され、ファイルのステータスを示されます。
 ファイルは編集のためにチェックアウトされていません。
ファイルが編集のためにチェックアウトされました。
 ファイルが編集されました。
 ファイルが追加されました。

| オプション | 説明 |
|---|---|
| 開く | 選択した .xaml ファイルが TFS/SVN リポジトリから編集のためにチェックアウトされたものではない場合、[デザイナー] パネルでこのファイルを読み取り専用で開きます。 |
| 名前を変更する | 選択したファイルまたはフォルダーの名前を変更できます。[名前の変更] ウィンドウを開きます。名前を変更した .xaml ファイルをチェックインする際には、以前変更したバージョンもチェックインする必要があります。 |
| 削除する | 選択した項目をローカル マシンからのみ削除します。ファイルの前回チェックインしたバージョンがまだ TFS/SVN リポジトリで利用可能です。 |
| 編集用にチェックアウト | 選択したファイルまたはフォルダーを、編集用にロック済みと表示します。ファイルをチェックアウトすると、他のユーザーが編集できないように、サーバー上でファイルがロックされます。 |
| 編集を終了 | リポジトリの project.json ファイルが、変更とコミットメッセージとともにチェックアウトされます。 |
| 追加 | 選択した項目を TFS/SVN サーバーにアップロードします。同じ項目が既にサーバーにアップロードされている場合、このオプションは使用できません。 |
| 最新バージョンを取得 | 選択した項目の最新バージョンを TFS/SVN リポジトリからダウンロードします。 |
| Show changes... (変更を表示...) | ファイル差分検出ウィンドウを開き、バージョン管理されているファイルとローカルにマッピングされているファイルの変更点を比較します。 |
| チェックイン | [変更をチェックイン] ウィンドウを表示します。選択した項目を最新バージョンとしてサーバーにアップロードできます。.xaml ファイルはアップロードする前に保存する必要があります。チェックイン後、ファイルは Studio で読み取り専用になります。 |
| 元に戻す | [保留中の変更を元に戻す] ウィンドウを表示します。プロジェクトに加えた変更を元に戻すことができます。変更されたファイルを前のステートまたはバージョン管理されていないステートに戻すか、ローカル マシンから削除されたファイルを取得します。 ファイルをチェックインすると、変更は元に戻せなくなります。 |
| 実行 | 選択したワークフローがチェックアウトされていない、またはリポジトリに追加されていない場合でも、実行します。 |
| メインに設定 | 選択した .xaml ファイルをプロジェクトのメインとして設定します。既定では、最初に作成された .xaml がメインとして設定されています。 |
| リポジトリ URL をコピー | プロジェクトのリポジトリ URL をクリップボードにコピーします。 |
プロジェクト設定を調整する
作業中のオートメーション プロジェクトごとに、個別の設定のセットを設定できます。これらの設定は [ プロジェクト設定]  ウィンドウで利用できます。このウィンドウを開くには、[ プロジェクト] パネルの をクリックします。
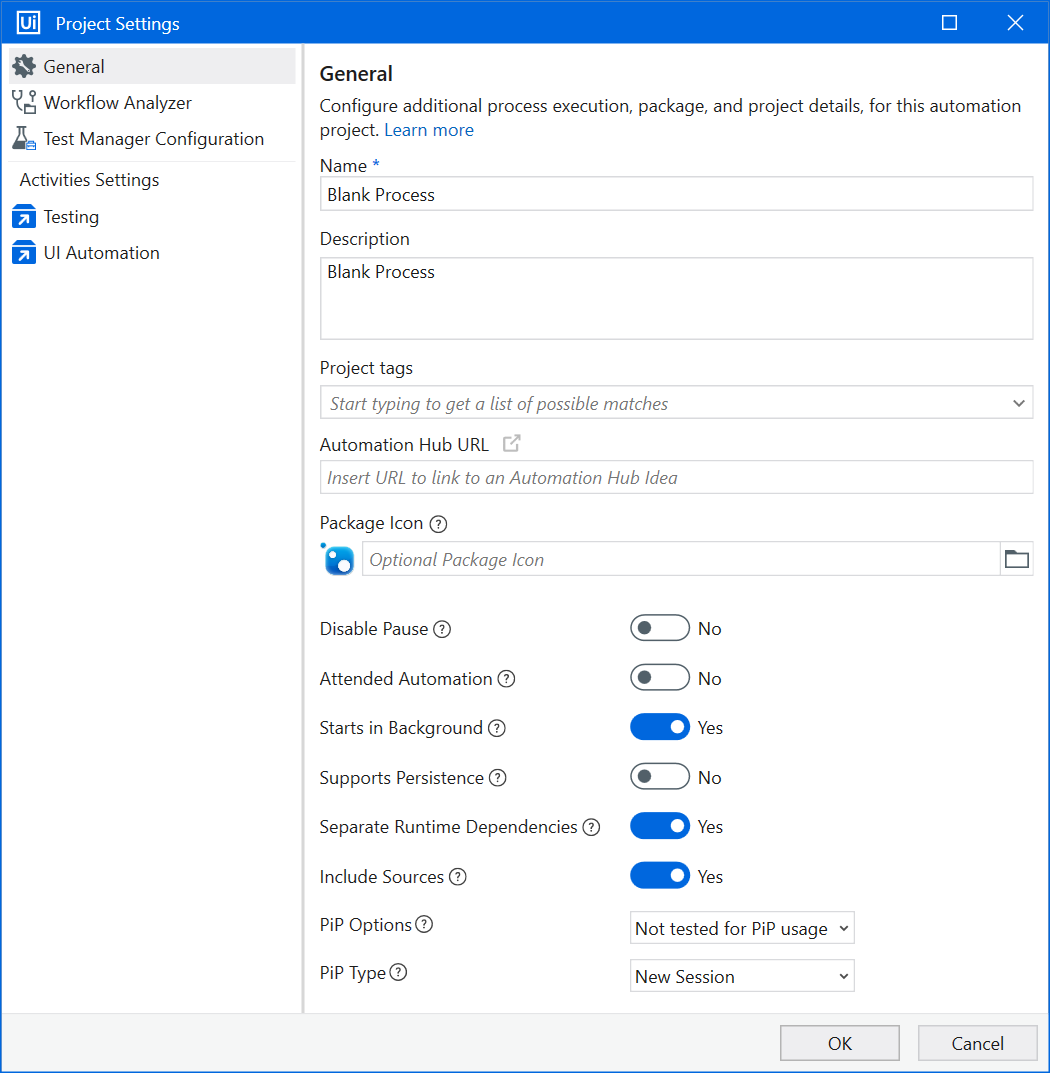
[設定] ウィンドウのフィールドの説明
以下の表では、プロセス、テスト オートメーション、およびテンプレート プロジェクトのプロジェクト設定について説明しています。ライブラリに使用できる設定については、「ライブラリについて」をご覧ください。
| フィールド | 説明 |
|---|---|
| 名前 | プロジェクト名を変更します。名前には空白文字を含めることができます。プロジェクトに名前を付ける際、空白文字はパブリッシュ時に削除される点にご注意ください。このフィールドには最大 128 文字まで入力できます。 |
| 説明 | プロジェクトの説明を変更します。このフィールドには最大 500 文字まで入力できます。 |
| プロジェクト タグ | 新しいタグを作成するか、Orchestrator で既に定義されているタグを再利用して、1 つ以上のタグをプロジェクトに追加できます。タグにはラベルとプロパティ (キーと値のペア) の 2 種類があります。タグはパブリッシュされるパッケージに含まれており、プロジェクトの説明と分類に役立ちます。たとえば、自動化されたアプリケーション ( 入力を開始すると、定義済みのタグから一致候補が提案され、一致のリストから選択して再利用できます。プロパティが一致する場合は、キーの後に 新しいタグを追加するには、名前を入力した後、名前の横にプラス記号が表示されているエントリをクリックします。文字列を ラベルとキーと値のプロパティは、最大 256 文字に制限されています。タグ名に 、%、&、\、?、/,:は使用できません。 プロジェクト タグは Orchestrator のプロセスに自動的に適用できます。タグの使用について詳しくは、『UiPath Orchestrator ガイド』の「タグを使用してリソースを整理する」をご覧ください。 |
| Automation Hub URL | プロジェクトにリンクされている Automation Hub のアイデアの URL です。詳しくは、「プロジェクトを Automation Hub のアイデアにリンクする」をご覧ください。 |
| パッケージのアイコン | 必要に応じて、プロジェクトのカスタム アイコンを定義します。ファイルを参照して選択するか、最大 1MB の jpeg、jpg、または png ファイルへのパスまたはパブリック URL を入力します。 プロジェクトがパブリッシュされると、アイコンは次のように表示されます。
Orchestrator にパブリッシュされるライブラリまたは埋め込みアイコンがサポートされていないフィードに対してローカル ファイルが使用されていると、[パッケージを管理] にアイコンが表示されません。この場合は、URL を使用してアイコンを指定します。 |
| 一時停止を無効化 | ユーザーが UiPath Assistant から実行を一時停止する機能を有効化または無効化します。実行中にプロセスを一時停止するとクラッシュが発生する場合には、[はい] に設定します。たとえば、ワークフローのアクティビティが Timeout プロパティを使用している場合、実行を一時停止すると、タイムアウトの期限が切れ、実行が中止されてしまいます。 |
| 有人オートメーション | プロジェクトを有人コンテキストでのみ実行するには、[はい] に設定します。この設定は、UI Automation アクティビティやユーザーの操作を必要とするその他のアクティビティが含まれるプロジェクトで使用します。 |
| バックグラウンドで開始 | プロジェクトをバックグラウンド プロセスに変換するには、[はい] に設定します。ユーザーの操作を必要としないかぎり、他のプロセスと同時にバックグラウンドで実行できます。 |
| 永続性をサポート | プロセスで永続性がサポートされているとマークするには、[はい] に設定します。 |
| 実行時の依存関係を分離 | ロボットのパフォーマンスを向上させ、パブリッシュしたパッケージのサイズを縮小するため、ライブラリはデザイン パッケージとランタイム パッケージに分離されています。Studio ではデザイン パッケージが使用され、Robot ではスリムな実行パッケージが使用されます。 |
| ソースを含める | これまで非公開になっていたワークフローを含むすべての.xaml ソースをライブラリ パッケージに含めるには、[はい] に設定します。Windows - レガシ ライブラリの場合、ファイルは生成されるアセンブリ ファイル内、および lib\net45 フォルダーの .nupkg ファイル内に保存されます。Windows、およびクロスプラットフォームのライブラリとプロセスの場合、ファイルは content フォルダーの .nupkg ファイル内に保存されます。 |
| PiP のオプション | プロジェクトがピクチャ イン ピクチャ (PiP) を使用してテストされたかどうか、および既定で PiP で開始するかどうかを示します。
|
| PiP の種類 | プロジェクトを PiP で実行する場合にオートメーションをユーザー セッションから分離する方法を選択します。[新しいセッション] (マシン上の子セッション) または [新しいデスクトップ] (ユーザー セッション内の仮想デスクトップ) のいずれかを選択します。 |
[OK] をクリックすると、[プロジェクト] パネルと project.json ファイルに変更が表示されます。
プロジェクト レベルでアクティビティのプロパティを調整する方法について詳しくは、「 アクティビティのプロジェクト設定を行う 」をご覧ください。
Windows Workflow Foundation の制限により、大量のアクティビティを 1 つのシーケンスから別のシーケンスにコピーする場合は必ず、下にスクロールして、あらかじめ [Designer] パネルを開いておくことをお勧めします。
未使用のプロジェクト リソースを削除する
リソースが不要なと、プロジェクトが理解しにくくなり、パフォーマンスに影響を与える可能性があります。この問題を回避するには、Studio のリボンで [ 未使用を削除 ] をクリックし、削除するリソースを選択して、プロジェクトから未使用のリソースを削除します。
- ワークフロー - プロジェクトで参照されていないワークフロー ファイルを削除します。
- 変数 - 現在開いているファイルで使用されていない変数を削除します。
- 引数 - 現在開いているファイルで使用されていない引数を削除します。
- 依存関係 - アクティビティがプロジェクトで使用されていない、インストール済みのアクティビティ パッケージを削除します。
- インポート - 現在開いているファイルで使用されていない、インポートされた名前空間を削除します。
- スクリーンショット - プロジェクト内のアクティビティで使用されていない、参考スクリーンショットを削除します。