- Getting started
- Notifications
- Licensing
- Troubleshooting
- Connector Builder
- Act! 365
- ActiveCampaign
- Active Directory - Preview
- Adobe Acrobat Sign
- Adobe PDF Services
- Amazon Bedrock
- Amazon Connect
- Amazon Polly
- Amazon SES
- Amazon Transcribe
- Amazon Web Services
- Anthropic Claude
- Asana
- AWeber
- Azure AI Document Intelligence
- Azure Maps
- BambooHR
- Box
- Brevo
- Calendly
- Campaign Monitor
- Cisco Webex Teams
- Citrix Hypervisor
- Citrix ShareFile
- Clearbit
- Confluence Cloud
- Constant Contact
- Coupa
- CrewAI – Preview
- Customer.io
- Database Hub - Preview
- Databricks Agent
- Datadog
- DeepSeek
- Deputy
- Discord - Preview
- DocuSign
- Drip
- Dropbox
- Dropbox Business
- Egnyte
- Eventbrite
- Exchangerates
- Exchange Server - Preview
- Expensify
- Facebook
- Freshbooks
- Freshdesk
- Freshsales
- Freshservice
- GetResponse
- GitHub
- Gmail
- Google Cloud Platform
- Google Docs
- Google Drive
- Google Forms - Preview
- Google Maps
- Google Sheets
- Google Speech-to-Text
- Google Text-to-Speech
- Google Tasks - Preview
- Google Vertex
- Google Vision
- Google Workspace
- GoToWebinar
- Greenhouse
- Hootsuite
- HTTP
- HTTP Webhook - Preview
- Hubspot CRM
- HubSpot Marketing
- HyperV - Preview
- Icertis
- About the Icertis connector
- Icertis authentication
- iContact
- Insightly CRM
- Intercom
- Jina.ai
- Jira
- Keap
- Klaviyo
- LinkedIn
- Mail
- Mailchimp
- Mailgun
- Mailjet
- MailerLite
- Marketo
- Microsoft 365
- Microsoft Azure
- Microsoft Azure Active Directory
- Microsoft Azure AI Foundry
- Microsoft Azure OpenAI
- Microsoft Dynamics 365 CRM
- Microsoft OneDrive & Sharepoint
- Microsoft Outlook 365
- Microsoft Power Automate – Preview
- Microsoft Sentiment
- Microsoft Teams
- Microsoft Translator
- Microsoft Vision
- Miro
- NetIQ eDirectory
- Okta
- OpenAI
- OpenAI V1 Compliant LLM
- Oracle Eloqua
- Oracle NetSuite
- PagerDuty
- PayPal
- PDFMonkey
- Perplexity
- Pinecone
- Pipedrive
- QuickBooksOnline
- Quip
- Salesforce
- Salesforce AgentForce & Flows – Preview
- Salesforce Marketing Cloud
- SAP BAPI
- SAP Cloud for Customer
- SAP Concur
- SAP OData
- SendGrid
- ServiceNow
- Shopify
- Slack
- SmartRecruiters
- Smartsheet
- Snowflake
- Snowflake Cortex
- Stripe
- Sugar Enterprise
- Sugar Professional
- Sugar Sell
- Sugar Serve
- System Center - Preview
- TangoCard
- Todoist
- Trello
- Twilio
- UiPath Apps - Preview
- UiPath Data Fabric – Preview
- UiPath GenAI Activities
- UiPath Orchestrator
- X (formerly Twitter)
- Xero
- watsonx.ai
- WhatsApp Business
- WooCommerce
- Workable
- Workday
- Workday REST
- VMware ESXi vSphere
- YouTube
- Zendesk
- Zoho Campaigns
- Zoho Desk
- Zoho Mail
- Zoom
- ZoomInfo

Integration Service user guide
Icertis authentication
This connector supports two authentication types:
- OAuth 2.0 Authorization code (default)
- API key
OAuth 2.0 Authorization code
OAuth 2.0 Authorization code is the default authentication type for the Icertis connector. It is based on setting up an OAuth 2.0 application in Microsoft Azure.
Prerequisites
To use OAuth 2.0 Authorization code authentication, you need:
- A valid license or subscription for the Icertis Contract Intelligence (ICI) Platform.
- A valid license or subscription for Microsoft Azure.
Authorization flow
The OAuth 2.0 Authorization code authentication method uses the following authorization flow:
- The client application requests a JWT access token for the ICI API from the Azure authorization server.
- The Azure token issuance endpoint validates the credentials and issues the JWT access token for the ICI API.
- Over HTTPS, the client application uses the returned JWT access token to add the JWT string with a
Bearerdesignation in the Authorization header of the request to the ICI API. - ICI’s token validation handler validates the access token with the Azure authorization server.
- If the token validation is successful, ICI sets up the user context based on a particular claim type value mapped against a user in the ICI repository and returns the desired resource accordingly. This user can be a service or an application user.

Configuring an application in Microsoft Azure
Take the following steps to configure an ICI application in Azure.
-
Login to the Microsoft Azure portal at https://portal.azure.com. From the home page, select App registrations.
-
In the App registrations page, select New registration.
-
In the Register an application window, provide the following details for the new app:
-
Name: ICM API, for example.
-
Supported account types: select Accounts in this organizational directory only (Single tenant).
-
Provide the following Web Redirect URI:
{baseURL\\_CallBack\} -
Select Register. The new application is now available in the App registration – Owned applications tab.

-
-
Select your app from the App registrations page. The Manage section includes tabs such as Authentication, Certificates & secrets, API permissions etc. You can further configure the application using these sections.
-
In the Authentication tab, you can add a new redirect URI or edit the existing one. Under Implicit grant, select Access tokens. This enables the implicit grant flow and selects the token type you want to be issued by the authorization token.
-
Next, under Certificates & secrets, select New client secret. In the new window, add the client secret Description (for example: "ICM API secret which will be used for Access Tokens") and select the expiry date (for example, one year). Select Add to create the new secret. Copy the client secret. Do not share this secret publicly and store it a secure location. You will not be able to retrieve it again later.
-
Under Expose an API, select the Set button next to Application ID URI. A form is displayed, with a default value already generated. Select Save. The Application ID URI uses the following format:
api://{Client ID}.
-
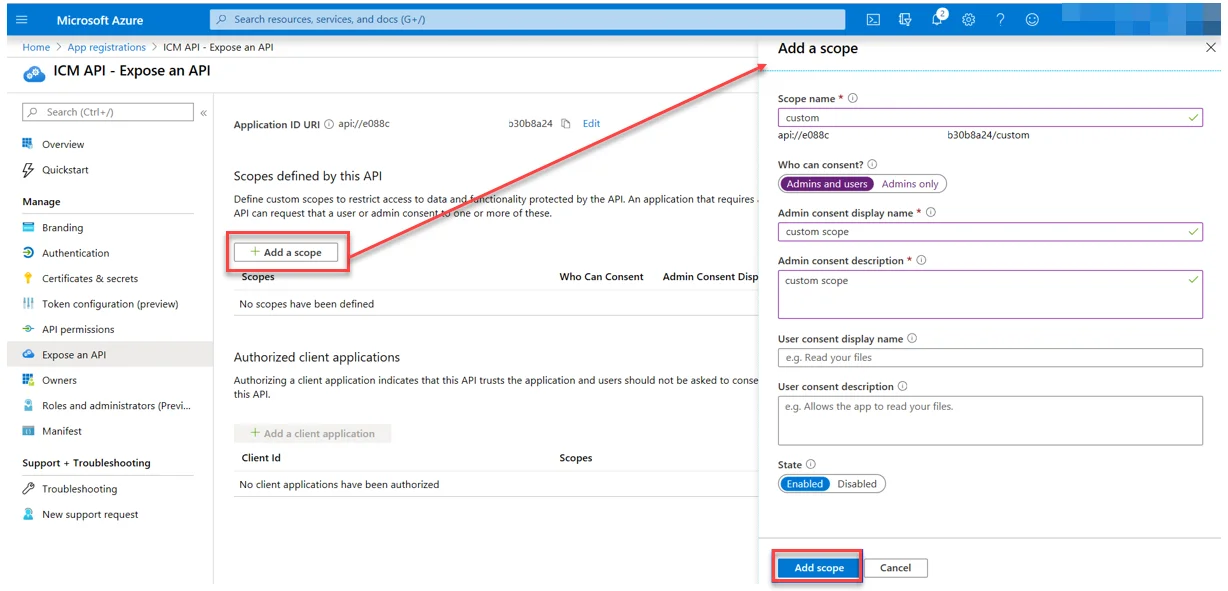
Your Azure application is now set up with default scopes and grant types. If you want to add custom scopes, under Expose an API, select Add a scope. Configure the new scope, then select Add scope.

Send the application details to Icertis
Once you create your application, contact your Icertis admin and provide them with the following details for both your development and production environments:
| Required app details | Details | Comments |
|---|---|---|
| Application (client) ID | Dev: [Customer to provide] Production: [Customer to provide] | Application ID for the app created for accessing the ICI APIs |
| Directory (tenant) ID | Dev: [Customer to provide] Production: [Customer to provide] | Tenant ID for the app created for accessing the ICI APIs |
| Object ID | Dev: [Customer to provide] Production: [Customer to provide] | Object ID for the app created for accessing the ICI APIs |
| OpenID Connect metadata document | Dev: [Customer to provide] Production: [Customer to provide] | Metadata document URL for the app created for accessing the ICI APIs |
ICI configuration
In the ICI Platform, you need a minimum configuration setup to get started.
Add or update the following keys in the tenant.json file of the ICI application with the help of your Icertis developer team:
| Key | Value | JSON value |
|---|---|---|
Core.API.OAuth.STSDiscoveryEndpoint | https://login.microsoftonline.com/{Directory (tenant) ID}/v2.0/.well-known/openid-configuration | { "Id": "1033c3c0-6bf2-4a93-b813-c3ba42a199b3", "IsEncrypted": false, "OverrideType": "Overridable", "ValueType": "System.String, mscorlib, Version=4.0.0.0, Culture=neutral, PublicKeyToken=b77a5c561934e089", "Value": "https://login.microsoftonline.com/{Directory (tenant) ID}/v2.0/.well-known/openid-configuration", "Description": "STS Discovery Endpoint URL", "DefaultValue": null, "IsReadOnly": false, "ErrorMessageDescription": null, "Name": "Core.API.OAuth.STSDiscoveryEndpoint" }{ "Id": "1033c3c0-6bf2-4a93-b813-c3ba42a199b3", "IsEncrypted": false, "OverrideType": "Overridable", "ValueType": "System.String, mscorlib, Version=4.0.0.0, Culture=neutral, PublicKeyToken=b77a5c561934e089", "Value": "https://login.microsoftonline.com/{Directory (tenant) ID}/v2.0/.well-known/openid-configuration", "Description": "STS Discovery Endpoint URL", "DefaultValue": null, "IsReadOnly": false, "ErrorMessageDescription": null, "Name": "Core.API.OAuth.STSDiscoveryEndpoint" } |
Core.API.OAuth.ValidAudiences | api://{Client ID} | { "Id": "94c37b1b-2fb1-4f4e-a3de-6796279031e6", "IsEncrypted": false, "OverrideType": "Overridable", "ValueType": "System.String, mscorlib, Version=4.0.0.0, Culture=neutral, PublicKeyToken=b77a5c561934e089", "Value": " api://{Client ID}", "Description": "Comma separated list of valid audiences", "DefaultValue": null, "IsReadOnly": false, "ErrorMessageDescription": null, "Name": "Core.API.OAuth.ValidAudiences" }{ "Id": "94c37b1b-2fb1-4f4e-a3de-6796279031e6", "IsEncrypted": false, "OverrideType": "Overridable", "ValueType": "System.String, mscorlib, Version=4.0.0.0, Culture=neutral, PublicKeyToken=b77a5c561934e089", "Value": " api://{Client ID}", "Description": "Comma separated list of valid audiences", "DefaultValue": null, "IsReadOnly": false, "ErrorMessageDescription": null, "Name": "Core.API.OAuth.ValidAudiences" } |
Core.API.OAuth.ValidIssuer | https://sts.windows.net/{Directory (tenant) ID}/ | { "Id": "d469b34c-f89f-42bb-934a-7ee4ef298130", "IsEncrypted": false, "OverrideType": "Overridable", "ValueType": "System.String, mscorlib, Version=4.0.0.0, Culture=neutral, PublicKeyToken=b77a5c561934e089", "Value": "https://sts.windows.net/{Directory (tenant) ID}/", "Description": "OAuth Token issuer", "DefaultValue": null, "IsReadOnly": false, "ErrorMessageDescription": null, "Name": "Core.API.OAuth.ValidIssuer" }{ "Id": "d469b34c-f89f-42bb-934a-7ee4ef298130", "IsEncrypted": false, "OverrideType": "Overridable", "ValueType": "System.String, mscorlib, Version=4.0.0.0, Culture=neutral, PublicKeyToken=b77a5c561934e089", "Value": "https://sts.windows.net/{Directory (tenant) ID}/", "Description": "OAuth Token issuer", "DefaultValue": null, "IsReadOnly": false, "ErrorMessageDescription": null, "Name": "Core.API.OAuth.ValidIssuer" } |
Core.API.OAuth.ExternalUpnClaimUri | http://schemas.microsoft.com/identity/claims/objectidentifier | { "Id": "1e783a54-b564-4748-a088-c04e8e05ab46", "IsEncrypted": false, "OverrideType": "Overridable", "ValueType": "System.String, mscorlib, Version=4.0.0.0, Culture=neutral, PublicKeyToken=b77a5c561934e089”, "Value":"http://schemas.microsoft.com/identity/claims/objectidentifier", "Description": "URL of the Claim to be used to uniquely identify user in ICI", "DefaultValue": null, "IsReadOnly": false, "ErrorMessageDescription": null, "Name": "Core.API.OAuth.ExternalUpnClaimUri" }{ "Id": "1e783a54-b564-4748-a088-c04e8e05ab46", "IsEncrypted": false, "OverrideType": "Overridable", "ValueType": "System.String, mscorlib, Version=4.0.0.0, Culture=neutral, PublicKeyToken=b77a5c561934e089”, "Value":"http://schemas.microsoft.com/identity/claims/objectidentifier", "Description": "URL of the Claim to be used to uniquely identify user in ICI", "DefaultValue": null, "IsReadOnly": false, "ErrorMessageDescription": null, "Name": "Core.API.OAuth.ExternalUpnClaimUri" } |
Where:
-
Core.API.OAuth.STSDiscoveryEndpointis the OpenID Connect metadata document value found in App registration > Overview > Endpoints.
-
Core.API.OAuth.ValidAudiencesis the Application ID URI found in App registration > Overview. -
Core.API.OAuth.ValidIssueris the standard claim value obtained from the combination of theiss URLand the directory (tenant) ID. Theiss URLishttps://sts.windows.netand the directory (tenant) ID is available in App registration > Overview.
-
Core.API.OAuth.ExternalUpnClaimUriis the standard claim URL. ICI uses theoidclaim type with the following URL:http://schemas.microsoft.com/identity/claims/objectidentifier.
Once the setup is ready at ICI level, you can test the ICI API with the access token received from Azure. Note that ICI authorizes only those access tokens of users who are provisioned in ICI.
API key
The API key authentication method uses an ICMAuthToken to create a connection. Use this authentication method to quickly validate that the APIs are hosted correctly.
The ICMAuthToken is generated against a logged-in Icertis Contract Intelligence (ICI) Platform user. Note that you can explicitly set up a token expiry date for a user.
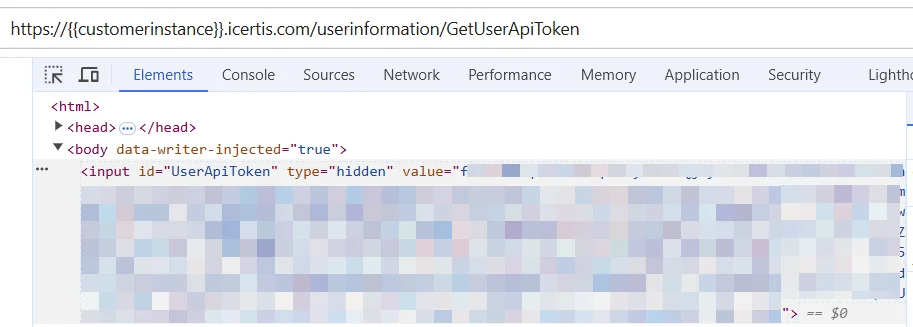
- As an ICI user, retrieve the API key by navigating to the following URL:
https://{{customerinstance}}.icertis.com/userinformation/GetUserApiToken. - Use your browser's developer tools to inspect the page and retrieve the UserApiToken.

Add the Icertis connection
- Select Integration Service from the left rail.
- From the Connectors list, select Icertis. You can also use the search bar to narrow down the connector.
- Select the Connect to Icertis button. You can choose between two authentication types: OAuth 2.0 Authorization code or API key.
- Enter the required credentials for your preferred authentication:
- OAuth 2.0 Authorization code (default): Client ID, Client Secret, Tenant ID, Scope.
- API key: API key.
- Select Connect.