- Getting started
- Notifications
- Licensing
- Troubleshooting
- Connector Builder
- Act! 365
- ActiveCampaign
- Active Directory - Preview
- Adobe Acrobat Sign
- Adobe PDF Services
- Amazon Bedrock
- Amazon Connect
- Amazon Polly
- Amazon SES
- Amazon Transcribe
- Amazon Web Services
- Anthropic Claude
- Asana
- AWeber
- Azure AI Document Intelligence
- Azure Maps
- BambooHR
- Box
- Brevo
- Calendly
- Campaign Monitor
- Cisco Webex Teams
- Citrix Hypervisor
- Citrix ShareFile
- Clearbit
- Confluence Cloud
- Constant Contact
- Coupa
- CrewAI – Preview
- Customer.io
- Database Hub - Preview
- Databricks Agent
- Datadog
- DeepSeek
- Deputy
- Discord - Preview
- DocuSign
- Drip
- Dropbox
- Dropbox Business
- Egnyte
- Eventbrite
- Exchangerates
- Exchange Server - Preview
- Expensify
- Facebook
- Freshbooks
- Freshdesk
- Freshsales
- Freshservice
- GetResponse
- GitHub
- Gmail
- Google Cloud Platform
- Google Docs
- Google Drive
- Google Forms - Preview
- Google Maps
- Google Sheets
- Google Speech-to-Text
- Google Text-to-Speech
- Google Tasks - Preview
- Google Vertex
- Google Vision
- Google Workspace
- GoToWebinar
- Greenhouse
- Hootsuite
- HTTP
- HTTP Webhook
- About the HTTP Webhook connector
- Using the Webhook connector
- Monitoring
- Hubspot CRM
- HubSpot Marketing
- HyperV - Preview
- Icertis
- iContact
- Insightly CRM
- Intercom
- Jina.ai
- Jira
- Keap
- Klaviyo
- LinkedIn
- Mail
- Mailchimp
- Mailgun
- Mailjet
- MailerLite
- Marketo
- Microsoft 365
- Microsoft Azure
- Microsoft Azure Active Directory
- Microsoft Azure AI Foundry
- Microsoft Azure OpenAI
- Microsoft Dynamics 365 CRM
- Microsoft OneDrive & Sharepoint
- Microsoft Outlook 365
- Microsoft Power Automate – Preview
- Microsoft Sentiment
- Microsoft Teams
- Microsoft Translator
- Microsoft Vision
- Miro
- NetIQ eDirectory
- Okta
- OpenAI
- OpenAI V1 Compliant LLM
- Oracle Eloqua
- Oracle NetSuite
- PagerDuty
- PayPal
- PDFMonkey
- Perplexity
- Pinecone
- Pipedrive
- QuickBooksOnline
- Quip
- Salesforce
- Salesforce AgentForce & Flows – Preview
- Salesforce Marketing Cloud
- SAP BAPI
- SAP Cloud for Customer
- SAP Concur
- SAP OData
- SendGrid
- ServiceNow
- Shopify
- Slack
- SmartRecruiters
- Smartsheet
- Snowflake
- Snowflake Cortex
- Stripe
- Sugar Enterprise
- Sugar Professional
- Sugar Sell
- Sugar Serve
- System Center - Preview
- TangoCard
- Todoist
- Trello
- Twilio
- UiPath Apps - Preview
- UiPath Data Fabric – Preview
- UiPath GenAI Activities
- UiPath Orchestrator
- X (formerly Twitter)
- Xero
- watsonx.ai
- WhatsApp Business
- WooCommerce
- Workable
- Workday
- Workday REST
- VMware ESXi vSphere
- YouTube
- Zendesk
- Zoho Campaigns
- Zoho Desk
- Zoho Mail
- Zoom
- ZoomInfo

Integration Service user guide
Using the Webhook connector
Using the HTTP Webhook connector from Studio
-
Select the HTTP Webhook trigger
In Studio, select the HTTP Webhook trigger.
-
Create or select a connection
Use an existing connection or create a new one.
-
Copy the webhook URL
Retrieve the generated webhook URL from the trigger activity.
-
Configure your data filter
Define the conditions under which the webhook event should trigger.
-
Publish your process
Publish the workflow so it is available to be triggered.
-
Register the webhook URL in your application
Paste the copied webhook URL from step 3 into your vendor application's webhook configuration.
Using the HTTP Webhook connector from Orchestrator
-
In Orchestrator, select Open Event Triggers > Add a new trigger.
-
Select your process, provide a name, and click Next.
-
Select Connector: HTTP Webhook.
-
Create or select a connection.
Use an existing connection or create a new one. Learn how to create connections.
-
Configure your data filter.
Define the conditions under which the webhook event should trigger. Learn how to configure data filters.
-
Copy the webhook URL for later use.
-
Add the trigger to complete setup.
-
In your workflow, use the Get Trigger Event Output activity to utilize the webhook’s header or body.
Pass
UiPathEventObjectId(data type=Text) as the input argument for the required property UiPath event object ID.
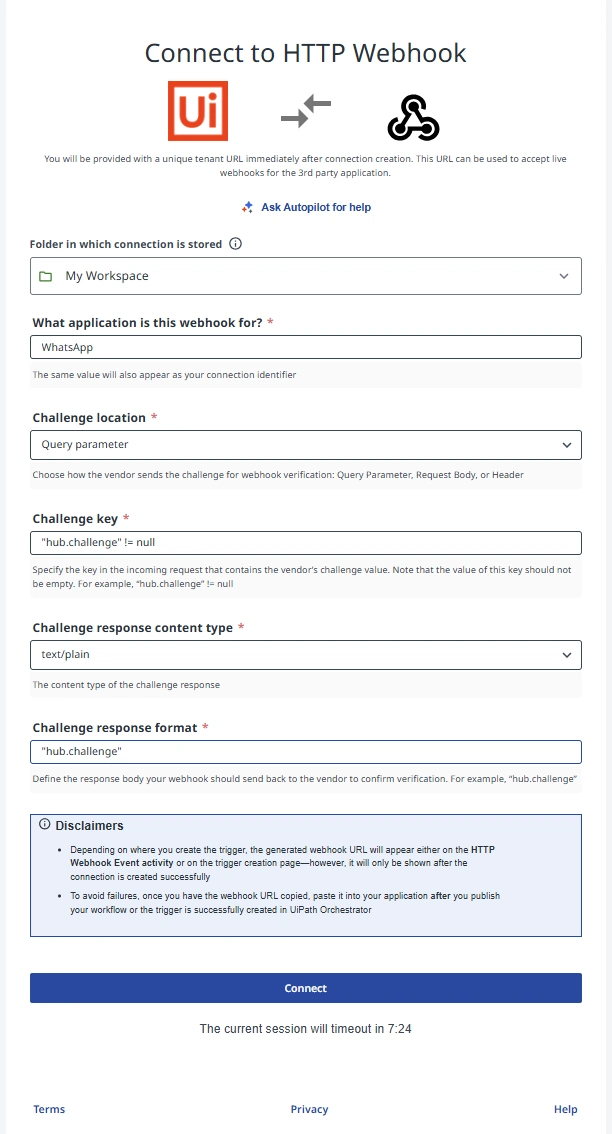
Creating an HTTP Webhook connection
- Name the connection
In the What application is this webhook for field, enter a descriptive name for the webhook application, something that makes it easy to identify which vendor or integration this connection represents. This value becomes the Connection Identifier. - Configure the Challenge location
Choose how the vendor will send the challenge token so UiPath can respond correctly or select No challenge. Common options:- Query parameter (e.g.,
?challenge=...) - JSON body (POST with
{ "challenge": "..." }) - Header (e.g.,
X-Hub-Challenge)
- Query parameter (e.g.,
- Configure the challenge verification and connect
If the vendor requires a handshake, enter the challenge configuration that matches the vendor's pattern (which field/header/query to read and how to echo/validate it). When configuration is complete, click Connect. Learn more about Challenge verification.
- Use a name that includes the vendor and environment (for example, Stripe-prod or Slack-staging) to avoid confusion.
- If you're unsure which challenge pattern the vendor uses, check their webhook docs or run a test registration to inspect the handshake request.
Webhook challenge verification
Some vendors require webhook URLs to be validated before they start sending real events. This is done using a challenge–response mechanism. When you register a webhook, the vendor sends a special challenge request, and the endpoint must respond exactly as expected.
The HTTP Webhook connector supports these verification flows through the Webhook Challenges Framework, allowing you to configure how UiPath should read and respond to vendor challenges.
Challenge verification support
UiPath supports both types of vendor webhook behaviors:
- Vendors that do not use challenge verification
- Vendors that require a challenge handshake before activating the webhook
This ensures compatibility with simple webhook providers as well as those with more advanced security requirements.
When vendors do not use challenge verification
Many applications simply accept a webhook URL and start delivering events immediately.
For these vendors:
- Users only need to create or select a connection.
- Copy the webhook URL.
- Paste it into the vendor's webhook configuration.
No additional steps are required. The webhook becomes active as soon as the vendor starts sending events.
This is the most common and simplest scenario, and UiPath handles it seamlessly.
When vendors do require challenge verification
Some vendors send a challenge request to verify the webhook URL before enabling it.
In these cases:
- Users must configure the challenge response in the HTTP Webhook connection.
- UiPath listens for the vendor's challenge request.
- UiPath automatically returns the correct challenge value based on the configuration.
- Once the vendor validates the response, normal events begin to flow.
Because vendors differ in how they send the challenge (query param, JSON body, header, etc.), UiPath's configuration allows users to handle any of these patterns.
This ensures compatibility with webhook providers that enforce security handshakes such as Slack, Meta (Facebook/Instagram), Stripe, and others.
Configuring challenge verification
You configure challenge behavior using four parameters:
-
Challenge Key
Field/key containing the challenge value. Used to detect challenge requests (must not be null). -
Challenge Location
Where the key appears:- Body
- Query parameter
- Header
-
Challenge Response Content Type
Format of the response returned back to the vendor:- text/plain
- application/json
-
Challenge Response Format
Defines which value is returned (usually the challenge key itself).
UiPath extracts the value from the incoming challenge and responds accordingly.
Generic example
Incoming request
 {
  "challenge": "ABC123"
 }
 {
  "challenge": "ABC123"
 }
Configuration
- Challenge Key:
challenge != null - Challenge location: Body
- Response Type:
text/plain - Response Format:
challenge
Response
ABC123
WhatsApp challenge verification example
WhatsApp uses the query parameter–based challenge method with hub.challenge.
Configuration
| Parameter | Value |
|---|---|
| Challenge Key | hub.challenge != null |
| Challenge Location | Query parameter |
| Challenge Response Content Type | text/plain |
| Challenge Response Format | hub.challenge |
Vendor request
GET https://your-webhook-url?hub.challenge=1234567890
Expected UiPath response
HTTP/1.1 200 OK
Content-Type: text/plain

1234567890
HTTP/1.1 200 OK
Content-Type: text/plain

1234567890
This confirms ownership, and WhatsApp begins sending real webhook events afterward.
Summary—Generic vs WhatsApp
| Step | Generic Example | WhatsApp Example |
|---|---|---|
| Challenge Location | Body / Query / Header | Query |
| Key Fomat | Simple key (e.g., challenge) | Key with dot ("hub.challenge") |
| Response Type | text/plain or application/json | text/plain |
| Response Value | Value of the key | Value of "hub.challenge" |
| Method | POST or GET | GET only |
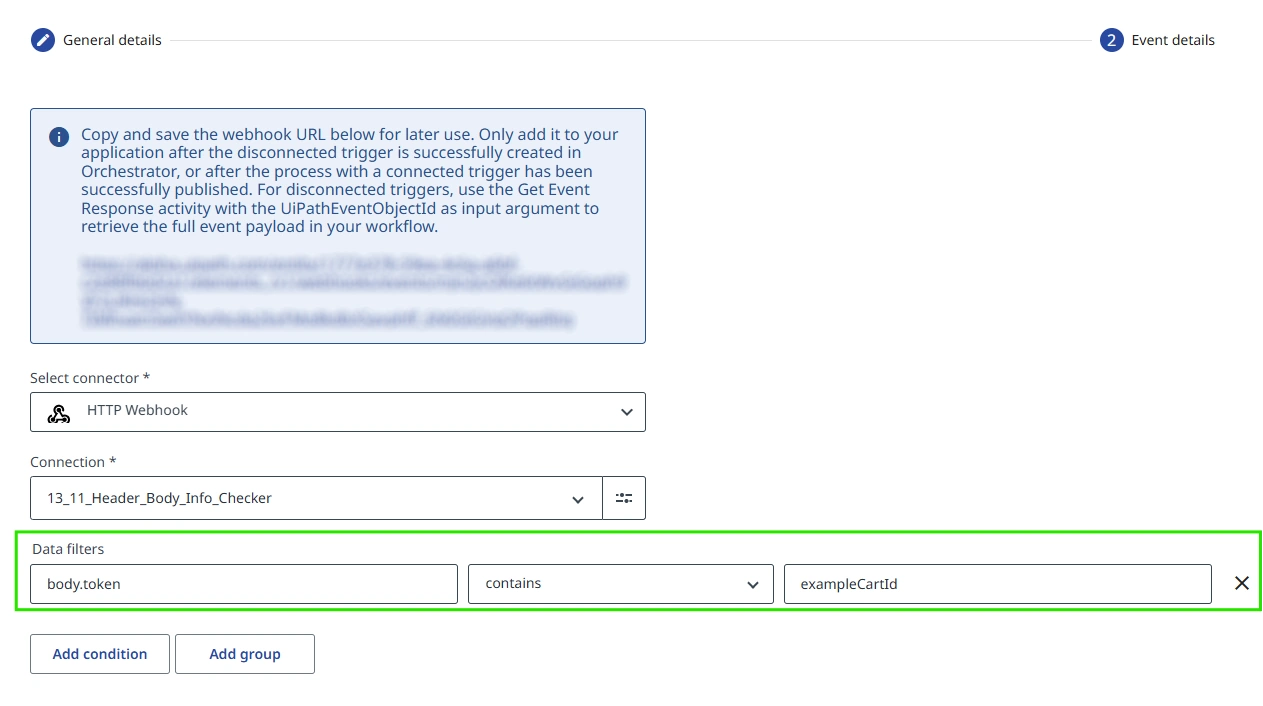
Configuring data filters
Data filters can be applied to both the body and the header of the provider’s response.
Let's assume the provider returns a body response as follows:
{
  "id": "exampleCartId",
  "token": "exampleCartId",
  "email":"example@email.com"
  }
{
  "id": "exampleCartId",
  "token": "exampleCartId",
  "email":"example@email.com"
  }
Orchestrator event triggers
If you want your process to trigger when the token contains exampleCartId, here’s how you can set it up:
When a JSON property includes a hyphen (-), it must be enclosed in double quotes.
For example: header."x-shopify-shop-domain" contains ecommerce.
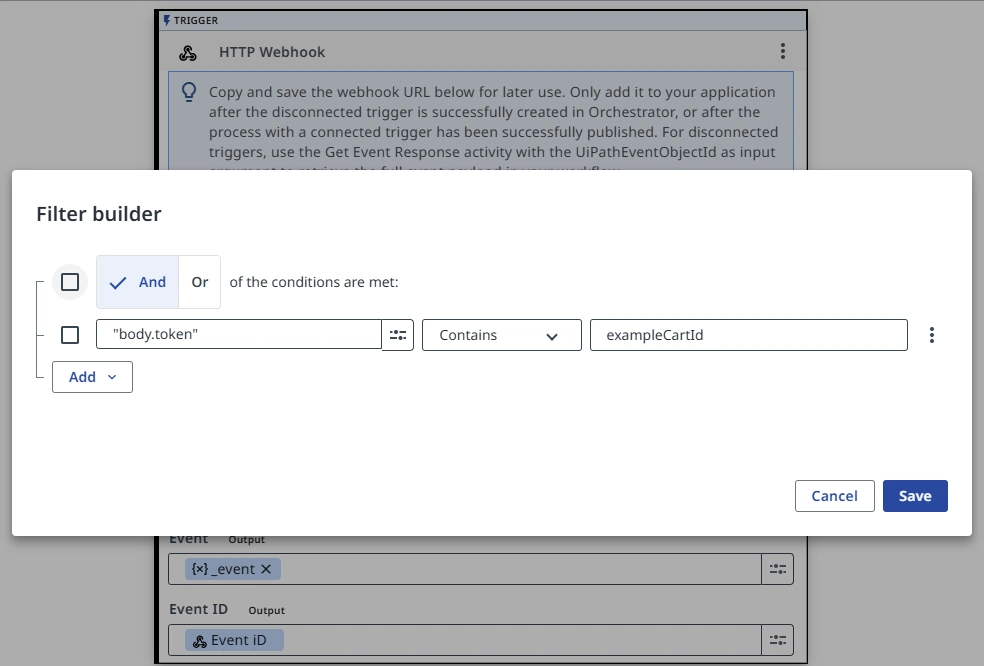
Studio event triggers
To accomplish the same behavior using the HTTP Webhook trigger activity in Studio, configure the filter as follows:
Publishing
Publish your workflow starting
from an HTTP Webhook event to activate the public
facing URL. You can then test this by triggering
events in the vendor application or send a direct
curl command to the
URL:
Automation Cloud:
curl -X POST https://cloud.uipath.com/{webhook_url} -d "example
            curl call"
curl -X POST https://cloud.uipath.com/{webhook_url} -d "example
            curl call"
Automation Cloud Public Sector:
curl -X POST https://govcloud.uipath.us/{webhook_url} -d "example
            curl call"
curl -X POST https://govcloud.uipath.us/{webhook_url} -d "example
            curl call"
When Integration Service accepts the event, it responds back with the following JSON payload:
{ "webhookEventId": "wr-4ad55717e1.a7bbf1e8-72a1-4371-82d2-d{example}", "correlationId": "384d496c-2f6d-{example}" }
{ "webhookEventId": "wr-4ad55717e1.a7bbf1e8-72a1-4371-82d2-d{example}", "correlationId": "384d496c-2f6d-{example}" }
This payload is useful for testing, but not necessary anywhere within your workflow.
- Using the HTTP Webhook connector from Studio
- Using the HTTP Webhook connector from Orchestrator
- Creating an HTTP Webhook connection
- Webhook challenge verification
- Challenge verification support
- Configuring challenge verification
- Generic example
- WhatsApp challenge verification example
- Summary—Generic vs WhatsApp
- Configuring data filters
- Orchestrator event triggers
- Studio event triggers
- Publishing