- 基本情報
- 通知
- ライセンス
- トラブルシューティング
- コネクタ ビルダー
- Act! 365
- ActiveCampaign
- Active Directory - プレビュー
- Adobe Acrobat Sign
- Adobe PDF Services
- Amazon Bedrock
- Amazon Connect
- Amazon Polly
- Amazon SES
- Amazon Transcribe
- Amazon Web Services
- Anthropic Claude
- Asana
- AWeber
- Azure AI Document Intelligence
- Azure Defender for Cloud
- Azure Maps
- BambooHR
- Box
- Brevo
- Calendly
- Campaign Monitor
- Cisco Webex Teams
- Citrix Hypervisor
- Citrix ShareFile
- Clearbit
- Confluence Cloud
- Constant Contact
- Coupa
- CrewAI – プレビュー
- Customer.io
- Database Hub - プレビュー
- Databricks エージェント
- Datadog
- DeepSeek
- Deputy
- Discord - プレビュー
- DocuSign
- Drip
- Dropbox
- Dropbox Business
- Egnyte
- Eventbrite
- Exchangerates
- Exchange Server - プレビュー
- Expensify
- Facebook
- Freshbooks
- Freshdesk
- Freshsales
- FreshService
- Getresponse
- GitHub
- Gmail
- Google Cloud Platform
- Google ドキュメント
- Google ドライブ
- Google フォーム - プレビュー
- Google マップ
- Google スプレッドシート
- Google Speech-to-Text
- Google Text-to-Speech
- Google ToDo リスト - プレビュー
- Google Vertex
- Google Vision
- Google Workspace
- GoToWebinar
- Greenhouse
- Hootsuite
- HTTP
- HTTP Webhook
- HubSpot CRM
- Hubspot Marketing
- HyperV - プレビュー
- IcertisIcertis
- iContact
- Insightly CRM
- Intercom
- Jina.ai
- Jira
- Keap
- Klaviyo
- LinkedIn
- メール
- Mailchimp
- Mailgun
- Mailjet
- MailerLite
- Marketo
- Microsoft 365
- Microsoft Azure
- Microsoft Azure Active Directory
- Microsoft Azure AI Foundry
- Microsoft Azure OpenAI
- Microsoft Azure Sentinel
- Microsoft Dynamics 365 CRM
- Microsoft OneDrive & SharePoint
- Microsoft Outlook 365
- Microsoft Power Automate – プレビュー
- Microsoft Sentiment
- Microsoft Sentinel 脅威インテリジェンス
- Microsoft Teams
- Microsoft Translator
- Microsoft Vision
- Miro
- NetIQ eDirectory
- Nvidia NIM – Preview
- Okta
- OpenAI
- OpenAI V1 準拠の LLM
- Oracle Eloqua
- Oracle NetSuite
- PagerDuty
- Paypal
- PDFMonkey
- Perplexity
- Pinecone
- Pipedrive
- QuickBooks Online
- Quip
- Salesforce
- Salesforce AgentForce & Flows – プレビュー
- Salesforce Marketing Cloud
- SAP BAPI
- SAP Cloud for Customer
- SAP Concur
- SAP OData
- SendGrid
- ServiceNow
- Shopify
- Slack
- SmartRecruiters
- Smartsheet
- Snowflake
- Snowflake Cortex
- Stripe
- Sugar Enterprise
- Sugar Professional
- Sugar Sell
- Sugar Serve
- System Center - プレビュー
- TangoCard
- Todoist
- Trello
- Twilio
- UiPath Apps (プレビュー)
- UiPath Data Fabric – プレビュー
- UiPath GenAI アクティビティ
- UiPath Orchestrator
- X(旧ツイッター)
- Xero
- watsonx.ai
- WhatsApp Business
- WooCommerce
- Workable
- Workday
- Workday REST
- VMware ESXi vSphere
- YouTube
- Zendesk
- Zoho Campaigns
- Zoho Desk
- Zoho Mail
- Zoom
- ZoomInfo

Integration Service ユーザー ガイド
コネクション
コネクションについて
コネクションは、単一のユーザーと外部アプリケーション間でのタスクの確立に役立ちます。コネクションは、ユーザーが API プロバイダーで認証されると作成されます。
前提条件
Before you can use connections, make sure the following conditions are met:
- Integration Service is enabled and provisioned for your tenant.
- Users who work with connections have the necessary permissions in Orchestrator. To create a connection, a user must have the Connections - Create permission in the target folder. For more information on permissions, see Configuring access for accounts in the Orchestrator user guide.
Orchestrator のコネクション
Starting with March 2026, you can create new Integration Service connections in Orchestrator. Existing Integration Service connections will continue to be visible on the Integration Service Connections tab until July 2026 (this date is subject to possible extensions). After this date, existing Integration Service connections will be migrated to Orchestrator, and the Connections tab in Integration Service will be removed. This change is scheduled to become available to Community users first, then to Enterprise users progressively, depending on organization and tenant regions. Follow the Integration Service release notes to learn when the change is first announced.
Key benefits of managing connections in Orchestrator
この変更には、いくつかの重要なメリットがあります。
-
コンテキストの切り替えが少ない
アセット、キュー、トリガー、コネクションをすべて 1 か所で作成できるようになり、別の左側のメニューに移動する必要がありません。クリック回数が減り、ページの読み込みが減り、認知的負荷が軽減されることで、ワークフローがスムーズになります。
-
トラブルシューティングが容易
実行が失敗する場合、すでに Orchestrator でジョブ、キュー、またはログを確認しています。関連するコネクションを同じインターフェイスで表示および管理できるようになり、解決までの時間が短縮されます。
-
一貫したメンタルモデル
Orchestrator ではすでにリソースが一元化されています。アセットやトリガーと共にコネクションを管理すると、より直感的で一貫性のあるエクスペリエンスが得られます。
共有されたコネクション
共有フォルダー内にコネクションを作成すると、そのフォルダーへのアクセス権を持つすべてのユーザーがそのコネクションをオートメーション ワークフローで使用できるようになります。アクセス権を持つすべてのユーザーがコネクションを編集できます。
個人用ワークスペースでは、個人アカウントを使用して認証を行うコネクションを作成し、サービス アカウントを通じて認証を行うコネクションには共有フォルダーのみを使用することをお勧めします。管理者は、通常のユーザーがチームのフォルダーに Integration Service の共有コネクションを作成できないようにすることができます。詳細については、『Orchestrator ガイド』の「 ユーザー レベルの Integration Service コネクションのガバナンスを適用する 」をご覧ください。
Integration Service のすべてのコネクタは、実行時のコネクションの共有と構成をサポートします。実行時のコネクションの構成について詳しくは、『 Orchestrator ユーザー ガイド』をご覧ください。
コネクションを作成する
The Connections tab in Orchestrator provides a central location for creating and managing connections. You can also create connections directly from automations in UiPath Studio, UiPath Studio Web, or UiPath Assistant.
To create a connection in Orchestrator, follow these steps:
- Select Orchestrator from the product launcher.
- Select a folder, and then navigate to the Connections tab.
- [ コネクションを追加] を選択します。
- To open the connection creation page, select the connector from the list. You can use the search bar to find the connector.
- Select the authentication type (if applicable), enter the required credentials, and then select Connect.
For more details, refer to Managing connections in the Orchestrator user guide.
コネクションを正常に作成するには、Integration Service の IP アドレス許可リストを構成する必要があります。詳しくは、『Automation Cloud 管理ガイド』の「 ファイアウォールを設定する 」をご覧ください。
認証の種類を選択する
Some Integration Service connectors support multiple authentication types. You select the type when creating the connection. Available options can include:
- OAuth 2.0 の認可コード
- OAuth 2.0 パスワード
- 独自の OAuth 2.0 アプリ (BYOA) を使用する
- 個人用アクセス トークン (PAT)
Available options vary depending on the connector.
接続/コネクションを管理する
You can manage all connections in one place from the Connections tab in Orchestrator. This is where you can check the health of connections, reconnect, manage triggers, edit connection details such as the name and polling interval, and delete connections.
For more details, refer to Managing connections in the Orchestrator user guide.
Managing connections from UiPath Assistant
Integration Service のコネクションは、UiPath Assistant から直接管理できます。詳しくは、「 UiPath Assistant での接続」をご覧ください。
[ ブラウザーで設定 ] を選択して、Studio Web で [ コネクション ] ページを開きます。詳しくは、『Studio Web ガイド』の「 コネクションを管理する 」をご覧ください。
Automation Cloud (公共部門向け) のユーザーは、UiPath Assistant でコネクションを表示できますが、管理することはできません。代わりに、Orchestrator の [ パッケージ要件 ] タブを使用して Integration Service のコネクションを設定および管理できます。
独自の OAuth 2.0 アプリ (BYOA) を使用する
UiPath Integration Service offers a Bring your own Oauth2.0 app (BYOA) model that allows enterprises to connect using their own OAuth 2.0 applications instead of the default UiPath-registered public OAuth app.
UiPath registers and maintains OAuth 2.0 apps on vendor developer portals for the majority of connectors (for example, Microsoft, Google, Salesforce, Atlassian Jira, etc.). In most cases, these apps come with predefined scopes and are managed entirely by UiPath.
However, some organizations may have strict IT, security, or compliance policies that prevent them from using external app registrations. In such cases, BYOA enables customers to use their own Client ID and Client Secret to authenticate and authorize Integration Service connections.
Common scenarios for when to use BYOA
Use BYOA when:
- The application supports the OAuth2.0 Authorization code grant authentication type. Other OAuth2.0 types cannot be used under BYOA.
- Your enterprise requires that all third-party integrations use internally managed OAuth apps.
- You need to add or modify scopes that are not part of UiPath's default registered app.
- Your organization's security or compliance policies prohibit shared app usage.
- You want to control the OAuth app lifecycle, including rotation of secrets.
UiPath's public OAuth apps use fixed scopes and cannot be modified per customer request. If you require additional scopes, BYOA is the correct option.
How BYOA works
When creating a connection in Integration Service, you can select Bring your own Oauth2 app as the authentication type.
This allows you to enter:
- Client ID and Client Secret - Credentials obtained from your app registration in the vendor's developer portal.
- Scopes - Permissions required by the connector.
- Redirect URI - Non-editable callback URL (
https://cloud.uipath.com/provisioning_/callbackfor Automation Cloud). This is the callback URL that Integration Service uses to complete the OAuth flow.
Integration Service uses your credentials to perform the OAuth flow and securely stores the resulting access and refresh tokens.
Configuring a BYOA connection
Step 1: Register an OAuth App on the vendor portal
Create an OAuth 2.0 app in the vendor's developer portal (for example, Salesforce, Microsoft, Jira or Google). During registration:
- Set the redirect/callback URI to
https://cloud.uipath.com/provisioning_/callback. - Add the required scopes (see connector-specific documentation for mandatory scopes).
- Ensure the vendor supports the grant type required by the connector (Authorization Code Grant).
Step 2: Create a connection in Integration Service
-
Navigate to Integration Service > Connectors, select the desired connector, and then click Connect.
-
Select the authentication type Bring Your Own OAuth2 2.0 app.
-
Enter the following details from your registered app:
- クライアント ID
- クライアント シークレット
- Scopes (select from existing or type them manually)
注:Many vendors (Atlassian Jira, Coupa, etc.) expect the same scopes are present in your app as well.
-
Follow the on-screen prompts to complete the OAuth consent flow by providing your username and password on the vendor's login page.
-
Once authorized, the connection is securely stored and available to be used.
-
Integration service takes care of periodically refreshing the access token.
Step 3: Verify mandatory scopes
Each connector has mandatory scopes required for its activities and triggers.
If your BYOA app does not include these scopes, connection creation will fail, or certain actions may not work as expected.
Refer to the connector's documentation to confirm the list of mandatory scopes.
ベスト プラクティス
- Use a dedicated enterprise app registration for UiPath Integration Service; avoid reusing app IDs from unrelated integrations.
- Include only the necessary scopes for least-privilege access.
- Keep client secrets rotated periodically and update them in Integration Service by editing connections.
- Document app ownership and ensure continuity if admins change.
- Verify redirect URIs exactly match the value displayed in Integration Service; mismatched URIs cause OAuth errors.
Security and maintenance
- BYOA credentials are encrypted and stored securely in UiPath Integration Service and never exposed in plain text.
- UiPath does not manage or monitor your custom app credentials or scopes.
- Secret rotation, app de-registration, or scope maintenance are the customer's responsibility.
一般的な問題
The following table lists common issues encountered when using BYOA connections, along with their possible causes and resolutions.
| 問題 | 考えられる原因 | 解決方法 |
|---|---|---|
| Invalid client or secret | Wrong client ID or secret. | Verify credentials from the vendor app registration. |
| Redirect URI mismatch | The redirect URI in the vendor app does not match UiPath's value. | Update the redirect URI in the vendor app registration. |
| Insufficient scopes or Access denied | Missing mandatory scopes in vendor app. | Add required scopes and reauthorize. |
| Token expiring frequently | Vendor app configured with short-lived tokens. | Enable refresh tokens in the app or extend token validity. |
ソリューション内の接続
コネクションとイベント トリガーは、ソリューション パッケージの一部として管理できます。ソリューション パッケージの詳細としくみ、それらを作成、管理、デプロイする方法については、 ソリューション管理の概要 に関するこちらのページをご覧ください。
ソリューション パッケージを作成すると、コネクションとそれに関連するイベント トリガーを [ コンポーネント ] パネルで利用できます。編集できるプロパティは、[ コネクション名]、[ コネクションの説明]、[ 認証の種類] です。イベント トリガーの場合は、 Orchestrator の場合と同じ設定手順を実行できます。

これらのフィールドは、編集のためにロックされていない限り、デプロイ時に編集することもできます。
ソリューションが作成されパブリッシュされると、[コンポーネント] パネルでコネクションを利用できるようになります。これで、ソリューション パッケージの作成時に選択したすべてのコネクションをデプロイできます。
ソリューション管理では、イベント トリガーが接続されていない限り、プロセスのコネクションは表示されません。この問題はソリューションのデプロイに影響する場合があり、適切に動作させるには手動での接続設定が必要です。
Integration Service に作成されていない特定のフォルダーにソリューション パッケージをデプロイすることもできます。この場合、フォルダーは自動的に作成されます。


コネクションの認証の種類
管理者は、既存のコネクションを使用するか、新しいコネクションを作成するか、エンドユーザーにコネクションを選択させるかをデプロイ時に決定します。
ソリューションは、コネクションとそれに関連するエンティティ リレーション (コネクションが属するワークフローやプロセスなど) を移動しますが、認証の資格情報は移行しません。
デプロイ時に、管理者は認証の種類を次のように設定できます。
-
ユーザーが構成可能: 既存のコネクションからコネクションを作成または使用することはできません。ユーザーは、実行時にソリューションがデプロイされた後にコネクションを設定します。詳しくは、『Orchestrator ガイド』の「 接続を設定する 」をご覧ください。
-
Authenticate after deployment is done: 新しいコネクションが作成され、デプロイ後に認証が必要になります。認証手順が完了するまで、コネクションはアクティブ化されません。
- 認証が完了する前に、ユーザー名は
Systemと表示されます。認証に成功すると、ユーザ名が更新され、オーセンティケ―タ―の資格情報が表示されます。
- 認証が完了する前に、ユーザー名は
コンポーネントをリンクするオプションもあります。[ 既存のものにリンク] を選択すると、ソリューション パッケージをデプロイするユーザーがアクセスできるすべてのコネクションがポップアップ ウィンドウに表示されます。任意の既存のコネクションをソリューション パッケージの一部として選択できます。
ソリューション パッケージに含まれるコネクタに既存のコネクションを選択し、デプロイ時に新しいフォルダーも選択した場合は、そのフォルダーは Integration Service 内に作成され、コネクションは含まれません。このフォルダーは、設定が変更された場合、または新しいコネクションが追加された場合に使用します。
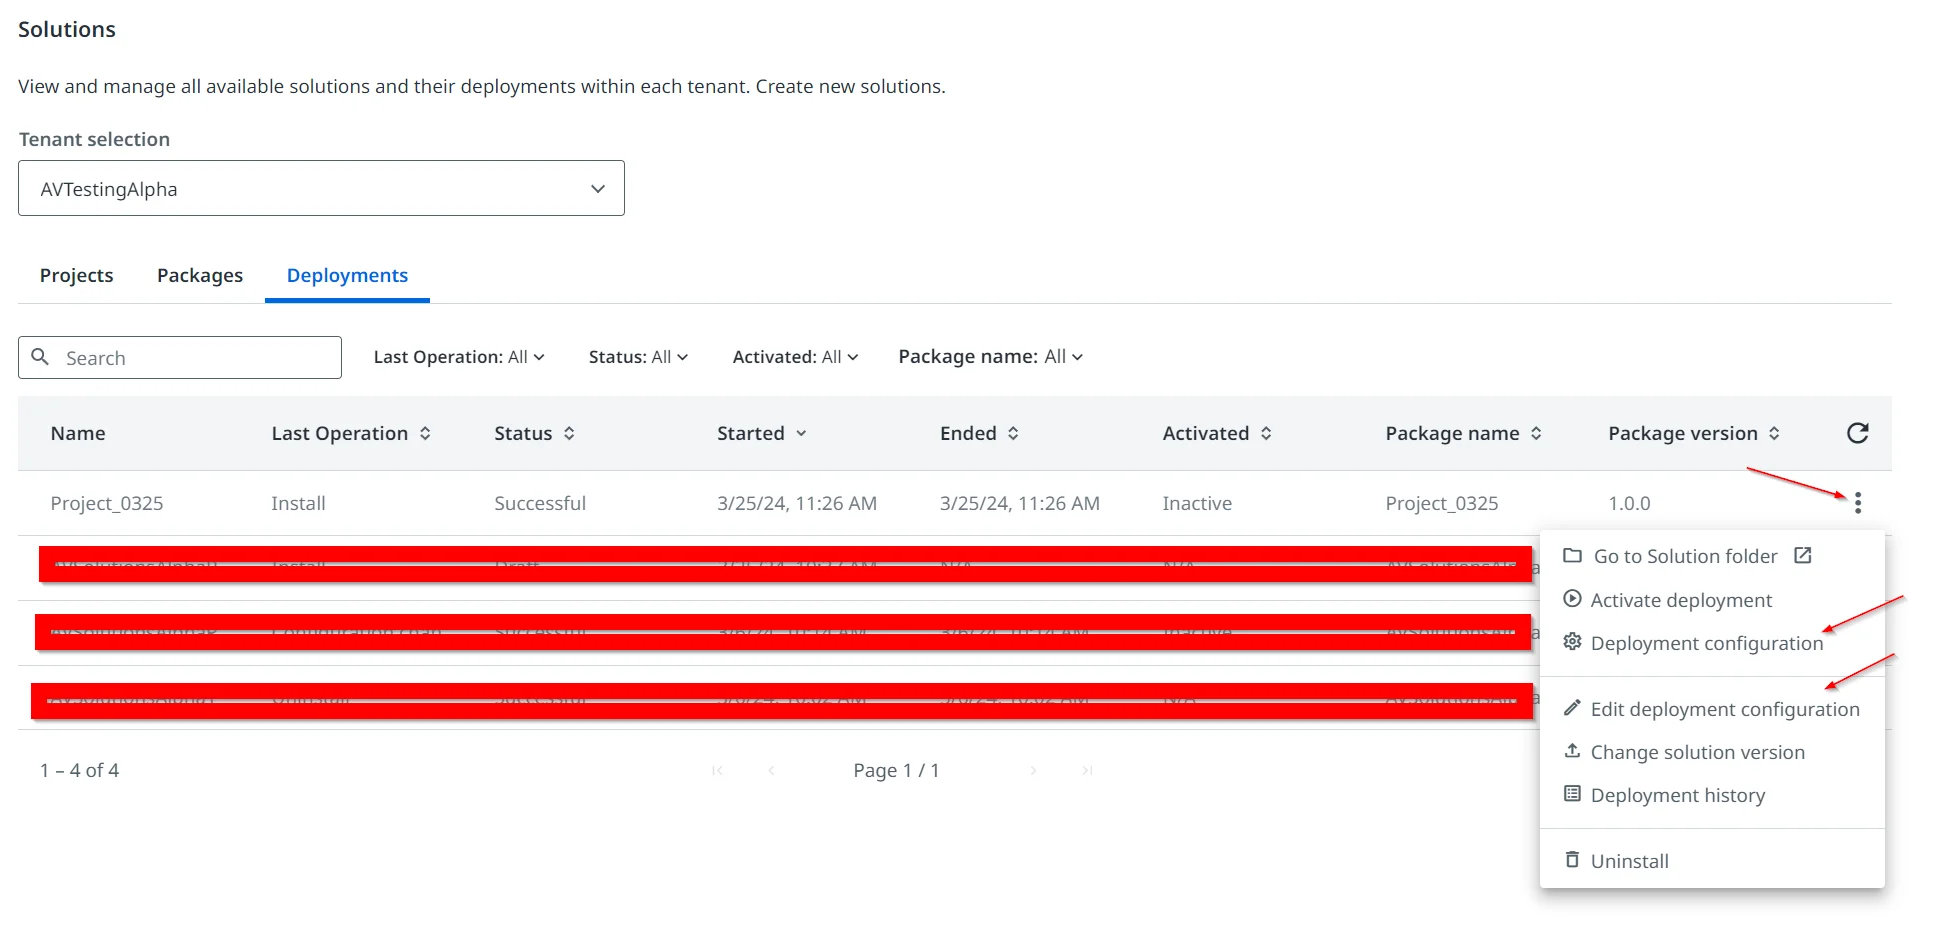
[ 既存のものにリンク ] オプションは、[ デプロイの設定 ] または [デプロイの設定を編集] メソッドから設定を編集する場合には使用できません。デプロイ後にコンポーネントをリンクしたり、 認証の種類 を編集したりするには、ソリューション パッケージ をアップグレードする 必要があります。これには、ソリューションを編集し、新しいバージョンを再度デプロイする必要があります。
別のコネクションを使用するようにワークフローをアップグレードしても、ソリューションを使用してフォルダー内に作成されたコネクションは削除されません。これにより、これらのコネクションを利用するプロセスやオートメーションが、アップグレードの影響を受けないことが保証されます。
Troubleshooting connection issues
For information on how to fix common issues you might encounter when using connection, see Connections troubleshooting.
- コネクションについて
- 前提条件
- Orchestrator のコネクション
- Key benefits of managing connections in Orchestrator
- 共有されたコネクション
- コネクションを作成する
- 認証の種類を選択する
- 接続/コネクションを管理する
- Managing connections from UiPath Assistant
- 独自の OAuth 2.0 アプリ (BYOA) を使用する
- Common scenarios for when to use BYOA
- How BYOA works
- Configuring a BYOA connection
- ベスト プラクティス
- Security and maintenance
- 一般的な問題
- ソリューション内の接続
- Troubleshooting connection issues