- 概要
- Document Processing Contracts
- リリース ノート
- Document Processing Contracts について
- Box クラス
- IPersistedActivity インターフェイス
- PrettyBoxConverter クラス
- IClassifierActivity インターフェイス
- IClassifierCapabilitiesProvider インターフェイス
- ClassifierDocumentType クラス
- ClassifierResult クラス
- ClassifierCodeActivity クラス
- ClassifierNativeActivity クラス
- ClassifierAsyncCodeActivity クラス
- ClassifierDocumentTypeCapability クラス
- ContentValidationData クラス
- EvaluatedBusinessRulesForFieldValue クラス
- EvaluatedBusinessRuleDetails クラス
- ExtractorAsyncCodeActivity クラス
- ExtractorCodeActivity クラス
- ExtractorDocumentType クラス
- ExtractorDocumentTypeCapabilities クラス
- ExtractorFieldCapability クラス
- ExtractorNativeActivity クラス
- ExtractorResult クラス
- FieldValue クラス
- FieldValueResult クラス
- ICapabilitiesProvider インターフェイス
- IExtractorActivity インターフェイス
- ExtractorPayload クラス
- DocumentActionPriority 列挙型
- DocumentActionData クラス
- DocumentActionStatus 列挙型
- DocumentActionType 列挙型
- DocumentClassificationActionData クラス
- DocumentValidationActionData クラス
- UserData クラス
- Document クラス
- DocumentSplittingResult クラス
- DomExtensions クラス
- Page クラス
- PageSection クラス
- Polygon クラス
- PolygonConverter クラス
- Metadata クラス
- WordGroup クラス
- Word クラス
- ProcessingSource 列挙型
- ResultsTableCell クラス
- ResultsTableValue クラス
- ResultsTableColumnInfo クラス
- ResultsTable クラス
- Rotation 列挙型
- ルール クラス
- RuleResult クラス
- RuleSet クラス
- RuleSetResult クラス
- SectionType 列挙型
- WordGroupType 列挙型
- IDocumentTextProjection インターフェイス
- ClassificationResult クラス
- ExtractionResult クラス
- ResultsDocument クラス
- ResultsDocumentBounds クラス
- ResultsDataPoint クラス
- ResultsValue クラス
- ResultsContentReference クラス
- ResultsValueTokens クラス
- ResultsDerivedField クラス
- ResultsDataSource 列挙型
- ResultConstants クラス
- SimpleFieldValue クラス
- TableFieldValue クラス
- DocumentGroup クラス
- DocumentTaxonomy クラス
- DocumentType クラス
- Field クラス
- FieldType 列挙型
- FieldValueDetails クラス
- LanguageInfo クラス
- MetadataEntry クラス
- TextType 列挙型
- TypeField クラス
- ITrackingActivity インターフェイス
- ITrainableActivity インターフェイス
- ITrainableClassifierActivity インターフェイス
- ITrainableExtractorActivity インターフェイス
- TrainableClassifierAsyncCodeActivity クラス
- TrainableClassifierCodeActivity クラス
- TrainableClassifierNativeActivity クラス
- TrainableExtractorAsyncCodeActivity クラス
- TrainableExtractorCodeActivity クラス
- TrainableExtractorNativeActivity クラス
- BasicDataPoint クラス - プレビュー
- ExtractionResultHandler クラス - プレビュー
- Document Understanding ML
- Document Understanding OCR ローカル サーバー
- Document Understanding
- IntelligentOCR
- リリース ノート
- IntelligentOCR アクティビティ パッケージについて
- プロジェクトの対応 OS
- タクソノミーを読み込み
- ドキュメントをデジタル化
- ドキュメント分類スコープ
- キーワード ベースの分類器
- Document Understanding プロジェクト分類器
- インテリジェント キーワード分類器
- ドキュメント分類アクションを作成
- ドキュメント検証成果物を作成
- ドキュメント検証成果物を取得
- ドキュメント分類アクション完了まで待機し再開
- 分類器トレーニング スコープ
- キーワード ベースの分類器トレーナー
- インテリジェント キーワード分類器トレーナー
- データ抽出スコープ
- Document Understanding プロジェクト抽出器
- Document Understanding プロジェクト抽出器トレーナー
- 正規表現ベースの抽出器
- フォーム抽出器
- インテリジェント フォーム抽出器
- ドキュメントを墨消し
- ドキュメント検証アクションを作成
- ドキュメント検証アクション完了まで待機し再開
- 抽出器トレーニング スコープ
- 抽出結果をエクスポート
- マシン ラーニング抽出器
- マシン ラーニング抽出器トレーナー
- マシン ラーニング分類器
- マシン ラーニング分類器トレーナー
- 生成 AI 分類器
- 生成 AI 抽出器
- 認証を構成する
- ML サービス
- OCR
- OCR Contracts
- リリース ノート
- OCR コントラクトについて
- プロジェクトの対応 OS
- IOCRActivity インターフェイス
- OCRAsyncCodeActivity クラス
- OCRCodeActivity クラス
- OCRNativeActivity クラス
- Character クラス
- OCRResult クラス
- Word クラス
- FontStyles 列挙型
- OCRRotation 列挙型
- OCRCapabilities クラス
- OCRScrapeBase クラス
- OCRScrapeFactory クラス
- ScrapeControlBase クラス
- ScrapeEngineUsages 列挙型
- ScrapeEngineBase
- ScrapeEngineFactory クラス
- ScrapeEngineProvider クラス
- OmniPage
- PDF
- [リストから削除済] ABBYY
- [リストから削除済] ABBYY Embedded

Document Understanding アクティビティ
履歴書に基づいて Workday で応募者を作成する
概要
Summary: Create a pre-hire in Workday using the data provided in the CV.
Applications: Workday
Description: After identifying appropriate candidates using Document Understanding to extract experience information from CVs, create a pre-hire in workday using the data provided in the CV.
This example presents Document Understanding activities such as Classify Document, Extract Document Data, and Create Validation Task.
ワークフロー
If you want to save time, use the Create Pre-Hire in Workday Based on CV template in Studio Web to build this workflow.
- Studio Web を開いて、新しいプロジェクトを作成します。
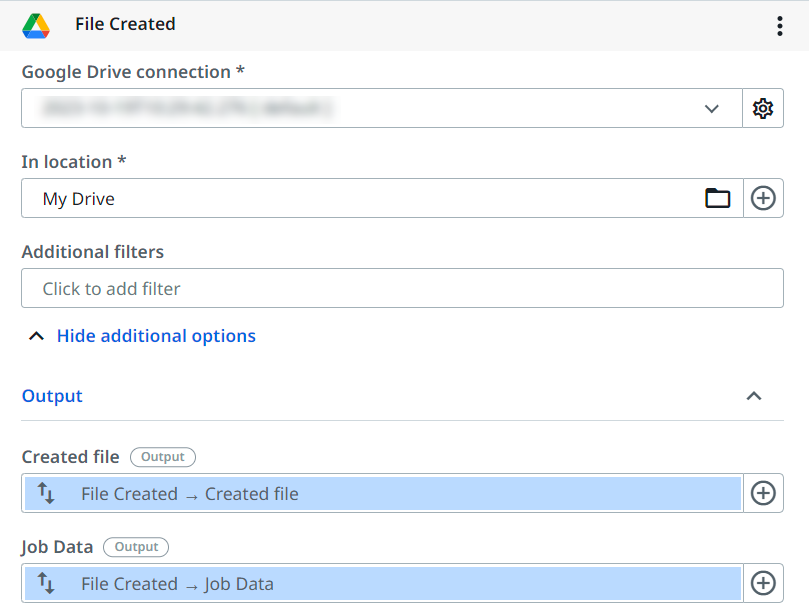
- Add a File Created activity to your workflow. Set up the location of the CV you want to use in the workflow, and the location of the output file. In the activity, perform the following configurations:
-
Google ドライブのコネクションを設定します。
-
In the In location field, choose the folder where the CV is located.
-
If needed, add additional filters (such as created by, file extension, and name) in the Additional filters field.
-
In the Created file field, reference the created file to be used in the workflow.
Figure 1. Configuring the Google Drive connection properties
-
- Next, add a Classify Document activity, to classify the documents.
-
In the Project field, select your Document Understanding project from the dropdown list.
-
In the Classifier field, select Generative Classifier from the dropdown list.
-
In the Prompt field, configure three document types:
-
CV: The document used before employment, containing candidates skills and work experience.
-
ID: The identification document of the candidate.
-
W-9 Form: The tax form for the candidate.
必要に応じてさらにドキュメントの種類を設定できます。
Figure 2. Configuring three document types in the Prompt builder, using the Generative Classifier
![生成 AI 分類器を使用して、[プロンプト ビルダー] で 3 つのドキュメントの種類を設定する](https://dev-assets.cms.uipath.com/assets/images/activities/document-understanding-configuring-three-document-types-in-the-prompt-builder-using-the-generative--4d544880-9c396209.webp)
-
-
In the Input field, add the file created at step two.
Figure 3. Adding the previously created file in the Input field of the Classify Document activity
![前に作成したファイルを [ドキュメントを分類] アクティビティの [入力] フィールドに追加する](https://dev-assets.cms.uipath.com/assets/images/activities/document-understanding-adding-the-previously-created-file-in-the-input-field-of-the-classify-docume-a68da7a9-3283a8eb.webp)
-
- Next, add an If activity. This activity is used to extract candidate information if a document type is defined as CV, or display a message if not. Configure the activity as follows:
-
In the Condition field, select the Plus icon to select Condition builder.
-
In the Condition builder select Add condition.
-
In the Click to use variable field, select the Document Type Name property of the Classify Document activity.
-
From the dropdown select equals.
-
In the Enter text or press Ctrl+Space field, enter CV.
-
Select Save to save your condition.
Figure 4. Creating and configuring the condition inside the Condition builder
-
- Next, add a Write Line activity in the Then branch of the activity. Configure the activity as follows:
-
In the Text field, select the Plus icon to select Text builder.
-
In the Text builder, enter "Found CV to process:".
-
For the Insert variable dropdown list, select the Created file variable from the File Created activity.
-
Select Save to save your changes.
Figure 5. Configure the Write Line activity, using the Text builder, to output a certain value
![テキスト ビルダーを使用して [1 行を書き込み] アクティビティを設定し、特定の値を出力する](https://dev-assets.cms.uipath.com/assets/images/activities/document-understanding-configure-the-write-line-activity-using-the-text-builder-to-output-a-certain-v-517df855-a2e567b9.gif)
-
- Next, add an Extract Document Data activity. This activity is used to extract data from the classified document. In the activity, perform the following steps:
-
In the Project field, select your Document Understanding project from the dropdown list.
-
In the Extractor field, select Generative from the dropdown list.
-
In the Prompt field, configure seven fields:
-
First name: First name of the candidate.
-
Email: Email address of the candidate.
-
Experience: Previous experience of the candidate.
-
SalesSkills: Does the candidate have Sales skills?
-
Employer: What is the current employer of the candidate?
-
Last name: Last name of the candidate.
-
Country: What's the country of residence for the candidate?
必要に応じて、さらにフィールドを設定できます。
Figure 6. Configuring the Generative Extractor Prompt builder with the CV fields
![生成 AI 抽出器の [プロンプト ビルダー] に履歴書のフィールドを設定する](https://dev-assets.cms.uipath.com/assets/images/activities/document-understanding-configuring-the-generative-extractor-prompt-builder-with-the-cv-fields-32504-08036c25-ff3b34e0.webp)
-
-
In the Input field, add the document data resulted from the Classify Document activity.
Figure 7. Entering the document data resulted from the Classify Document activity in the Input field of the Extract Document Data activity
![[ドキュメントを分類] アクティビティから生成されたドキュメント データを [ドキュメント データを抽出] アクティビティの [入力] フィールドに入力する](https://dev-assets.cms.uipath.com/assets/images/activities/document-understanding-entering-the-document-data-resulted-from-the-classify-document-activity-in-t-a8f2e285-6a86e7c2.webp)
-
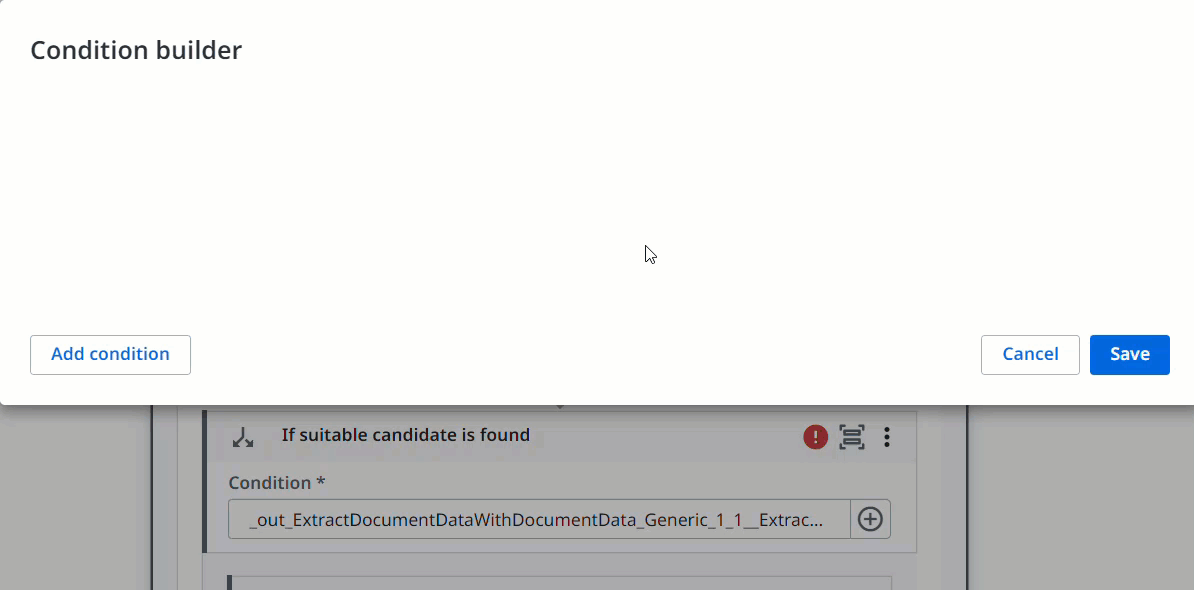
- Next, add an If activity. This activity is used to create pre-hire in Workday if a suitable candidate is found, or display a message if not. Configure the activity as follows:
-
In the Condition field, select the Plus icon to select Condition builder.
-
In the Click to use variable field, select the SalesSkills property of the Extract Document Data activity.
-
From the dropdown select equals.
-
In the Enter text or press Ctrl+Space field, enter Yes.
-
Select Save to save your condition.
Figure 8. Creating and configuring the condition inside the Condition builder
-
- Next, add a Write Line activity in the Then branch of the second If activity. Configure the activity as follows:
-
In the Text field, select the Plus icon to select Text builder.
-
In the Text builder, add a message containing information from the First Name, Last Name, Employer, and email fields configured using the Prompt builder of the Extract Document Data activity.
例:
Received CV applications from Sales Manager with name: First Name | Last Name, currently working at Employer - creating pre-hire profile. Email at email.
Figure 9. The text that the Write Line activity should show in the output
![[1 行を書き込み] アクティビティの出力に表示するテキスト](https://dev-assets.cms.uipath.com/assets/images/activities/document-understanding-the-text-that-the-write-line-activity-should-show-in-the-output-325081-0a1da932-4f52482a.webp)
-
- Next, add a Workday Create Pre-Hire activity and set up your Workday connection.
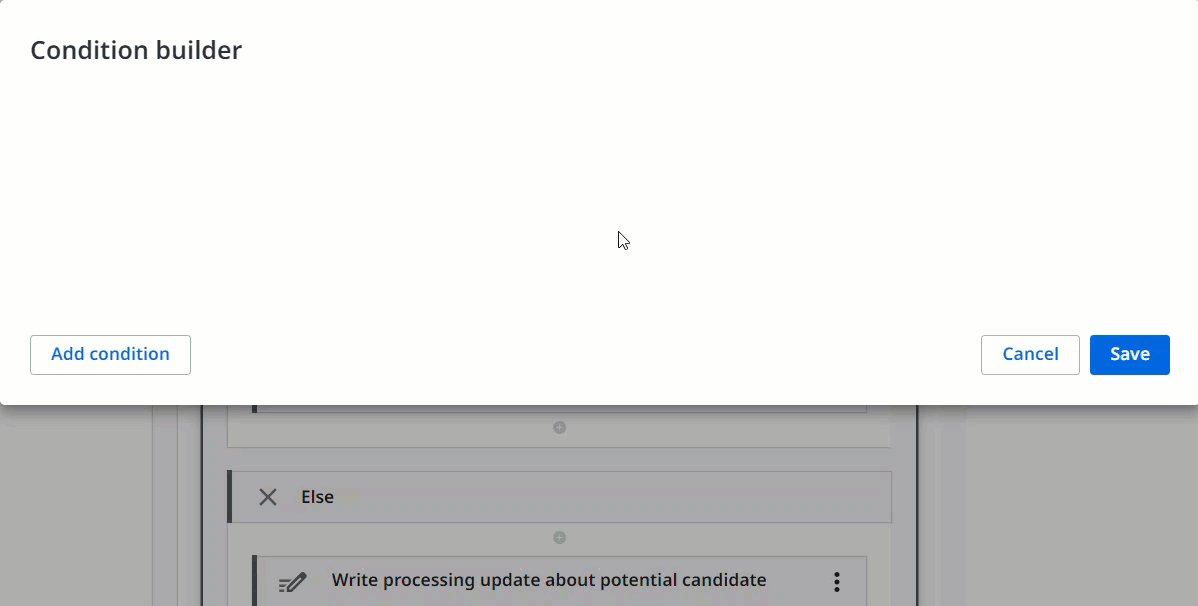
- Next, add a Write Line activity in the Else branch of the second If activity. This activity will display a message if a candidate does not meet the required criteria (in our example, Sales experience). Configure the activity as follows:
-
In the Text field, select the Plus icon to select Text builder.
-
In the Text builder, add a message containing information from the First Name and Last Name fields configured using the Prompt builder of the Extract Document Data activity.
例:
Candidate First Name Last Name, does not have Sales experience, sending the CV for validation.
Figure 10. Creating the expression for the Write Line activity in the Text builder
![[テキスト ビルダー] で [1 行を書き込み] アクティビティの式を作成する](https://dev-assets.cms.uipath.com/assets/images/activities/document-understanding-creating-the-expression-for-the-write-line-activity-in-the-text-builder-3250-79306dd7-c35cee06.webp)
-
- Add a Create Validation Task activity after the Write Line activity. This activity is used to create a document validation action in Action Center when a CV does not meet the required criteria. Configure the activity as follows:
-
In the Extracted data field, provide the output of the Extract Document Data activity.
-
In the Action title, provide a title of the action that needs to be created in Action Center. In our example, you can add "Validate CV".
-
In the Action properties section, choose a priority of the action from the Action priority dropdown list.
-
Specify the Orchestrator folder where the resources will be stored in the Orchestrator folder field.
-
In the Action catalog field, specify the catalog where the action is created in Action Center.
Figure 11. Configuring the properties of the Create Validation Task activity
![[検証タスクを作成] アクティビティのプロパティを設定する](https://dev-assets.cms.uipath.com/assets/images/activities/document-understanding-configuring-the-properties-of-the-create-validation-task-activity-325151-12822d56-c429033e.webp)
-
- Finally, add a Write Line activity in the Else branch of the first If activity. This activity will display a message if the processed document is not a CV. Configure the activity as follows:
-
In the Text field, select the Plus icon to select Text builder.
-
In the Text builder, add a message containing the Created File property of the File Created activity and the Document Type property of the Extract Document Data activity.
例:
Document Created file is not a CV, but a Document Type, so there is nothing to process.
Figure 12. Creating the expression for the Write Line activity in the Text builder
![[テキスト ビルダー] で [1 行を書き込み] アクティビティの式を作成する](https://dev-assets.cms.uipath.com/assets/images/activities/document-understanding-creating-the-expression-for-the-write-line-activity-in-the-text-builder-3251-b1aaf6f7-10f311d2.webp)
-
これで完了です。プロジェクトを実行できます。