- Visão geral
- Automação de Interface Gráfica
- Sobre o pacote de atividades UIAutomation
- Aplicativos e tecnologias automatizados com a Automação de Interface Gráfica
- Compatibilidade do projeto
- UI-ANA-016 - Extrair URL de navegador aberto
- UI-ANA-017 - ContinuarComErro verdadeiro
- UI-ANA-018 - Listar atividades de OCR/Imagem
- UI-DBP-006 - Uso do contêiner
- UI-DBP-013 - Uso Incorreto da Automação do Excel
- UI-DBP-030 - Uso de variáveis proibidas em seletores
- UI-DBP-031 - Verificação de atividades
- UI-PRR-001 - Simular clique
- UI-PRR-002 - Simular Digitação
- UI-PRR-003 - Uso incorreto do aplicativo aberto
- UI-PRR-004 - Atrasos Embutidos em Código
- UI-REL-001 - Idx grande em Seletores
- UI-SEC-004 - Dados de e-mail do seletor
- UI-SEC-010 — restrições de app/URL
- UI-USG-011 - Atributos não permitidos
- UX-SEC-010 — restrições de app/URL
- UX-DBP-029 - Uso de senha não segura
- UI-PST-001 - Nível de log de auditoria nas configurações do projeto
- Ferramenta de Migração de Navegador do UiPath
- Região do Recorte
- Computer Vision Recorder
- Índice de atividades
- Ativar
- Anchor Base
- Anexar Navegador
- Anexar Janela
- Block User Input
- Texto Explicativo
- Marcar
- Click
- Clicar na Imagem
- Click Image Trigger
- Click OCR Text
- Clicar no Texto
- Click Trigger
- Close Application
- Fechar Guia
- Close Window
- Context Aware Anchor
- Copy Selected Text
- Element Attribute Change Trigger
- Element Exists
- Element Scope
- Element State Change Trigger
- Export UI Tree
- Extrair Dados Estruturados
- Find Children
- Localizar Elemento
- Localizar Imagem
- Find Image Matches
- Find OCR Text Position
- Localizar Elemento Relativo
- Find Text Position
- Get Active Window
- Get Ancestor
- Get Attribute
- Get Event Info
- Get From Clipboard
- Obter Texto Completo
- Get OCR Text
- Get Password
- Get Position
- Get Source Element
- Get Text
- Obter Texto Visível
- Voltar
- Avançar
- Ir para a Página Inicial
- Google Cloud Vision OCR
- Hide Window
- Highlight
- Hotkey Trigger
- Hover
- Focalizar Imagem
- Hover OCR Text
- Focalizar Texto
- Imagem Existe
- Indicate On Screen
- Inject .NET Code
- Inject Js Script
- Invoke ActiveX Method
- Key Press Trigger
- Carregar Imagem
- Maximize Window
- Microsoft Azure Computer Vision OCR
- Microsoft OCR
- Microsoft Project Oxford Online OCR
- Minimize Window
- Monitorar eventos
- Mouse Trigger
- Move Window
- Navegar Para
- OCR Text Exists
- On Element Appear
- On Element Vanish
- Aparecer Na Imagem
- Desaparecer Na Imagem
- Abrir Aplicativo
- Abrir Navegador
- Atualizar Navegador
- Replay User Event
- Restore Window
- Save Image
- Select Item
- Select Multiple Items
- Enviar Tecla de Acesso
- Set Clipping Region
- Set Focus
- Set Text
- Set To Clipboard
- Set Web Attribute
- Show Window
- Iniciar Processo
- System Trigger
- Take Screenshot
- Tesseract OCR
- Texto Existe
- Dica de ferramenta
- Type Into
- Digitar Texto Seguro
- Use Foreground
- Wait Attribute
- Esperar Elemento Desaparecer
- Aguardar Imagem Desaparecer
- Application event trigger
- Block User Input
- Check/Uncheck
- Check App State
- Check Element
- Click
- Click Event Trigger
- Drag and Drop
- Extract Table Data
- Localizar elementos
- For Each UI Element
- Get Browser Data
- Obter Área de Transferência
- Get Text
- Get URL
- Go To URL
- Highlight
- Hover
- Inject Js Script
- Keyboard Shortcuts
- Keypress Event Trigger
- Mouse Scroll
- Navigate Browser
- Select Item
- Set Browser Data
- Definir Área de Transferência
- Set Runtime Browser
- Set Focus
- Set Text
- Take Screenshot
- Type Into
- Unblock User Input
- Use Application/Browser
- Window operation
- Realize pesquisa no navegador e recupere resultados usando APIs de Automação de interface gráfica
- Navegação na Web
- Localizar imagens
- Clicar em imagens
- Disparar e monitorar eventos
- Criar e substituir arquivos
- Páginas HTML: extrair e manipular informações
- Manipulação de janelas
- Seleção automatizada de listas
- Localizar e manipular elementos de janela
- Gerenciar automação de texto
- Carregar e processar imagens
- Gerenciar ações ativadas pelo mouse
- Automatizar o runtime de aplicativos
- Execução automatizada de um aplicativo local
- Navegação em navegador
- Automação da Web
- Exemplo de escopo de disparador
- Habilitar o suporte de Automação de Interface Gráfica no DevExpress
- Computer Vision Local Server
- Automação Móvel
- Notas de versão
- Sobre a arquitetura de automação de dispositivos móveis
- Compatibilidade do projeto
- Get Log Types
- Get Logs
- Get Page Source
- Get Device Orientation
- Get Session Identifier
- Instalar Aplicativo
- Gerenciar Aplicativo Atual
- Manage Other App
- Open DeepLink
- Abrir URL
- Mobile Device Connection
- Deslizar Direcional
- Padrão de Desenho
- Positional Swipe
- Press Hardware Button
- Set Device Orientation
- Take Screenshot
- Obter parte da captura de tela
- Element Exists
- Execute Command
- Get Attribute
- Get Selected Item
- Get Text
- Set Selected Item
- Set Text
- Deslizar
- Tap
- Type Text
- Terminal
- Notas de versão
- Sobre o pacote de atividades Terminal
- Compatibilidade do projeto
- Melhores práticas
- Find Text
- Get Color At Position
- Get Cursor Position
- Get Field
- Obter Campo na Posição
- Obter Área da Tela
- Get Text
- Obter Texto na Posição
- Mover Cursor
- Mover cursor para o texto
- Enviar Tecla de Controle
- Send Keys
- Send Keys Secure
- Set Field
- Definir Campo na Posição
- Terminal Session
- Aguardar Texto do Campo
- Wait Screen Ready
- Aguardar Texto da Tela
- Aguardar Texto na Posição

Atividades do UIAutomation
Extração da Tabela
A extração de tabela, parte da experiência moderna no Studio, permite que você use o pacote de atividades de automação da interface do usuário para extrair automaticamente dados estruturados de aplicativos e salvá-los como um objeto DataTable que pode ser usado posteriormente em seus processos de automação.
Esse processo pode ser feito usando o Gravador de Extração de Tabela no Studio, que pode ser acessado a partir da faixa de opções se o pacote UIAutomation v21.4 ou superior estiver instalado em seu projeto atual e você tiver selecionado a Experiência Moderna.
O mesmo assistente também é usado ao usar uma atividade Extract Table Data em seu fluxo de trabalho.
Usando o gravador de extração de tabela
Se tiver a Experiência Moderna selecionada em seu projeto e o pacote de atividades Automação de Interface Gráfica instalado, você pode localizar o gravador Extração de Tabela na Faixa de Opções no Studio.

Clicking the Table Extraction button in the Ribbon opens up the Table Extraction wizard.

Esse assistente permite configurar todo o conjunto de recursos que a atividade Extract Table Data oferece, de maneira muito simples.
Para alternar entre as estruturas de interface gráfica disponíveis (Default, UIAutomation, ou Active Accessibility), você pode selecionar uma opção no menu suspenso ou pressionar F4.
Além disso, a seção Informações orienta você em todas as etapas necessárias para extrair com sucesso quaisquer dados estruturados. A seção pode ser recolhida para revelar mais informações sobre a etapa na qual você está atualmente.

Para iniciar o processo de extração de dados, basta clicar no botão Adicionar dados . Isso inicia o processo de indicação de uma série de elementos semelhantes que podem ser usados para identificar a tabela que você deseja criar. Isso inicia o processo Indicar, que destaca todos os elementos detectados do aplicativo com o qual você está trabalhando no momento. Ao selecionar o  Você pode extrair URLs e origens de imagens dos dados extraídos, caso eles estejam presentes. Elas são adicionadas como uma nova coluna à sua tabela final.

As you can see above, after clicking a column header, the wizard prompts you with a message, asking whether you want to extract all of the available columns, which are automatically identified. Selecting Yes scrapes the entire table.
Se você selecionar um elemento mais próximo (menor ancestral comum) de apenas um dos elementos da primeira coluna, ele será automaticamente considerado o primeiro elemento de uma nova coluna.
If the table spans multiple pages, you can simply click Next Button and select the next page navigation button or link.
Cada coluna pode ser editada ou excluída individualmente, permitindo que você personalize sua tabela final da maneira que achar melhor.

Once you have selected all the data you want, simply clicking the Save and return to Studio button automatically closes the wizard and saves everything you have done in your workflow.
Editando dados de extração
You can resume editing an already scraped table by using the Edit extract data option in the contextual menu in the body of the Extract Table Data activity. Using this option reopens the wizard with all of the configurations performed earlier and enables you to pick up where you left off.

Editando Colunas
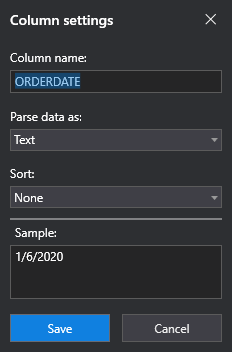
Clicar no ícone da roda dentada ao lado da coluna que você deseja editar abre a janela Configurações da coluna.

Here, you can edit the Column Name. This can be done by simply using the text box and specifying the name you want for the column in the final table.
The Parse data as drop-down menu enables you to select between the three main types of data you can use for the columns, Text, Number, and Date & Time.
The Sample text box displays a sample of a value in the column being parsed as the data type you chose in the Parse data as drop-down.
Texto
The Sort drop-down menu specifies whether you want to sort the data in the column or not. By default, None is selected, meaning the data is not sorted in any way. If you want to sort the data in the column alphabetically, you can do so by selecting Ascending or Descending, depending on the method you prefer.
Número
Selecting Number in the Parse data as drop-down displays other, number-specific options.

The Sort drop-down menu specifies whether you want to sort the data in the column or not. By default, None is selected, meaning the data is not sorted in any way. If you want to sort the data in the column alphanumerically, you can do so by selecting Ascending or Descending, depending on the method you prefer.
The Decimal separator specifies the symbol you want to use for decimal separation in your final table. By default, this symbol is ..
The Thousands separator specifies the symbol you want to use for thousand separation in your final table. By default, this symbol is ,.
When scraping numbers, they are parsed according to the selected options, and separators and other symbols (e.g. $) are removed.
Data e hora
Selecting Date & Time in the Parse data as drop-down displays other options, specific to date and time formats.
If the column you are editing does not match the format that is specified, the Column Settings window lets you know in the Sample section.
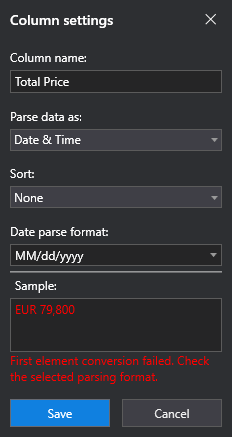
The Sort drop-down menu specifies whether you want to sort the data in the column or not. By default, None is selected, meaning the data is not sorted in any way. If you want to sort the data in the column by date, you can do so by selecting Ascending or Descending, depending on the method you prefer.
The Data parse format drop-down enables you to select from a multitude of date and time formats that are supported.
When selecting dates, they are formatted according to the format that is selected in your operating system. The parsing format selected in the wizard is just to identify the data you are scraping.
Seção de configurações
The Settings section lets you choose if you want to limit the extraction of elements in the table. By default, this option is set to No limit, which does not limit the extraction in any way, scraping the entire visible table.
The Max rows option limits the scraping according to the number of rows that is mentioned in the field to the right. By default, this is set to 1000 rows.
The Max pages option limits the scraping according to the number of pages that is mentioned in the field to the right. By default, this is set to 100 pages.
Seção de visualização
The Preview section specifies how many columns and rows are identified for the table you have indicated. Also, by clicking the eye button, you can see a preview of the extracted table.
A visualização é desabilitada ao editar no modo offline.
ExtractMetadata
The Extract metadata property contains an XML definition of the path identifying the data to be extracted for each column. The path is built starting from the data extraction target (defined by your selector) to the column elements. The path uses attributes such as tag, idx, and text.
Exemplo:
<extract>
<!—columns data identified by a path >
<column exact='1' name=’Description’ attr='text'>
<webctrl tag='div' />
<webctrl tag='div' idx='1' />
<webctrl tag='div' idx='1' />
<webctrl tag='div' idx='2' />
<webctrl tag='div' idx='1' />
<webctrl tag='div' idx='1' />
<webctrl tag='span' idx='1' />
</column>
<column exact='1' name=’Currency’ attr='text'>
<webctrl tag='div' />
<webctrl tag='div' idx='1' />
<webctrl tag='div' idx='1' />
<webctrl tag='div' idx='2' />
<webctrl tag='div' idx='1' />
<webctrl tag='div' idx='1' />
<webctrl tag='span' idx='2' />
</column>
</extract>
Quando os atributos tag, idxe text não são suficientes para identificar os dados de amostra indicados pelo usuário, um seletor CSS é gerado no lugar do caminho. Este seletor usa a classe comum dos elementos de amostra.
Exemplo:
<extract>
<!—column data identified by a path >
<column exact='1' name='Description' attr='text'>
<webctrl tag='li' />
<webctrl tag='div' idx='1' />
<webctrl tag='a' idx='1' />
<webctrl tag='div' idx='2' />
<webctrl tag='div' idx='1' />
<webctrl tag='h3' idx='1' />
</column>
<!—column data identified by a css-selector >
<column css-selector='.currency-value' name='Currency' attr='text' />
</extract>
For the Description column, tag and index attributes are used to identify the column data.
For the Currency column, the elements are identified via the CSS-selector which contains the common class of the samples.
Opcionalmente, se disponível, um seletor CSS também pode ser usado para a Descrição:
<extract>
<!—columns data identified by css-selectors >
<column css-selector='.product-title ' name='Description' attr='text' />
<column css-selector='.currency-value' name='Currency' attr='text' />
</extract>
<extract>
<!—columns data identified by css-selectors >
<column css-selector='.product-title ' name='Description' attr='text' />
<column css-selector='.currency-value' name='Currency' attr='text' />
</extract>
A definição de linha usa os mesmos métodos de identificação da coluna e é usada para extrair dados correlacionados. Uma linha contém um elemento de cada coluna.
Exemplo:
<extract>
<! -- row definition - ->
<row exact='1'>
<webctrl tag='li' />
<webctrl tag='div' idx='1' />
<webctrl tag='a' idx='1' />
<webctrl tag='div' idx='2' />
<webctrl tag='div' idx='1' />
</row>
<column exact='1' name='Description' attr='text'>
<webctrl tag='li' />
<webctrl tag='div' idx='1' />
<webctrl tag='a' idx='1' />
<webctrl tag='div' idx='2' />
<webctrl tag='div' idx='1' />
<webctrl tag='h3' idx='1' />
</column>
<column css-selector='.currency-value' name='Column' attr='text' />
</extract>
Configurações da tabela
This property contains an XML definition of the column settings, as they were defined in the scraping wizard. Column properties like Name or Format can be changed directly in this XML definition and will be used at runtime when building the output data table.
Exemplo:
<table xmlns:xsi='http://www.w3.org/2001/XMLSchema-instance' xmlns:xsd='http://www.w3.org/2001/XMLSchema' Type='Structured'>
<Column xsi:type='DataColumn' ReferenceName='Column0' Name=’Description'>
<Format xsi:type='TextColumnFormat' />
</Column>
<Column xsi:type='DataColumn' ReferenceName='Column2' Name=’Currency'>
<Format xsi:type='TextColumnFormat' />
</Column>
</Table>