- Introdução
- Notificações
- Licenciamento
- Solução de problemas
- Construtor de Conector
- Sobre o Construtor de Conector
- Criação do primeiro conector
- Como criar seu conector a partir de uma definição de API
- Configuração da autenticação
- Uso de variáveis no Construtor do Conector
- Designer de atividades
- Criação de um gatilho
- Connector Builder checklist
- Introdução
- Exemplo A: criar um conector a partir de uma tela em branco com autenticação do Token de Acesso Pessoal
- Exemplo B: criar um conector de uma tela em branco com autenticação de chave de API
- Exemplo C: criar um conector a partir de uma especificação de API com autenticação de credenciais do cliente OAuth 2.0
- Act! 365
- ActiveCampaign
- Active Directory - Visualização
- Adobe Acrobat Sign
- Adobe PDF Services
- Amazon Bedrock
- Amazon Connect
- Amazon Polly
- Amazon SES
- Amazon Transcribe
- Amazon Web Services
- Anthropic Claude
- Asana
- AWeber
- Azure AI Document Intelligence
- Azure Defender for Cloud
- Azure Maps
- BambooHR
- Box
- Brevo
- Calendly
- Campaign Monitor
- Cisco Webex Teams
- Citrix Hypervisor
- Citrix ShareFile
- Clearbit
- Confluence Cloud
- Constant Contact
- Coupa
- CrewAI – Pré-visualização
- Customer.io
- Database Hub - Pré-visualização
- Agente do Databricks
- Datadog
- Pesquisa Profunda
- Deputy
- Discord - Visualização
- DocuSign
- Gota
- Dropbox
- Dropbox Business
- Egnyte
- Eventbrite
- Taxas de câmbio
- Exchange Server - Pré-visualização
- Expensify
- Facebook
- Freshbooks
- Freshdesk
- Freshsales
- Freshservice
- GetResponse
- GitHub
- Gmail
- Google Cloud Platform
- Documentos Google
- Google Drive
- Formulários Google - Pré-visualização
- Google Maps
- Planilhas Google
- Google Speech-to-Text
- Text-to-Speach do Google
- Google Tasks - Visualização
- Google Vertex
- Google Vision
- Google Workspace
- GoToWebinar
- Greenhouse
- Hootsuite
- Http
- Webhook HTTP
- Hubspot CRM
- HubSpot Marketing
- HyperV - Pré-visualização
- Icertis
- iContact
- Insightly CRM
- Intercom
- Jina.ai
- Jira
- Keap
- Klaviyo
- LinkedIn
- Email
- Mailchimp
- Mailgun
- Mailjet
- MailerLite
- Marketo
- Microsoft 365
- Microsoft Azure
- Microsoft Azure Active Directory
- Microsoft Azure AI Foundry
- Microsoft Azure OpenAI
- Microsoft Azure Sentinel
- Microsoft Dynamics 365 CRM
- Microsoft OneDrive & SharePoint
- Microsoft Outlook 365
- Microsoft Power Automate – Prévia
- Microsoft Sentiment
- Microsoft Sentinel Threat Intelligence
- Microsoft Teams
- Microsoft Translator
- Microsoft Vision
- Miro
- NetIQ eDirectory
- Nvidia NIM — Prévia
- OKTA
- OpenAI
- LLM em conformidade com OpenAI V1
- Oracle Eloqua
- Oracle NetSuite
- PagerDuty
- Paypal
- PDFMonkey
- Perplexity
- Pinecone
- Pipedrive
- QuickBooksOnline
- Quip
- Salesforce
- Salesforce AgentForce e fluxos – Visualização
- Salesforce Marketing Cloud
- SAP BAPI
- SAP Cloud for Customer
- SAP Concur
- SAP OData
- SendGrid
- ServiceNow
- Shopify
- Slack
- SmartRecruiters
- Smartsheet
- Snowflake
- Snowflake Cortex
- Stripe
- Sugar Enterprise
- Sugar Professional
- Sugar Sell
- Sugar Serve
- System Center - Pré-visualização
- TangoCard
- Todoist
- Trello
- Twilio
- UiPath Apps - Preview
- UiPath Data Fabric – Visualização
- Atividades da UiPath GenAI
- UiPath Orchestrator
- X (anteriormente Twitter)
- Xero
- watsonx.ai
- WhatsApp Business
- UiPath Marketplace
- Funcional
- Workday
- Workday REST
- VMware ESXi vSphere
- YouTube
- Zendesk
- Zoho Campaigns
- Zoho Desk
- Zoho Mail
- Zoom
- ZoomInfo
Guia do usuário do Integration Service
The Connector Builder checklist helps you verify that your connector is correctly configured before publishing. It tracks the key setup steps and reflects the actual state of your connector in real time — each step turns green automatically once the corresponding configuration is in place.
To open the checklist, select the checklist icon in the top toolbar of Connector Builder. A red dot on the icon indicates that one or more steps are not yet complete.
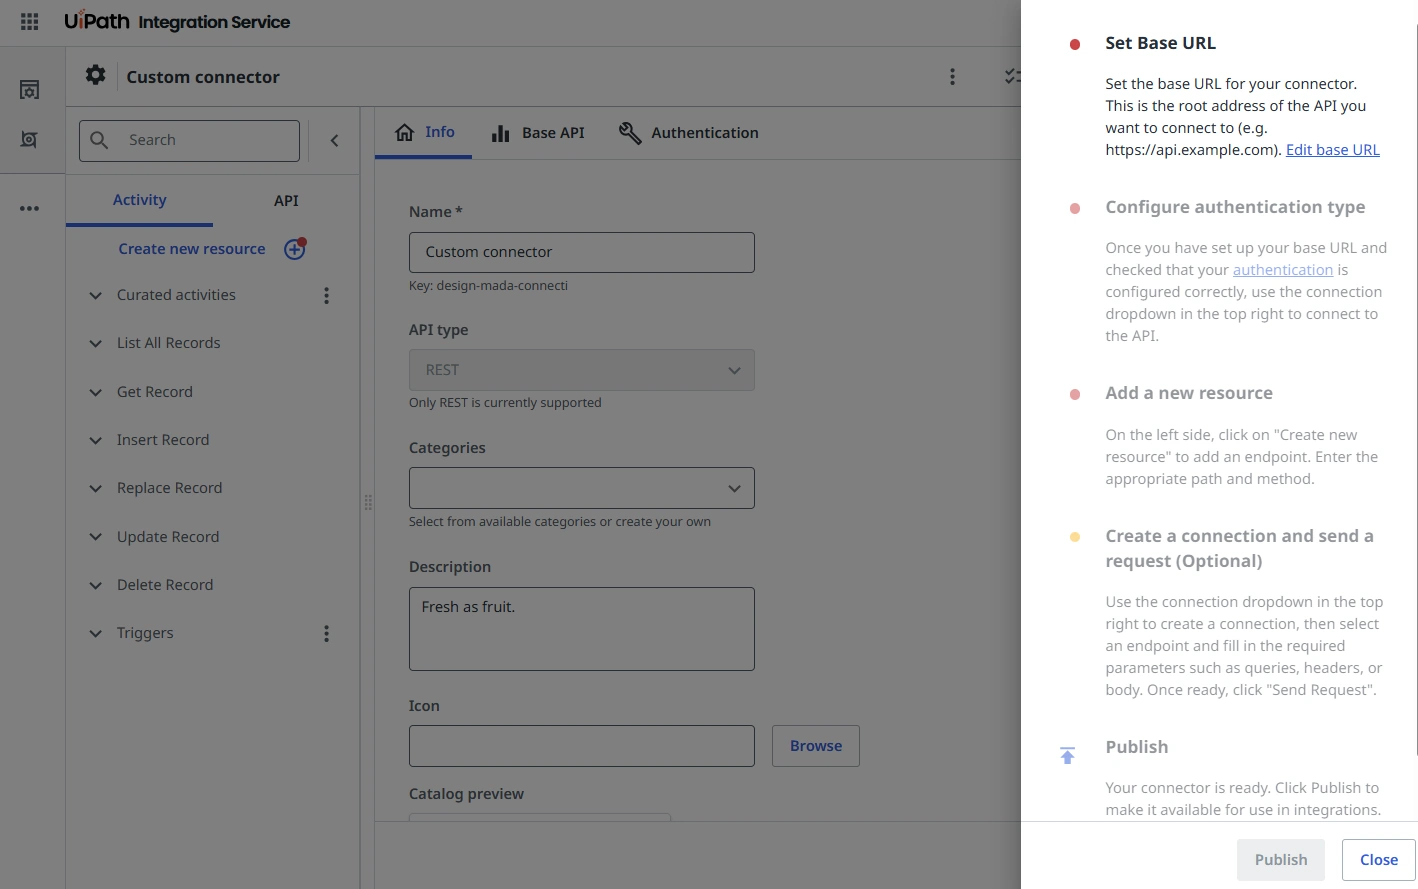
Checklist items
The checklist contains the following items:
| Item | Required | Description | Completion criteria |
|---|---|---|---|
| Set Base URL | Sim | The root address of the API your connector connects to (for example, https://api.example.com). | A base URL is saved in the Base API tab. |
| Configure authentication type | Sim | The authentication method used to connect to the API, configured in the Authentication tab. | An authentication type is configured and a connection is established using the Add connection dropdown. |
| Add a new resource | Sim | At least one endpoint added via Create new resource on the left panel, with a path and HTTP method defined. | At least one resource endpoint exists. |
| Create a connection and send a request | Não | A connection created and a test request sent using the Send Request option for an endpoint. | A request has been sent successfully. |
| Publicar | — | Publishes the connector and makes it available in integrations. Select Publish directly from the checklist or from the toolbar. | Connector is published. |
Status indicators
Each checklist item displays a colored dot that reflects its current status:
- Red dot — The item is mandatory and has not been completed.
- Yellow dot — The item is optional and has not been completed.
- Green dot — The item has been completed.
Publish validation
The Publish button — available both in the toolbar and directly in the checklist drawer — validates all mandatory steps before allowing a connector to be published. If a required step is not complete, a tooltip indicates which step to complete next:
- Set Base URL — No base URL has been configured.
- Connect to API — Authentication is not configured or no connection has been established.
- Add an endpoint — No resources have been created.
Once all mandatory steps are complete, the connector can be published.