- Bevor Sie beginnen
- Verwalten des Zugriffs
- Erste Schritte
- Integrationen
- Arbeiten mit Prozess-Apps
- Arbeiten mit Dashboards und Diagrammen
- Arbeiten mit Prozessdiagrammen
- Arbeiten mit Discover-Prozessmodellen und Import BPMN-Modellen
- Showing or hiding the menu
- Kontextinformationen
- Exportieren
- Filter
- Senden von Automatisierungsideen an den UiPath® Automation Hub
- Tags
- Fälligkeitsdaten
- Vergleichen
- Konformitätsprüfung
- Prozesssimulation
- Ursachenanalyse (Vorschau)
- Simulation des Automatisierungspotenzials
- Starten eines Task Mining-Projekts über Process Mining
- Auslösen einer Automatisierung über eine Prozess-App
- Anzeigen von Prozessdaten
- Process Insights (Vorschau)
- Erstellen von Apps
- Laden von Daten
- Transforming data
- Autopilot™ for SQL (Vorschau)
- Structure of transformations
- Tips for writing SQL
- Exportieren und Importieren von Transformationen
- Anzeigen der Datenausführungsprotokolle
- Zusammenführen von Ereignisprotokollen
- Konfigurieren von Tags
- Konfigurieren von Fälligkeitsdaten
- Konfigurieren von Feldern für das Automatisierungspotenzial
- Aktivitätskonfiguration: Definieren der Aktivitätsreihenfolge
- Verfügbarmachen der Transformationen in Dashboards
- Datenmodelle
- Hinzufügen und Bearbeiten von Prozessen
- Anpassen von Dashboards
- Veröffentlichen von Prozess-Apps
- App-Vorlagen
- Benachrichtigungen
- Zusätzliche Ressourcen

Process Mining-Benutzerhandbuch
Automatisierungsmanager
Einleitung
Mit dem Automatisierungsmanager können Sie Automatisierungen verwalten, die mit Process Mining verbunden sind. Mit dem Automatisierungsmanager können Sie Orchestrator- Warteschlangen auswählen, die für Automatisierungen verwendet werden sollen, die von Geschäftsbenutzern über die Prozess-App ausgelöst werden.
Automatisierungsmanager ist im Dashboard-Editor integriert. Weitere Informationen finden Sie unterArbeiten mit dem Dashboard-Editor .
Veröffentlichen Sie Ihre Prozess-App, nachdem Sie eine Automatisierung hinzugefügt oder bearbeitet haben, um die Automatisierung für Geschäftsanwender verfügbar zu machen. Siehe Veröffentlichen von Prozess-Apps. Stellen Sie außerdem sicher, dass Geschäftsanwender über die entsprechenden Zugriffsrechte im Orchestrator verfügen, um auf die Warteschlange zuzugreifen. Weitere Informationen dazu finden Sie unter Standardrollen .
Manuell ausgelöste Automatisierungen und automatisch ausgelöste Automatisierungen
Es gibt zwei verschiedene Arten von Automatisierungen, die von einer Prozess-App ausgelöst werden können.
- Manuell ausgelöste Automatisierungen werden von Geschäftsbenutzern über die Prozess-App-Dashboards initiiert.
- Automatisch ausgelöste Automatisierungen werden initiiert, wenn vordefinierte Bedingungen, die durch Tags bestimmt werden, während der Datenausführung für die Prozess-App erfüllt sind.
Hinweis:
Manuelle Trigger können sowohl über die Development-App als auch über die veröffentlichte App erfolgen. Automatische Trigger werden nur beim Laden von Daten in eine veröffentlichte App angewendet.
Manuell ausgelöste Automatisierungen
Wenn Sie den Triggertyp Manuell für die Automatisierung auswählen, können Geschäftsanwender die Automatisierung über die veröffentlichte Prozess-App auslösen. Die Option Eine Automatisierung auslösen ist in den meisten Dashboards und Diagrammen verfügbar. Die folgende Abbildung zeigt ein Beispiel.

Wenn der Benutzer Objekte ausgewählt hat, die für eine Automatisierung in Frage kommen, kann die Option Eine Automatisierung auslösen ausgewählt werden, um die Eingabedaten für die Automatisierung einzugeben. Die folgende Abbildung zeigt ein Beispiel.
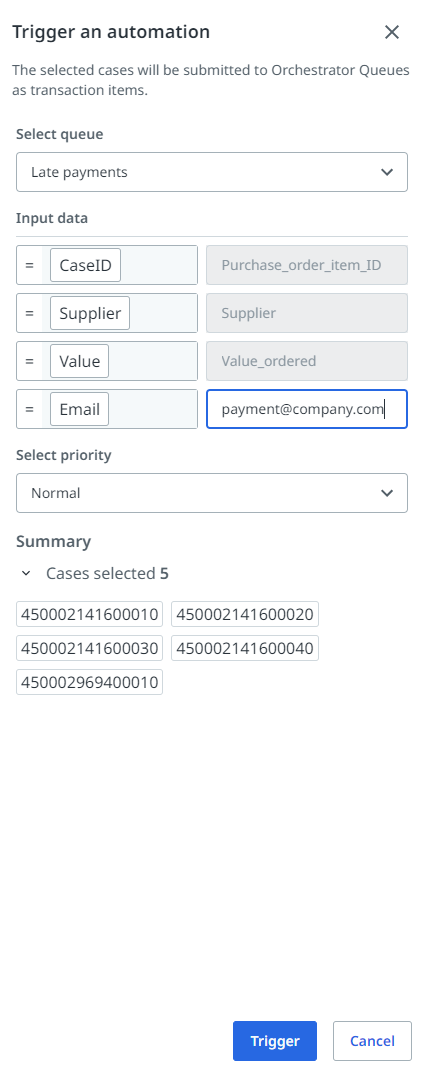
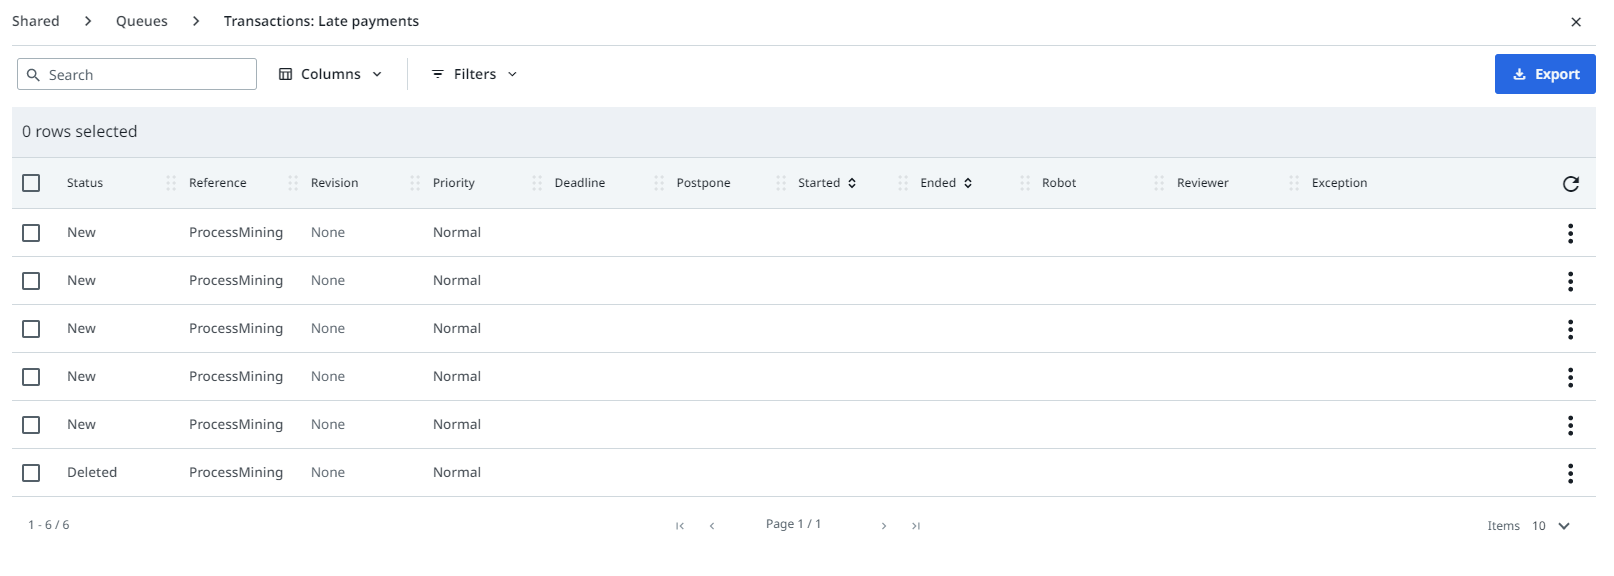
Für jeden ausgewählten Fall wird ein Warteschlangenelement in der Orchestrator-Warteschlange erstellt, das die in Studio definierte Automatisierung auslöst .
Weitere Informationen zum Auslösen einer Automatisierung über eine veröffentlichte Prozess-App finden Sie unter Auslösen einer Automatisierung über eine Prozess-App.
Automatisch ausgelöste Automatisierungen
Automatisierte Trigger können Automatisierungen auslösen, wenn bestimmte Ereignisse innerhalb des Prozesses auftreten. Dies ermöglicht eine sofortige Aufmerksamkeit für einen Fall, um die Effizienz zu steigern und die Workflows zu optimieren.
Wenn Sie den Triggertyp Automatisch für die Automatisierung auswählen, wird die Automatisierung automatisch ausgelöst, wenn die Triggerbedingungen erfüllt sind. Die Triggerbedingungen werden durch Tags bestimmt, die jedes Mal ausgewertet werden, wenn Daten für die Prozess-App geladen werden. Jeder Fall, der die Bedingungen erfüllt, erstellt ein Warteschlangenelement in der Orchestrator-Warteschlange, das die in Studio definierte Automatisierung initiiert.
Opening Automation manager
Wählen Sie das Menü in der Headerleiste des Dashboard-Editors und dann Automatisierungen im Dropdownmenü aus. Die Seite des Automatisierungsmanagers wird angezeigt, die die für Ihre Prozess-App definierten Automatisierungen anzeigt.
Wählen Sie das Menü in der Headerleiste und dann Dashboards aus, um zum Dashboard-Editor zurückzukehren.
Erstellen einer Automatisierung
Sie können direkt über den Automatisierungsmanager mit dem Erstellen einer Automatisierung in Studio beginnen.
- Öffnen Sie in Process Mining die Prozess-App, für die Sie die Automatisierungsintegration im Dashboard-Editor aktivieren möchten. Weitere Informationen finden Sie unter Arbeiten mit dem Dashboard-Editor .
- Wählen Sie im Dashboard-Editor die Option Automatisierungsmanager aus, um den Automatisierungsmanager zu öffnen.
- Wählen Sie Automatisierung erstellen aus, um Studio zu öffnen. Weitere Informationen dazu finden Sie unter Automatisierungsmanager .
Adding an automation
Führen Sie die folgenden Schritte aus, um Ihrer Prozess-App eine Automatisierung hinzuzufügen:
-
Wählen Sie im Automatisierungsmanager die Option + Automatisierung verbinden aus. Die Seite „Warteschlange hinzufügen“ wird angezeigt, auf der alle Orchestrator-Warteschlangen angezeigt werden, die über ein JSON-Schema für spezifische Daten verfügen. SieheEinrichten der Automatisierungsintegration.
-
Wählen Sie die Warteschlange aus, die Sie für die Automatisierung verwenden möchten. Die erforderlichen Eingabefelder für die Warteschlange werden im Eigenschaftenbereich angezeigt.
-
Wenn mehrere Objekte für Ihre Prozess-App verfügbar sind, wählen Sie das entsprechende Objekt in der Dropdownliste Objekt aus.
-
Wählen Sie den Trigger-Typ für die Automatisierung im Listenfeld Trigger aus.
-
Ordnen Sie die Warteschlangeneingabefelder den entsprechenden Datenfeldern Ihrer Prozess-App zu. Anstatt eine Zuordnung zu einem bestimmten Datenfeld vorzunehmen, können Sie für ein Texteingabefeld die Option Geschäftsbenutzereingaben auswählen. Dies ermöglicht es Geschäftsanwendern, einen Freitext einzugeben, wenn sie eine Automatisierung auslösen.
Hinweis:Die Option Eingabe von Geschäftsanwendern gilt nur für manuelle Trigger.
 Wichtig:
Überprüfen Sie den Datentyp der Warteschlangeneingabefelder, die im JSON-Schema für spezifische Daten definiert sind, und stellen Sie sicher, dass Sie die Eingabefelder einem Process Mining -Datenfeld mit dem richtigen Eingabetyp zuordnen. Sehen Sie sich App-Vorlagen an .
-
Geben Sie die Maximale Anzahl der gleichzeitig gesendeten Objekte ein, um die Anzahl der Objekte zu begrenzen, die an den Orchestrator gesendet werden können .
Hinweis:Als Analyst ist es wichtig, die Anzahl der Objekte zu begrenzen, die ein Geschäftsanwender basierend auf dem spezifischen Anwendungsfall an den Orchestrator senden kann. Standardmäßig erlaubt das System das Senden von 50 Objekten an die Warteschlange, der Bereich kann jedoch von 1 bis 1000 angepasst werden, was Flexibilität für verschiedene Szenarien bietet.
-
Wählen Sie den Typ des Triggers für die Automatisierung im Listenfeld Trigger aus.
- Wenn Sie einen automatischen Trigger für eine Automatisierung konfigurieren möchten, fügen Sie die Felder hinzu und wählen Sie die Feldwerte aus, um eine oder mehrere Triggerbedingungen zu definieren.
Hinweis:
Für Triggerbedingungen können nur Felder vom Typ
nominalverwendet werden.
- Wenn Sie einen automatischen Trigger für eine Automatisierung konfigurieren möchten, fügen Sie die Felder hinzu und wählen Sie die Feldwerte aus, um eine oder mehrere Triggerbedingungen zu definieren.
Ein Fall, der bei der Auswertung des Filters eine Bedingung erfüllt, wird an den Orchestrator gesendet.
Jede Trigger-Bedingung wird separat ausgewertet. Fall 001 hat z. B. die Tags A und B. Wenn Sie die Trigger-Bedingungen sowohl für A als auch für B festgelegt haben, wird dieser Fall zweimal an den Orchestrator gesendet (einer basierend auf Bedingung A und einer basierend auf Bedingung B).
- Wählen Sie Speichern aus.
Editing an automation
Führen Sie diese Schritte aus, um eine Automatisierung zu bearbeiten.
- Suchen Sie im Automatisierungsmanager die Automatisierung, die Sie in der Liste der Automatisierungen bearbeiten möchten, und wählen Sie sie aus
 .
. - Ändern Sie die Einstellungen wie gewünscht.
- Wählen Sie Speichern aus.
Refreshing the queue
Wenn Änderungen an der Orchestrator- Warteschlange vorgenommen werden, müssen Sie die Warteschlange in Process Mining aktualisieren . Zum Beispiel, wenn sich das JSON-Schema für spezifische Daten geändert hat oder wenn der Name oder die Beschreibung der Warteschlange im Orchestrator bearbeitet wurde . Um die Warteschlange in Process Mining zu aktualisieren, bearbeiten Sie die Automatisierung im Automatisierungsmanager.
Führen Sie diese Schritte aus, um die Warteschlange für eine Automatisierung zu aktualisieren.
- Suchen Sie die Automatisierung, für die Sie die Warteschlange aktualisieren möchten, und wählen Sie sie aus .
- Wählen Sie oben im Eigenschaftenbereich die Taste Aktualisieren .
- Wählen Sie Speichern aus.
Removing an automation
Führen Sie diese Schritte aus, um eine Automatisierung zu entfernen.
- Suchen Sie die Automatisierung, die Sie aus der Automatisierungsliste entfernen möchten, und wählen Sie sie aus
 .
.
Die Automatisierung wird aus der Liste der Automatisierungen entfernt.