- Overview
- UI Automation
- About the UI Automation activity package
- Applications and technologies automated with UI Automation
- Project compatibility
- UI-ANA-016 - Pull Open Browser URL
- UI-ANA-017 - ContinueOnError True
- UI-ANA-018 - List OCR/Image Activities
- UI-DBP-006 - Container Usage
- UI-DBP-013 - Excel Automation Misuse
- UI-DBP-030 - Forbidden Variables Usage In Selectors
- UI-DBP-031 - Activity verification
- UI-PRR-001 - Simulate Click
- UI-PRR-002 - Simulate Type
- UI-PRR-003 - Open Application Misuse
- UI-PRR-004 - Hardcoded Delays
- UI-REL-001 - Large Idx in Selectors
- UI-SEC-004 - Selector Email Data
- UI-SEC-010 - App/Url Restrictions
- UI-USG-011 - Non Allowed Attributes
- UX-SEC-010 - App/Url Restrictions
- UX-DBP-029 - Insecure Password Use
- UI-PST-001 - Audit Log Level in Project Settings
- UiPath Browser Migration Tool
- Clipping region
- Computer Vision Recorder
- Activities index
- Activate
- Anchor Base
- Attach Browser
- Attach Window
- Block User Input
- Callout
- Check
- Click
- Click Image
- Click Image Trigger
- Click OCR Text
- Click Text
- Click Trigger
- Close Application
- Close Tab
- Close Window
- Context Aware Anchor
- Copy Selected Text
- Element Attribute Change Trigger
- Element Exists
- Element Scope
- Element State Change Trigger
- Export UI Tree
- Extract Structured Data
- Find Children
- Find Element
- Find Image
- Find Image Matches
- Find OCR Text Position
- Find Relative Element
- Find Text Position
- Get Active Window
- Get Ancestor
- Get Attribute
- Get Event Info
- Get From Clipboard
- Get Full Text
- Get OCR Text
- Get Password
- Get Position
- Get Source Element
- Get Text
- Get Visible Text
- Go Back
- Go Forward
- Go Home
- Google Cloud Vision OCR
- Hide Window
- Highlight
- Hotkey Trigger
- Hover
- Hover Image
- Hover OCR Text
- Hover Text
- Image Exists
- Indicate On Screen
- Inject .NET Code
- Inject Js Script
- Invoke ActiveX Method
- Key Press Trigger
- Load Image
- Maximize Window
- Microsoft Azure Computer Vision OCR
- Microsoft OCR
- Microsoft Project Oxford Online OCR
- Minimize Window
- Monitor Events
- Mouse Trigger
- Move Window
- Navigate To
- OCR Text Exists
- On Element Appear
- On Element Vanish
- On Image Appear
- On Image Vanish
- Open Application
- Open Browser
- Refresh Browser
- Replay User Event
- Restore Window
- Save Image
- Select Item
- Select Multiple Items
- Send Hotkey
- Set Clipping Region
- Set Focus
- Set Text
- Set To Clipboard
- Set Web Attribute
- Show Window
- Start Process
- System Trigger
- Take Screenshot
- Tesseract OCR
- Text Exists
- Tooltip
- Type Into
- Type Secure Text
- Use Foreground
- Wait Attribute
- Wait Element Vanish
- Wait Image Vanish
- Accessibility Check
- Application Event Trigger
- Block User Input
- Check/Uncheck
- Check App State
- Check Element
- Click
- Click Event Trigger
- Drag and Drop
- Extract Table Data
- Find Elements
- For Each UI Element
- Get Browser Data
- Get Clipboard
- Get Text
- Get URL
- Go to URL
- Highlight
- Hover
- Inject Js Script
- Keyboard Shortcuts
- Keypress Event Trigger
- Mouse Scroll
- Navigate Browser
- Select Item
- Set Browser Data
- Set Clipboard
- Set Runtime Browser
- Set Focus
- Set Text
- Take Screenshot
- Type Into
- Unblock User Input
- Use Application/Browser
- Window Operation
- Perform browser search and retrieve results using UI Automation APIs
- Web Browsing
- Find Images
- Click Images
- Trigger and Monitor Events
- Create and Override Files
- HTML Pages: Extract and Manipulate Information
- Window Manipulation
- Automated List Selection
- Find and Manipulate Window Elements
- Manage Text Automation
- Load and Process Images
- Manage Mouse Activated Actions
- Automate Application Runtime
- Automated Run of a Local Application
- Browser Navigation
- Web Automation
- Trigger Scope Example
- Enable UI Automation support in DevExpress
- Computer Vision Local Server
- Mobile Automation
- Release notes
- About the mobile device automation architecture
- Project compatibility
- Get Log Types
- Get Logs
- Get Page Source
- Get Device Orientation
- Get Session Identifier
- Install App
- Manage Current App
- Manage Other App
- Open DeepLink
- Open URL
- Mobile Device Connection
- Directional Swipe
- Draw Pattern
- Positional Swipe
- Press Hardware Button
- Set Device Orientation
- Take Screenshot
- Take Screenshot Part
- Element Exists
- Execute Command
- Get Attribute
- Get Selected Item
- Get Text
- Set Selected Item
- Set Text
- Swipe
- Tap
- Type Text
- Terminal
- Release notes
- About the Terminal activity package
- Project compatibility
- Best practices
- Find Text
- Get Color at Position
- Get Cursor Position
- Get Field
- Get Field at Position
- Get Screen Area
- Get Text
- Get Text at Position
- Move Cursor
- Move Cursor to Text
- Send Control Key
- Send Keys
- Send Keys Secure
- Set Field
- Set Field at Position
- Terminal Session
- Wait Field Text
- Wait Screen Ready
- Wait Screen Text
- Wait Text at Position

UI Automation activities
Selection Helper
The UI Automation activities enable you to work with UI elements by simulating human interaction. To do this, you can identify UI elements by indicating them on your screen. Usually, a pair of elements are indicated for this purpose: a target and an anchor. This pair is known as a descriptor.
When indicating, the Selection Helper is used to help you perform more advanced tasks, such as pausing the execution, changing the framework that is being used for UI elements detection, selecting an anchor, or editing the selector you are using, to name a few.
For more information, check out the Using the selection screen video.
Indicating an element
To indicate an UI element, you must first drag and drop an Use Application/Browser activity into the Workflow Designer in Studio and then indicate the application or the browser you want to automate.
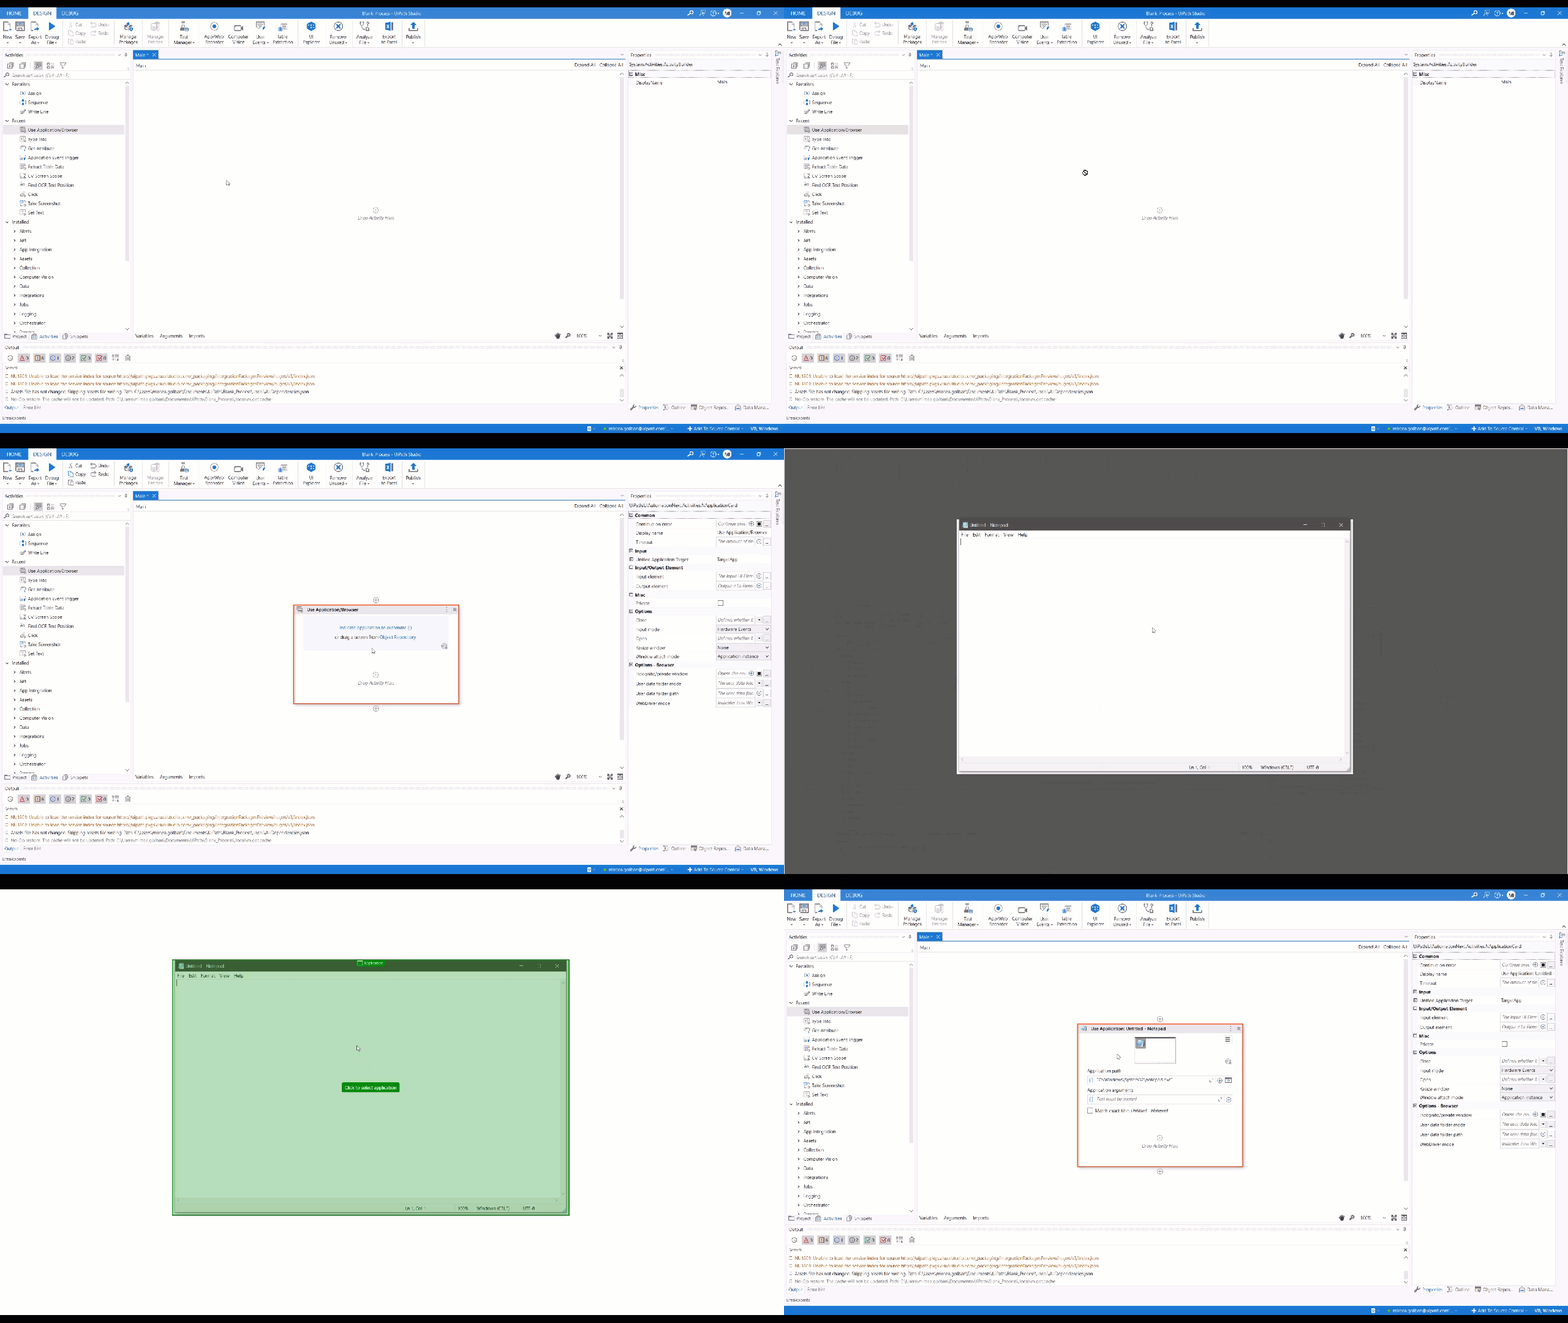
Once the application or the browser is indicated, you can drag any Modern UI Automation activity inside the Use Application/Browser activity and choose Indicate application to automate from the application card to select an application or a browser.
Next, click the UI element you want to interact with. The element is highlighted green.
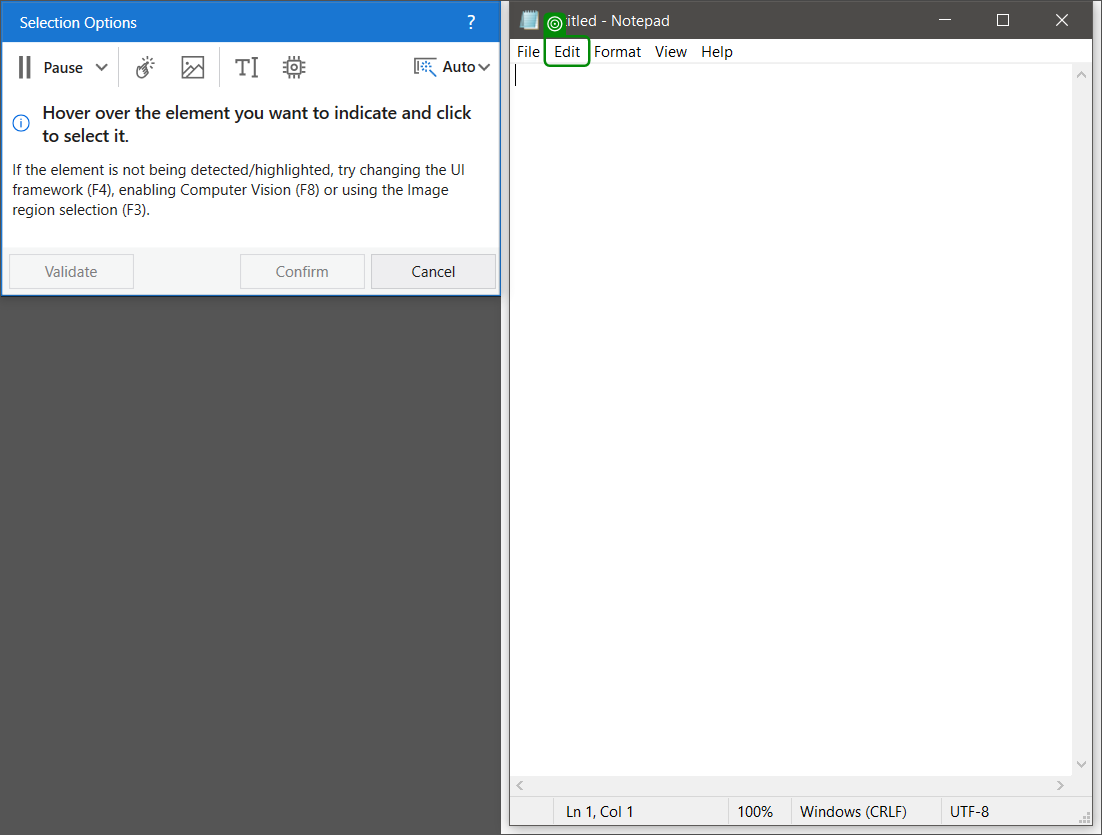
Selection Options helper
In this stage of the Selection Options helper, you can use certain functionalities, as follows:
-
Pause selection - You can pause the configuration for a specified amount of time or pause the configuration with no timeout and resume it when you want. From the drop-down menu you can choose one of these options:
- 1 second
- 3 seconds
- 5 seconds - This is the default value.
- 7 seconds
- 9 seconds
- No time limit - The configuration is paused until Resume is selected.This option stops the indicate process and enables you to interact with your machine any way you want, being especially useful if the application is minimized, out of view, or other reasons like bringing the application in the correct state. You can use
F2as a hotkey.
Note:You can scroll in applications that are scrollable without having to pause the Selection Screen.
-
Hoverable items selection - You can indicate items that are only visible when hovering over them. You can use
F6as a hotkey. -
Image region selection - You can switch from indicating direclty the element you want to use to selecting a freeform area that contains the target element and which is later processed via image recognition. You can also drag a selection on the screen to indicate an area that you want to use as your target. Doing this disables the Strict selector and Fuzzy selector search methods. You can use
F3as a hotkey. -
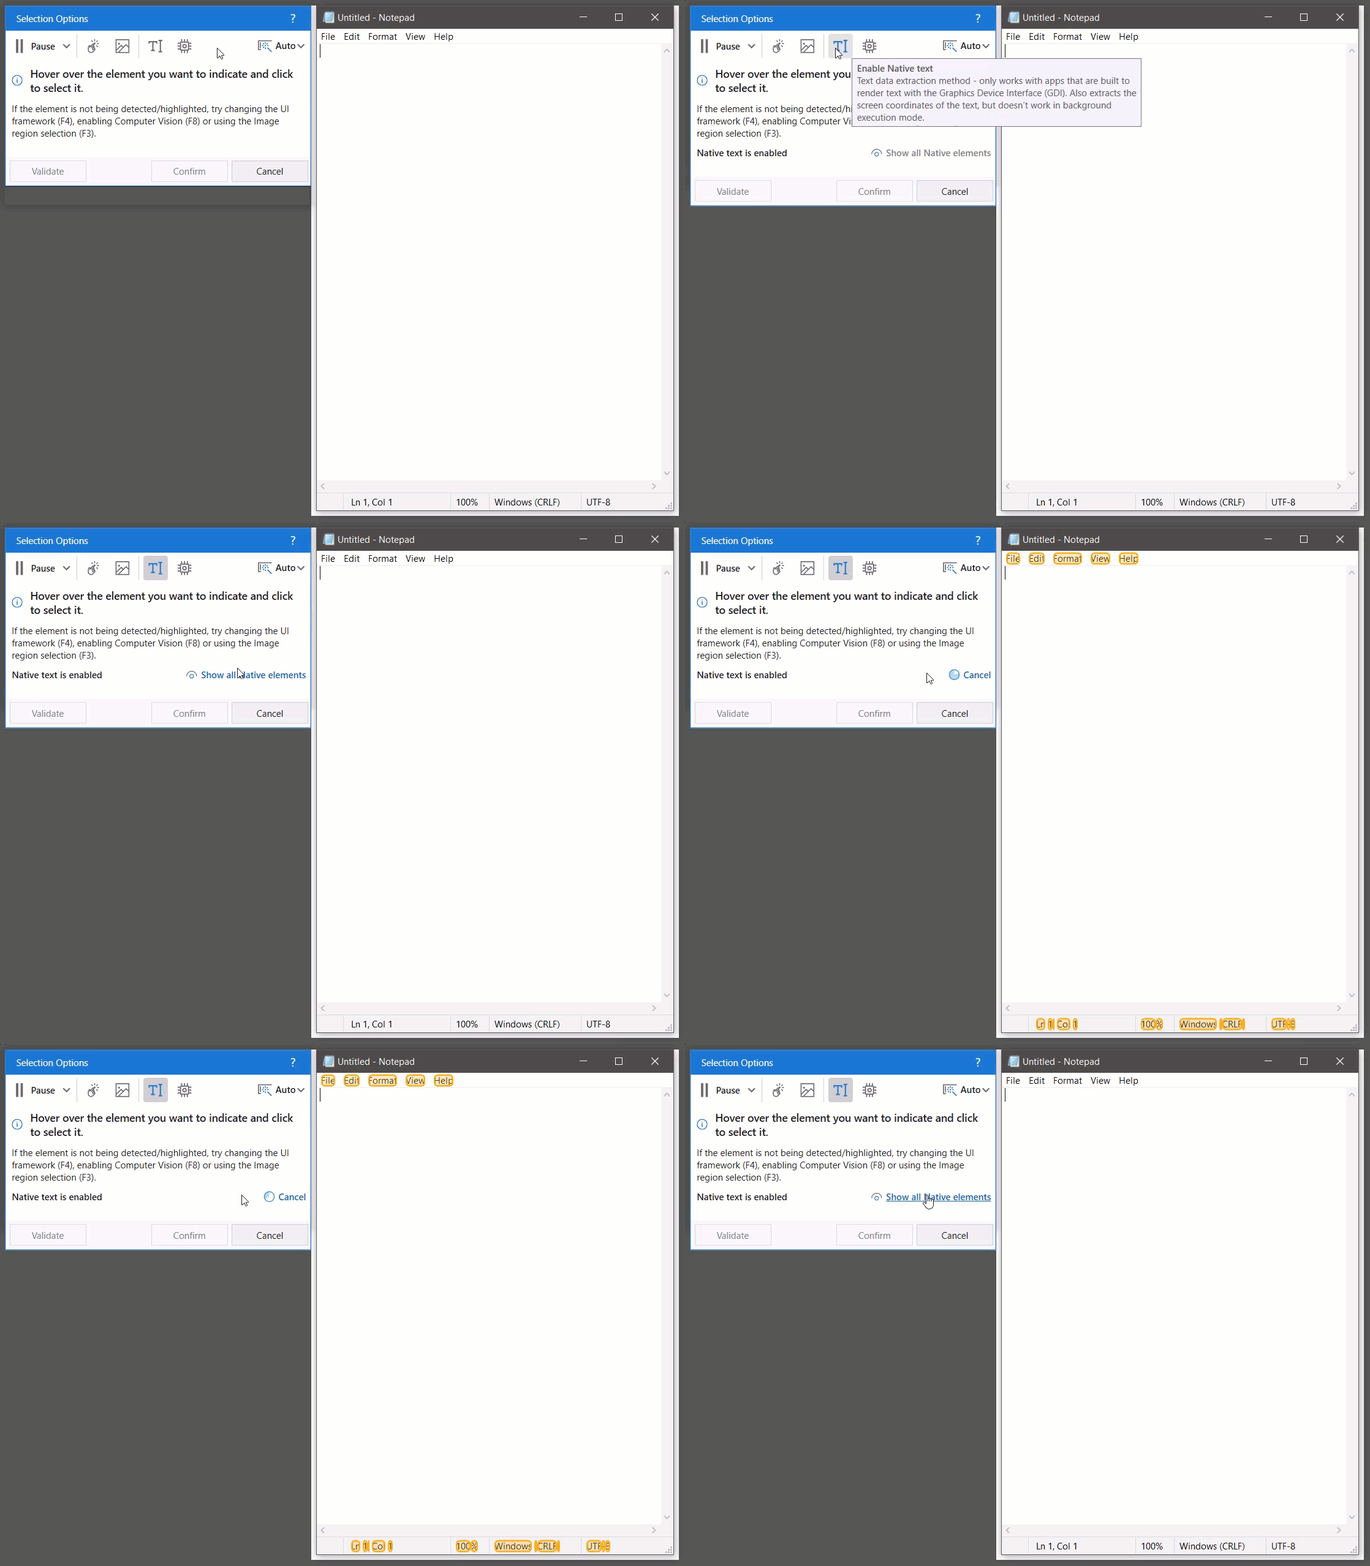
Enable Native text - You can identify all the text labels on the target application that can be viewed through the Native method. By clicking the Show all Native elements button, the text labels are highlighted in the target application.
-
Enable Computer Vision - You can enable Computer Vision to automate certain areas or elements especially when selectors are not available, for instance when automating on a remote desktop. You can use
F8as a hotkey. By clicking the Show all CV elements button, all the elements found by Computer Vision are highlighted in the target application.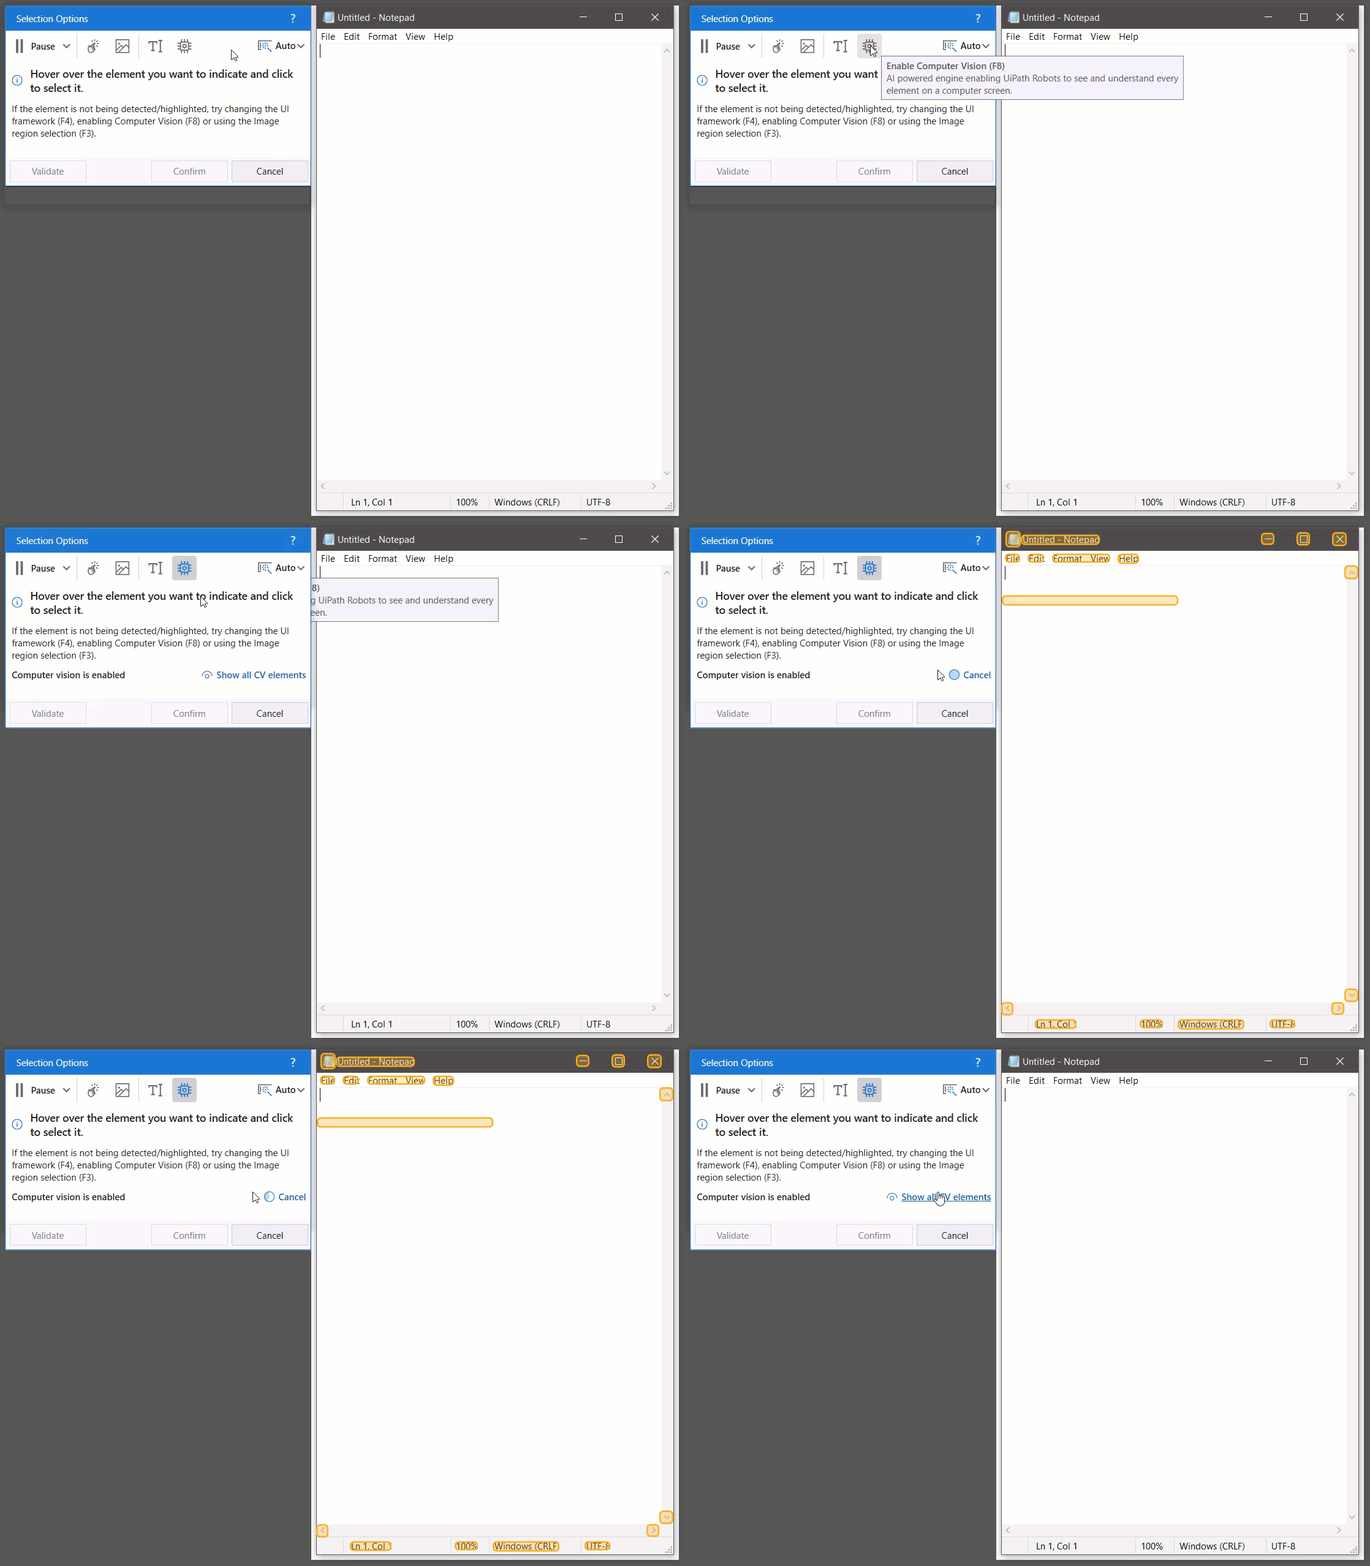
-
Change UI framework - You can change the technology used to determine the UI elements and their selectors. You can use either the drop-down menu or the
F4hotkey. The available framework types for Windows projects are:- Auto - Automatically chooses the framework that is considered to be the most suitable for the indicated element. This option is selected by default. Usually work fine with all types of user interfaces.
- Active Accessibility - Uses the Active Accessibility framework, which is Windows specific. It is recommended to use this option with legacy software, when the default option does not work.
- UI Automation - Uses the proprietary UiPath framework. It is recommended to use this option with newer applications, when the default option does not work.The UI frameworks available for macOS are:
- Default - Automatically choses the most suitable framework for the indicated element, prioritizing in this order: Sap, Java, Ax.
- Java - Prioritizes technologies like this Java, Ax.
-
default one that prioritizes in this order: Sap, Java, Ax. And we have a Java one that prioritizes technologies like this Java, Ax.
-
Validate - Validate the selection you have made. More details in the Validating the descriptor chapter below.
-
Confirm - Confirm the changes and close the selection wizard.
-
Cancel - Discard all changes and close the selection wizard.
Once a target is selected, this opens the next stage of the Selection Options window, which enables you to further configure the descriptor for the indicated element, by adding an anchor and configuring more advanced settings.
When using StudioX, the Settings in this screen are not displayed by default. To edit them, you must use the  button while hovering over the target or anchor.
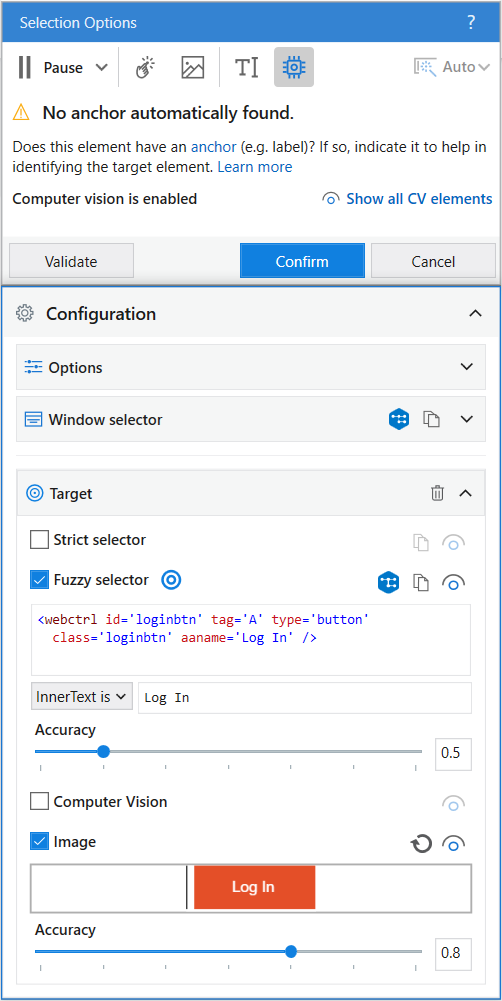
Once you have finished configuring the Selection Options, to return to UiPath Studio and keep all the changes you have made, you can select Confirm, press Enter, or select the blue check mark in the hover menu.
The entire process looks like this:
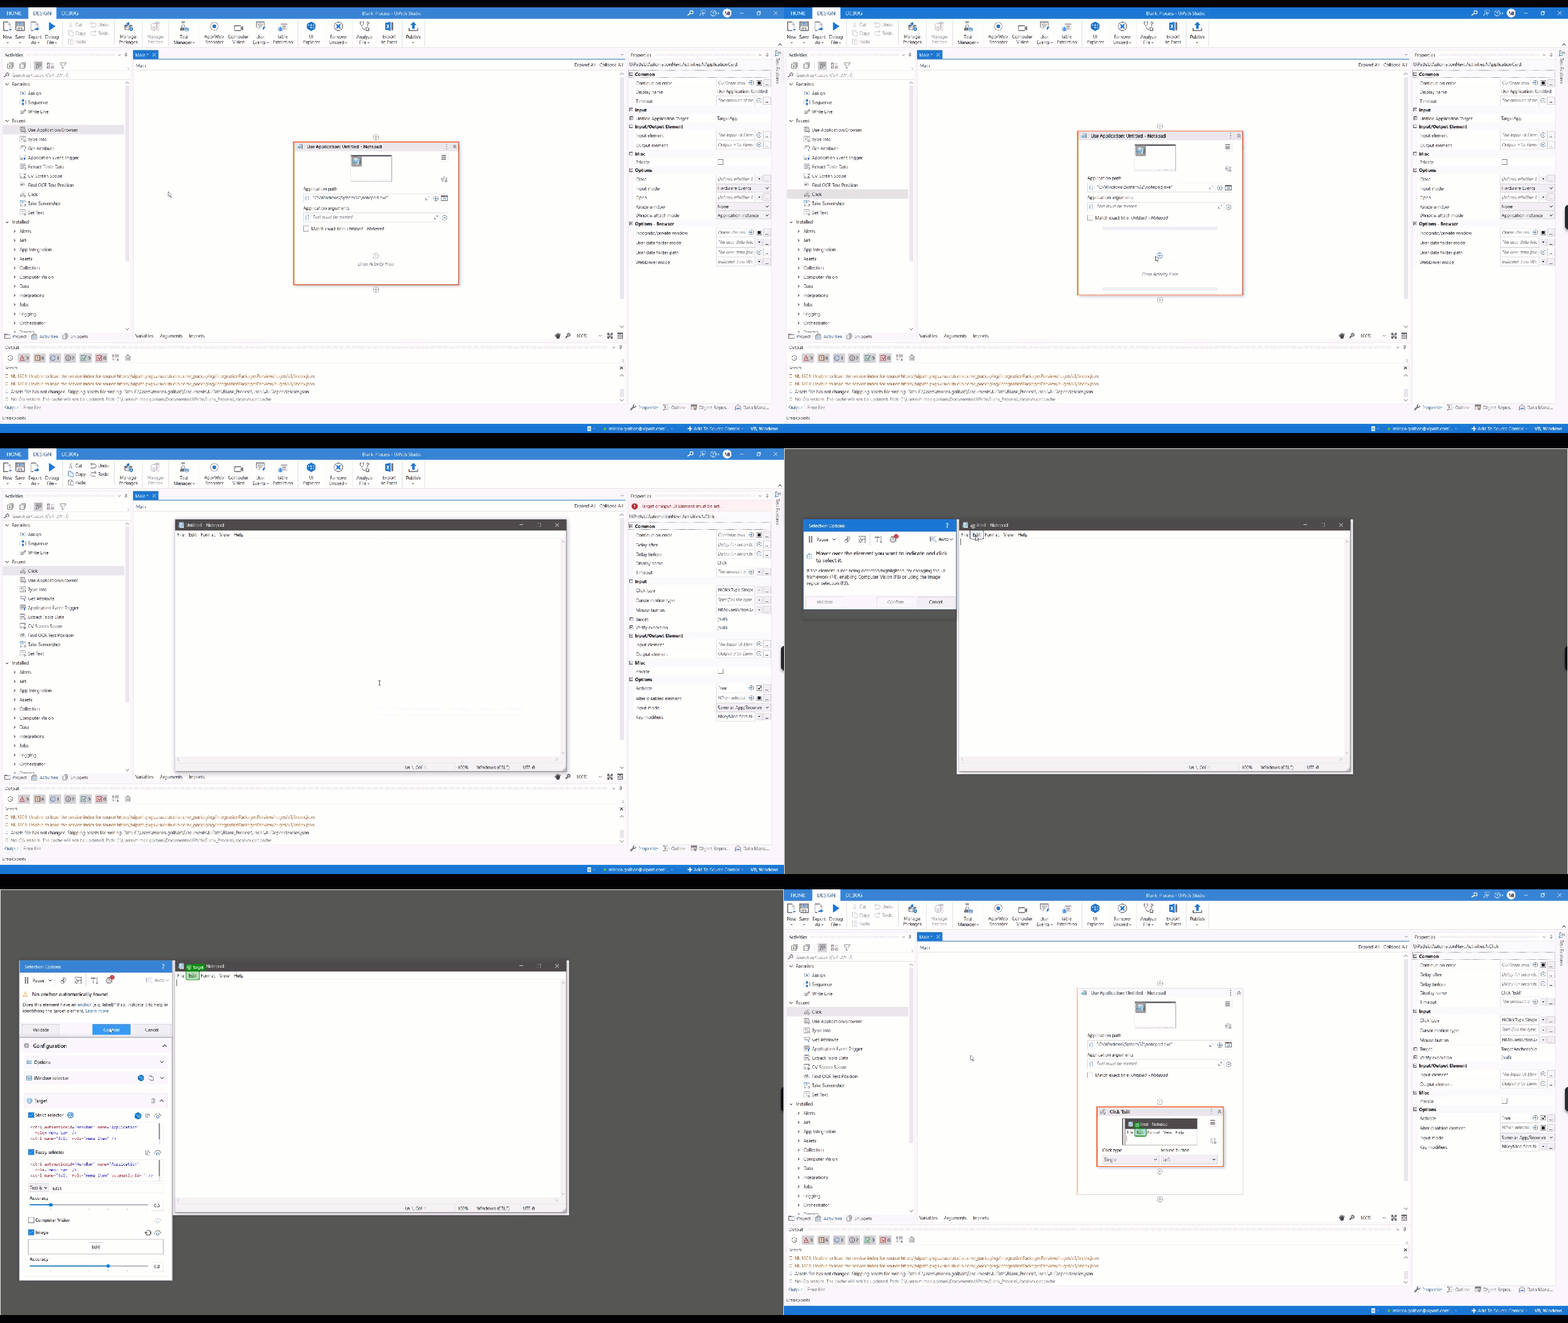
You can read more about the advanced features of the Selection Screen in the Advanced descriptor configuration page.
Known limitations
In Studio Web, the Selection Helper cannot be displayed on browser pages without body.
When attempting to indicate a UI element on a browser page that uses a <frameset> instead of <body>, the UI Automation Selection Helper does not launch.
As the <frameset> element is deprecated in modern HTML standards, it is not supported by Studio Web.
Example: On the website https://www.1link.co.uk, the Selection Helper does not open when automating from Studio Web.

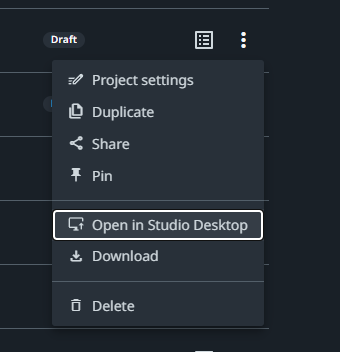
Workaround: Open the project in Studio Desktop and perform the automation from there instead.
