- Overview
- UI Automation
- About the UI Automation activity package
- Applications and technologies automated with UI Automation
- Project compatibility
- UI-ANA-016 - Pull Open Browser URL
- UI-ANA-017 - ContinueOnError True
- UI-ANA-018 - List OCR/Image Activities
- UI-DBP-006 - Container Usage
- UI-DBP-013 - Excel Automation Misuse
- UI-DBP-030 - Forbidden Variables Usage In Selectors
- UI-DBP-031 - Activity verification
- UI-PRR-001 - Simulate Click
- UI-PRR-002 - Simulate Type
- UI-PRR-003 - Open Application Misuse
- UI-PRR-004 - Hardcoded Delays
- UI-REL-001 - Large Idx in Selectors
- UI-SEC-004 - Selector Email Data
- UI-SEC-010 - App/Url Restrictions
- UI-USG-011 - Non Allowed Attributes
- UX-SEC-010 - App/Url Restrictions
- UX-DBP-029 - Insecure Password Use
- UI-PST-001 - Audit Log Level in Project Settings
- UiPath Browser Migration Tool
- Clipping region
- Computer Vision Recorder
- Activities index
- Activate
- Anchor Base
- Attach Browser
- Attach Window
- Block User Input
- Callout
- Check
- Click
- Click Image
- Click Image Trigger
- Click OCR Text
- Click Text
- Click Trigger
- Close Application
- Close Tab
- Close Window
- Context Aware Anchor
- Copy Selected Text
- Element Attribute Change Trigger
- Element Exists
- Element Scope
- Element State Change Trigger
- Export UI Tree
- Extract Structured Data
- Find Children
- Find Element
- Find Image
- Find Image Matches
- Find OCR Text Position
- Find Relative Element
- Find Text Position
- Get Active Window
- Get Ancestor
- Get Attribute
- Get Event Info
- Get From Clipboard
- Get Full Text
- Get OCR Text
- Get Password
- Get Position
- Get Source Element
- Get Text
- Get Visible Text
- Go Back
- Go Forward
- Go Home
- Google Cloud Vision OCR
- Hide Window
- Highlight
- Hotkey Trigger
- Hover
- Hover Image
- Hover OCR Text
- Hover Text
- Image Exists
- Indicate On Screen
- Inject .NET Code
- Inject Js Script
- Invoke ActiveX Method
- Key Press Trigger
- Load Image
- Maximize Window
- Microsoft Azure Computer Vision OCR
- Microsoft OCR
- Microsoft Project Oxford Online OCR
- Minimize Window
- Monitor Events
- Mouse Trigger
- Move Window
- Navigate To
- OCR Text Exists
- On Element Appear
- On Element Vanish
- On Image Appear
- On Image Vanish
- Open Application
- Open Browser
- Refresh Browser
- Replay User Event
- Restore Window
- Save Image
- Select Item
- Select Multiple Items
- Send Hotkey
- Set Clipping Region
- Set Focus
- Set Text
- Set To Clipboard
- Set Web Attribute
- Show Window
- Start Process
- System Trigger
- Take Screenshot
- Tesseract OCR
- Text Exists
- Tooltip
- Type Into
- Type Secure Text
- Use Foreground
- Wait Attribute
- Wait Element Vanish
- Wait Image Vanish
- Application Event Trigger
- Block User Input
- Check/Uncheck
- Check App State
- Check Element
- Click
- Click Event Trigger
- Drag and Drop
- Extract Table Data
- Find Elements
- For Each UI Element
- Get Browser Data
- Get Clipboard
- Get Text
- Get URL
- Go to URL
- Highlight
- Hover
- Inject Js Script
- Keyboard Shortcuts
- Keypress Event Trigger
- Mouse Scroll
- Navigate Browser
- Select Item
- Set Browser Data
- Set Clipboard
- Set Runtime Browser
- Set Focus
- Set Text
- Take Screenshot
- Type Into
- Unblock User Input
- Use Application/Browser
- Window Operation
- Perform browser search and retrieve results using UI Automation APIs
- Web Browsing
- Find Images
- Click Images
- Trigger and Monitor Events
- Create and Override Files
- HTML Pages: Extract and Manipulate Information
- Window Manipulation
- Automated List Selection
- Find and Manipulate Window Elements
- Manage Text Automation
- Load and Process Images
- Manage Mouse Activated Actions
- Automate Application Runtime
- Automated Run of a Local Application
- Browser Navigation
- Web Automation
- Trigger Scope Example
- Enable UI Automation support in DevExpress
- Computer Vision Local Server
- Mobile Automation
- Release notes
- About the mobile device automation architecture
- Project compatibility
- Get Log Types
- Get Logs
- Get Page Source
- Get Device Orientation
- Get Session Identifier
- Install App
- Manage Current App
- Manage Other App
- Open DeepLink
- Open URL
- Mobile Device Connection
- Directional Swipe
- Draw Pattern
- Positional Swipe
- Press Hardware Button
- Set Device Orientation
- Take Screenshot
- Take Screenshot Part
- Element Exists
- Execute Command
- Get Attribute
- Get Selected Item
- Get Text
- Set Selected Item
- Set Text
- Swipe
- Tap
- Type Text
- Terminal
- Release notes
- About the Terminal activity package
- Project compatibility
- Best practices
- Find Text
- Get Color at Position
- Get Cursor Position
- Get Field
- Get Field at Position
- Get Screen Area
- Get Text
- Get Text at Position
- Move Cursor
- Move Cursor to Text
- Send Control Key
- Send Keys
- Send Keys Secure
- Set Field
- Set Field at Position
- Terminal Session
- Wait Field Text
- Wait Screen Ready
- Wait Screen Text
- Wait Text at Position

UI Automation activities
Trigger Scope Example
To better understand the importance of the Element State Change Trigger and Element Attribute Change Trigger activities, we have created a sample automation project which monitors the URL attribute of a web browser and, when changed, moves the automation in a Picture-in-Picture session, monitoring user click actions and saving the UI element as a variable.
In this regard, we need to use the Trigger Scope activity two times: once, to monitor the appearance and element change of the page we navigate on, and second, to monitor the click actions on the page.

Since the first triggers only need to be activated once, we need to set the SchedulingMode property of the Trigger Scope activity to OneTime.
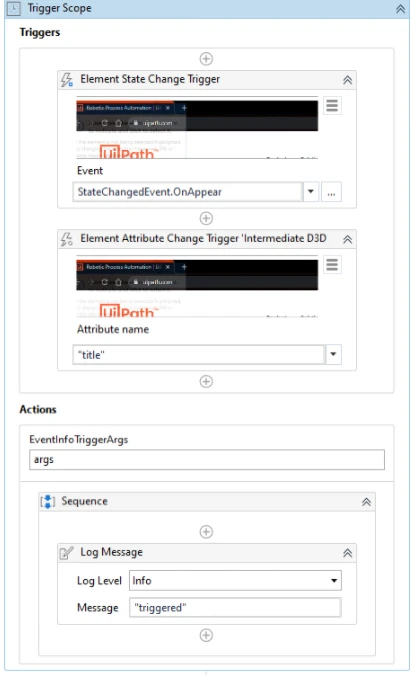
First, we need to know when the web page of interest shows up on screen. In this regard, we use the Element State Change Trigger activity, with the following configuration:
The Event property set to OnAppear
The Selector configured to target the particular web page. In our case, it would look something like this:
<wnd app='chrome.exe' title='Robotic Process Automation | UiPath - Google Chrome' />
<wnd app='chrome.exe' title='Robotic Process Automation | UiPath - Google Chrome' />
Next, we use the Element Attribute Change Trigger to know when the page is changed. We do this by monitoring the Title attribute. This means the activity properties need to be configured as follows:
The AttributeName property needs to be set to ”title” (between quotes), because this is the attribute we want to monitor.
The Selector configured, in our case, as follows:
<wnd app='chrome.exe' title='Robotic Process Automation | UiPath - Google Chrome' />
<wnd cls='Intermediate D3D Window' />
<wnd app='chrome.exe' title='Robotic Process Automation | UiPath - Google Chrome' />
<wnd cls='Intermediate D3D Window' />
Optionally, we can add a Log Message activity in the Actions section to log the previously configured triggers.
As soon as these triggers are activated, automation goes into Picture-in-Picture mode. Note that the Picture-in-Picture option from the Debug tab in Studio needs to be enabled.

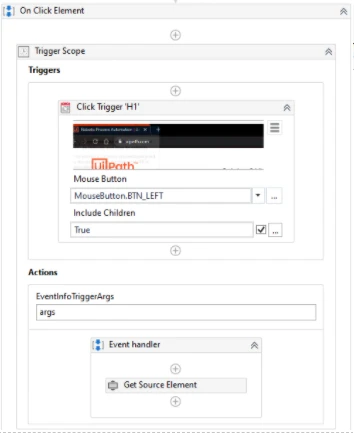
Once these triggers are activated, we need to monitor the click actions on the page and save the target UI element as a UIElement variable. As such, we need to use a second Trigger Scope activity in a new Sequence, which only monitors and responds to click actions.

In the Triggers section of the Trigger Scope, we need to add a Click Trigger activity to monitor the corresponding action, with the following properties:
The MouseButton property set to MouseButton.BTN_LEFT. This monitors the left mouse button clicks.
The TriggerMode property set to TriggerDown. This means the trigger is activated when the left mouse button is pressed (not released).
Lastly, we need to save the UI element on which the click action is performed. In this regard, we add the Get Source Element activity inside the Actions section of the Trigger Scope, with the following properties configured:
The EventInfo property set to args.EventInfo. This means that the trigger arguments are used.
The UiElement property set to an alphanumerical value (not between quotes). This saves the element on which the click action is performed as a UiElement variable.
Run the workflow. The automation tracks the URL attribute of a web browser and, when changed, moves the automation in a Picture-in-Picture session, watching user click actions and saving the UI element as a variable.