- Avant de commencer
- Gestion de l’accès
- Démarrage
- Intégrations
- Travailler avec des applications de processus
- Travailler avec des tableaux de bord et des graphiques
- Travailler avec des graphiques de processus
- Travailler avec des modèles de processus Découvrir et importer des modèles BPMN
- Afficher ou masquer le menu
- Informations contextuelles
- Exporter (Export)
- Filtres
- Envoi d’idées d’automatisation au Automation Hub d’UiPath®
- Balises
- Dates d’échéance
- Comparer
- Vérification de la conformité
- Simulation de processus
- Analyse des causes profondes (Aperçu)
- Simulation du potentiel d’automatisation
- Démarrage d'un projet Task Mining à partir de Process Mining
- Déclenchement d'une automatisation à partir d'une application de processus
- Afficher les données de processus
- Informations sur le processus (aperçu)
- Création d'applications
- Modèles d'applications
- Création d'une nouvelle application
- Sélectionner le modèle d'application
- Définir les propriétés de l'application
- Sélectionner la source de données
- Mappage des tables d'entrée
- Mappage des champs d'entrée
- Sélection du processus automatisé
- Configuration des automatisations
- Finaliser la création de l'application
- Clonage d'une application
- Exportation et importation d'applications de processus
- Modification des tableaux de bord
- Gérer les autorisations des applications
- Suppression d'une application
- Chargement des données
- Transforming data
- Autopilot™ pour SQL
- Structure des transformations
- Conseils pour l'écriture de SQL
- Exportation et importation de transformations
- Afficher les journaux d'exécution des données
- Fusion des journaux d'événements
- Configuration des balises
- Configuration des dates d'échéance
- Configuration des champs pour le potentiel d'automatisation
- Configuration des activités : Définition de l'ordre des activités
- Rendre les transformations disponibles dans les tableaux de bord
- Modèles de données
- Ajouter et modifier des processus
- Personnaliser les tableaux de bord
- Publier les applications de processus
- Modèles d'applications
- Notifications
- Ressources supplémentaires

Guide de l'utilisateur de Process Mining
Gestionnaire de l’automatisation
Introduction
Le gestionnaire d'automatisation vous permet de gérer les automatisations connectées à Process Mining. Avec le gestionnaire d'automatisation, vous pouvez sélectionner les files d'attente Orchestrator à utiliser pour les automatisations déclenchées par les utilisateurs professionnels à partir de l'application de processus.
Le gestionnaire d'automatisation est intégré à l'éditeur de tableau de bord. Reportez-vous à la sectionTravailler avec l'éditeur de tableau de bord pour plus de détails.
Publiez votre application de processus après avoir ajouté ou modifié une automatisation pour mettre l'automatisation à la disposition des utilisateurs professionnels. Reportez-vous à la section Publier des applications de processus. Assurez-vous également que les utilisateurs professionnels disposent des droits d'accès appropriés dans Orchestrator pour accéder à la file d'attente. Reportez-vous à la section Rôles par défaut pour plus de détails.
Automatisations déclenchées manuellement et automatisations déclenchées automatiquement
Il existe deux différents types d'automatisations qui peuvent être déclenchés à partir d'une application de processus.
- Les automatisations déclenchées manuellement sont lancées par les utilisateurs professionnels à partir des tableaux de bord de l'application de processus.
- Les automatisations déclenchées automatiquement sont lancées lorsque des conditions prédéfinies, déterminées par les balises, sont remplies lors de l'exécution des données pour l'application de processus.
Remarque :
Les déclencheurs manuels peuvent être effectués depuis l'application de développement ou l'application publiée. Les déclencheurs automatiques ne sont appliqués que lors du chargement de données sur une application publiée.
Automatisations déclenchées manuellement
Lorsque vous sélectionnez le type de déclencheur Manuel pour l'automatisation, les utilisateurs professionnels peuvent déclencher l'automatisation à partir de l'application de processus publiée. L'option Déclencher une automatisation est disponible sur la plupart des tableaux de bord et des graphiques. L'illustration suivante vous en fournit un exemple.

Lorsque l'utilisateur a sélectionné des objets candidats à l'automatisation, l'option Déclencher une automatisation peut être sélectionnée pour saisir les données d'entrée de l'automatisation. L'illustration suivante montre un exemple.
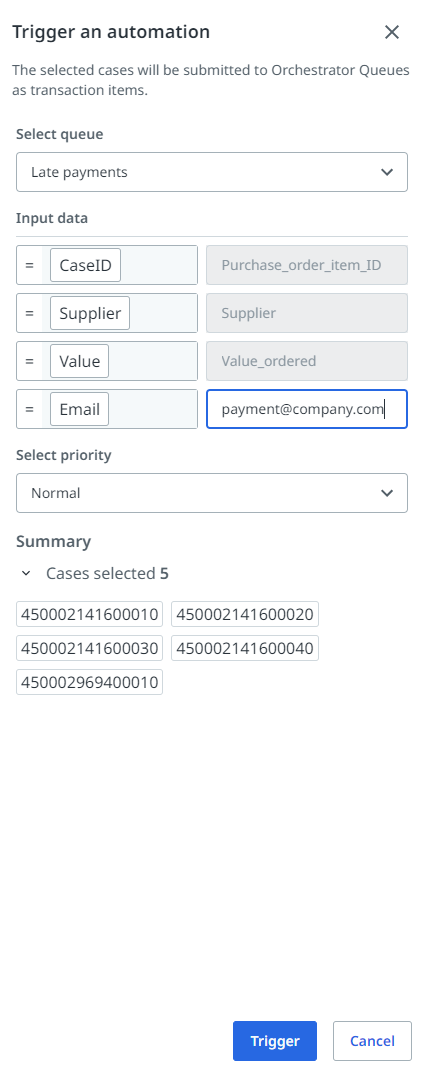
Pour chaque cas sélectionné, un élément de file d'attente est créé dans la file d'attente Orchestrator qui déclenchera l'automatisation définie dans Studio.
Consultez la section Déclenchement d'une automatisation à partir d'une application de processus pour savoir comment déclencher une automatisation à partir d'une application de processus publiée.
Automatisations déclenchées automatiquement
Les déclencheurs automatisés peuvent déclencher des automatisations lorsque des événements spécifiques se produisent dans le processus. Cela permet une attention immédiate à un cas pour une efficacité améliorée et des workflows simplifiés.
Lorsque vous sélectionnez le type de déclencheur automatique pour l'automatisation, l'automatisation est déclenchée automatiquement lorsque les conditions de déclencheur sont remplies. Les conditions du déclencheur sont déterminées par les balises qui sont évaluées tout temps que les données de l'application de processus sont chargées. Chaque cas qui remplit les conditions crée un élément de file d'attente dans la file d'attente Orchestrator, qui lance l'automatisation définie dans Studio.
Ouvrir Automation Manager
Sélectionnez le menu dans la barre d'en-tête de l'éditeur de tableau de bord et sélectionnez Automatisations dans le menu déroulant. La page Gestionnaire de l'automatisation s'affiche, et affiche les automatisations définies pour votre application de processus.
Sélectionnez le menu dans la barre d'en-tête et sélectionnez Tableaux de bord pour revenir à l'éditeur de tableau de bord.
Construire une automatisation
Vous pouvez commencer à créer une automatisation dans Studio directement depuis le Gestionnaire d'automatisation.
- Dans Process Mining, ouvrez l'application de processus pour laquelle vous souhaitez activer l'intégration de l'automatisation dans l ' éditeur de tableau de bord. Reportez-vous à la section Travailler avec l'éditeur de tableau de bord pour plus de détails.
- Dans l ' éditeur de tableau de bord, sélectionnez l'option Gestionnaire d'automatisation pour ouvrir le gestionnaire d'automatisation.
- Sélectionnez Créer une automatisation pour ouvrir Studio. Reportez-vous au Gestionnaire de l'automatisation pour plus de détails.
Ajouter une automatisation
Suivez ces étapes pour ajouter une automatisation à votre application de processus :
-
Dans le Gestionnaire d'automatisations, sélectionnez + Connecter l'automatisation. La page Ajouter une file d'attente s'ouvre, affichant toutes les files d'attente Orchestrator qui ont un Schéma JSON de données spécifiques. Reportez-vous àla section Configuration de l'intégration d'Automatisation.
-
Sélectionnez la file d’attente que vous souhaitez utiliser pour l’automatisation. Les champs d'entrée requis pour la file d'attente s'affichent dans le panneau Propriétés .
-
Si plusieurs objets sont disponibles pour votre application de processus, sélectionnez l'objet applicable dans la liste déroulante Objet .
-
Sélectionnez le type de déclencheur de l'automatisation dans la zone de liste Déclencheur .
-
Mappez les champs d'entrée de la file d'attente aux champs de données appropriés de votre application de processus. Au lieu d'effectuer un mappage vers un champ de données spécifique, vous pouvez sélectionner l'option Entrée de l'utilisateur Occupé pour un champ de saisie de texte. Cela permet aux utilisateurs professionnels de saisir un texte libre lors du déclenchement d'une automatisation.
Remarque :L'option Entrée de l'utilisateur professionnel s'applique uniquement aux déclencheurs manuels .
 Important :
Vérifiez le type de données des champs d'entrée de la file d'attente définis dans le Schéma JSON de données spécifiques et assurez-vous de mapper les champs d'entrée à un champ de données Process Mining avec le type d'entrée correct. Consultez Modèles d'applications.
-
Saisissez le Nombre maximal d'objets envoyés simultanément pour limiter le nombre d'objets pouvant être envoyés à Orchestrator.
Remarque :En tant qu'analyste, il est important de envisager de limiter le nombre d'objets qu'un utilisateur professionnel peut envoyer à Orchestrator en fonction du cas d'utilisation spécifique. Par défaut, le système autorise 50 objets à envoyer à la file d'attente, mais la plage peut être ajustée de 1 à 1 000, offrant plus de flexibilité pour différents scénarios.
-
Sélectionnez le type de déclencheur de l'automatisation dans la zone de liste Déclencheur .
- Si vous souhaitez configurer un Déclencheur automatique pour une automatisation, ajoutez les champs et sélectionnez les valeurs de champ pour définir une ou plusieurs conditions de déclencheur.
Remarque :
Seul un champ de type
nominalpeut être utilisé pour les conditions de déclencheur.
- Si vous souhaitez configurer un Déclencheur automatique pour une automatisation, ajoutez les champs et sélectionnez les valeurs de champ pour définir une ou plusieurs conditions de déclencheur.
Un cas qui remplit une condition lors de l'évaluation du filtre sera envoyé à Orchestrator.
Chaque condition de déclencheur est évaluée séparément. Par exemple, l'incident 001 comporte les balises A et B. Lorsque vous avez défini les conditions du déclencheur pour A et B, cet incident sera envoyé deux fois à Orchestrator (un en fonction de la condition A et un autre en fonction de la condition B).
- Sélectionnez Save (Enregistrer).
Modification d’une automatisation
Suivez ces étapes pour modifier une automatisation.
- Dans le gestionnaire d'automatisation, localisez l'automatisation que vous souhaitez modifier dans la liste des automatisations et sélectionnez
 .
. - Modifiez les paramètres comme vous le souhaitez.
- Sélectionnez Save (Enregistrer).
Actualisation de la file d'attente
Si des modifications sont apportées à la file d’attente Orchestrator , vous devez actualiser la file d’attente dans Process Mining. Par exemple, lorsque le schéma JSON de données spécifiques a changé, ou lorsque le nom ou la description de la file d'attente a été modifié dans Orchestrator. Pour actualiser la file d'attente dans Process Mining, vous modifiez l'automatisation dans le Gestionnaire d'automatisation.
Suivez ces étapes pour actualiser la file d'attente d'une automatisation.
- Localisez l'automatisation pour laquelle vous souhaitez actualiser la file d'attente et sélectionnez .
- Sélectionnez le bouton Refresh en haut du panneau des propriétés.
- Sélectionnez Save (Enregistrer).
Supprimer une automatisation
Suivez ces étapes pour supprimer une automatisation.
- Localisez l'automatisation que vous souhaitez supprimer de la liste des automatisations et sélectionnez
 .
.
L'automatisation est supprimée de la liste des automatisations.