- Información general
- Automatización de IU
- Acerca del paquete de actividades de automatización de IU
- Aplicaciones y tecnologías automatizadas con UI Automation
- Compatibilidad de proyectos
- UI-ANA-016: Introducir URL para abrir el navegador
- UI-ANA-017: ContinueOnError verdadero
- UI-ANA-018: enumerar actividades de OCR / imagen
- UI-DBP-006: uso del contenedor
- UI-DBP-013: uso incorrecto de la automatización de Excel
- UI-DBP-030: uso de variables prohibidas en selectores
- UI-DBP-031: verificación de actividad
- UI-PRR-001: Simular clic
- UI-PRR-002: Simular tipo
- UI-PRR-003: uso incorrecto de aplicación abierta
- UI-PRR-004: retrasos codificados
- UI-REL-001: Idx grande en selectores
- UI-SEC-004: datos de correo electrónico del selector
- UI-SEC-010: Restricciones de aplicaciones / URL
- UI-USG-011: atributos no permitidos
- UX-SEC-010: restricciones de aplicaciones / URL
- UX-DBP-029: uso no seguro de contraseña
- UI-PST-001: nivel de registro de auditoría en la configuración del proyecto
- Herramienta de migración del navegador de UiPath
- Recorte de región
- Grabadora de Computer Vision
- Acerca de la automatización de imágenes y texto
- Actividades con el ratón y el teclado
- Ejemplo de uso de la automatización de ratón y teclado
- Actividades de texto
- Ejemplo de uso de la automatización de texto
- Actividades de OCR
- Actividades de imagen
- Ejemplo de uso de la automatización de OCR y la automatización de imágenes
- Índice de actividades
- Activar
- Base de anclaje
- Asociar navegador
- Asociar ventana
- Bloquear entrada de usuario
- Aviso
- Comprobar
- Clic
- Clic en imagen
- Desencadenador de clic de imagen
- Clic en texto OCR
- Clic en el texto
- Desencadenador de clic
- Cerrar aplicación
- Cerrar pestaña
- Cerrar ventana
- Anclaje consciente de contexto
- Copiar texto seleccionado
- Desencadenador de cambio del atributo del elemento
- Elemento existente
- Ámbito del elemento
- Desencadenador de cambio de estado de elemento
- Exportar el árbol de la IU
- Extraer datos estructurados
- Buscar elementos secundarios
- Buscar elemento
- Buscar imagen
- Buscar coincidencias de imágenes
- Buscar texto OCR
- Buscar elemento relativo
- Buscar posición de texto
- Obtener ventana activa
- Obtener antecesor
- Obtener atributo
- Obtener información de atributo
- Obtener a partir del portapapeles
- Obtener texto completo
- Obtener texto OCR
- Obtener contraseña
- Obtener posición
- Obtener elemento de origen
- Obtener texto
- Obtener texto visible
- Volver
- Avanzar
- Ir a inicio
- Google Cloud Vision OCR
- Ocultar ventana
- Resaltar
- Desencadenador de tecla de acceso rápido
- Mantener el puntero
- Mantener el puntero en imagen
- Mantener el puntero sobre texto OCR
- Mantener el puntero en el texto
- Imagen existente
- Indicar en pantalla
- Insertar código .NET
- Inject Js Script
- Invocar método de ActiveX
- Desencadenador de pulsación de tecla
- Cargar imagen
- Maximizar ventana
- Microsoft Azure Computer Vision OCR
- Microsoft OCR
- Microsoft Project Oxford Online OCR
- Minimizar ventana
- Supervisar eventos
- Desencadenador del ratón
- Mover ventana
- Ir a
- Texto OCR existente
- Apariencia en elemento
- Fuga en elemento
- Apariencia en imagen
- Fuga en imagen
- Abrir aplicación
- Abrir navegador
- Actualizar navegador
- Reproducir evento de usuario
- Restaurar ventana
- Guardar imagen
- Seleccionar elemento
- Seleccionar varios elementos
- Enviar tecla de acceso rápido
- Establecer región de recorte
- Establecer foco
- Establecer texto
- Establecer en portapapeles
- Establecer atributo web
- Mostrar ventana
- Iniciar proceso
- Desencadenador del sistema
- Realizar captura
- Tesseract OCR
- Texto existente
- Información sobre herramientas
- Escribir en
- Escribir Texto Seguro
- Utilizar primer plano
- Esperar a atributo
- Esperar a fuga de elemento
- Esperar a fuga de imagen
- Desencadenador de eventos de aplicación
- Bloquear entrada de usuario
- Marcar/Desmarcar
- Comprobar estado de aplicación
- Comprobar elemento
- Clic
- Clic desencadenador de eventos
- Arrastrar y soltar
- Extraer datos de tabla
- Buscar elementos
- Para cada elemento de interfaz de usuario
- Obtener datos del navegador
- Obtener Portapapeles
- Obtener texto
- Obtener URL
- Ir a URL
- Resaltar
- Mantener el puntero
- Inject Js Script
- Atajos del teclado
- Desencadenador de eventos de pulsación de tecla
- Desplazamiento del ratón
- Navegar por el navegador
- Seleccionar elemento
- Establecer datos del navegador
- Configurar el portapapeles
- Establecer navegador de Runtime
- Establecer foco
- Establecer texto
- Realizar captura
- Escribir en
- Desbloquear entrada de usuario
- Utilizar Aplicación/Navegador
- Operación de ventana
- Transacción de llamada
- Clic en imagen en pantalla
- Hacer clic en botón de barra de herramientas
- Expandir tabla jerárquica ALV
- Expandir árbol ALV
- Expandir árbol
- Lectura de barra de estado
- Inicio de sesión en SAP
- Inicio de sesión en SAP
- Desencadenador de cambio de atributos de sesión de SAP
- Seleccionar fechas en el calendario
- Seleccionar elemento de menú
- Ámbito de la celda de la tabla
- Transacción de llamada
- Clic en imagen en pantalla
- Hacer clic en botón de barra de herramientas
- Expandir tabla jerárquica ALV
- Expandir árbol ALV
- Expandir árbol
- Lectura de barra de estado
- Inicio de sesión en SAP
- Inicio de sesión en SAP
- Seleccionar fechas en el calendario
- Seleccionar elemento de menú
- Ámbito de la celda de la tabla
- Realizar búsquedas en el navegador y recuperar resultados mediante las API de automatización de IU
- Exploración web
- Buscar imágenes
- Hacer clic en imágenes
- Eventos de desencadenador y supervisor
- Crear y anular archivos
- Páginas HTML: extraer y manipular información
- Manipulación de ventana
- Selección de lista automatizada
- Buscar y manipular elementos de ventana
- Gestionar automatización de texto
- Cargar y procesar imágenes
- Gestionar acciones activadas por el ratón
- Automatizar tiempo de ejecución de aplicación
- Ejecución automática de una aplicación local
- Navegación de explorador
- Automatización web
- Ejemplo de ámbito de desencadenador
- Habilitar soporte de automatización de IU en DevExpress
- Computer Vision Local Server
- Automatización móvil
- Notas relacionadas
- Acerca de la arquitectura de automatización de dispositivos móviles
- Compatibilidad de proyectos
- Obtener tipos de registro
- Obtener registros
- Obtener origen de la página
- Obtener la orientación del dispositivo
- Obtener identificador de sesión
- Instalar aplicación
- Administrar aplicación actual
- Administrar otras aplicaciones
- Abrir enlace profundo
- Abrir URL
- Conexión de dispositivo móvil
- Deslizamiento direccional
- Patrón de dibujo
- Pase de dedo posicional
- Pulse un botón del hardware
- Establecer orientación del dispositivo
- Realizar captura
- Tomar parte de la captura de pantalla
- Elemento existente
- Ejecutar comando
- Obtener atributo
- Obtener elemento seleccionado
- Obtener texto
- Establecer elemento seleccionado
- Establecer texto
- Deslizamiento
- Pulsar
- Escribir Texto
- Primeros pasos con las API de automatización móvil
- Gestionar cuadros de diálogo emergentes en automatizaciones móviles
- Creating variables from selector attributes
- Creación de flujos de trabajo de automatización móvil
- Utilizar automatización móvil para una aplicación de banca móvil
- Automatización para aplicaciones React Native
- Terminal
- Notas relacionadas
- Acerca del paquete de actividades de Terminal
- Compatibilidad de proyectos
- Mejores prácticas
- Buscar texto
- Obtener color de la posición
- Obtener la posición del cursor
- Obtener campo
- Obtener campo en posición
- Obtener área de pantalla
- Obtener texto
- Obtener texto en posición
- Mover cursor
- Mover cursor al texto
- Enviar tecla de control
- Teclas de envío
- Teclas de envío seguras
- Establecer campo
- Configurar campo en posición
- Sesión del terminal
- Esperar texto de campo
- Esperar a que la pantalla esté lista
- Esperar texto en pantalla
- Esperar texto en posición

Actividades UIAutomation
Extracción de tablas
La extracción de tablas, parte de la experiencia moderna en Studio, te permite usar el paquete de actividades de automatización de IU para extraer automáticamente datos estructurados de las aplicaciones y guardarlos como un objeto DataTable que luego se puede usar en tus procesos de automatización.
Este proceso se puede realizar utilizando la Grabadora de extracción de tablas en Studio, a la que se puede acceder desde la Cinta si el paquete Automatización de IU v21.4 o superior está instalado en tu proyecto actual, y has seleccionado la Experiencia moderna.
El mismo asistente también se utiliza cuando se utiliza una actividad Extraer datos de tabla en tu flujo de trabajo.
Uso de la grabadora de extracción de tablas
Si tienes la experiencia moderna seleccionada en tu proyecto y el paquete de actividades Automatización de IU instalado, puedes encontrar la grabadora de extracción de tablas en la cinta de Studio.

Clicking the Table Extraction button in the Ribbon opens up the Table Extraction wizard.

Este asistente ofrece una forma muy sencilla de configurar todo el conjunto de funcionalidades que ofrece la actividad Extracción de datos de tabla.
Para cambiar entre los marcos de IU disponibles (Predeterminado, AutomatizaciónDeIU o Accesibilidad activa), puedes seleccionar una opción del menú desplegable o pulsar F4.
Además, la sección Información le guía por todos los pasos que debe seguir para extraer con éxito cualquier dato estructurado. La sección se puede colapsar para revelar más información sobre el paso en el que se encuentra actualmente.

Para comenzar el proceso de extracción de datos, simplemente haz clic en el botón Añadir datos . Esto inicia el proceso de indicar una serie de elementos similares que pueden utilizarse para identificar la tabla que quieres crear. Esto inicia el proceso Indicar, que resalta todos los elementos detectados de la aplicación con la que estás trabajando actualmente. Al seleccionar el  , puedes extraer las URL y las fuentes de imagen de los datos extraídos, si están presentes. Estos se añaden como una nueva columna a tu tabla final.

As you can see above, after clicking a column header, the wizard prompts you with a message, asking whether you want to extract all of the available columns, which are automatically identified. Selecting Yes scrapes the entire table.
Si seleccionas un elemento que está más cerca (antecesor común más bajo) de solo uno de los elementos de la primera columna, se considera automáticamente como el primer elemento de una nueva columna.
If the table spans multiple pages, you can simply click Next Button and select the next page navigation button or link.
Cada columna puede editarse o eliminarse individualmente, lo que le permite personalizar su tabla final como lo desee.

Once you have selected all the data you want, simply clicking the Save and return to Studio button automatically closes the wizard and saves everything you have done in your workflow.
Editar datos de extracción
You can resume editing an already scraped table by using the Edit extract data option in the contextual menu in the body of the Extract Table Data activity. Using this option reopens the wizard with all of the configurations performed earlier and enables you to pick up where you left off.

Editar columnas
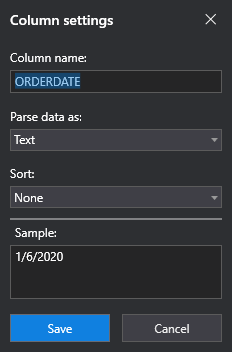
Al hacer clic en el icono de la rueda dentada junto a la columna que desea editar, se abre la ventana Configuración de columna.

Here, you can edit the Column Name. This can be done by simply using the text box and specifying the name you want for the column in the final table.
The Parse data as drop-down menu enables you to select between the three main types of data you can use for the columns, Text, Number, and Date & Time.
The Sample text box displays a sample of a value in the column being parsed as the data type you chose in the Parse data as drop-down.
Texto
The Sort drop-down menu specifies whether you want to sort the data in the column or not. By default, None is selected, meaning the data is not sorted in any way. If you want to sort the data in the column alphabetically, you can do so by selecting Ascending or Descending, depending on the method you prefer.
Número
Selecting Number in the Parse data as drop-down displays other, number-specific options.

The Sort drop-down menu specifies whether you want to sort the data in the column or not. By default, None is selected, meaning the data is not sorted in any way. If you want to sort the data in the column alphanumerically, you can do so by selecting Ascending or Descending, depending on the method you prefer.
The Decimal separator specifies the symbol you want to use for decimal separation in your final table. By default, this symbol is ..
The Thousands separator specifies the symbol you want to use for thousand separation in your final table. By default, this symbol is ,.
When scraping numbers, they are parsed according to the selected options, and separators and other symbols (e.g. $) are removed.
Fecha y hora
Selecting Date & Time in the Parse data as drop-down displays other options, specific to date and time formats.
If the column you are editing does not match the format that is specified, the Column Settings window lets you know in the Sample section.
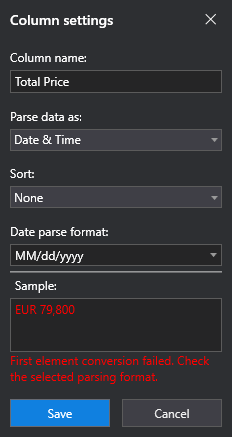
The Sort drop-down menu specifies whether you want to sort the data in the column or not. By default, None is selected, meaning the data is not sorted in any way. If you want to sort the data in the column by date, you can do so by selecting Ascending or Descending, depending on the method you prefer.
The Data parse format drop-down enables you to select from a multitude of date and time formats that are supported.
When selecting dates, they are formatted according to the format that is selected in your operating system. The parsing format selected in the wizard is just to identify the data you are scraping.
Sección de configuración
The Settings section lets you choose if you want to limit the extraction of elements in the table. By default, this option is set to No limit, which does not limit the extraction in any way, scraping the entire visible table.
The Max rows option limits the scraping according to the number of rows that is mentioned in the field to the right. By default, this is set to 1000 rows.
The Max pages option limits the scraping according to the number of pages that is mentioned in the field to the right. By default, this is set to 100 pages.
Sección de vista previa
The Preview section specifies how many columns and rows are identified for the table you have indicated. Also, by clicking the eye button, you can see a preview of the extracted table.
La vista previa está deshabilitada cuando se edita en modo sin conexión.
ExtraerMetadatos
The Extract metadata property contains an XML definition of the path identifying the data to be extracted for each column. The path is built starting from the data extraction target (defined by your selector) to the column elements. The path uses attributes such as tag, idx, and text.
Ejemplo:
<extract>
<!—columns data identified by a path >
<column exact='1' name=’Description’ attr='text'>
<webctrl tag='div' />
<webctrl tag='div' idx='1' />
<webctrl tag='div' idx='1' />
<webctrl tag='div' idx='2' />
<webctrl tag='div' idx='1' />
<webctrl tag='div' idx='1' />
<webctrl tag='span' idx='1' />
</column>
<column exact='1' name=’Currency’ attr='text'>
<webctrl tag='div' />
<webctrl tag='div' idx='1' />
<webctrl tag='div' idx='1' />
<webctrl tag='div' idx='2' />
<webctrl tag='div' idx='1' />
<webctrl tag='div' idx='1' />
<webctrl tag='span' idx='2' />
</column>
</extract>
Cuando los atributos tag, idxy text no son suficientes para identificar los datos de muestra indicados por el usuario, se genera un selector de CSS en lugar de la ruta. Este selector utiliza la clase común de los elementos de muestra.
Ejemplo:
<extract>
<!—column data identified by a path >
<column exact='1' name='Description' attr='text'>
<webctrl tag='li' />
<webctrl tag='div' idx='1' />
<webctrl tag='a' idx='1' />
<webctrl tag='div' idx='2' />
<webctrl tag='div' idx='1' />
<webctrl tag='h3' idx='1' />
</column>
<!—column data identified by a css-selector >
<column css-selector='.currency-value' name='Currency' attr='text' />
</extract>
For the Description column, tag and index attributes are used to identify the column data.
For the Currency column, the elements are identified via the CSS-selector which contains the common class of the samples.
Opcionalmente, si está disponible, también se puede utilizar un selector de CSS para la Descripción:
<extract>
<!—columns data identified by css-selectors >
<column css-selector='.product-title ' name='Description' attr='text' />
<column css-selector='.currency-value' name='Currency' attr='text' />
</extract>
<extract>
<!—columns data identified by css-selectors >
<column css-selector='.product-title ' name='Description' attr='text' />
<column css-selector='.currency-value' name='Currency' attr='text' />
</extract>
La definición de fila utiliza los mismos métodos de identificación que la columna y se utiliza para extraer datos correlativos. Una fila contiene un elemento de cada columna.
Ejemplo:
<extract>
<! -- row definition - ->
<row exact='1'>
<webctrl tag='li' />
<webctrl tag='div' idx='1' />
<webctrl tag='a' idx='1' />
<webctrl tag='div' idx='2' />
<webctrl tag='div' idx='1' />
</row>
<column exact='1' name='Description' attr='text'>
<webctrl tag='li' />
<webctrl tag='div' idx='1' />
<webctrl tag='a' idx='1' />
<webctrl tag='div' idx='2' />
<webctrl tag='div' idx='1' />
<webctrl tag='h3' idx='1' />
</column>
<column css-selector='.currency-value' name='Column' attr='text' />
</extract>
Configuración de la tabla
This property contains an XML definition of the column settings, as they were defined in the scraping wizard. Column properties like Name or Format can be changed directly in this XML definition and will be used at runtime when building the output data table.
Ejemplo:
<table xmlns:xsi='http://www.w3.org/2001/XMLSchema-instance' xmlns:xsd='http://www.w3.org/2001/XMLSchema' Type='Structured'>
<Column xsi:type='DataColumn' ReferenceName='Column0' Name=’Description'>
<Format xsi:type='TextColumnFormat' />
</Column>
<Column xsi:type='DataColumn' ReferenceName='Column2' Name=’Currency'>
<Format xsi:type='TextColumnFormat' />
</Column>
</Table>