- Primeros pasos
- Notificaciones
- Licencia
- Solución de problemas
- Creador de conectores
- Acerca del generador de conectores
- Crear tu primer conector
- Crear tu conector a partir de una definición de API
- Configurar la autenticación
- Utilizar variables en el Creador de conectores
- Diseñador de actividades
- Crear un desencadenador
- Primeros pasos
- Ejemplo A: crear un conector a partir de un lienzo en blanco con autenticación de token de acceso personal
- Ejemplo B: crear un conector a partir de un lienzo en blanco con autenticación de clave API
- Ejemplo C: crear un conector a partir de una especificación de API con autenticación de credenciales de cliente OAuth 2.0
- Act! 365
- ActiveCampaign
- Active Directory: vista previa
- Adobe Acrobat Sign
- Servicios de Adobe PDF
- Amazon Bedrock
- Amazon Connect
- Amazon Polly
- Amazon SES
- Amazon Transcribe
- Amazon Web Services
- Anthropic Claude
- Asana
- AWeber
- Azure AI Document Intelligence
- Azure Maps
- BambooHR
- Box
- Brevo
- Calendly
- Campaign Monitor
- Cisco Webex Teams
- Citrix Hypervisor
- Citrix ShareFile
- Clearbit
- Confluence Cloud
- Constant Contact
- Coupa
- CrewAI: vista previa
- Customer.io
- Hub de base de datos: vista previa
- Agente de Databricks
- Datadog
- BúsquedaProfunda
- Deputy
- Discord - Vista previa
- DocuSign
- Goteo
- Dropbox
- Dropbox Business
- Egnyte
- Eventbrite
- Tipos de cambio
- Exchange Server: vista previa
- Expensify
- Facebook
- Freshbooks
- Freshdesk
- Freshsales
- Freshservice
- GetResponse
- GitHub
- Gmail
- Plataforma Google Cloud
- Google Docs
- Google Drive
- Formularios de Google: vista previa
- Google Maps
- Google Sheets
- Google Speech-to-Text
- Texto a voz de Google
- Google Tasks: vista previa
- Google Vertex
- Google Vision
- Google Workspace
- GoToWebinar
- Greenhouse
- Hootsuite
- Http
- Webhook HTTP
- Hubspot CRM
- Hubspot Marketing
- HyperV: vista previa
- Icertis
- iContact
- Insightly CRM
- Intercom
- Jina.ai
- Jira
- Keap
- Klaviyo
- LinkedIn
- Correo
- Mailchimp
- Mailgun
- Mailjet
- MailerLite
- Marketo
- Microsoft 365
- Microsoft Azure
- Microsoft Azure Active Directory
- Microsoft Azure AI Foundry
- Microsoft Azure OpenAI
- Microsoft Dynamics 365 CRM
- Microsoft OneDrive y SharePoint
- Microsoft Outlook 365
- Microsoft Power Automate: vista previa
- Opinión de Microsoft
- Microsoft Teams
- Microsoft Translator
- Microsoft Vision
- Miro
- NetIQ eDirectory
- OKTA
- OpenAI
- LLM compatible con OpenAI V1
- Oracle Eloqua
- Oracle NetSuite
- PagerDuty
- PayPal
- PDFMonkey
- Perplexity
- Pinecone
- Pipedrive
- QuickBooksOnline
- Quip
- Salesforce
- Salesforce AgentForce y flujos: vista previa
- Salesforce Marketing Cloud
- SAP BAPI
- SAP Cloud for Customer
- SAP Concur
- SAP OData
- SendGrid
- ServiceNow
- Shopify
- Slack
- SmartRecruiters
- Smartsheet
- Snowflake
- Snowflake Cortex
- Stripe
- Sugar Enterprise
- Sugar Professional
- Sugar Sell
- Sugar Serve
- System Center: vista previa
- TangoCard
- Todoist
- Trello
- Twilio
- UiPath Apps - Preview
- Data Fabric de UiPath: vista previa
- Actividades de UiPath GenAI
- UiPath Orchestrator
- X (anteriormente Twitter)
- Xero
- watsonx.ai
- WhatsApp Business
- WooCommerce
- Viable
- Workday
- REST de Workday
- VMware ESXi vSphere
- YouTube
- Zendesk
- Zoho Campaigns
- Zoho Desk
- Zoho Mail
- Zoom
- ZoomInfo

Guía de usuario de Integration Service
Crear tu primer conector
Esta sección explica cómo crear un conector utilizando Connector Builder y utilizarlo dentro de una automatización. El ejemplo cubre la creación de un conector a través de un proceso manual, por lo que abordamos automáticamente los puntos que de otro modo podrían omitirse.
El flujo de trabajo que estamos diseñando está destinado a recibir mensajes diarios de Slack de precios de acciones que son de interés. Polygon.io proporciona un conjunto de API gratuitas que recuperan información de stock y pueden utilizarse para nuestro propósito. Tienen un proceso de registro rápido que, a cambio, nos proporciona una clave API para realizar las llamadas a la API que necesitamos hacer.
También puedes consultar la sección Crear tu conector a partir de una definición de API . Aquí se explica cómo importar una definición de Swagger y dejar que el Creador de conectores complete la mayor parte del trabajo por ti.
Registrarse en Polygon.io
La mayoría de las aplicaciones de los proveedores requieren detalles de autenticación en forma de nombre de usuario y contraseña, aplicación OAuth, clave API, etc. Polygon.io no es diferente. Proporciona un registro gratuito para probar algunas de sus API.
- Ve a Polygon.io y crea una cuenta.
- Abre tu panel y selecciona Claves API para ver tu clave.

Crear un conector en el Creador de conectores
Ve a Integration Service y selecciona Crea tu conector.
Comencemos con Un conector en blanco. Si tienes alguna forma de definición de API a mano (Swagger, YAML, etc.), puedes seleccionar Iniciar desde la definición de API y dejar que Connector Builder haga la mayor parte del trabajo de configuración por ti.
-
Descarga el icono
polygon.svgde la web para añadir su logotipo a tu catálogo.Nota: Todos los tipos de imágenes son compatibles, pero recomendamos utilizar un SVG cuadrado.
-
Añade un nombre y una descripción para tu conector personalizado y luego selecciona Crear.

Configurar la autenticación y conectarse
La documentación de introducción de Polygon hace referencia a que cualquier llamada API a su plataforma requiere que envíes tu clave API en los encabezados o como parámetro de consulta. Para ello, debes añadirlo a los encabezados, como se explica en el siguiente ejemplo:
-
Pasa tu clave API en la cadena de consulta de la siguiente manera, donde
<your_token>es la clave API:https://api.polygon.io/v2/aggs/ticker/AAPL/range/1/day/2023-01-09/2023-01-09?apiKey=<your_token>https://api.polygon.io/v2/aggs/ticker/AAPL/range/1/day/2023-01-09/2023-01-09?apiKey=<your_token> -
Como alternativa, puedes añadir un encabezado de Autorización a la solicitud con tu clave API como token, en el siguiente formulario, donde
<your_token>es la clave API:Authorization: Bearer <your_token>Authorization: Bearer <your_token> -
En el Creador de conectores, ve a Configuración y selecciona la pestaña API base . Establece la URL base en
https://api.polygon.io.Nota:En este ejemplo, no añadimos la sección
version "v2"a la URL base. Esto nos permite ejecutar algunas de las llamadas API de stock más antiguas.
-
A continuación, ve a la pestaña Autenticación para seleccionar tu Tipo de autenticación preferido de la lista desplegable. Para este ejemplo, vamos a seleccionar el token de acceso personal (PAT). Nota: La documentación de Polygon hace referencia a una clave API, pero dado que debe enviarse como Authorization: Bearer <your\_token>, en realidad se parece más a un token de estilo OAuth. Por lo tanto, el token de acceso personal (PAT) es técnicamente la mejor definición. Más información sobre los diferentes tipos de autenticación.
-
Copia tu clave API de Polígono y establece el Valor como:
Bearer <your_key>. -
Establece el campo Preguntar al usuario en No, para que a los usuarios no se les pida su clave al crear una conexión a este conector. Esto se debe a que no vamos a compartir este conector más allá de nuestro tenant. Sin embargo, si quieres compartir el conector más allá del tenant, no añadas tu propia clave. Establece Preguntar al usuario en Sí, para que se pida a otros usuarios que se suscriban al servicio Polygon. Los tipos de autenticación preconfigurados en el Creador de conectores se encargan de la mayor parte del trabajo por ti. Por ejemplo, el token de acceso personal envía automáticamente Autorización: Portador <your\_token> como encabezado de autenticación, en lugar de tener que crear esta configuración tú mismo.

-
Establece una conexión con la configuración mencionada seleccionando el botón No conectado > Añadir conexión . Observa cómo esto ya funciona como cualquier otro conector de Integration Service. Selecciona Conectar para tener una conexión de prueba a la que realizar llamadas a la API.
Pruebe sus llamadas a la API
Después de establecer una conexión con el software de terceros, pasamos a realizar las llamadas a la API reales.
-
Ve al panel izquierdo a API > Crear nuevo grupo de recursos. El objetivo es recibir una notificación diaria de Slack sobre el precio de apertura de una acción determinada. El punto final que vamos a implementar ahora es la API de apertura/cierre diario de Polygon.

-
En la ventana Crear nuevo grupo de recursos , copia la información del punto final de los documentos de Polygon.
-
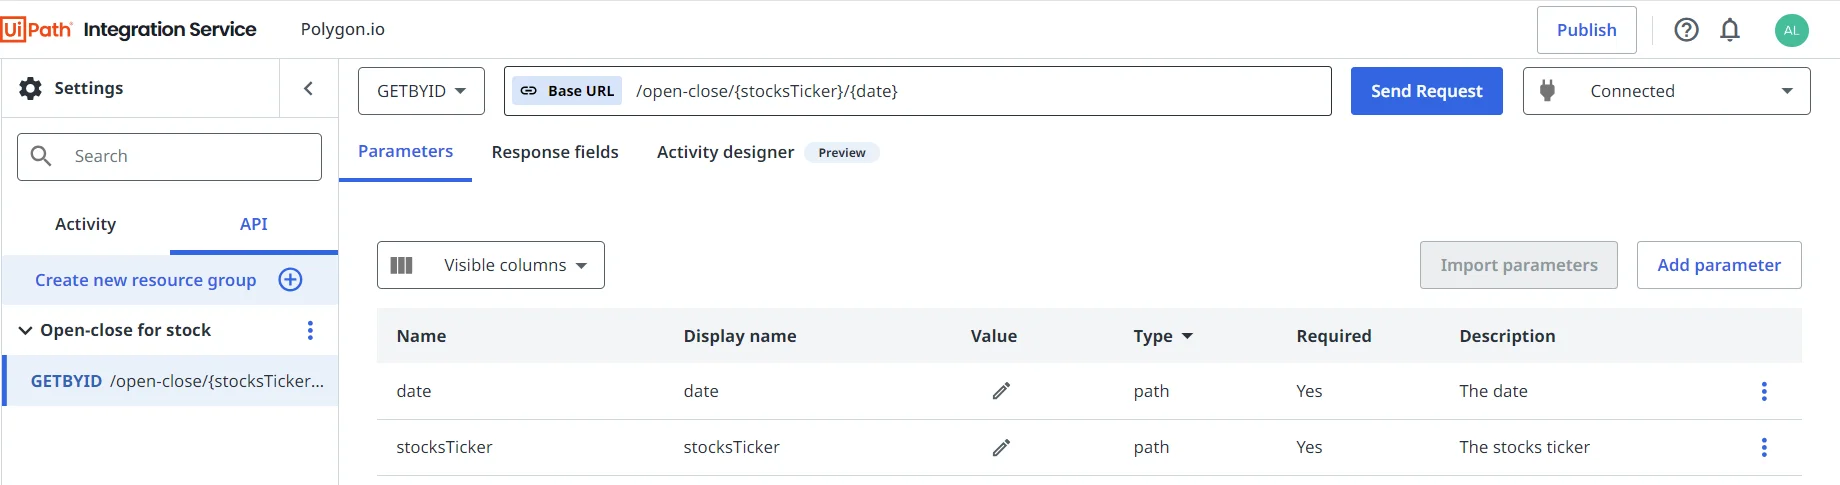
Establece la Ruta en
/open-close/{stocksTicker}/{date}. -
En la lista Seleccionar métodos , habilita Obtener registro (GETBYID), ya que seleccionamos un único objeto, en lugar de una matriz de objetos.
-
Proporcione un nombre para mostrar, como Abrir - Cerrar para stock. El Creador de conectores convertirá automáticamente las variables
{x}en variables de ruta. -
Selecciona Crear para añadir este recurso.

-
Para probar si la configuración funciona, selecciona el botón Enviar solicitud junto a tu recurso. Esto crea valores para los dos parámetros de ruta. Podemos tomarlos del ejemplo de uso en los documentos de Polygon.

Publicar el conector en el catálogo
Puedes realizar algunos pasos adicionales para que los recursos y parámetros se vean y se comporten mejor. Por ejemplo, identifica que el parámetro Fecha es de tipo DateTime y proporciona la máscara como ejemplo. Proporcionar nombres para mostrar hace que tu conector se muestre mejor dentro de la actividad de Studio. La siguiente imagen muestra cómo configurar estos campos:

Como paso final, selecciona Publicar para publicar tu conector en tu tenant. El conector aparece en la lista de conectores destacados en tu tenant, y cualquiera que esté utilizando el mismo tenant puede utilizar el conector Polygon.
Para obtener más información, consulta la sección detallada Publicar tu conector .

Utilizar el conector en UiPath Studio
Crear un conector personalizado en Integration Service solo es relevante si puedes utilizarlo en un flujo de trabajo.
Para probar tu conector personalizado en un flujo de trabajo:
- Abre UiPath Studio y crea un nuevo proyecto. Por ejemplo, precios diarios de las acciones de Slack. Como queremos recibir mensajes diarios, la primera actividad utilizada en este flujo de trabajo es un Desencadenador de tiempo.
- A continuación, cuando arrastres una actividad de Polygon al lienzo, se te pedirá que te conectes a Polygon.io con tu cuenta.
- Una vez establecida la conexión, configura la actividad Polígono para recuperar información sobre acciones de Apple (AAPL). Puedes codificar el stock que te interesa, pero debes formatear la fecha para que sea la fecha del tiempo de ejecución.
- A continuación, añade una actividad de Slack Enviar mensaje al canal para enviar esta información a un canal. Si quieres enviarte la información a ti mismo, utiliza Enviar mensaje al usuario.
La API de Polygon solo acepta una acción a la vez, pero puedes configurar Studio para realizar varias llamadas a través del conector y también notificar sobre el precio de apertura de acciones (PATH) diario de UiPath.