- Introdução
- Melhores práticas
- Tenant
- Sobre o contexto do tenant
- Pesquisa de recursos em um tenant
- Gerenciamento de robôs
- Conectar Robôs ao Orchestrator
- Armazenamento de credenciais do robô no CyberArk
- Armazenamento de senhas do Unattended Robot no Azure Key Vault (somente leitura)
- Armazenamento de credenciais do Unattended Robot no HashiCorp Vault (somente leitura)
- Armazenando credenciais de Unattended Robots no AWS Secrets Manager (somente leitura)
- Exclusão de sessões não assistidas desconectadas e não responsivas
- Autenticação do robô
- Autenticação de robôs com credenciais de cliente
- Autenticação do SmartCard
- Configuração de recursos de automação
- Auditar
- Configurações - Nível do tenant
- Serviço Catálogo de recursos
- Automation Suite Robots
- Contexto de Pastas
- Automações
- Processos
- Trabalhos
- Apps
- Gatilhos
- Logs
- Monitoramento
- Filas
- Ativos
- Armazenar Buckets
- Teste do Orquestrador
- Integrações
- Solução de problemas

Guia do usuário do Orchestrator
Selecionando manualmente os dias não úteis
- Selecione um calendário. O calendário no lado direito da janela é devidamente atualizado.
- No calendário exibido, clique nas datas nas quais você deseja que seus gatilhos parem de disparar. Clique novamente em uma data selecionada para desmarcá-la.
- Selecione Salvar em para salvar as datas selecionadas como dias não úteis.
Fazendo upload de .csv arquivos
Permite que você carregue uma série de datas em um calendário selecionado, diretamente de um arquivo .csv. Observe que o arquivo deve ser previamente preenchido usando um formato predefinido, para que a operação de carregamento seja bem-sucedida. As novas datas do seu arquivo carregado substituirão quaisquer datas já contidas no calendário.
ExcludedDate cabeçalho da coluna. Todos os dias não úteis devem estar dentro dessa coluna, gravados no formato YYYY-MM-DD, YYYY/MM/DD ou YYYY MM DD.
Consulte a seção Exemplo abaixo para obter mais informações.
Opção 1
- No calendário selecionado, clique em Carregar csv.
- Navegue até o arquivo .csv desejado, selecione-o e clique em Abrir. O Orchestrator analisa o arquivo para confirmar se ele cumpre as regras de formatação (consulte o exemplo na seção abaixo).
- Clique em Sim na caixa de diálogo de confirmação para substituir as datas já contidas no calendário pelas novas datas do seu arquivo carregado.
- Clique em Salvar para salvar o calendário modificado.
Opção 2
- Arraste e solte o arquivo
.desejado sobre a parte superior do calendário. O Orchestrator analisa o arquivo para confirmar se ele cumpre as regras de formatação (veja o exemplo na seção abaixo). - Clique em Sim na caixa de diálogo de confirmação para substituir as datas já contidas no calendário pelas novas datas do seu arquivo carregado.
- Clique em Salvar para salvar o calendário modificado.
Exemplo
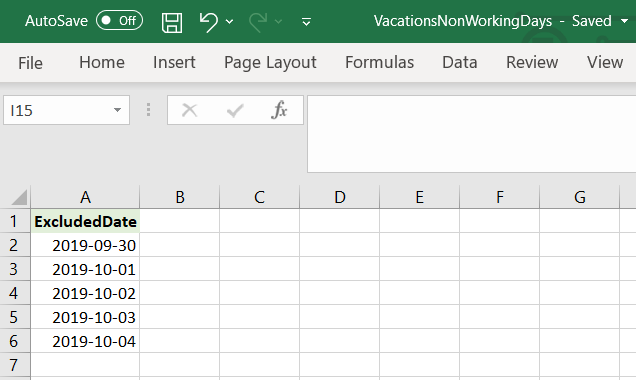
Digamos que você carregue em um calendário o conteúdo do seguinte arquivo .csv. Uma maneira fácil de criar esse arquivo é preencher os dados em um arquivo do Excel e salvá-lo como um arquivo .csv:
Ou você pode baixar um arquivo .csv com todos os cabeçalhos de colunas pré-preenchidos e personalizá-lo de acordo com suas necessidades.
Observe que esse arquivo contém um cabeçalho de coluna predefinido, ExcludedDate. Insira todos os seus dias não úteis nessa coluna, usando o formato AAAA-MM-DD, AAAA/MM/DD ou AAAA MM DD.
- Selecione um calendário na guia Dias não úteis na página Configurações.
- Modifique o nome do calendário.
- Clique em Salvar para salvar o nome alterado.