- Overview
- UI Automation
- About the UI Automation activity package
- Applications and technologies automated with UI Automation
- Project compatibility
- UI-ANA-016 - Pull Open Browser URL
- UI-ANA-017 - ContinueOnError True
- UI-ANA-018 - List OCR/Image Activities
- UI-DBP-006 - Container Usage
- UI-DBP-013 - Excel Automation Misuse
- UI-DBP-030 - Forbidden Variables Usage In Selectors
- UI-DBP-031 - Activity verification
- UI-PRR-001 - Simulate Click
- UI-PRR-002 - Simulate Type
- UI-PRR-003 - Open Application Misuse
- UI-PRR-004 - Hardcoded Delays
- UI-REL-001 - Large Idx in Selectors
- UI-SEC-004 - Selector Email Data
- UI-SEC-010 - App/Url Restrictions
- UI-USG-011 - Non Allowed Attributes
- UX-SEC-010 - App/Url Restrictions
- UX-DBP-029 - Insecure Password Use
- UI-PST-001 - Audit Log Level in Project Settings
- UiPath Browser Migration Tool
- Clipping region
- Computer Vision Recorder
- Activities index
- Activate
- Anchor Base
- Attach Browser
- Attach Window
- Block User Input
- Callout
- Check
- Click
- Click Image
- Click Image Trigger
- Click OCR Text
- Click Text
- Click Trigger
- Close Application
- Close Tab
- Close Window
- Context Aware Anchor
- Copy Selected Text
- Element Attribute Change Trigger
- Element Exists
- Element Scope
- Element State Change Trigger
- Export UI Tree
- Extract Structured Data
- Find Children
- Find Element
- Find Image
- Find Image Matches
- Find OCR Text Position
- Find Relative Element
- Find Text Position
- Get Active Window
- Get Ancestor
- Get Attribute
- Get Event Info
- Get From Clipboard
- Get Full Text
- Get OCR Text
- Get Password
- Get Position
- Get Source Element
- Get Text
- Get Visible Text
- Go Back
- Go Forward
- Go Home
- Google Cloud Vision OCR
- Hide Window
- Highlight
- Hotkey Trigger
- Hover
- Hover Image
- Hover OCR Text
- Hover Text
- Image Exists
- Indicate On Screen
- Inject .NET Code
- Inject Js Script
- Invoke ActiveX Method
- Key Press Trigger
- Load Image
- Maximize Window
- Microsoft Azure Computer Vision OCR
- Microsoft OCR
- Microsoft Project Oxford Online OCR
- Minimize Window
- Monitor Events
- Mouse Trigger
- Move Window
- Navigate To
- OCR Text Exists
- On Element Appear
- On Element Vanish
- On Image Appear
- On Image Vanish
- Open Application
- Open Browser
- Refresh Browser
- Replay User Event
- Restore Window
- Save Image
- Select Item
- Select Multiple Items
- Send Hotkey
- Set Clipping Region
- Set Focus
- Set Text
- Set To Clipboard
- Set Web Attribute
- Show Window
- Start Process
- System Trigger
- Take Screenshot
- Tesseract OCR
- Text Exists
- Tooltip
- Type Into
- Type Secure Text
- Use Foreground
- Wait Attribute
- Wait Element Vanish
- Wait Image Vanish
- Accessibility Check
- Application Event Trigger
- Block User Input
- Check/Uncheck
- Check App State
- Check Element
- Click
- Click Event Trigger
- Drag and Drop
- Extract Table Data
- Find Elements
- For Each UI Element
- Get Browser Data
- Get Clipboard
- Get Text
- Get URL
- Go to URL
- Highlight
- Hover
- Inject Js Script
- Keyboard Shortcuts
- Keypress Event Trigger
- Mouse Scroll
- Navigate Browser
- Save Image
- Select Item
- Set Browser Data
- Set Clipboard
- Set Runtime Browser
- Set Focus
- Set Text
- Take Screenshot
- Type Into
- Unblock User Input
- Use Application/Browser
- Window Operation
- Perform browser search and retrieve results using UI Automation APIs
- Web Browsing
- Find Images
- Click Images
- Trigger and Monitor Events
- Create and Override Files
- HTML Pages: Extract and Manipulate Information
- Window Manipulation
- Automated List Selection
- Find and Manipulate Window Elements
- Manage Text Automation
- Load and Process Images
- Manage Mouse Activated Actions
- Automate Application Runtime
- Automated Run of a Local Application
- Browser Navigation
- Web Automation
- Trigger Scope Example
- Enable UI Automation support in DevExpress
- Computer Vision Local Server
- Mobile Automation
- Release notes
- About the mobile device automation architecture
- Project compatibility
- Get Log Types
- Get Logs
- Get Page Source
- Get Device Orientation
- Get Session Identifier
- Install App
- Manage Current App
- Manage Other App
- Open DeepLink
- Open URL
- Mobile Device Connection
- Directional Swipe
- Draw Pattern
- Positional Swipe
- Press Hardware Button
- Set Device Orientation
- Take Screenshot
- Take Screenshot Part
- Element Exists
- Execute Command
- Get Attribute
- Get Selected Item
- Get Text
- Set Selected Item
- Set Text
- Swipe
- Tap
- Type Text
- Terminal
- Release notes
- About the Terminal activity package
- Project compatibility
- Best practices
- Find Text
- Get Color at Position
- Get Cursor Position
- Get Field
- Get Field at Position
- Get Screen Area
- Get Text
- Get Text at Position
- Move Cursor
- Move Cursor to Text
- Send Control Key
- Send Keys
- Send Keys Secure
- Set Field
- Set Field at Position
- Terminal Session
- Wait Field Text
- Wait Screen Ready
- Wait Screen Text
- Wait Text at Position
- Terminal coded automation APIs
UI Automation activities
Output or screen scraping methods refer to those activities that enable you to extract data from a specified UI element or document, such as a.pdf file.
To understand which one is better for automating your business process, let’s see the differences between them.
| Capability Method | Speed | Accuracy | Background Execution | Extract Text Position | Extract Hidden Text | Support for Citrix |
|---|---|---|---|---|---|---|
| FullText | 10/10 | 100% | yes | no | yes | no |
| Native | 8/10 | 100% | no | yes | no | no |
| OCR | 3/10 | 98% | no | yes | no | yes |
FullText is the default method, it is fast and accurate, yet unlike the Native method, it cannot extract the screen coordinates of the text.
Both these methods work only with desktop applications, but the Native method only works with apps that are built to render text with the Graphics Device Interface (GDI).
OCR is not 100% accurate but can be useful to extract text that the other two methods could not, as it works with all applications including Citrix. Studio uses two OCR engines, by default: Google Tesseract and Microsoft Modi.
Languages can be changed for OCR engines and you can find out how to Install OCR Languages.
| Capability Method | Multiple Languages Support | Preferred Area Size | Support for Color Inversion | Set Expected Text Format | Filter Allowed Characters | Best with Microsoft Fonts |
|---|---|---|---|---|---|---|
| Google Tesseract | Can be added | Small | yes | yes | yes | no |
| Microsoft MODI | Supported by default | Large | no | no | no | yes |
To start extracting text from various sources, click the Screen Scraping button, in the Wizards group, on the Design ribbon tab.
The screen scraping wizard enables you to point at a UI element and extract text from it, using one of the three output methods described above. Studio automatically choses a screen scraping method for you, and displays it at the top of the Screen Scraper Wizard window.
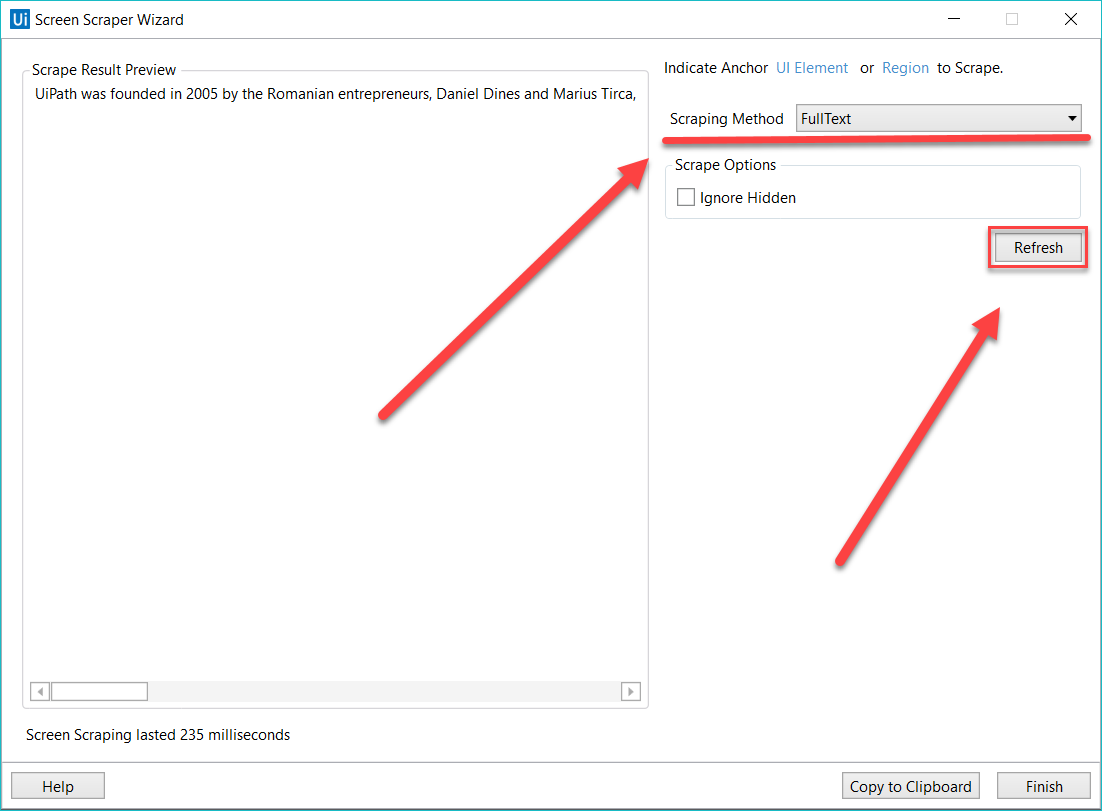
To change the method of screen scraping, select another one from the Options panel and then click Refresh.
When you are satisfied with the scraping results, click Copy to Clipboard and then Finish. The latter option copies the extracted text to the Clipboard, and it can be added to a Generate Data Table activity in the Designer panel. Just like desktop recording, screen scraping generates a container (with the selector of the top-level window) which contains activities, and partial selectors for each activity.
Each type of screen scraping comes with different features in the Screen Scraper Wizard, in the Options panel:
- FullText

- Ignore Hidden – when this checkbox is selected, the hidden text from the selected UI element is not copied.
- Native

- No Formatting – when this checkbox is selected, the copied text does not extract formatting information from the text. Otherwise, the extracted text’s relative position is retained.
- Get Words Info – when this checkbox is selected, Studio also extracts the screen coordinates of each word. Additionally, the Custom Separators field is displayed, which enables you to specify the characters used as separators. If the field is empty, all known text separators are used.
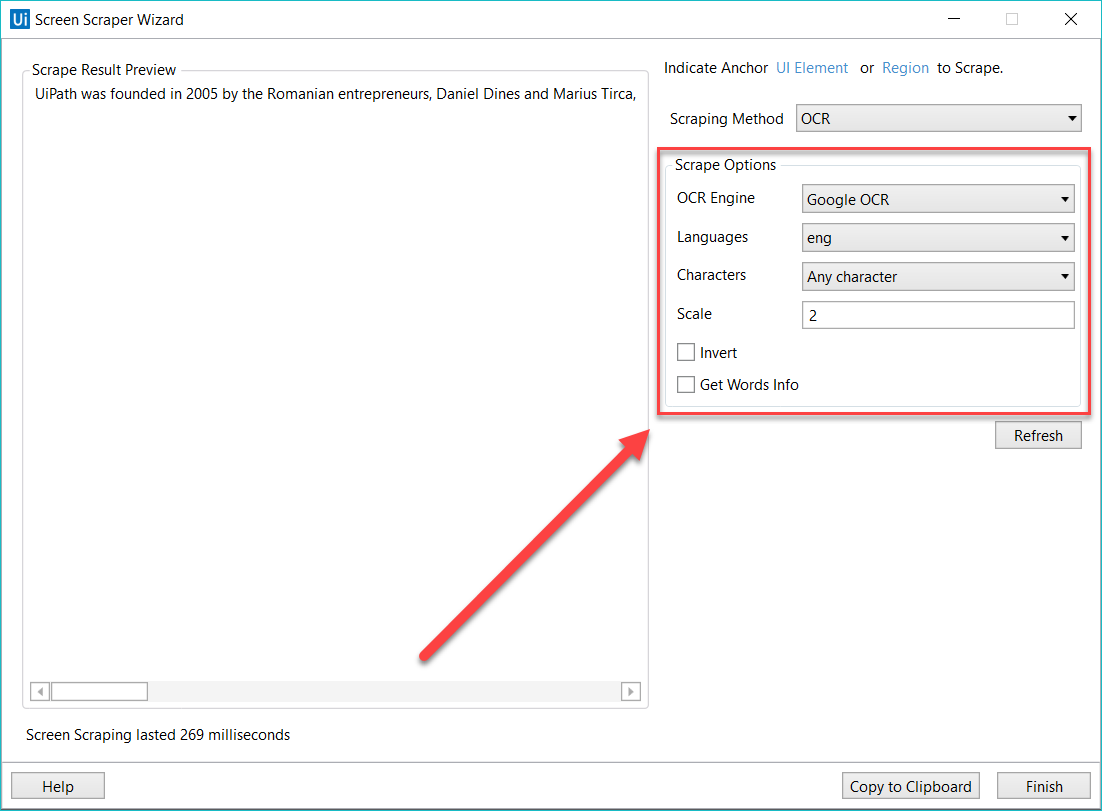
- Google OCR

- Languages – only English is available by default.
- Characters – enables you to select which types of characters to be extracted. The following options are available: Any character, Numbers only, Letters, Uppercase, Lowercase, Phone numbers, Currency, Date and Custom. If you select Custom, two additional fields, Allowed and Denied, are displayed that enable you to create custom rules on which types of characters to scrape and which to avoid.
- Invert – when this checkbox is selected, the colors of the UI element are inverted before scraping. This is useful when the background is darker than the text color.
- Scale – the scaling factor of the selected UI element or image. The higher the number is, the more you enlarge the image. This can provide a better OCR read and it is recommended with small images.
- Get Words Info – gets the on-screen position of each scraped word.
Note:
In some instances of Studio, the Google Tesseract engine may have training files (about training files: Wikipedia, GitHub) that do not work for certain non-English languages. Running a project with these corrupted training files may lead to an exception being thrown. To fix this issue, download the training file for the language you wish to use from here and copy it into the tessdata folder from the UiPath installation directory. To check if the training files you downloaded work, you can download this test project.
- UiPath Screen OCR
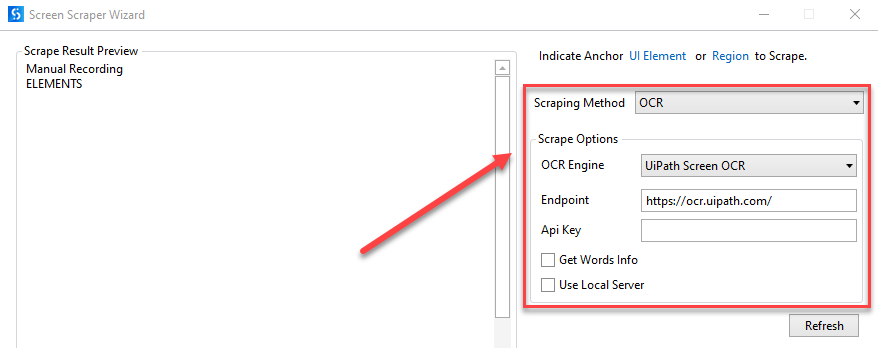
- Endpoint – the endpoint where the OCR model is hosted, either publicly or through an ML Skill in AI Center.
- API Key – the endpoint API key.
- Get Words Info – gets the on-screen position of each scraped word.
- Use Local Server – select this option if you want to run the OCR locally (requires Computer Vision Local Server Pack)
- Microsoft OCR
Important:
Microsoft OCR scraping engine does not support .NET 5 workflows.

- Languages – enables you to change the language of the scraped text. By default, English is selected.
- Scale – the scaling factor of the selected UI element or image. The higher the number is, the more you enlarge the image. This can provide a better OCR read and it is recommended with small images.
- Get Words Info - gets the on-screen position of each scraped word.
Besides getting text out of an indicated UI element, you can also extract the value of multiple types of attributes, its exact screen position, and its ancestor.
This type of information can be extracted through dedicated activities that are found in the Activities panel, under UI Automation > Element > Find and UI Automation > Element > Attribute.
These activities are:
-
Get Ancestor – enables you to retrieve an ancestor from a specified UI element. You can indicate at which level of the UI hierarchy to find the ancestor, and store the results in a UiElement variable.
-
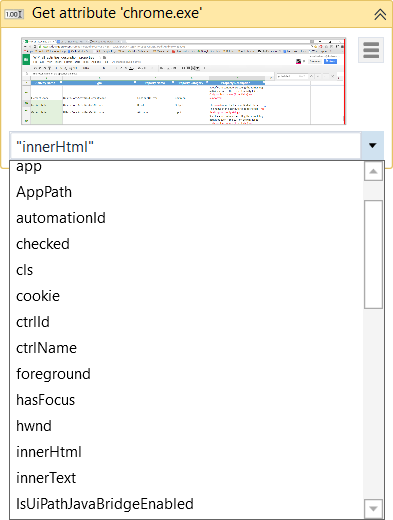
Get Attribute – retrieves the value of a specified UI element attribute. Once you indicate the UI element on screen, a drop-down list with all available attributes is displayed.
-
Get Position – retrieves the bounding rectangle of the specified UiElement, and supports only Rectangle variables.
UiPath Studio also features Relative Scraping, a scraping method that identifies the location of the text to be retrieved relative to an anchor. To learn more, refer to Relative Scraping.
You can also generate tables from unstructured data and store the information in DataTable variables, by using the Screen Scraping Wizard. For more information, see Generating Tables from Unstructured Data.