- Getting started
- Best practices
- Tenant
- Actions
- Folders Context
- Automations
- Processes
- Jobs
- Triggers
- Logs
- Monitoring
- Queues
- Assets
- Storage Buckets
- Orchestrator testing
- Action Catalogs
- Profile
- System Administrator
- Identity Server
- Authentication
- Other Configurations
- Integrations
- Classic Robots
- Troubleshooting
A queue is a container that enables you to hold an unlimited number of items. Queue items can store multiple types of data, such as invoice information or customer details. This information can be processed in other systems - SAP or Salesforce, for instance.
The data stored in, and output from, Queue items is free form by default. For situations where a specific schema is needed, such as integrations with other applications, processing machine-generated forms, or analytics, you can upload custom JSON schemas to ensure that all Queue item data is in the proper format.
In Orchestrator, newly created queues are empty by default. To populate them with items, you can either use the upload functionality in Orchestrator or Studio activities. The latter also enables you to change item statuses and process them. As soon as queue items are processed, they become transactions.
Queues enable you to create large automation projects underlined by complex logic. For example, you can create a process that collects all invoice information and creates a queue item for each piece of data to store it. Subsequently, you can create another process that gathers the information from Orchestrator and uses it to perform additional tasks, such as paying the invoices in a different application, postponing their payment according to their due date or value, sending emails to the accounting team every time a bill is paid, etc.
The Queues page enables you to create new queues. It also provides you with viewing access on previously created queues, charts with the transaction status progress over time, and various other details, such as average execution time and the total number of successful transactions.
The data available in the queues grid is updated at regular intervals, which means that it is not always displayed in real time, and that slight delays are possible. Additionally, it is not affected by retention policies, so archiving database items does not change the information available in the grid.
Item statuses are controlled by RPA developers when they create the automation projects, while revision statuses are controlled in Orchestrator and enable you to perform version control, but only of queue items that have been abandoned or have failed with an application or business exception.
Failed or abandoned items can also be assigned to a reviewer, which can be changed or cleared at any point, if needed. Each of these changes are tracked in the History tab of the Audit Details window. The reviewer is in charge of assessing the current status of the transactions they are assigned to, and changing the review status. The status of queue items up for revision can be changed in the Review Requests page.
No Transaction Data error
message).
If the reference cannot be unique, it is advisable to dequeue without reference.
Schema Definitions
JSON schema for the Specific Data,Output Data, and/or Analytics Data. With the schema(s) in place, all transactions are validated against the provided format, and if the resulting data does
not conform, that item fails with a Business Exception.
- The schema is not applied retroactively to existing transactions, only to those executed after you have uploaded the schema(s).
- Your schema(s) must not contain an array.
- For validation purposes,
DateTimeis accepted asstringtype. - Use of and validation of an Analytics Data schema requires Robots and Activities of version 19.10 or greater.
- If the uploaded schema(s) do not contain a valid schema definition
URI, then thedraft-07definition, as in the below example, is used as the fallback.
A sample schema:
{
  "definitions": {},
  "$schema": "http://json-schema.org/draft-07/schema#",
  "$id": "http://example.com/root.json",
  "type": "object",
  "title": "The Root Schema",
  "additionalProperties": { "type": "string" },
  "required": [
    "stringTest",
    "intTest",
    "boolTest"
  ],
  "properties": {
    "stringTest": {
      "$id": "#/properties/stringTest",
      "type": "string",
      "title": "The Stringtest Schema",
      "default": "",
      "examples": [
        "stringTest"
      ],
      "pattern": "^(.*)$"
    },
    "intTest": {
      "$id": "#/properties/intTest",
      "type": "integer",
      "title": "The Inttest Schema",
      "default": 0,
      "examples": [
        30
      ]
    },
    "boolTest": {
      "$id": "#/properties/boolTest",
      "type": "boolean",
      "title": "The Booltest Schema",
      "default": false,
      "examples": [
        false
      ]
    }
  }
}{
  "definitions": {},
  "$schema": "http://json-schema.org/draft-07/schema#",
  "$id": "http://example.com/root.json",
  "type": "object",
  "title": "The Root Schema",
  "additionalProperties": { "type": "string" },
  "required": [
    "stringTest",
    "intTest",
    "boolTest"
  ],
  "properties": {
    "stringTest": {
      "$id": "#/properties/stringTest",
      "type": "string",
      "title": "The Stringtest Schema",
      "default": "",
      "examples": [
        "stringTest"
      ],
      "pattern": "^(.*)$"
    },
    "intTest": {
      "$id": "#/properties/intTest",
      "type": "integer",
      "title": "The Inttest Schema",
      "default": 0,
      "examples": [
        30
      ]
    },
    "boolTest": {
      "$id": "#/properties/boolTest",
      "type": "boolean",
      "title": "The Booltest Schema",
      "default": false,
      "examples": [
        false
      ]
    }
  }
}The Transactions page displays the transactions from a given queue. It also shows their statuses, the dates when they should be processed, the Robot that processed them, and the type of exception thrown or assigned reference, if any.
You can search for a specific transaction or a group of them, according to a custom reference, which is added through the Reference property of the Add Queue Item and Add Transaction Item activities. The reference can be used to link your transactions to other applications used within an automation project. Additionally, this feature enables you to search for certain transactions in Orchestrator, according to the provided custom reference.
Transaction references can also be enforced to be unique at the queue level. This feature is enabled when creating the queue and applies to all transactions except deleted or retried ones. This makes identifying a specific item a breeze and eases the review process.
Execution error: UiPath.Core.Activities.OrchestratorHttpException: Error creating Transaction. Duplicate Reference. error message in the Job Details window.
Information stored in queue items is displayed in Orchestrator, in the Transaction Details window, under Specific Data. Additionally, if the item failed and was retried, the item's history is displayed in the same window.
Queue.MaxSpecificDataSizeInKiloBytes parameter. Anything beyond this limit cannot be added to a queue, and it returns the 403 - Payload Too Large error code. If you need to upload larger items, store the large data in external storage and only reference the link within
the item.
The Transaction Details window contains three tabs:
- Details - enables you to view the exact information added to a transaction, as well as the statuses it went through, and the number of times it was retried.
- Comments - enables you to view and add transaction-related comments in case you need to share information about a specific transaction with your teammates. All the users with View,Edit, and Delete permissions on Queues and Transactions can add, edit, or remove comments, respectively; however, keep in mind you can make changes to your own comments only.
- History - enables you to see what action was performed by who, see who the reviewer is and what the review status is.
Processing Order
Within any given queue, the transactions are processed hierarchically, according to this order:
- Items that have a Deadline, as follows:
- in order of Priority; and
- according to the set Deadline for items with the same Priority.
- Items with no Deadline, in order of Priority, and
- according to the rule First In, First Out for items with the same Priority.
DateTime.Now.AddHours(2), DateTime.Now.AddDays(10) and DateTime.Now.Add(New System.TimeSpan(5, 0, 0, 0)). Additionally, you can use the US notation to add an exact time, such as 10/10/2019 07:40:00. Automatic correction of this date is available, for example, if you write 12 10 2019 9:0, it is automatically transformed to 12/10/2019 09:00:00.
The dates added in Studio for the Deadline and Postpone fields are displayed in Orchestrator, in the Transactions page, under the Deadline and Postpone columns.
Exporting Transactions
You can export all the transactions and information related to a given queue to a .csv file by clicking the Export button on the Transactions page. All page filtering options apply to the generated file, too.
To ensure the best performance, please note that the exported entries are not in reverse chronological order.
This tool helps you set an SLA (item Deadline) for newly added items in a queue. This helps you assess if they can be processed promptly and what resources you need to allocate such that their SLA is not breached. Whenever the SLA is in danger of not being met, you are properly notified to make adjustments accordingly.
The SLA only applies to those items that don't have a deadline set, meaning that a newly added item with no deadline defined beforehand has it automatically filled according to the value set as the SLA. Specifically, each item's deadline is represented by the value set for the queue SLA from when the item was added into the queue. For instance, if I set the SLA to 2 hours, and I add 3 items into the queue at 4, 5, and 6 PM, then my items have the deadlines 6, 7, 8 PM, respectively.
Items that have a Deadline (either set in Studio or a .csv file used for upload) are not affected by the SLA setting.
- The Priority of the items added in a queue after enabling SLA predictions is automatically set to High, regardless of how it was set in Studio or the .csv file used for upload.
- You cannot delete a process associated with a queue with enabled SLA predictions.
- If at least one queue item exceeds its deadline, Over Capacity is displayed in the Necessary Robots (SLA) column, and predictions are no longer calculated.
- Predictions are made for queue items with deadlines in the next 24 hours (can be changed using the
Queue.SlaReadaheadTimeLimitHoursparameter inweb.config), and do not take into account the items' defer dates.
Queue triggers and SLA predictions are interdependent in terms of queue-process association. So whenever configuring one, the other is prefilled such as to have parity between the configurations. Say I define a queue trigger for queue Y to use process X. SLA predictions for queue Y can only be made using process X; therefore, X is prefilled and read-only when enabling queue SLA for Y.
Risk SLA
You can also define a Risk SLA for your items, which works like a buffer zone before the SLA. Explicitly, the risk deadlines of your items are calculated based on the Risk SLA from the moment the queue item was added in the queue. Say I set the Risk SLA to 2 hours, and I add 3 items into the queue at 4:30, 5:15, and 6:45 PM, then my items have the risk deadlines 6:30, 7:15, 8:45 PM, respectively.
After the Risk SLA has passed and the queue item is not processed, the item becomes at risk of not meeting its deadline. The user is properly notified, such that he can make adjustments accordingly.
Permissions
To be able to configure SLA predictions for a queue, you need the following permissions:
- View on Processes
- View on Queues
- Edit on Queues (to configure SLA when editing a queue)
- Create on Queues (to configure SLA when creating a queue)
This feature enables you to bulk upload queue items into a specific queue in Orchestrator using a .csv file. To do that, first upload your file into your Orchestrator instance for a specific queue. After the file is successfully processed, the contained items are uploaded into the queue according to the selected strategy. Please note that the file must be populated beforehand using predefined formats so that the upload operation is successful.
There is a series of predefined column headers that you can use when building your .csv file, but you can also use other custom headers. After successfully uploading the .csv file, the information in columns with predefined headers is mapped to columns as found in Orchestrator. Information in columns with custom headers is placed under the Specific Data section of the corresponding item in Orchestrator.
Upload.Queues.MaxNumberOfItems parameter in the UiPath.Orchestrator.dll.configpage.
Column Mapping
|
File Column Header |
Orchestrator Field |
|---|---|
|
Reference Mandatory for unique reference queues. It supports all special characters, except double quotes -
" |
Reference Note: References are not compatible with v2016.2 or lower versions of Orchestrator or Robot.
|
|
Deadline Must be populated with a date in one of the following formats:
|
Deadline |
|
Postpone Must be populated with a date in one of the following formats:
|
Postpone |
|
Priority Must be populated with one of the following values:
If the priority is not specified in the file, the items are uploaded with a high priority, by default. |
Priority Mapped to the following values, respectively:
|
|
[Custom_Name] The name can only be made of alphanumeric characters: 0-9, a-z, or underscores. |
Specific Data Mapped in JSON format. For example: On-Us Check: 5540 |
Please note that you cannot have empty column headers in your file.
reference is mapped to the Specific Data section, instead of the Reference column.
Upload Strategies
There are two strategies for handling the upload:
- ProcessAllIndependently - processes all items individually and adds them to the queue, if successful. If not, it returns a list of those whose processing failed. You have the option to download the list into a .csv file populated with the same fields as in the initially uploaded file.
- AllOrNothing - adds the items only if all of them are successfully processed. Otherwise, none are added.
Example:
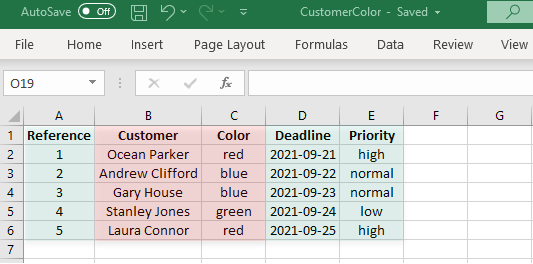
Let's say you upload into a queue the content of the following .csv file. An easy way to create such a file is to populate the data into an excel file and save it as a .csv file:
Or you can download a .csv file with all the pre-filled column headers and customize it to your needs.
Notice that this file contains 3 predefined columns, having the same name as in Orchestrator (Reference, Deadline, and Priority, highlighted in green) and 2 custom columns (Customer and Color, highlighted in red).
- Click Upload Items for the desired queue, and select the .csv file. Orchestrator parses the file to confirm it meets formatting rules.
- Select the desired upload strategies and click Upload to finish the process.
Select More Actions > View Transactions to view the uploaded queue items.
The Transactions page displays each item uploaded from your file. The information contained within the file's predefined columns is mapped to the columns with the same name in Orchestrator (Reference,Deadline, and Priority, highlighted in green):
![]()
The information in the custom columns is mapped in JSON format to the Specific Data section of each item. Click View Details for the desired item to see it: