- Getting started
- Best practices
- Tenant
- Actions
- Folders Context
- Automations
- Processes
- Jobs
- Triggers
- About Triggers
- Managing Triggers
- Using Cron Expressions
- Logs
- Monitoring
- Queues
- Assets
- Storage Buckets
- Orchestrator testing
- Action Catalogs
- Profile
- System Administrator
- Identity Server
- Authentication
- Other Configurations
- Integrations
- Classic Robots
- Troubleshooting

Orchestrator user guide
Time Trigger
Queue Trigger
|
Description | |
|---|---|
|
Minimum number of items that trigger the first job |
The item-processing job is only started after the targeted queue has at least this number of new items. Deferred queue items are not counted. |
|
Maximum number of pending and running jobs allowed simultaneously |
The maximum number of allowed pending and running jobs, counted together. For 2 or more jobs allowed simultaneously, the third option needs to be defined as described below. |
|
Another job is triggered for each __ new item(s) |
The number of new queue items (on top of the number configured for the Minimum number of items that trigger the first job option) to trigger a new job. |
Click the corresponding Edit button, make the intended changes, and then click Update in the Edit Trigger window.
By default, a trigger gets disabled automatically after 10 failed launches and no successful runs occurring in the last day.
Triggers.DisableWhenFailedCount parameter in UiPath.Orchestrator.dll.config. To update the number of days, use Triggers.DisableWhenFailingSinceDays.
To disable a trigger, click the corresponding More Actions button, and then Disable. A disabled time trigger is marked by the ![]() icon in front of it. A disabled queue trigger is marked by the
icon in front of it. A disabled queue trigger is marked by the ![]() icon in front of it.
icon in front of it.
Alternatively, you can select it and then click the Disable icon.
You can also configure your trigger to get automatically disabled at a specific date and time in the future. You can do that as follows:
- Click the corresponding Edit button.
- Enable the Disable Trigger at option.
- Fill in the desired date and time. The trigger time zone influences when the trigger gets disabled.
- Click Update for the changes to take effect.
To enable a trigger, click the corresponding More Actions button, and then Enable. An enabled time trigger is marked by the ![]() icon in front of it. An enabled queue trigger is marked by the
icon in front of it. An enabled queue trigger is marked by the ![]() in front of it.
in front of it.
Alternatively, you can select it and then click the Enable icon.
To remove a trigger, click the corresponding More Actions button, and then Remove.
Alternatively, you can select it and then click Remove.
To display the jobs started by a specific trigger, click the More Actions button, and then View jobs. This displays the Jobs window, which comprises all the jobs executed in the past through the selected trigger (if any).
Creating New Calendars
By Manually Selecting Non-working Days
By Uploading .csv Files
Enables you to upload a series of dates into a selected calendar, directly from a .csv file. Please note that the file must be populated beforehand using a predefined format so that the upload operation is successful. The new dates from your uploaded file overwrite any dates already contained in the calendar.
ExcludedDate column header. All the non-working days must be within that column, written in the YYYY-MM-DD, YYYY/MM/DD or YYYY MM DD format.
See the Example section below for more information.
Option 1
- On the selected calendar click Upload csv.
- Navigate to the desired .csv file, select it and click Open. Orchestrator parses the file to confirm it meets formatting rules (see the example section below).
- Click Yes in the confirmation dialog to overwrite the dates already contained in the calendar with the new dates from your uploaded file.
- Click Save to save the modified calendar.
Option 2
- Drag & Drop the desired
.file over the selected calendar's top part. Orchestrator parses the file to confirm it meets formatting rules (see the example section below). - Click Yes in the confirmation dialog to overwrite the dates already contained in the calendar with the new dates from your uploaded file.
- Click Save to save the modified calendar.
Example
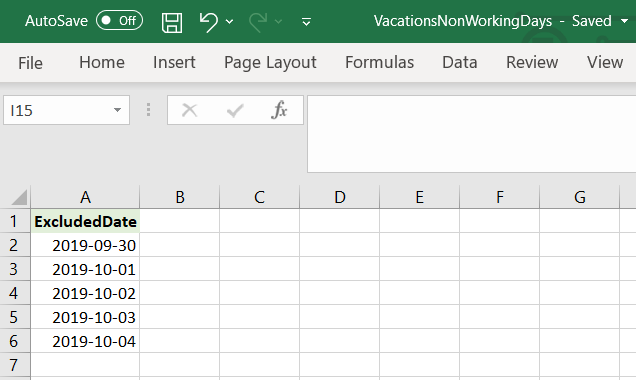
Let's say you upload into a calendar the content of the following .csv file. An easy way to create such a file is to populate the data into an excel file and save it as a .csv file:
Or you can download a .csv file with all the pre-filled column headers and customize it to your needs.
Notice that this file contains a predefined column header, ExcludedDate. Enter all your non-working days in that column, using YYYY-MM-DD,YYYY/MM/DD or YYYY MM DD format.

Renaming Calendars
- Select a calendar in the Non-Working Days tab on the Settings page.
- Modify the name of the calendar.
- Click Save to save the changed name.
Deleting Calendars
You can also remove non-working days from a calendar. After clicking on a non-working day it is no longer marked. Remember to save your changes.