- Introduction
- Setting up your account
- Balance
- Clusters
- Concept drift
- Coverage
- Datasets
- General fields
- Labels (predictions, confidence levels, label hierarchy, and label sentiment)
- Models
- Streams
- Model Rating
- Projects
- Precision
- Recall
- Annotated and unannotated messages
- Extraction Fields
- Sources
- Taxonomies
- Training
- True and false positive and negative predictions
- Validation
- Messages
- Access control and administration
- Manage sources and datasets
- Understanding the data structure and permissions
- Creating or deleting a data source in the GUI
- Preparing data for .CSV upload
- Uploading a CSV file into a source
- Creating a dataset
- Multilingual sources and datasets
- Enabling sentiment on a dataset
- Amending dataset settings
- Deleting a message
- Deleting a dataset
- Exporting a dataset
- Using Exchange integrations
- Model training and maintenance
- Understanding labels, general fields, and metadata
- Label hierarchy and best practices
- Comparing analytics and automation use cases
- Turning your objectives into labels
- Overview of the model training process
- Generative Annotation
- Dastaset status
- Model training and annotating best practice
- Training with label sentiment analysis enabled
- Understanding data requirements
- Train
- Overview
- Training using clusters
- Training using Search
- Introduction to Refine
- Precision and recall explained
- Precision and Recall
- How validation works
- Understanding and improving model performance
- Reasons for label low average precision
- Training using Check label and Missed label
- Training using Teach label (Refine)
- Training using Search (Refine)
- Understanding and increasing coverage
- Improving Balance and using Rebalance
- When to stop training your model
- Using general fields
- Generative extraction
- Using analytics and monitoring
- Automations and Communications Mining™
- Developer
- Uploading data
- Downloading data
- Exchange Integration with Azure service user
- Exchange Integration with Azure Application Authentication
- Exchange Integration with Azure Application Authentication and Graph
- Migration Guide: Exchange Web Services (EWS) to Microsoft Graph API
- Fetching data for Tableau with Python
- Elasticsearch integration
- General field extraction
- Self-hosted Exchange integration
- UiPath® Automation Framework
- UiPath® official activities
- How machines learn to understand words: a guide to embeddings in NLP
- Prompt-based learning with Transformers
- Efficient Transformers II: knowledge distillation & fine-tuning
- Efficient Transformers I: attention mechanisms
- Deep hierarchical unsupervised intent modelling: getting value without training data
- Fixing annotating bias with Communications Mining™
- Active learning: better ML models in less time
- It's all in the numbers - assessing model performance with metrics
- Why model validation is important
- Comparing Communications Mining™ and Google AutoML for conversational data intelligence
- Licensing
- FAQs and more

Communications Mining user guide
Training using clusters
- Permissions required for Automation Cloud users:
- Source - Read to view messages.
- Dataset - Read to view labels.
- Dataset - Review to apply labels.
- Permissions required for legacy users:
- View sources to view messages.
- View labels to view labels.
- Review and annotate to apply labels.
Overview
Once your data is in the platform, the platform will group and display 30 clusters of communications (messages) that it believes share concepts or similar intents. The aim of this part of the training process is to go through each of these clusters and annotate the data presented in each of them.
This process makes training the model easier and faster to begin with, as you can add labels to multiple similar messages at once, as well as adding or removing labels to individual messages as required.
Tips for annotating clusters
- Do not spend too long thinking about the name of the label. You can rename a label at any point during the training process.
- Be as specific as possible when naming a label and keep the taxonomy as flat as possible initially, which means to not add too many child labels. It is better to be as specific as possible with your label name at the outset as you can always change and restructure the hierarchy later. At this stage you should add as many labels as possible to a message as you can always go back and delete them later, which is quicker and easier than expanding an existing label.
- It is easier to create a more specific, finer-grained taxonomy in the first instance. If the taxonomy is too detailed, it is easy to edit and refine your taxonomy later. This means to add more rather than less labels and sub labels.
- It is good to start with labels in a flat hierarchy, which means to not add too many sub-labels. You can always restructure the taxonomy to a more hierarchical structure later.
- Each message can have multiple labels assigned to it. Make sure to apply all relevant labels, otherwise, you teach the model not to associate it with the label that you have omitted.
- It is better to take the time to carefully annotate now, so that the machine can rapidly and precisely predict labels in future.
- Not all clusters will have obviously similar intents, and you can move on if they are all different.
Empty Discover page
When you first create a new dataset, you may find that the Discover page is empty as shown in the following image. This can happen because the algorithms of the platform are busy working in the background to group your messages into clusters. Depending on the number of messages in the data source, this could take up to a few hours to process.

Layout
You can find in the following image the layout of Discover, as well as an example of a cluster. In the image, the platform detected that these messages share the common theme of the comfort of the hotel beds:
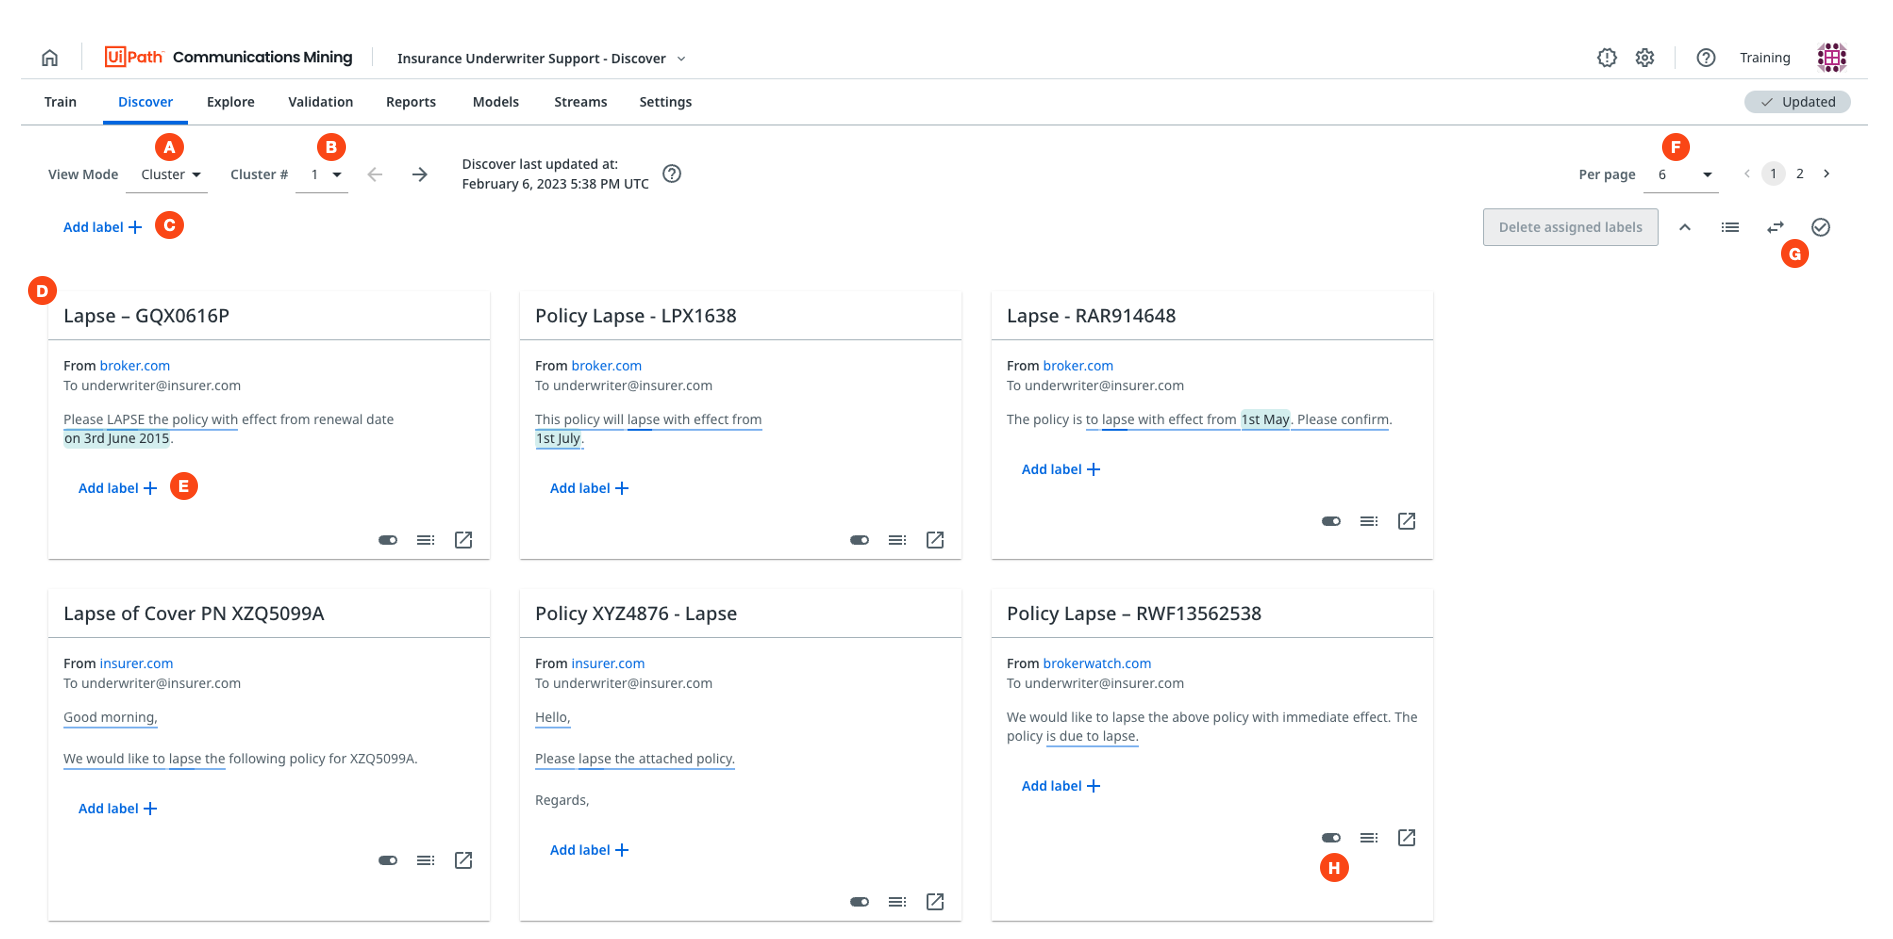
Layout explained:
A- Toggle button to switch between Cluster and Search mode.B- Dropdown menu that allows you to switch between different clusters.C- Button to apply a label to all of the messages shown on the page.D- One of 6 messages shown from cluster number 7, where each cluster contains 12 messages.E- Button to apply a label to an individual message.F- Dropdown menu to adjust the number of messages shown on the page, between 6 and 12.G- Buttons to adjust and invert the selection of messages on the page.H- Button to deselect a message to exclude it from labels added in bulk.
Highlighting common themes in Discover
As depicted in the following image, Discover highlights the parts of a message that most contribute to that message being included in the cluster, helping you identify the common themes quicker:
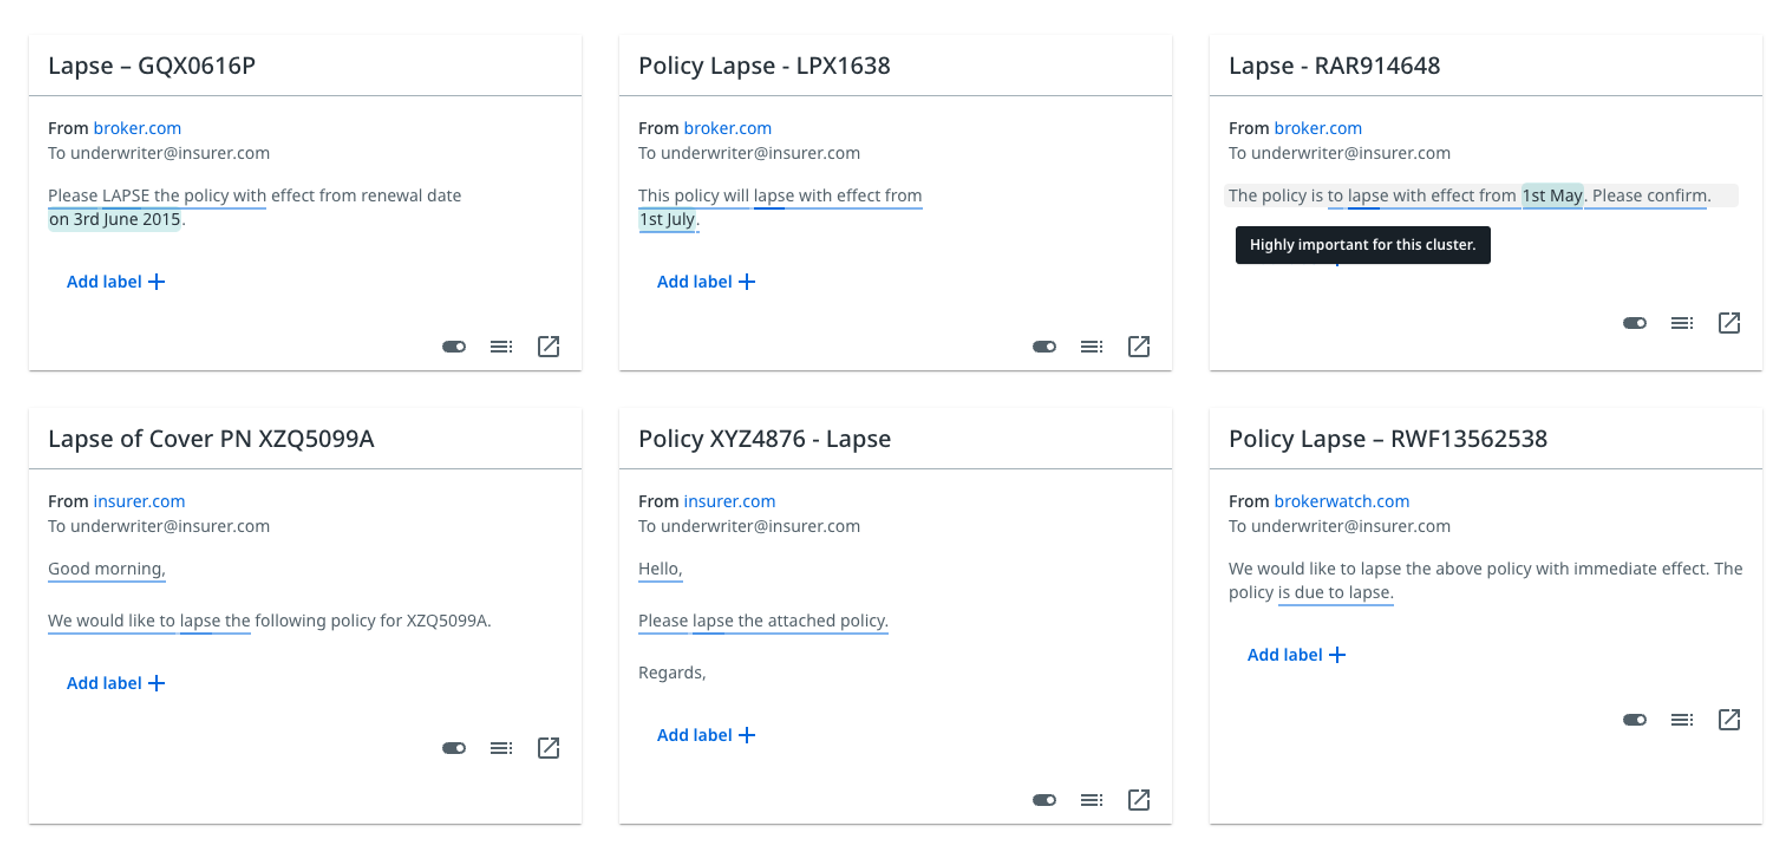
- The darker lines indicate more importantparts of the span. Hover over it for more details.
- The lighter coloured lines indicate a medium and slightly weaker contribution to the cluster.
Key steps
This section describes the process for annotating a dataset that does not have sentiment analysis enabled. If you do have sentiment analysis enabled, the process is very similar, you also select a positive or negative sentiment when applying each label. In addition, you can use neutral label names where the sentiment denotes whether its the positive or negative version of that concept. For more details on annotating with sentiment analysis, check Training with label sentiment analysis enabled.
-
Review each message in the cluster
-
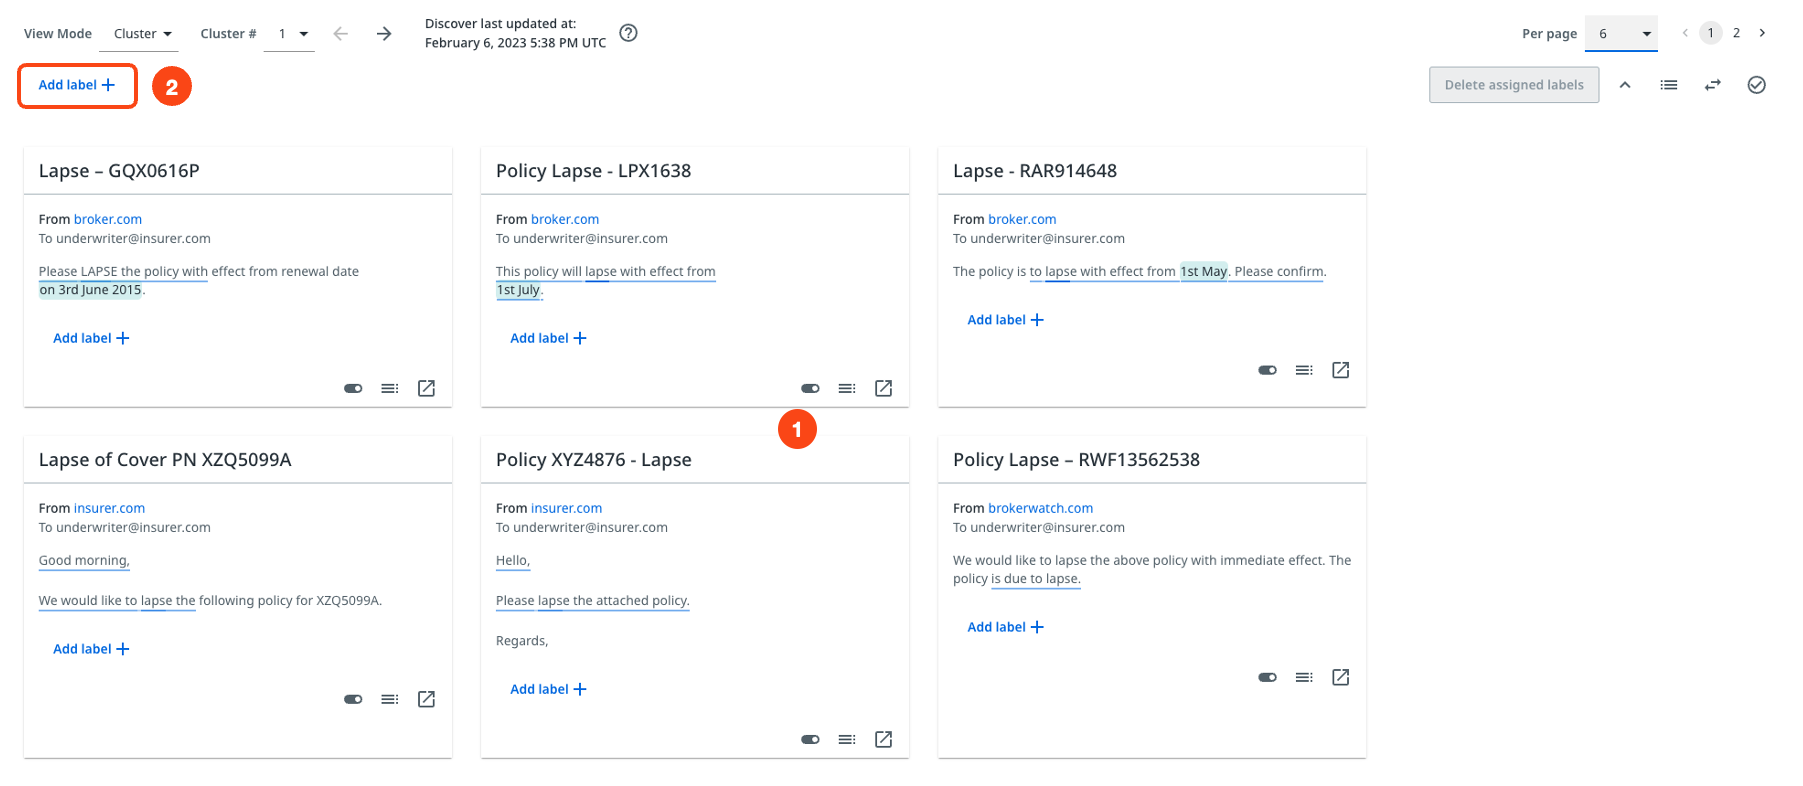
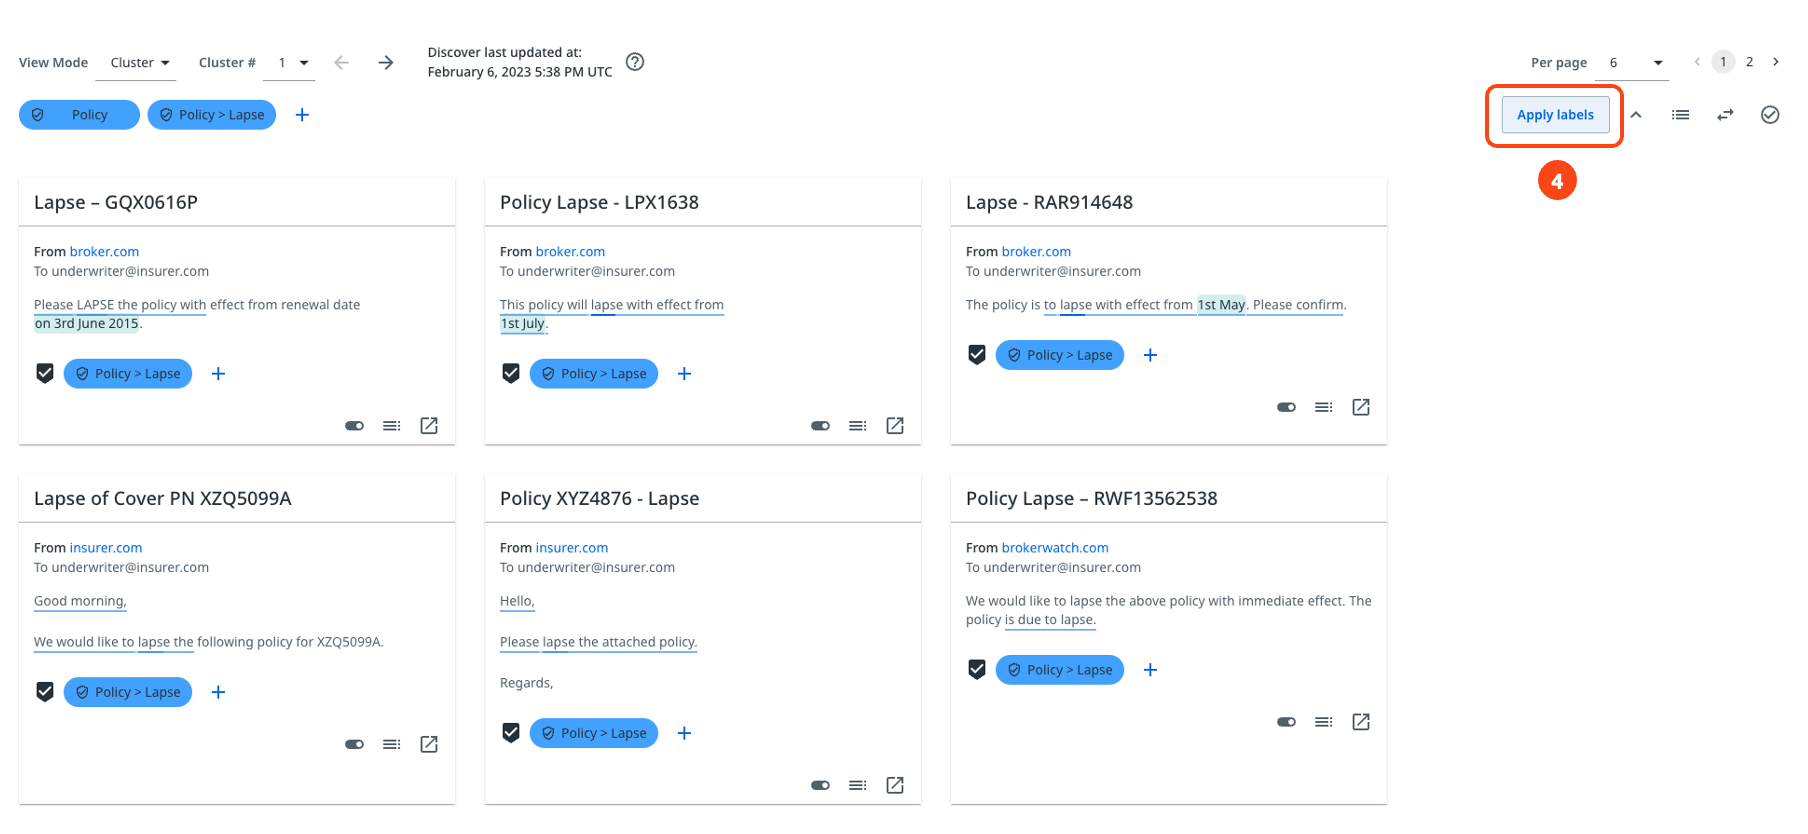
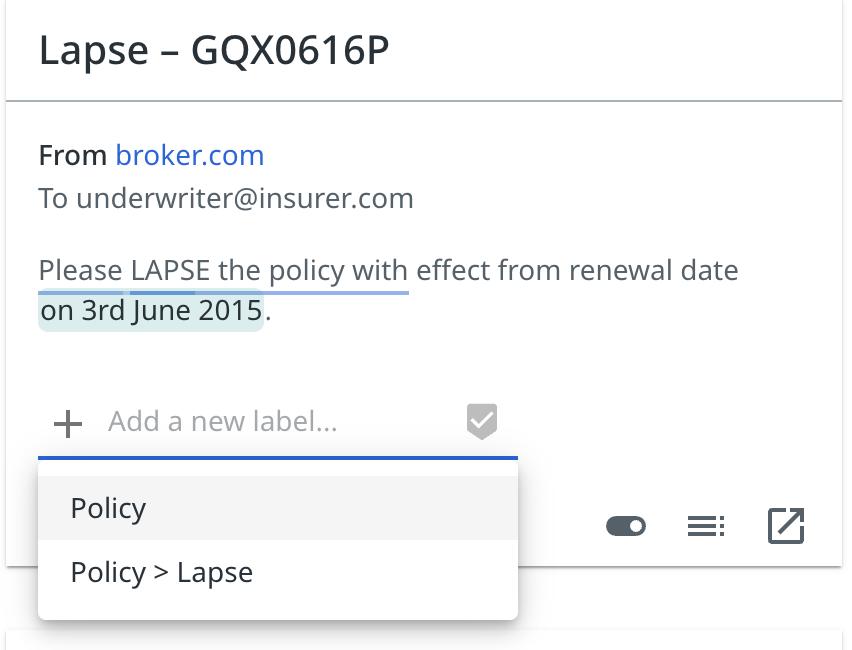
If you think there is a label that applies to all messages on the page, select Add label.
-
Enter the name of the label, and hit Enter or select the pin button that appears. The pin button allows you to add several labels at once, if you enter the name of another label and select the pin button again.

This step does not apply the label yet.
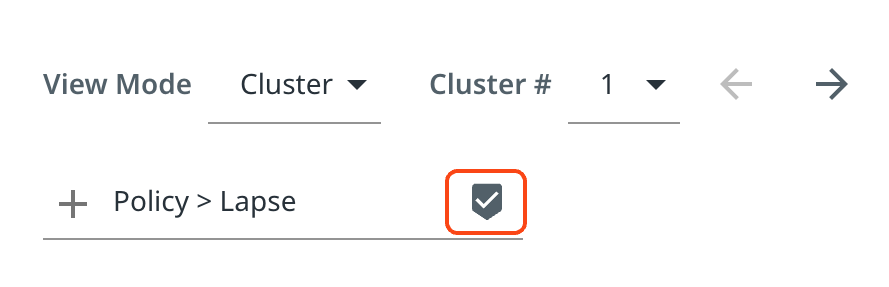
-
Select Apply labels to assign the labels to the messages. The assigned labels appear on every message card in the Discover page.
Alternatively, you can add a label to individual messages by selecting Add label + on a message card.
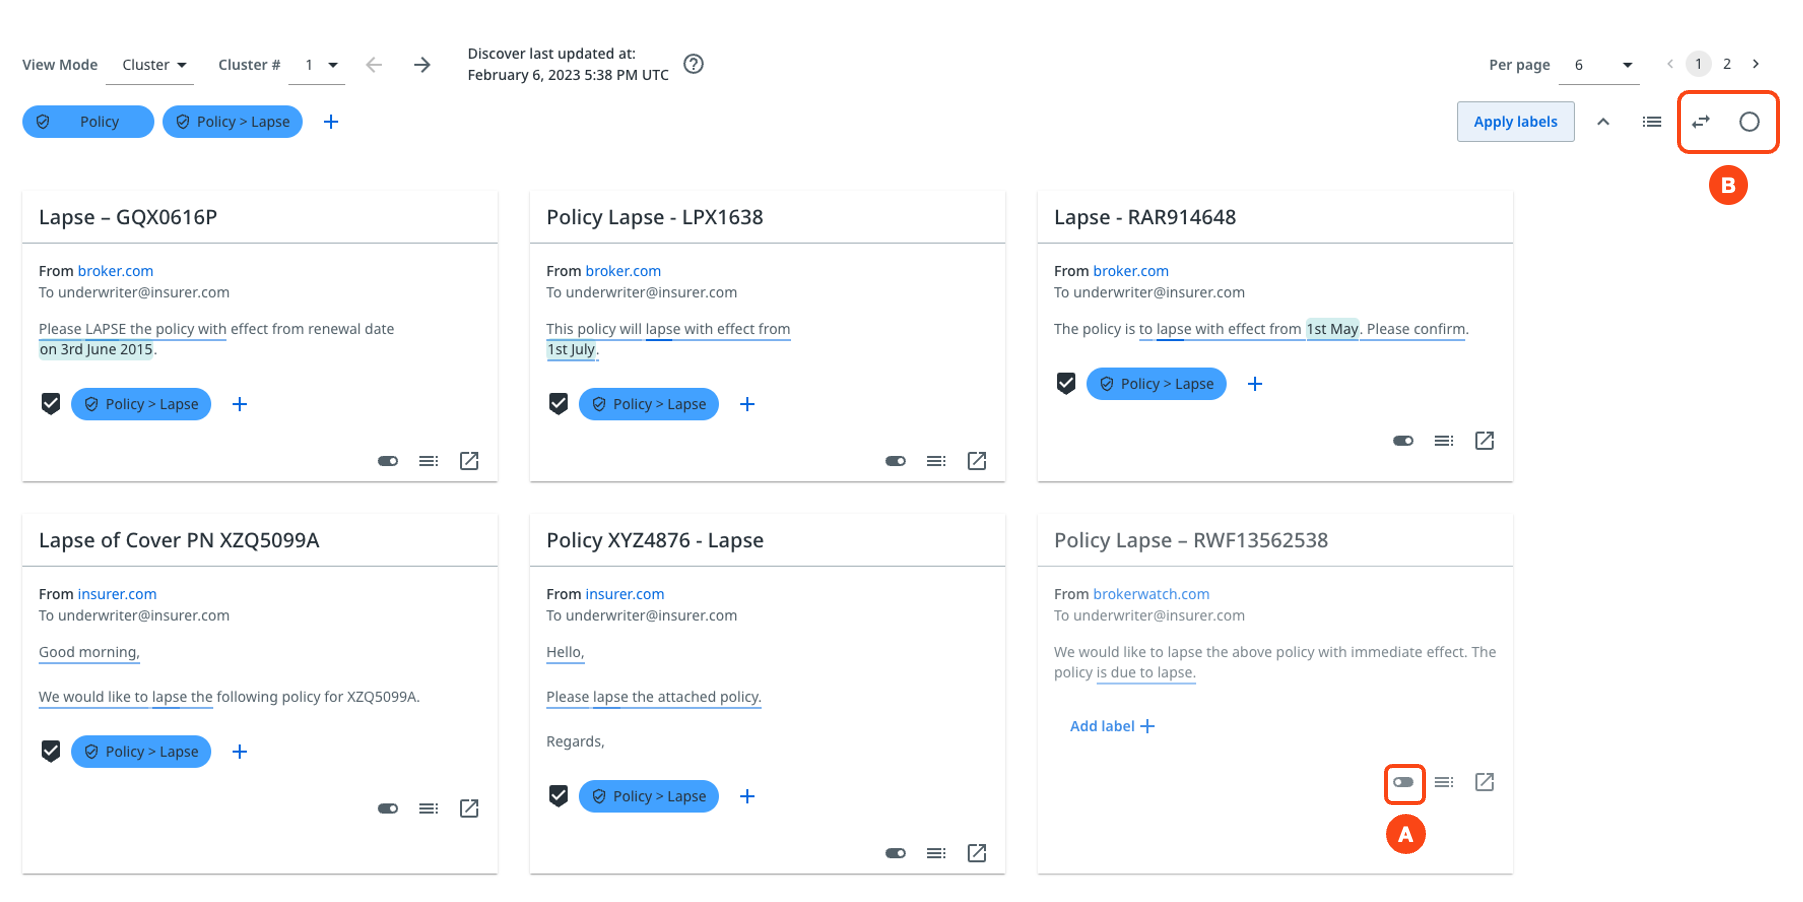
If you want to add a label to a group of messages on the page, but want to exclude one or more, you can deselect them using the toggle button. Check highlight A in the following image. You can then invert the selection, or deselect or reselect all using the buttons in highlight B of the following image.
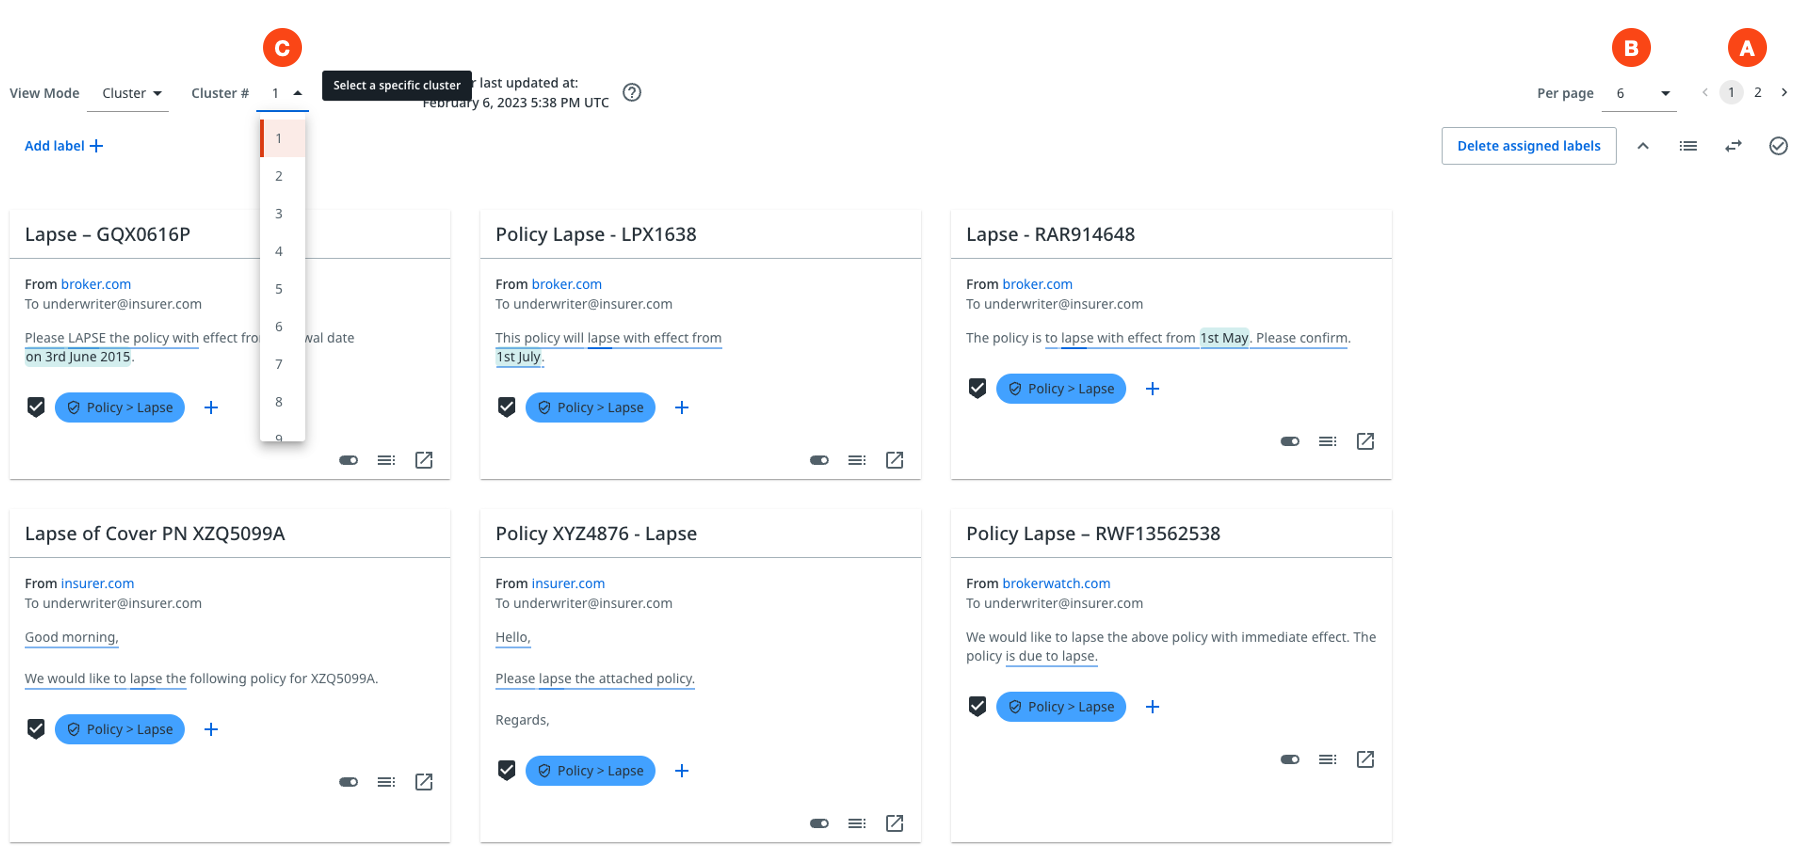
The next image highlights the following actions:
- A - View different pages of the same cluster by selecting the page numbers or arrows.
- B - Adjust the number of messages per page using the Per page dropdown list.
- C - Once the cluster is annotated, continue with a new cluster using the Cluster # dropdown list.
The model will present you with 30 clusters. Make sure you work your way through them to create a solid basis for the Explore phase. However, if a cluster is not relevant to you, skip it.
Discover begins to retrain after a significant amount of training is completed. After 180 messages have been annotated, which is half of the clusters, Discover will retrain and update the clusters. Continue working through them until you have reviewed at least 30.