Orchestrator
2022.4
false
Banner background image
Orchestrator User Guide
Last updated Feb 15, 2024

Managing Triggers

Creating a Time Trigger

  1. In a folder, navigate to Automations > Triggers and on the Triggers page, click Add a new trigger. The Create Trigger page is displayed.
  2. Select Time as the trigger type.
  3. In the Name field, add a name for the trigger to easily identify it.
  4. From the Process Name drop-down menu, select the process you want to configure a time trigger for.
  5. From the Job Priority drop-down menu, select the priority of the job. The default value is Inherited, meaning that the job priority is the same as the one defined for the selected process.
  6. From the Runtime type drop-down menu, select the runtime used to execute the jobs that are launched by the trigger.
  7. On the Execution Target tab, select your jobs' allocation mechanism and execution target.

    Desciption


    Dynamic allocation

    Allocate Dynamically

    Dynamic allocation with no explicit account and machine selection allows you to execute a foreground process multiple times under the account and machine that become available first. Background processes get executed on any account, regardless if it's busy or not, as long as you have sufficient runtimes.

    Using the Allocate Dynamically option you can execute a process up to 10000 times in one job.


    Account

    The process is executed under a specific account. Specifying only the account results in Orchestrator allocating the machine dynamically. Specifying both the account and the machine template means the job launches on that very account-machine pair.


    Machine

    The process is executed on one of the host machines attached to the selected machine template. Specifying only the machine template results in Orchestrator allocating the account dynamically. Specifying both the account and the machine template means the job launches on that very account-machine pair.

    Note: Make sure the required runtime licenses to execute the job are allocated to the associated machine template.
     

    Hostname

    After selecting a machine template, the Hostname option is displayed, allowing you to select the desired workstation/robot session to execute the process.

    All available sessions in the active folder are displayed, either unconnected, disconnected, or connected.

    Note: Only unattended runtimes can be used to configure the mapping. Make sure the required runtime licenses to execute the job are allocated to the associated machine template.

    Select valid account-machine mappings

    The process can be executed on specific account-machine pairs.

    Note:
    • A warning is displayed upon selecting a hostname that is not active (i.e., with the Unresponsive or Disconnected status).

    • Accounts part of mappings that are employed in triggers cannot be deleted or unassigned from the folder the trigger resides in. Make sure the account is not set as an execution target in a trigger so you can delete them.

    Note: A warning is displayed upon selecting a hostname that is not active (i.e., with the Unresponsive or Disconnected status). Jobs scheduled to be executed by the inactive session remain in a Pending state until the corresponding connection to Orchestrator is made.
    • To acknowledge your selection of the inactive hostname, click Confirm.

    • To go back and select another hostname, click Cancel.

    Configuring the same trigger with the same account-machine mapping, but with the additional hostname selection doubles the number of jobs to be executed.
    • For example, say you configured a trigger T1 with the account A1 mapped to the machine template MT1. A number of ten jobs are queued in this configuration.

      Later on, you configure the same trigger T1 with the account A1 mapped to the machine template MT1, but now you also select a hostname H1. The same ten jobs are queued again for this case, as Orchestrator interprets the configuration as new.

  8. On the Arguments tab, provide values for input arguments if your process has any.
  9. From the Timezone drop-down menu, select the time zone according to which the trigger is to be set off.
    Note:
    • The trigger time zone is not dependent on the tenant time zone. You can set a different time zone for your time trigger execution.
    • Locations that use daylight saving time (DST) are listed in their UTC offset. The UTC offset is not increased when DST is in effect. For example, during the DST period, the London time zone is displayed as UTC+00:00.
    • You do not have to adjust the time zone in order to account for DST, as Orchestrator's schedule mechanism automatically takes into account when launching a job. A job scheduled to run at 12:00 runs at 12:00 both in winter and summer.
  10. Select the execution frequency of the trigger (Minutes, Hourly, Daily, Weekly, Monthly, Advanced). On the right side of this section, configure the details depending on the chosen option (frequency, exact time, or a cron expression). Orchestrator uses an open-source library to parse and display cron descriptions, which can be found here.
  11. From the Non-working days restrictions drop-down menu, select a non-working days calendar, if you want your trigger to stop firing on certain non-business days.
  12. Turn on the Schedule ending of job execution toggle to select a job termination strategy.
    Note:
    • The amount of time specified here elapses according to the specifications, even if the job is queued. For example, if you schedule a job to run at 1 p.m. and set it to stop after 20 minutes, the job stops at 1:20 p.m. even if it had stayed in a queue until 1:15 p.m., and then started.
    • The Schedule ending of job execution options of a trigger are preserved for manually started jobs.

    For example, say you created the trigger T1 and you activated the following job ending schedules:

    • Schedule ending of job execution:Stop a job after 10 mins
    • Schedule automatic "Kill", if the job does not stop:Kill job after 2 mins

      On the Automations > Triggers page, when you click Start a Job Now for the trigger T1, the Start Job page opens with the job ending schedules already applied, the same ones you configured when you created the trigger.

    • Select Stop from the drop-down - attempts to gracefully end the execution after the defined time interval has passed since the job is stuck in a Pending state (set the time to a minimum of 1 minute, maximum of 10 days, 23 hours and 59 minutes);
      Example: Orchestrator will attempt to stop jobs that have been stuck for at least 10 minutes in Pending.
      docs image
    • Select Kill from the drop-down - attempts to forcefully end the execution after the defined time interval has passed since the job is stuck in a Pending state (set the time to a minimum of 1 minute, maximum of 10 days, 23 hours and 59 minutes);

      Example: Orchestrator will attempt to kill jobs that have been stuck for at least 10 minutes in Pending.
      docs image
    • Select Stop from the drop-down and enable the If the job does not stop, kill it option - attempts to gracefully end the execution after the defined time interval has passed since the job is stuck in a Pending state and then attempts to forcefully end it after the defined time interval has passed since the job is stuck in a Stopping state (set the time to a minimum of 1 minute, maximum of 10 days, 23 hours and 59 minutes).

      Example: Orchestrator will attempt to stop jobs that have been stuck in Pending for at least 10 minutes. If the termination does not happen, Orchestrator will attempt killing those jobs that have been Stopping for at least 20 minutes.
      docs image
  13. Turn on the Schedule automatic trigger disabling toggle, and enter the date and time when the trigger is to be disabled. The selected time zone influences when the time trigger gets disabled.
  14. To keep the same account-machine context configured for starting the job, check the Keep Account/Machine allocation on job resumption box. This optimizes your license and resource usage.

Creating a Queue Trigger

Note: Queue triggers and SLA predictions are interdependent in terms of queue-process association. So whenever configuring one, the other is prefilled such as to have parity between the configurations. Say I define a queue trigger for queue Y to use process X. SLA predictions for queue Y can only be made using process X, therefore X is prefilled and read-only when enabling queue SLA for Y.
  1. In a folder, navigate to Automations > Triggers and on the Triggers page, click Add a new trigger. The Create Trigger page is displayed.
  2. Select Queue as the trigger type.
  3. In the Name field, add a name for the trigger to easily identify it.
  4. From the Process Name drop-down menu, select the process you want to configure a time trigger for.
  5. From the Job Priority drop-down menu, select the priority of the job. The default value is Inherited, meaning that the job priority is the same as the one defined for the selected process.
  6. From the Runtime type drop-down menu, select the runtime license type.
  7. On the Execution Target tab, select your jobs' allocation mechanism and execution target.

    Desciption


    Account

    The process is executed under a specific account. Specifying only the account results in Orchestrator allocating the machine dynamically. Specifying both the account and the machine template means the job launches on that very account-machine pair.

    Machine

    The process is executed on one of the host machines attached to the selected machine template. Specifying only the machine template results in Orchestrator allocating the account dynamically. Specifying both the account and the machine template means the job launches on that very account-machine pair.

    Note: Make sure the required runtime licenses to execute the job are allocated to the associated machine template.

    Hostname

    After selecting a machine template, the Hostname option is displayed, allowing you to select the desired workstation/robot session to execute the process.

    All available sessions in the active folder are displayed, either unconnected, disconnected, or connected.

    Note: Only unattended runtimes can be used to configure the mapping. Make sure the required runtime licenses to execute the job are allocated to the associated machine template.
    Note: A warning is displayed upon selecting a hostname that is not active (i.e., with the Unresponsive or Disconnected status). Jobs scheduled to be executed by the inactive session remain in a Pending state until the corresponding connection to Orchestrator is made.
    • To acknowledge your selection of the inactive hostname, click Confirm.

    • To go back and select another hostname, click Cancel.

    Configuring the same trigger with the same account-machine mapping, but with the additional hostname selection doubles the number of jobs to be executed.
    • For example, say you configured a trigger T1 with the account A1 mapped to the machine template MT1. A number of ten jobs are queued in this configuration.

      Later on, you configure the same trigger T1 with the account A1 mapped to the machine template MT1, but now you also select a hostname H1. The same ten jobs are queued again for this case, as Orchestrator interprets the configuration as new.

  8. On the Arguments tab, provide values for input arguments if your process has any.
  9. Fill in the Minimum number of items to trigger the first job.,Maximum number of pending and running jobs allowed simultaneously.,Another job is triggered for each _ new item(s) fields.

    Description


    Minimum number of items that trigger the first job

    The item-processing job is only started after the targeted queue has at least this number of new items. Deferred queue items are not counted.

    Maximum number of pending and running jobs allowed simultaneously

    The maximum number of allowed pending and running jobs, counted together. For 2 or more jobs allowed simultaneously, the third option needs to be defined as described below.

    Another job is triggered for each __ new item(s)

    The number of new queue items (on top of the number configured for the Minimum number of items that trigger the first job option) to trigger a new job.

  10. From the Timezone drop-down menu, select the time zone according to which the queue trigger gets disabled.
  11. From the Non-working days restrictions drop-down menu, select a non-working days calendar if you want your trigger to stop firing on certain non-business days.
  12. Turn on the Schedule ending of job execution toggle to select a job termination strategy.
    Note:
    • The amount of time specified here elapses according to the specifications, even if the job is queued. For example, if you schedule a job to run at 1 p.m. and set it to stop after 20 minutes, the job stops at 1:20 p.m. even if it had stayed in a queue until 1:15 p.m., and then started.
    • The Schedule ending of job execution options of a trigger are preserved for manually started jobs.

    For example, say you created the trigger T1 and you activated the following job ending schedules:

    • Schedule ending of job execution:Stop a job after 10 mins
    • Schedule automatic "Kill", if the job does not stop:Kill job after 2 mins

      On the Automations > Triggers page, when you click Start a Job Now for the trigger T1, the Start Job page opens with the job ending schedules already applied, the same ones you configured when you created the trigger.

    • Select Stop from the drop-down - attempts to gracefully end the execution after the defined time interval has passed since the job is stuck in a Pending state (set the time to a minimum of 1 minute, maximum of 10 days, 23 hours and 59 minutes);
      Example: Orchestrator will attempt to stop jobs that have been stuck for at least 10 minutes in Pending.
      docs image
    • Select Kill from the drop-down - attempts to forcefully end the execution after the defined time interval has passed since the job is stuck in a Pending state (set the time to a minimum of 1 minute, maximum of 10 days, 23 hours and 59 minutes);

      Example: Orchestrator will attempt to kill jobs that have been stuck for at least 10 minutes in Pending.
      docs image
    • Select Stop from the drop-down and enable the If the job does not stop, kill it option - attempts to gracefully end the execution after the defined time interval has passed since the job is stuck in a Pending state and then attempts to forcefully end it after the defined time interval has passed since the job is stuck in a Stopping state (set the time to a minimum of 1 minute, maximum of 10 days, 23 hours and 59 minutes).

      Example: Orchestrator will attempt to stop jobs that have been stuck in Pending for at least 10 minutes. If the termination does not happen, Orchestrator will attempt killing those jobs that have been Stopping for at least 20 minutes.
      docs image
  13. Enable the Schedule automatic trigger disabling toggle, and enter the date and time when the trigger is to be disabled. The selected time zone selected influences when the queue trigger gets disabled.
  14. To keep the same account-machine context configured for starting the job, check the Keep Account/Machine allocation on job resumption box. This optimizes your license and resource usage.

Editing a Trigger

Click the corresponding Edit button, make the intended changes, and then click Update in the Edit Trigger window.

Disabling a Trigger

To disable a trigger, click the corresponding More Actions button, and then Disable. A disabled time trigger is marked by the icon in front of it. A disabled queue trigger is marked by the icon in front of it.

Alternatively, you can select it and then click the Disable icon.

You can also configure your trigger to get automatically disabled at a specific date and time in the future. You can do that as follows:

  1. Click the corresponding Edit button.
  2. Enable the Schedule automatic trigger disabling option.
  3. Fill in the desired date and time. The trigger time zone influences when the trigger gets disabled.
  4. Click Update for the changes to take effect.
    By default, a trigger gets disabled automatically after 10 failed launches if it hadn’t been successfully launched in the last day.
    This value can be customized using the Triggers.DisableWhenFailedCount parameter.

Enabling a Trigger

To enable a trigger, click the corresponding More Actions button, and then Enable. An enabled time trigger is marked by the icon in front of it. An enabled queue trigger is marked by the in front of it.

Alternatively, you can select it and then click the Enable icon.

Removing a Trigger

To remove a trigger, click the corresponding More Actions button, and then Remove.

Alternatively, you can select it and then click Remove.

Displaying Jobs Started by a Trigger

To display the jobs started by a specific trigger, click the More Actions button, and then View jobs. This displays the Jobs window, which comprises all the jobs executed in the past through the selected trigger (if any).

Managing Non-Working Days

Creating New Calendars

  1. Open the Non-Working Days tab on the Settings page. A list with all the calendars previously defined is displayed, ordered alphabetically.

    The BankHoliday calendar is displayed here, if it exists. This calendar is created when upgrading your Orchestrator to 19.10 if you had non-working days defined in your previous version.

  2. Click Add to create a new calendar and type its name in the blank, highlighted field. The name must be unique, and it may contain a maximum of 150 alphanumeric characters. You can't create calendars with no names or containing only space characters.
  3. Click Save or press Enter on your keyboard to save the new calendar. The calendar is saved and displayed in the list of calendars.
  4. For the selected calendar, define non-working days either manually, or by uploading a .csv file, or a combination of these.
  5. In the Triggers page, when creating a new trigger or editing an existing one, select the desired calendar from the Non-working days restriction drop-down.
    Note: When you use non-working days, the trigger time zone must be the same as the tenant time zone (Tenant> Settings> General), because calendar restrictions cannot be applied in different time zones. A tenant without an explicitly defined time zone inherits it from the host.
  6. Click Update for the changes to take effect. Every change made to a calendar subsequently propagates to all triggers associated with that calendar.

By Manually Selecting Non-working Days

  1. Click a calendar to select it. The calendar on the right-side of the window is updated accordingly.
  2. On the displayed calendar click the dates on which you want your triggers to stop firing. Click again on a selected date to deselect it.
  3. Click Save to save the selected dates as non-working days.


By Uploading .csv Files

Enables you to upload a series of dates into a selected calendar, directly from a .csv file. Please note that the file must be populated beforehand using a predefined format so that the upload operation is successful. The new dates from your uploaded file overwrite any dates already contained in the calendar.

Note:
The .csv file must contain 
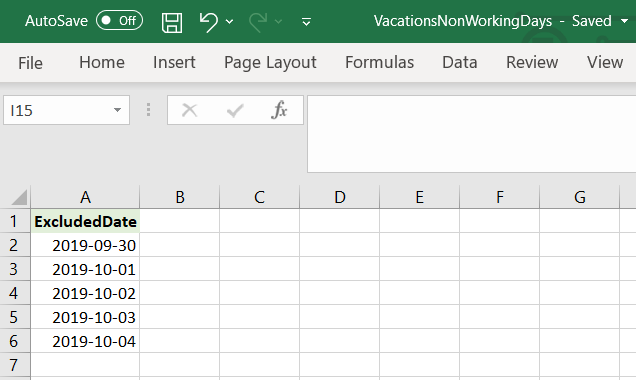
ExcludedDate column header. All the non-working days must be within that column, written in the YYYY-MM-DD, YYYY/MM/DD or YYYY MM DD format.

See the Example section below for more information.

Option 1
  1. On the selected calendar click Upload csv.
  2. Navigate to the desired .csv file, select it and click Open. Orchestrator parses the file to confirm it meets formatting rules (see the example section below).
  3. Click Yes in the confirmation dialog to overwrite the dates already contained in the calendar with the new dates from your uploaded file.
  4. Click Save to save the modified calendar.
Option 2
  1. Drag & Drop the desired . file over the selected calendar's top part. Orchestrator parses the file to confirm it meets formatting rules (see the example section below).
  2. Click Yes in the confirmation dialog to overwrite the dates already contained in the calendar with the new dates from your uploaded file.
  3. Click Save to save the modified calendar.  
Example

Let's say you upload into a calendar the content of the following .csv file. An easy way to create such a file is to populate the data into an excel file and save it as a .csv file:


Or you can download a .csv file with all the pre-filled column headers and customize it to your needs.

Notice that this file contains a predefined column header, ExcludedDate. Enter all your non-working days in that column, using YYYY-MM-DD,YYYY/MM/DD or YYYY MM DD format.


Renaming Calendars

  1. Select a calendar in the Non-Working Days tab on the Settings page.
  2. Modify the name of the calendar.
  3. Click Save to save the changed name.

Deleting Calendars

  1. Select a calendar in the Non-Working Days tab on the Settings page.
  2. Click Delete.
  3. Click Yes in the pop-up window to confirm your intent. The calendar is deleted.
    Note: You can only delete calendars that are not attached to any triggers.

You can also remove non-working days from a calendar. After clicking on a non-working day it is no longer marked. Remember to save your changes.

Was this page helpful?

Get The Help You Need
Learning RPA - Automation Courses
UiPath Community Forum
Uipath Logo White
Trust and Security
© 2005-2024 UiPath. All rights reserved.