- Release Notes
- Getting Started
- Governance
- Logging

Automation Ops user guide
Settings for Studio Policies
This page documents the settings available for StudioX, Studio, and Studio Pro policies. Unless stated otherwise, the settings are available in all template versions and for all Studio profiles.
The Studio Pro profile is no longer available in Studio 2021.10 and later versions. The last Studio Pro policy template version is 20.10.3.
Design
Select the Design tab to configure settings found in Home (Studio Backstage View) > Settings > Design.
- To govern a setting, select the check box or toggle next to it.
- To allow Studio users to edit a setting, select Allow users to override. This makes the setting from the policy the default, but allows users to change it. By default, overriding in Studio is not allowed.
Save and Publish
- Enforce Analyzer before Publish - Select Yes to prohibit publishing projects with Workflow Analyzer errors.
- Enforce Analyzer before Push/Check-In - Select Yes to prohibit sending projects with Workflow Analyzer errors to remote repositories.
- Enforce Analyzer before Run - Select Yes to prohibit running and debugging files or projects with Workflow Analyzer errors.
- Analyze RPA XAML Files Only - Select Yes to exclude XAML files with test cases from analysis when running the Workflow Analyzer for a project. This setting applies when the analyzer is triggered manually, as well as when it is enforced and triggered automatically before running/debugging a project and publishing test cases or a project.
- Enforce Check-In before Publish - Select Yes to restrict publishing projects added to source control repositories when they have local changes.
- Use “Smart File Paths” (For StudioX policies only) - Select Yes to enable the use of relative paths instead of absolute paths for file locations from the user profile folder so they work when shared with other users.
- Enable AI activity suggestions - Select Yes to enable AI activity suggestions in the Add activity search bar. If this option is enabled, when the activity search bar opens, Studio sends information about the current context to a UiPath® AI service that suggests activities to add based on the location in the workflow from which the search bar was opened.
- Export Analyzer results (For Studio policies only) - Select Yes to export the results of each workflow analysis to a JSON file in the project folder.
- Enforce Release Notes (For Studio policies only) - Select Yes to make the Release Notes field mandatory when publishing a project.
- Enable discovered activities - Select Yes to show all official activities packages that can be installed in a project.
- The Enable AI activity suggestions, Export Analyzer results, and Enforce Release Notes settings are available starting with the 21.10.0 policy template version.
- The Enable discovered activities setting is available starting with the 23.4.0 policy template version.
Design Style
-
Default language - Select the default language to use for expressions in new projects (VisualBasic or C#). Users can select a different language than the default when creating a new project.
In Studio versions prior to 2021.10, this setting applies only to the Studio Pro profile. In Studio 2021.10 and later versions, this setting applies only to the Studio profile.
-
Create docked annotations - Select the default way in which annotations are added to activities: Select Yes for docked inside the activity, or No for floating next to the activity.
-
Use Modern for new projects - Select Yes to enable a modern experience of working with UI Automation for new projects, with new and improved activities, recorders, and wizards. For more information, see Modern Design Experience.
-
Slim View for Collapsed Activities - Select Yes to reduce the space collapsed activities take up by enabling a view that only displays the title bar.
-
Default compatibility - Select the default target framework to use when creating a project in the Studio profile: Windows - Legacy, Windows, or Cross-platform.
-
Allowed compatibility frameworks - Select the target frameworks that are allowed when creating a project in the Studio profile: Windows - Legacy, Windows, or Cross-platform.
Note:- In Studio versions prior to 2023.10, you cannot open Windows - Legacy projects if creating Windows-Legacy projects is disabled.
- In Studio versions after 2023.10, you can open Windows - Legacy projects even if creating Windows-Legacy projects is disabled.
-
Connections service for new projects - Select Yes to use the Integration service as the default way to manage connections in all activities that support it. When enabled, the activities in the GSuite, Mail. and Office 365 packages that support this feature default to using Integration service connections for authentication.
-
Show deprecation banner for legacy projects - Select yes to control the visibility of the message that is displayed at the top of the window when opening a Windows - Legacy project.
- The Default compatibility and Allowed compatibility frameworks settings are available starting with the 21.10.0 policy template version.
- The Enforce Analyzer before Push/Check-In setting is available starting with the 22.4.0 policy template version.
- The Show deprecation banner for legacy projects setting is available starting with the 22.10.5 policy template version.
General
The General tab is not available for StudioX policies.
Select the General tab to configure settings found in Home (Studio Backstage View) > Settings > General.
- To govern a setting, select the check box or toggle next to it.
- To allow Studio users to edit a setting, select Allow users to override. This makes the setting from the policy the default, but allows users to change it.
The following settings are available:
- Send anonymous UI Descriptors - Select Yes to enable the sending of anonymous UI descriptors created using the Object Repository.
Feature Toggles
Select the Feature Toggles tab to control settings that are not available in the Studio UI and can only be configured using governance policies, such as setting a limit for the number of consecutive runs that can be triggered from StudioX, hiding certain activities from StudioX users, or enabling the collection of usage data in Application Insights in your organization's Azure portal.
Only the options in the General Settings section are available in policy template versions prior to 21.10.0.
General Settings
- Allow users to send feedback - Select Yes to enable the Send feedback form that users can access from the Studio title bar. This option is enabled by default.
- Hide Getting Started screen - Select Yes to hide the welcome screen with links to the UiPath® Academy, an introduction video, and tutorials that is displayed when users open Studio. Even if you don't hide this screen, users can still hide it after it is first displayed. This option is not enabled default.
- Publish applications metadata - Select Yes to track what external applications and URLs are targeted by an automation.
The Publish applications metadata setting is available starting with the 23.4.0 policy template version.
Control What Activities Are Available (StudioX Policies Only)
The following settings enable you to prevent the use of certain activities in StudioX:
- Show “Developer Panel” - Select Yes to allow enabling the Show Developer filter in the Activities panel which gives users access to activities that were not designed for StudioX.
- Activities to hide - Enter a list of activities that you want not to be available to users. Add the activity namespaces (e.g.
UiPath.Excel.Activities.Business.WriteRangeX) separated by comma (,). The activities added to this list are hidden in all projects where the package they are included in is installed as a dependency.
Collect Telemetry Data
If you want to monitor and analyze what users in your organization are doing in Studio, you can set up an Application Insights resource in your Azure portal and configure Studio to send telemetry data to it. To enable this feature, simply enter the instrumentation key of your Application Insights instance in the Application Insights target text box.
For more information about the telemetry data that is sent to Application Insights and how you can use it, refer to Governance in the Studio guide.
Prevent Production Runs (StudioX Policies Only)
The following settings enable you to limit the number of consecutive runs that can be triggered from StudioX for a project that has no changes, and to configure logging settings for events where the limit is exceeded.
- Permitted consecutive runs with no change - Maximum number of consecutive times a project without changes can be run from Studio.
- Dialog message prompts for users - Message to display to the user in a dialog box when the allowed number of consecutive executions is exceeded. The dialog box prompts the user to either publish the project or cancel the execution.
- Queue name to store the run count - Orchestrator queue in which to log information when the allowed number of consecutive executions is exceeded. The following information is logged for each event: username, project name, hash of the main XAML file, and timestamp from the local machine.
- Folder location of the queue - Orchestrator folder containing the queue in which to save the records.
Manage Sources
Select the Manage Sources tab to configure the following settings related to package and template sources:
-
Allow users to add or remove feeds - Select whether to allow users to add and remove package sources. This option is not enabled by default.
-
Allow users to enable or disable feeds - Select whether to allow users to enable and disable package sources. This option is not enabled by default.
-
Append Orchestrator feeds - Select whether to automatically enable the Orchestrator Tenant (available if the tenant libraries feed is enabled in Orchestrator) and Orchestrator Host feeds in Studio. This option is enabled by default.
-
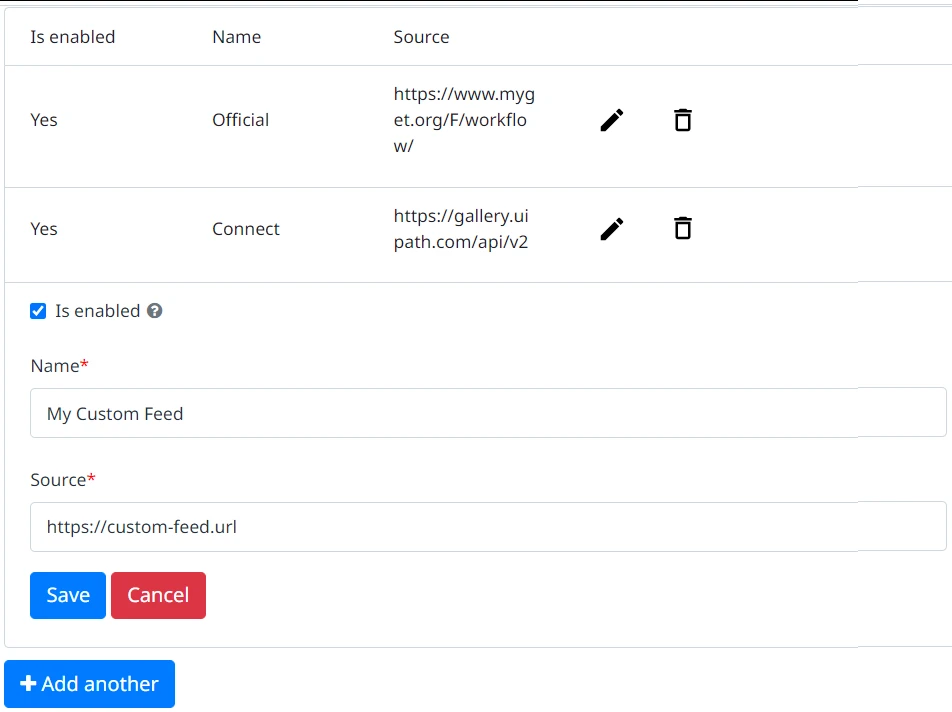
Default package sources - Configure which package sources are available in Studio. The Official and Connect (Marketplace) feeds are added by default.
-
To add a new feed, select Add another, provide the following information, and then select Save:
- Select whether to enable or disable the feed.
- Enter the name of the feed.
- Enter the source URL.
-
To edit a feed, select Edit.
-
To remove a feed, select Delete.

-
-
Template feeds - Configure which of the following template feeds are available in Studio: Getting Started, Official, and Marketplace. To disable a feed, select Edit next to it, and then deselect the Is enabled option. The feeds are enabled by default.
Note:The template feeds settings are available starting with the 22.10.0 policy template version.
Workflow Analyzer
Select the Workflow Analyzer tab to configure which Workflow Analyzer rules to enable, set the action, and configure parameters. The rules that are enabled by default in each Studio profile are also enabled by default in the policies for that profile, together with their default parameters, if applicable. For more information, read about the Workflow Analyzer in the Studio and StudioX guides.
General Workflow Analyzer Settings
-
Allow users to override - If enabled, users are allowed to make changes to Workflow Analyzer settings. This option is not enabled by default.
-
Referenced or embedded - Select how to define the settings for Workflow Analyzer rules and counters in the policy:
- Referenced - Define the settings using a JSON file configured similarly to the RuleConfig.json file. If you select this option, indicate the full path to the file in the Referenced Rules file box. The location must be accessible from the Studio machines.
- Embedded - Define the settings using the options on the policy page. This is the default option.
Manage Workflow Analyzer Rules
If you selected the Embedded option:
- To add a new rule, select Add another.
- To edit a rule, select Edit next to it.
- To remove a rule, select Delete next to it.
Configure Workflow Analyzer Rules
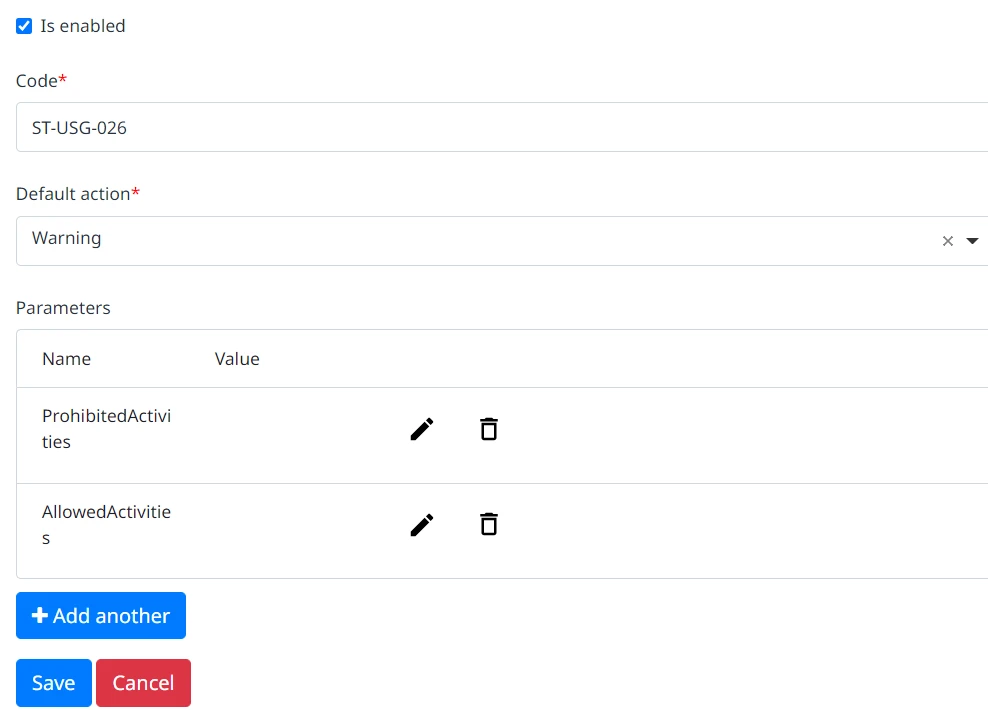
For each rule, configure the following options, and then select Save to apply the changes:
-
Is enabled - Select whether to enable the rule.
-
Code - Enter the rule code.
-
Default action - Select the default action of the rule: Error, Warning, Info, or Verbose.
-
Parameters - Configure the rule parameters:
-
To add a new parameter, select Add another.
-
To edit a parameter, select Edit.
-
To remove a parameter, select Delete.

-
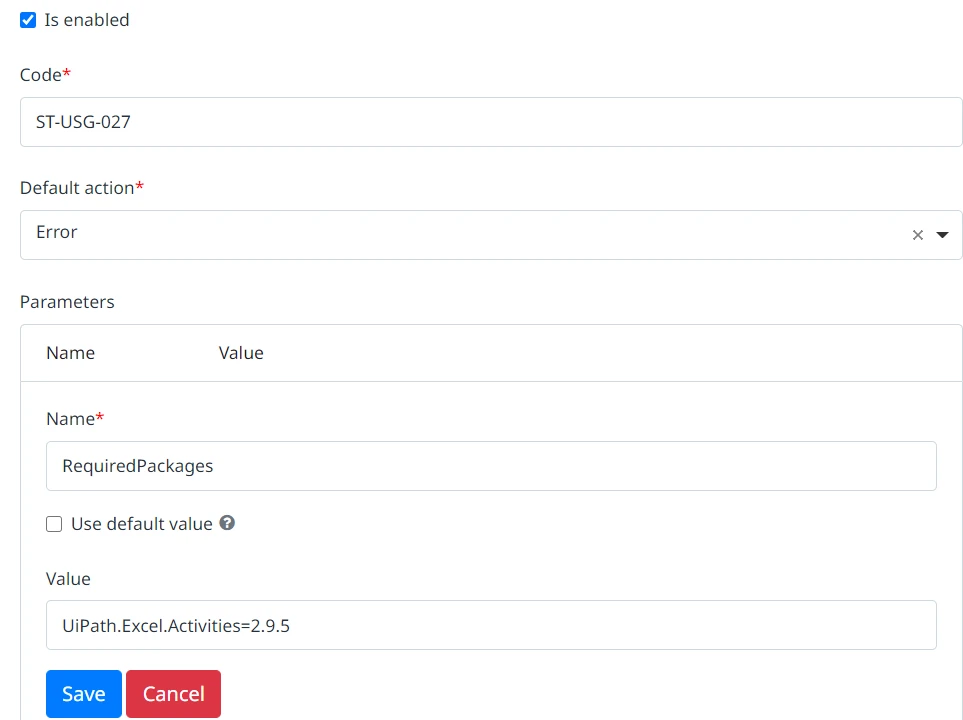
For each parameter, configure the following options, and then select Save to apply the changes:
-
Name - Enter the parameter name.
-
Use default value - Select this option to use the parameter value available by default in Studio. To use a custom value, deselect this option and enter the value in the provided text box.

To find out how to configure the default Workflow Analyzer rules, read about the rules included in Studio, the UiPath.UIAutomation.Activities, UiPath.Excel.Activities, and UiPath.Mail.Activities packages.
Location
Select the Location tab to govern the following:
-
Settings found in Home (Studio Backstage View) > Settings > Locations.
- To govern a setting, select the check box or toggle next to it, and then use the provided text box to enter the location. If no location is provided, the default location in Studio is used.
- To allow Studio users to edit a setting, select Allow users to override. This makes the setting from the policy the default, but allows users to change it.
The following location settings are available:
- Project path - The default location where projects are created.
- Publish process URL - The default location where processes are published when the custom feed option is selected.
- Publish library URL - The default location where libraries are published when the custom feed option is selected.
- Publish project templates URL - The default location where project templates are published when the custom feed option is selected.
- Workflow Analyzer Rules Location - The path to the folder from which to add custom Workflow Analyzer rules to Studio.
-
Which of the following feeds are available to users as publish locations: Custom, Personal workspace, Tenant processes, Folder packages, Host libraries, Tenant libraries, Local. To disable a feed, deselect the check box next to it. All locations are enabled by default.
Note:The publish locations setting is available starting with the 22.10.0 policy template version.
Team
The settings on the Team tab are available starting with the 21.10.0 policy template version.
Select the Team tab to configure and enforce allowed repositories for working with Git source control.
Configure the following:
-
Allow saving a project locally (For StudioX policies only) - Select True to allow users to save projects on their machine outside of local repositories. When set to False, users can't select This PC as the location when creating a new project in StudioX.
-
Allow editing locations of source control repositories - Select True if you want users to be able to edit the repository locations they use for their projects. Select False if you want only the allowed repositories to be available to users.
-
Create a list of allowed repositories. For each location you want to add to the list, select Add location, provide the following information, and then select Save to apply the changes:
- Repository name - Enter a name for the repository.
- Repository URL - Enter the URL of the repository. Adding a base URL (e.g.
https://github.com/MyOrg/) allows the use of repositories with child URLs (e.g.https://github.com/MyOrg/RPA). - Default repository folder (For StudioX policies only) - Optionally, enter a default folder for the location.
When adding locations, take into account that:
- Any strings placed between
%in the name and URL fields are interpreted as environment variables on the user machines. For example, this allows you to create repositories for each user named with the same pattern as the Windows username (e.g.first_name.last_name), and then use the%username%variable for both the name (e.g.%username%'s Repo) and URL (e.g.https://github.com/MyOrg/%username%). - All spaces in the URL field are replaced with hyphens (
-). Using the previous example with%username%, if usernames contain a space (first_name last_name), the URL resolves tofirst_name-last_name.
- Design
- Save and Publish
- Design Style
- General
- Feature Toggles
- General Settings
- Control What Activities Are Available (StudioX Policies Only)
- Collect Telemetry Data
- Prevent Production Runs (StudioX Policies Only)
- Manage Sources
- Workflow Analyzer
- General Workflow Analyzer Settings
- Manage Workflow Analyzer Rules
- Configure Workflow Analyzer Rules
- Location
- Team