UiPath を使用したエージェンティック オートメーションとオーケストレーションについて学ぶ
Maestro
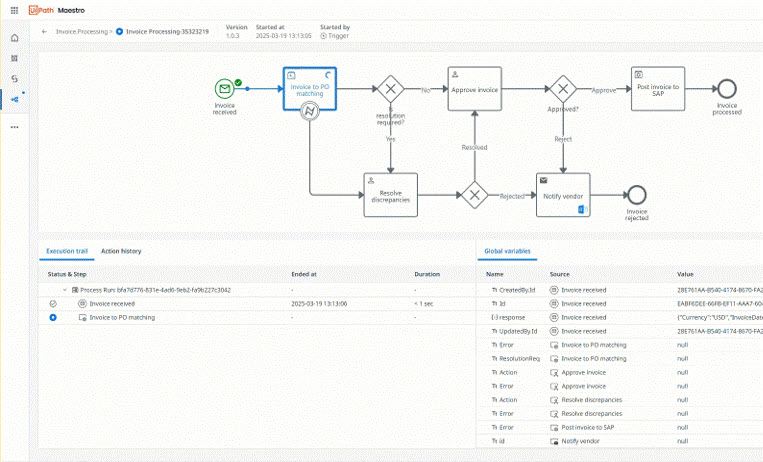
AI エージェント、オートメーション、そして人をエンドツーエンドのプロセス全体でオーケストレーションし、測定可能な成果を実現する
UiPath の利用を開始する
基本のエンドツーエンドのプロセスを構築する
エンドツーエンドの業務プロセスを 1 つのワークフローでオーケストレーションする
シンプルな RPA オートメーションを作成する
Studio で最初のプロジェクトを作成する
はじめてのエージェントを構築する
Studio Web ではじめてのエージェントを構築する
会話型エージェントを構築する
Studio Web のローコード デザイナーを使用して会話型エージェントを作成する
コネクタ
コネクタによる、外部システムへの安全で標準化されたアクセス方法について学ぶ
人気のトピック
ファイアウォールを構成する
Automation Cloud に必要なネットワーク トラフィックを許可する
Studio をインストールする
マシンに Studio をインストールする
Studio のチュートリアル
はじめてのオートメーションをステップ バイ ステップで構築する
データ所在地
Automation Cloud のデータの保存場所を選択する
Studio Web の概要
ブラウザーでオートメーションを作成して実行する
更新内容
ScreenPlay の一般提供を開始
エージェンティックな動作とコグニティブ機能がデスクトップで利用可能に
Autopilot for Maestro
自然言語のプロンプトを BPMN ワークフローに変換する
エージェント設計用のキャンバス
エージェントをより迅速かつ簡単に設計する
Test Cloud がオンプレミスで利用可能に
独自のインフラストラクチャを使用して自動化されたテストを安全に設計する
Automation Suite の新製品
AI Trust Layer とソリューションが Automation Suite で利用可能に