orchestrator
latest
false
- Orchestrator Mobile 应用
重要 :
新发布内容的本地化可能需要 1-2 周的时间才能完成。

Orchestrator mobile app
上次更新日期 2026年4月16日
iOS - 根证书颁发机构
概述
在 iOS 移动设备上使用 Orchestrator 应用程序连接到 Orchestrator 实例时,您可能会遇到 SSL 或 ATS 证书问题。
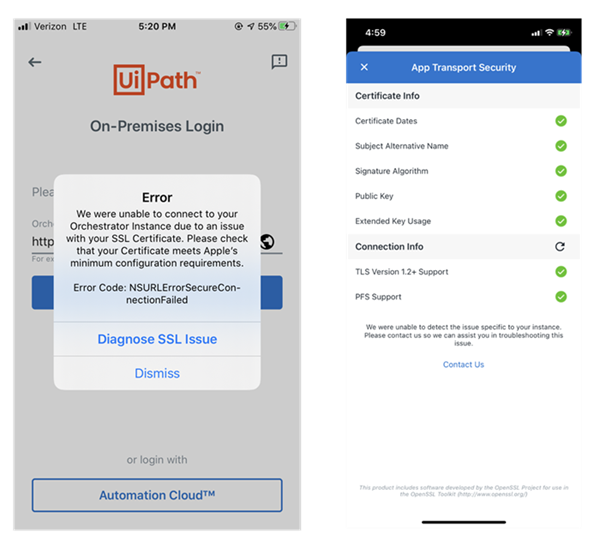
以下过程通过直接将根 SSL 证书安装到您的 iOS 移动设备并信任该证书来帮助您解决此问题。
查找根证书颁发机构
解决证书问题的第一步是确保 iOS 移动设备可以查看 Orchestrator 实例的根证书颁发机构。这可帮助您的 iOS 移动设备正确识别和导入证书。
在托管 Orchestrator 安装的计算机上:
- 打开 Internet 信息服务 (IIS) 管理器。
- 导航到“站点”>“UiPath Orchestrator”。
- 在右侧的“操作”面板中,单击“绑定…”。“网站绑定”窗口将打开。
- 选择您的 Orchestrator 实例绑定 URL,然后单击“编辑…”。“编辑网站绑定”窗口将打开。
- The SSL certificate field displays the name of your Orchestrator certificate. For more details about it, click View... .
- 切换到“详细信息”选项卡。搜索“颁发者”和“主题”字段。有两种情况:
- The Issuer and Subject values are the same: The SSL certificate selected at step 5 is your Root Certificate. Continue with Exporting the Root Certificate Authority, as described below.
- The Issuer and Subject values are different: The SSL certificate selected at step 5 is not your Root Certificate. In this case, continue with the procedure below.
要使用证书管理器查找根证书,请执行以下操作:
- 打开“运行”命令窗口,键入
certmgr.msc,然后单击“确定”。 - Navigate to Trusted Root Certification Authorities > Certificates. Search for the certificate that matches the Issuer from the previous procedure (step 6).
- 双击以打开“证书”窗口。
- 切换到“详细信息”选项卡。在属性列表中,选择“基本约束”。有两种情况:
- The bottom panel displays
Subject Type=CA: Your Root Certificate Authority is configured correctly. Jump to the section Exporting the Root Certificate Authority. - The bottom panel does not display
Subject Type=CA: You need to create a new certificate (see below) that includes the Root Certificate Authority, import it to the certificate stores (see below), and set it to your Orchestrator instance (see below).
- The bottom panel displays
要创建根证书颁发机构,请执行以下操作:
使用 PowerShell 创建新证书。脚本中必须包含 -TextExtension @("2.5.29.19={text}cA=true),这点很重要。
示例脚本
$rootcert = New-SelfSignedCertificate -certstorelocation cert:\localmachine\my -dnsname ROOT-CA-NAME-HERE -KeySpec KeyExchange -HashAlgorithm "SHA256" -KeyUsage CertSign, CRLSign, DigitalSignature -KeyExportPolicy Exportable -TextExtension @("2.5.29.19={text}cA=true")
$rootpwd = ConvertTo-SecureString -String ‘PUT-PASSWORD-HERE’ -Force -AsPlainText
$rootpath = ‘cert:\localMachine\my\’ + $rootcert.thumbprint
$rootCA = Export-PfxCertificate -cert $rootpath -FilePath c:\Users\uipath\Desktop\root-cert.pfx -Password $rootpwd

$cert = New-SelfSignedCertificate -certstorelocation cert:\localmachine\my -dnsname DNS-NAME-HERE -KeySpec KeyExchange -HashAlgorithm "SHA256" -Signer $rootcert
$pwd = ConvertTo-SecureString -String ‘PUT-PASSWORD-HERE’ -Force -AsPlainText
$path = ‘cert:\localMachine\my\’ + $cert.thumbprint
Export-PfxCertificate -cert $path -FilePath c:\Users\uipath\Desktop\signed-cert.pfx -Password $pwd
如果要创建对单独的证书进行签名的根证书颁发机构,请使用下面的脚本模板:
$rootcert = New-SelfSignedCertificate -certstorelocation cert:\localmachine\my -dnsname ROOT-CA-NAME-HERE -KeySpec KeyExchange -HashAlgorithm "SHA256" -KeyUsage CertSign, CRLSign, DigitalSignature -KeyExportPolicy Exportable -TextExtension @("2.5.29.19={text}cA=true") $rootpwd = ConvertTo-SecureString -String ‘PUT-PASSWORD-HERE’ -Force -AsPlainText $rootpath = ‘cert:\localMachine\my\’ + $rootcert.thumbprint $rootCA = Export-PfxCertificate -cert $rootpath -FilePath c:\Users\uipath\Desktop\root-cert.pfx -Password $rootpwd $cert = New-SelfSignedCertificate -certstorelocation cert:\localmachine\my -dnsname DNS-NAME-HERE -KeySpec KeyExchange -HashAlgorithm "SHA256" -Signer $rootcert $pwd = ConvertTo-SecureString -String ‘PUT-PASSWORD-HERE’ -Force -AsPlainText $path = ‘cert:\localMachine\my\’ + $cert.thumbprint Export-PfxCertificate -cert $path -FilePath c:\Users\uipath\Desktop\signed-cert.pfx -Password $pwd
$rootcert = New-SelfSignedCertificate -certstorelocation cert:\localmachine\my -dnsname ROOT-CA-NAME-HERE -KeySpec KeyExchange -HashAlgorithm "SHA256" -KeyUsage CertSign, CRLSign, DigitalSignature -KeyExportPolicy Exportable -TextExtension @("2.5.29.19={text}cA=true") $rootpwd = ConvertTo-SecureString -String ‘PUT-PASSWORD-HERE’ -Force -AsPlainText $rootpath = ‘cert:\localMachine\my\’ + $rootcert.thumbprint $rootCA = Export-PfxCertificate -cert $rootpath -FilePath c:\Users\uipath\Desktop\root-cert.pfx -Password $rootpwd $cert = New-SelfSignedCertificate -certstorelocation cert:\localmachine\my -dnsname DNS-NAME-HERE -KeySpec KeyExchange -HashAlgorithm "SHA256" -Signer $rootcert $pwd = ConvertTo-SecureString -String ‘PUT-PASSWORD-HERE’ -Force -AsPlainText $path = ‘cert:\localMachine\my\’ + $cert.thumbprint Export-PfxCertificate -cert $path -FilePath c:\Users\uipath\Desktop\signed-cert.pfx -Password $pwd
要导入证书,请执行以下操作:
- 双击 PowerShell 脚本创建的
.PFX文件。将打开“证书导入向导”。 - 选择“本地计算机”,然后单击“下一步”。
- 在向导的“证书存储”页面上,选择“将所有的证书都放入下列存储”,将“证书存储”设置为“个人”,然后单击“下一步”。
- 完成导入。
- 重复上述步骤,但这次将步骤 3 中的“证书存储”设置为“受信任的根证书颁发机构”。
将新证书导入到两个证书存储后,将其设置为您的 Orchestrator 实例。
要将新证书设置为 Orchestrator,请执行以下操作:
- 打开 Internet 信息服务 (IIS) 管理器。
- 导航到“站点”>“UiPath Orchestrator”。
- 在右侧的“操作”面板中,单击“绑定…”。“网站绑定”窗口将打开。
- 对于每个网站绑定,单击“编辑…”。“编辑网站绑定”窗口将打开。
- 在“SSL 证书”字段中,选择新证书,然后单击“确定”。
重要提示:
请务必更新每个网站绑定的证书。
- 更新所有绑定后,从“操作”面板中单击“重新启动”。
导出根证书颁发机构
正确配置证书后,您需要将其导出为 iOS 移动设备可识别的格式。
- 打开“运行”命令窗口,键入
certmgr.msc,然后单击“确定”。 - 导航到“受信任的根证书颁发机构”>“证书”,然后搜索您的 Orchestrator 证书。
- 右键单击它,然后选择“所有任务”>“导出…”。将打开“证书导出向导”。
- 选择“DER 编码二进制 X.509 (.CER)”导出格式。
- 完成导出。
信任证书
您可以将 .CER 文件发送到 iOS 移动设备。轻按收到的文件,即可开始下载证书。系统会显示以下提示消息:
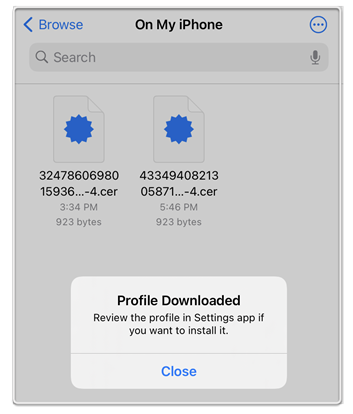
要在您的 iOS 移动设备上信任证书,请执行以下操作:
- 转到“设置”>“通用”>“配置文件”。证书将显示在“下载的配置文件”下。
- 单击该证书,然后单击“安装”。这将验证证书。
- 单击“完成”并返回到“通用”页面。
- Go to About > Certificate Trust Settings. The newly installed certificate is displayed under ENABLE FULL TRUST FOR ROOT CERTIFICATES. If you don't see the certificate, make sure the Basic Constraint certificate property has
Subject Type=CA. - 如果证书开关处于“关”状态,请将其切换为“开”。