# Working with Heatmap
> This page guides you through the user journey of interacting with the Heatmap. The page leads you through various stages, including creating test cases in Studio, setting up Heatmap ratios and configurations, examining and testing transactions, and running test sets. Check the following topics to start using the Heatmap.
This page guides you through the user journey of interacting with the Heatmap. The page leads you through various stages, including creating test cases in Studio, setting up Heatmap ratios and configurations, examining and testing transactions, and running test sets. Check the following topics to start using the Heatmap.
You work with a two-level heatmap view:
* **Application components**: Visual containers that group related SAP transactions under a specific component or module.
* **Transactions**: Boxes inside components representing individual SAP transactions or programs. Eachbox displays transaction data, such as:
+ Transaction name
+ SAP code
+ Testing status and coverage
## Create test cases in Studio
To get started with the Heatmap, you need to create test cases for your SAP transactions with UiPath Studio. To ensure the Heatmap accurately shows which transactions are covered by tests and their status, you need to set the Studio project **Enable SAP monitoring** setting to **True**.
### Linkage and connection between heatmap, test cases and transactions
All transactions inside the heatmap have a unique label automatically assigned to them at runtime. The label has the following format: `TRAN:SAP_CODE` or `PROG:SAPPROGRAM`.
The information about real executed transactions and their dependencies are collected at runtime. To allow test cases to link to the executed transactions, go to your Studio project settings, and under **UI Automation Classic**, set **Enable SAP monitoring** to **True**. This setting is available only for **Test Automation** projects.
:::note
Enabling SAP monitoring under **UI Automation Classic** will also link test cases and transactions for UI Automation modern activities.
:::
For example, a transaction named `Create Purchase Order`, with `ME21N` as its SAP code, has the `TRAN:ME21N` label. If you want to create a test case for this transaction, the same label appears in the **Labels** field of the **Create Test Case** dialog box.

## Configure Heatmap ratios and settings
After you create test cases in UiPath Studio for your SAP transactions, you can configure the ratios and settings based on which the Heatmap will display the test relevance and coverage.
### Heatmap ratios
The heatmap is created based on the values of the following SAP attributes:
SAP attribute
Description
Default value
Users
The number of users using the transaction.
40
Execution
The number of executions per transaction.
10
Time
The overall processing time it takes for a transaction to execute.
10
Object
The number of development objects used in a transaction, such as screens, functional modules, tables.
10
Intensity
The type of transaction:
High intensity transactions are considered the Create type of transaction
Medium-intensity transactions are considered the Change type of transactions
Low-intensity transactions are considered the Display type of transactions)
30
:::important
The sum of all assignment ratios must equal `100`.
:::
#### Direct connection to SAP instance
The settings can be adjusted based on the customer needs from the top-right corner of the heatmap .

#### Connection with CSV file
You configure them when downloading the CSV file from SAP, in the **Parameters** tab.

### Changing the heatmap settings
The Heatmap is generated based on the values of five SAP attributes. You can configure the assignment ratios to prioritize the attributes most relevant to your testing strategy.
The following table shows the SAP attributes used to generate the Heatmap:
SAP attribute
Description
Default value
Users
The number of users using the transaction.
40
Execution
The number of executions per transaction.
10
Time
The overall processing time it takes for a transaction to execute.
10
Object
The number of development objects used in a transaction, such as screens, functional modules, tables.
10
Intensity
The type of transaction:
High intensity transactions are considered the Create type of transaction
Medium-intensity transactions are considered the Change type of transactions
Low-intensity transactions are considered the Display type of transactions)
30
:::important
The sum of all assignment ratios must equal `100`.
:::
#### Direct connection to SAP instance
1. Select the gear icon  in the top-right.
2. Change the assignment ratios according to your use case.
For example, to highlight the most intense transactions (of type **Create**), rather than the most used ones, change the **User** ratio to `10`, and then the **Intensity** ratio to `60`.

#### Connection with CSV file
After you run the `Z_UIPATH_CUST_HEATMAP_DOWNLOAD` program, go in the **Parameters** tab and configure the ratios.

## Analyze and test transactions
After you create tests for your SAP transactions, and configure the Heatmap ratios, you can start analyzing the results and testing specific transactions. Check the following sections for information on how to leverage the Heatmap.
### Understanding the Heatmap results
The analysis of Heatmap results involves viewing the test coverage of your transactions, filtering test coverage types, and reviewing transaction overviews. Explore the following topics to gain a comprehensive understanding of how to examine Heatmap results.
#### Viewing test coverage for transactions
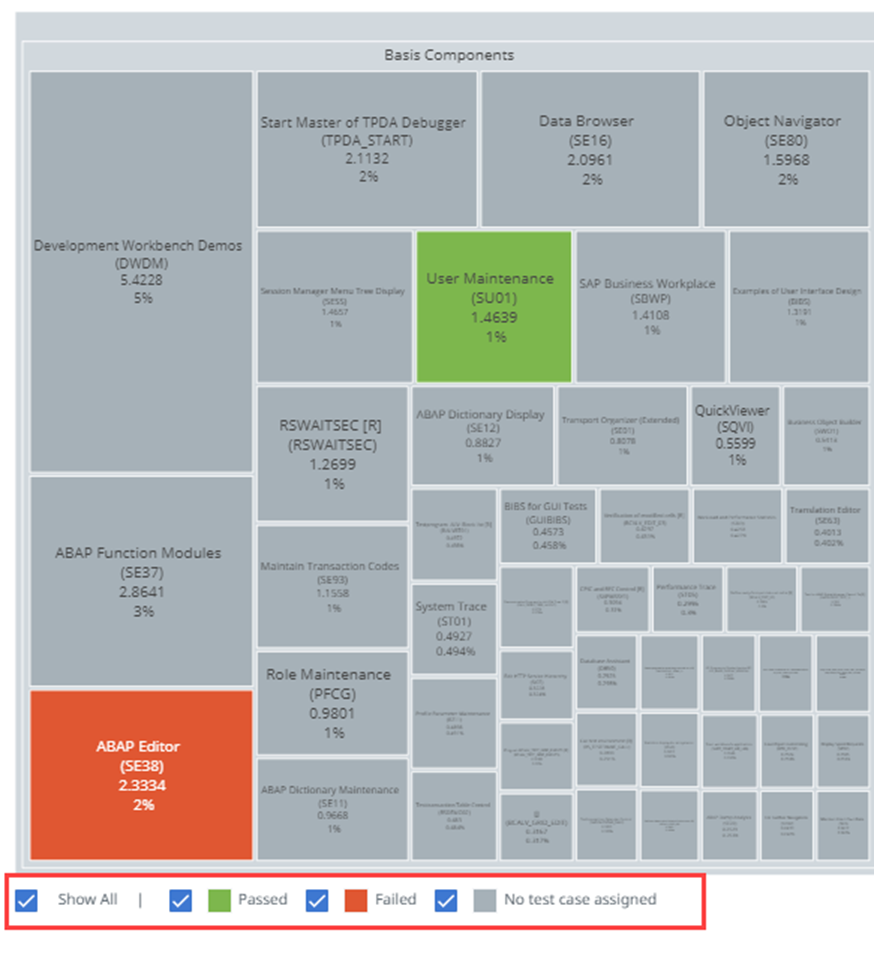
To see which transactions have automated tests, and the results:
1. Under the heatmap, select **Passed** to see the transactions that passed their test results.
2. Under the heatmap, select **Failed** to see the transactions that failed their test results.
3. Under heatmap, select **No test case assigned** to see the transactions that don't have any test cases assigned to them.
4. Under heatmap, select **Show all** (selected by default) to see all the above transactions.
#### Filtering heatmap transactions
1. Open **Heatmap** and select what transactions you want to appear from the **Top Transactions** dropdown:
1. **All transactions** (default)
2. **Top 10 transactions**
3. **Top 20 transactions**
2. Select the start time for transactions from the **Time period** dropdown:
1. **Last Month** (default)
2. **Last Week**
3. **Last Day**
The start and end time of transactions is displayed next to the **Time Period** dropdown.
#### Checking the overview of a transaction
1. Select a transaction from the heatmap.
2. Under **Details of selected transaction: Maintain Transaction Codes**, select **Overview**
3. Check out the **Transaction Name** and its SAP **Code**.
The SAP **Code** of a transaction is used to generate a unique label

### Creating test cases and test sets
After you analyze the results displayed in the Heatmap, you can start improving your testing portfolio, by creating test cases and test sets for uncovered or failed transactions. Check the following pages for steps on creating test cases and test sets for a specific transaction.
#### Creating test cases for a specific transaction
All transactions inside the heatmap have a unique label automatically assigned to them at runtime. The label has the following format: `TRAN:SAP_CODE` or `PROG:SAPPROGRAM`.
The information about real executed transactions and their dependencies are collected at runtime. To allow test cases to link to the executed transactions, go to your Studio project settings, and under **UI Automation Classic**, set **Enable SAP monitoring** to **True**. This setting is available only for **Test Automation** projects.
:::note
Enabling SAP monitoring under **UI Automation Classic** will also link test cases and transactions for UI Automation modern activities.
:::
For example, a transaction named `Create Purchase Order`, with `ME21N` as its SAP code, has the `TRAN:ME21N` label. If you want to create a test case for this transaction, the same label appears in the **Labels** field of the **Create Test Case** dialog box.
1. Select a transaction from the heatmap.
2. Under **Details of selected transaction: Maintain Transaction Codes**, select **Test Cases**.
3. Select **Create Test Case** and configure the test case that you want to create.
You can add other labels next to the one already assigned to the test case.
:::important
When you create a test case for a specific transaction, make sure you leave the label already assigned to the transaction untouched. Otherwise, the test case that you create won't be linked to the transaction. For this example, the label that is already assigned is `TRAN:SE16`.
:::

#### Creating test sets for a specific transaction
1. [Create test cases for a specific transaction](https://docs.uipath.com/test-manager/automation-suite/2023.10/user-guide/working-with-heatmap#creating-test-cases-for-a-specific-transaction).
2. Select the transaction for which you created the test cases.
3. Under **Details of selected transaction: Maintain Transaction Codes**, select **Test Sets**, and configure the test set that you want to create.
:::tip
To ease the process of linking a test set to a transaction, add the label of the transaction to the test set that you want to link. This way you can search for the test set you just created, using that specific label. For this example, the same label we used to create the test cases (`TRAN:SE16`) we added to the test set.
:::

4. After you create the test set, navigate to **Test Sets** in Test Manager.
5. Search for the test set you created and open it.
You can search for the test set using the label that you added at Step 3.
6. Select **Tasks** > **Assign Test Cases** > **Static Assignment**.
7. Search for the test cases that you created at Step 1 and assign them to this test set.
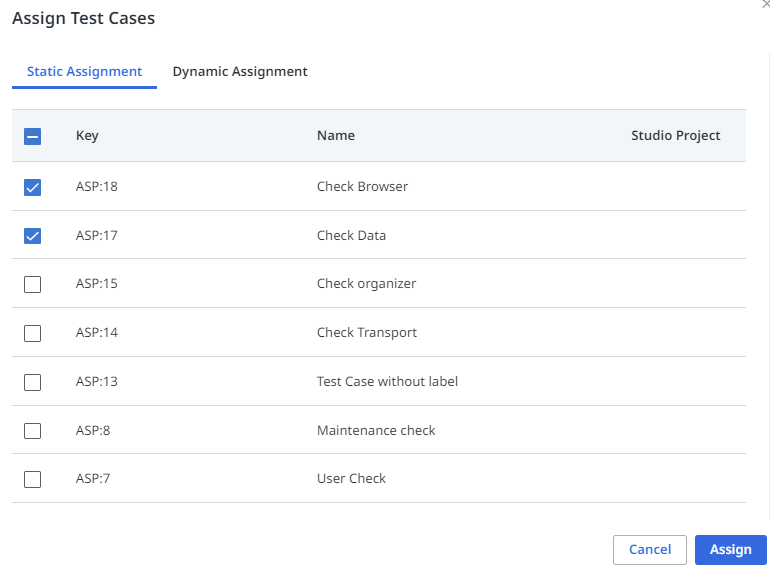
8. Navigate back to the **Heatmap** page, select the transaction, and check out the test set assigned to it.
### Linking Orchestrator test set to a transaction
1. Select a transaction, and under **Details of selected transaction: Maintain Transaction Codes**, select **Test Sets**.
2. Select **Link**, choose the Orchestrator test sets that you want to link, and select **Link**.
## Execute test sets for a transaction
1. Link a test set to a transaction.
2. Select **More Options** inline with the test set that you want to execute.
3. Select one of the following:
* **Execute Manually**
* **Execute Automated**
4. Check out the test results in the heatmap.
## Heatmap attachments
The SAP data that generates the heatmap can be found in Test Manager's **Dashboard**, under **Attachments**:
* For **ConnectSapInstance** as **Data Source**: three JSON files are attached (for **Day**, **Week** and **Month**)
* For **UploadFromCSV** as **Data Source**: the uploaded CSV file is attached.