# Test Results
> When you start executing a test set, Test Manager goes through the following process:
When you start executing a test set, Test Manager goes through the following process:
1. A Test Execution is created in the **Test Results** section of Test Manager. This serves as the container for the test results.
2. For every test case within the executed test set, an empty Test Case Log is generated. This log is attached to the Test Execution and will hold its associated test results.
3. As the execution continues, the Test Manager fills each Test Case Log with results and related log information.
:::note
Every time a test execution is created, Test Case Logs for all associated test cases from the original test set are added. This means existing Test Executions remain consistent, regardless of updates or deletions made to the original test set.
:::
The chart below illustrates the process of executing a test set in Test Manager.

As a consequence, after a test set has been executed, any changes to the test set or its associated test cases do not affect the results from previous executions. Even when a test set is deleted, all the test executions remain unchanged.
Who can see projects
All user roles can see test results.
For more information see [User and Group Access Management](https://docs.uipath.com/test-manager/automation-suite/2023.10/user-guide/managing-users-and-groups#user-and-group-access-management).
## Analyze Test Results
To view test executions, open **Test Results** in Test Manager. The execution of each test set is listed as a test execution entry. To understand how the test executions work behind the scenes, see [Test Results](https://docs.uipath.com/test-manager/automation-suite/2023.10/user-guide/test-results#test-results).

By analyzing your test execution, you can take the following actions:
* Find test results that have been executed manually or automatically through Orchestrator.
* Check the progress on running test executions.
* Open the test set that has been executed.
* Examine logs and attachments.
* Create defects in your defect management system directly from Test Manager, if you have an Application Lifecycle Management tool integration. For more information, see [ALM Tool Integration](https://docs.uipath.com/test-manager/automation-suite/2023.10/user-guide/about-alm-tool-connectors).
By default, the test executions are sorted based on the date on which the execution was finished. Currently running and pending executions are placed at the top.
You can identify the status through the color codes assigned to each test execution, as follows.:
* **Green**: Test cases that passed.
* **Red**: Test cases that failed.
* **Grey**: Test cases without a definitive results, such as test cases that have not been executed yet but are part of a test set that is currently being executed.
### Results from automated tests
The results from automated test executions are imported from Orchestrator automatically. To have your automated tests imported to Test Manager, you need to meet the following condition: The automated test needs to be part of a test set on your Test Manager project. For more information, see [Automated Tests](https://docs.uipath.com/test-manager/automation-suite/2023.10/user-guide/executing-tests#executing-tests).
:::note
If a Test Execution from Orchestrator holds results for test cases from several projects in Test Manager, the test execution is split in Test Manager. The results appear in the projects where the test cases are.
:::
### Overriding test results
Overriding the results of a test case can help in scenarios where the current test result does not accurately reflect the actual behavior of the application and re-execution is not an effective solution. You can override the test results of a test case and then you can clear the operation, if needed.
1. Navigate to **Test Results** and open a test result.
2. From the **Results** tab open a test case log.
3. In the **Assertions** tab, select **Tasks** > **Override result**.
4. In the **Override test result** window configure the following fields:
1. **Change result to** - select whether you want to override the result with the opposite status (**Passed**/**Failed**) or set the result to **None**.
2. **Comment** - Type the reason why you override the result.
5. Select **Confirm**. The test results that you overrode have the following icon next to the test result status: . Select the icon and you can view the override details.
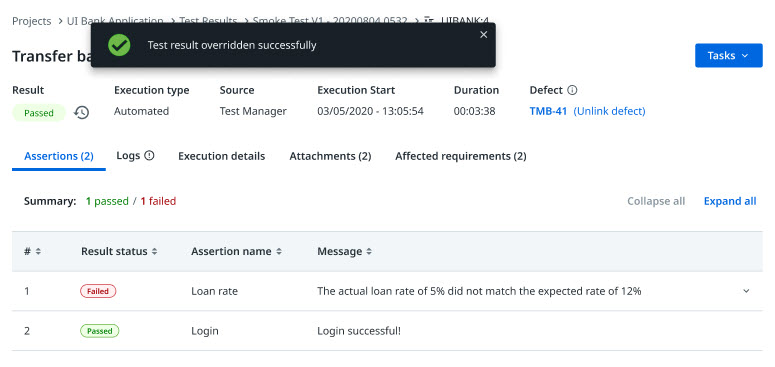
6. Optionally, if you want to clear the override operation, select the  next to the result status of a test case log.
1. In the **Override details** window, select **Clear override**.

7. Optionally, if you want to edit the override operation, select the  next to the result status of a test case log.
1. Perform changes, and click **Confirm**.
### Navigation and search
To quickly find your test results, use the search function and the filters. Navigate within the page using and configuring the paginator. Alternatively, you can use the breadcrumb to navigate between the pages.
1. **Filter** - You can use the filter to narrow your search. For example, you can search for test results by execution type, when the execution was finished or by status. The filters are automatically saved and kept active until you clear them.
2. **Search** - Use the search bar to find test results by their key, execution type or status (requires full search term match). You can use the search bar at the top of the page to look for test results.
### Working with test execution results
To get detailed results from a test execution, go to **Test Results** and click an entry to open the detailed view. A typical test execution detailed view shows information on when the executions started, duration, and [execution logs](https://docs.uipath.com/test-manager/automation-suite/2023.10/user-guide/test-results#analyze-test-results).
You can use the **Reporting Date** filter to set a single date for all the results from the test execution. This is useful when you run tests overnight, where some test cases are executed before and after midnight. Otherwise, the results are going to be split between different dates in the reports.
In the Results section you can examine all the test cases that were executed within the test set. You can take actions for each test case. For more info, see [Execution log](https://docs.uipath.com/test-manager/automation-suite/2023.10/user-guide/test-results#analyze-test-results).
You can also open the executed test set by right-clicking an entry in the **Test Sets** page and selecting **Open Test Set**, or directly within the test execution.

### Execution log
As part of test reporting, execution logs hold information such as execution details (e.g., data variation and screenshots), failed and passed assertions, and a detailed log of execution events.
To open a test case log, go to **Test Results**, open a test execution and then click a test case **Key**.

In the following table, you can view the type of information that is collected during test case execution.
Test execution reporting
Description
Assertions
View failed or passed assertions (e.g., Verify expression activity ), and associated screenshots if any were taken during test case execution. To make sure that Orchestrator takes screenshots during executions, visit the following resources:
Default roles in Orchestrator - to check if the default roles have the Test Case Execution Artifacts permission assigned. In case the default roles don't have this permission, then you can create a custom role with this permission.
Managing roles in Orchestrator - to learn how to create, edit, or import a role in Orchestrator.
Logs
View INFO level logs as part of the RobotLogs , with information about processes, execution robot, and event logs, including failures. Select the icon to go to the Logs tab of the selected test case, for a detailed description of the failure.
Execution details
View argument details such as input and output values, as well as execution and robot details (e.g., project, machine, robot).
Affected requirements
View the requirements that are assigned to the test case that has been executed. You can use this tab to go directly to the affected requirement.
Attachments
View:
the attachments uploaded using the Attach Document activity.
the attachments of a test case result, that is linked from Orchestrator.
### Viewing activity coverage
:::note
Activity coverage is available only for automated test executions.
:::
**Prerequisites**: Enable activity coverage for the desired test sets either in Orchestrator or Test Manager.
1. Open the test set, select **More Options**  and then **Execute Automated**.
2. Go to **Test Results** and open the test set you executed.
3. Go to the **Activity Coverage** tab and investigate the information on the activities that were covered during the test execution.

### Create defects from results
You can create defect reports including the execution log to your external defect management system, if you already have it integrated with Test Manager. For more information, see [ALM Tool Integration](https://docs.uipath.com/test-manager/automation-suite/2023.10/user-guide/about-alm-tool-connectors).
To create a defect out of an execution log, you need to [open a test case log](https://docs.uipath.com/test-manager/automation-suite/2023.10/user-guide/test-results#analyze-test-results), click **Tasks**, and then select **Create Defect**. After the defect has been created, a link is available in the execution log, so you can access the integrated external tool.
### Related articles
* [Bulk Operations](https://docs.uipath.com/test-manager/automation-suite/2023.10/user-guide/bulk-operations#bulk-operations)
* [Export Data](https://docs.uipath.com/test-manager/automation-suite/2023.10/user-guide/export-data#export-data)
## Defect synchronization
You can synchronize execution results with external tools, as part of the [Application Lifecycle Management tool integration](https://docs.uipath.com/test-manager/automation-suite/2023.10/user-guide/about-alm-tool-connectors). Information that is gathered during execution, such as results, logs, timestamps, and other details is synchronized with the tool that you have integrated with Test Manager.
Please note that at the moment there can be only one connection which is enabled for defect synchronization overall per project.
:::note
* To synchronize defects, you need to configure a
connector in Test Manager. See available connections in [Test Manager](https://docs.uipath.com/test-manager/automation-suite/2023.10/user-guide/about-alm-tool-connectors).
* You need to have [executed a test set first](https://docs.uipath.com/test-manager/automation-suite/2023.10/user-guide/executing-tests#executing-tests).
:::
### Who can synchronize defects
All user roles aside from Read-only can synchronize defects.
For more information see [User and Group Access Management](https://docs.uipath.com/test-manager/automation-suite/2023.10/user-guide/managing-users-and-groups#user-and-group-access-management).
### Create defect
You can create defects when you access test case logs in the **Test Results** page.
1. Navigate to **Test Results**
2. Open a test result and the click the test case key to open the logs.
3. Click **Tasks** and select **Create Defect**.

The defect is created and synchronized with your external tool. You can open the defect directly in the tool (e.g., Atlassian Jira) by navigating to the test execution result that has a synchronized defect.

### Unlink defect
When you unlink defects from an external tool, the entry created in the tool remains unchanged. In Test Manager, the test execution result will not be linked with an external tool.
1. Navigate to **Test Results**
2. Open a test result and then click **Tasks**
3. Select **Unlink Defect**.