# Recorder settings
> The Task Mining Recorder can be accessed by users who received an invitation to participate in the discovery process and installed the recorder. Refer to [Capturing with the recorder](https://docs.uipath.com/task-mining/automation-cloud/latest/user-guide/capture-a-trace-with-the-recorder-atm#capturing-with-the-recorder) for details. The Task Mining Recorder is used to facilitate the recording process management and define other specific settings that the users might need.
The Task Mining Recorder can be accessed by users who received an invitation to participate in the discovery process and installed the recorder. Refer to [Capturing with the recorder](https://docs.uipath.com/task-mining/automation-cloud/latest/user-guide/capture-a-trace-with-the-recorder-atm#capturing-with-the-recorder) for details. The Task Mining Recorder is used to facilitate the recording process management and define other specific settings that the users might need.
## Editing preferences
The **Preferences** page enables you to customize the Task Mining recorder to adjust it to your needs. You can open the **Preferences** page from the Recorder menu.
Follow these steps to open the **Preferences** page.
1. Launch the Task Mining recorder.
:::note
You can search for **Task Mining** in the Windows Start menu, or navigate to the application in the Windows file browser. If you’re unable to access the application that way, you can access via selecting **Capture trace** in a new Task Mining project or **Start recording** in an existing Task Mining project.
:::
2. If you are already signed in to Task Mining, you can skip this step. If not, select **Sign In** and authenticate yourself with your Automation CloudTM credentials.
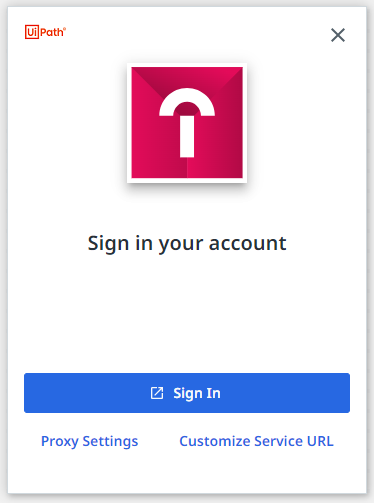
:::note
You can search for **Task Mining** in the Windows Start menu, or navigate to the application in the Windows file browser. If you’re unable to access the application that way, you can access via selecting **Capture trace** in a new Task Mining project or **Start recording** in an existing Task Mining project. For Unassisted Task Mining (UTM), you can always access the MSI via the email invitation to the project.
:::
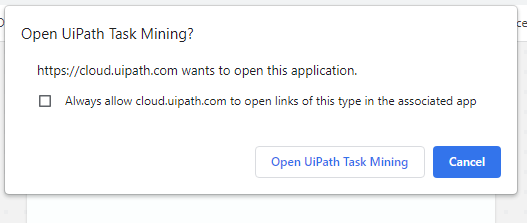
Select **Open UiPath Task Mining** and navigate back to the recorder. Select any tenant you have access to, to move forward and select **Continue**.
3. Select your account icon at the top of the recorder.
4. Select **Preferences** from the menu.
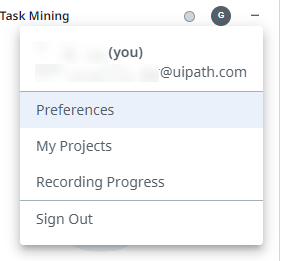
The **Preferences** are displayed in a separate window with the **General** tab selected.
## General
The settings on the **General** tab enable you to define your personal preferences for using the recorder.
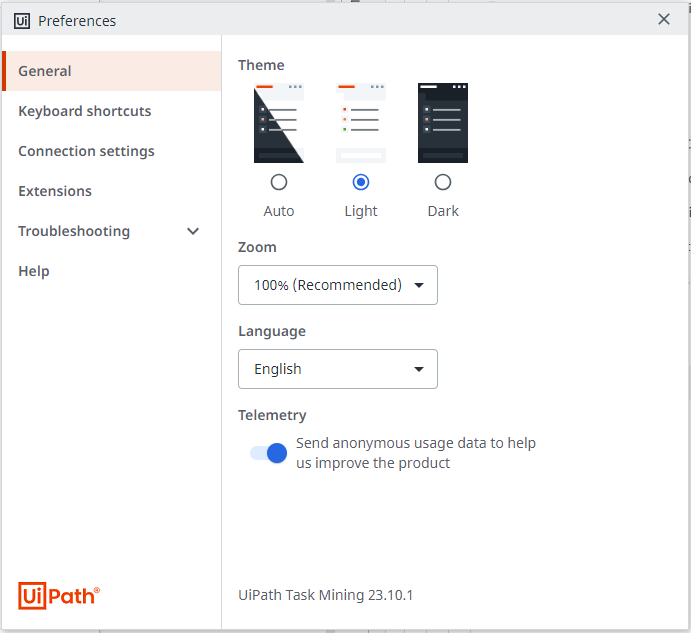
Below is an overview of the settings on the **General** tab.
Section
Enables you to
Theme
select the interface theme for a more comfortable experience.
Zoom
change the zoom percentage of the recorder window.
Language
select the preferred language used for the recorder windows and the recording. If you update the language during the creation/capturing process, the actions recorded after the new language is set up will be displayed in the newly selected language.
Telemetry
toggle anonymous telemetry data gathering on or off.
## Microphone settings
The settings on the **Microphone settings** tab enable you to configure the microphone if the **Enable audio capture** option is selected.
The following table describes the settings on the **Microphone settings** tab.
Setting
Enables you to
Enable audio capture
switch on or off audio capture for the recording. The Enable audio capture option is selected by default.
Microphone
select the microphone used for the audio capture. You can select a different microphone from the list of available microphones, but it is recommended to use the default option.
Input level
define the sensitivity of the microphone to sound input. A higher input level means the microphone is more sensitive to softer sounds, while a lower level makes the microphone less sensitive, requiring louder sounds to be picked up clearly.
Volume
define the loudness of the sound that comes out of your speakers or headphones when you are listening to the audio capture.
## Keyboard shortcuts
The settings on the **Keyboard shortcuts** tab enable you to define hotkeys you want to use for capturing process.
The following table describes the settings on the **Keyboard shortcuts** tab.
Setting
Enables you to
Default setting
Pause/resume capturing
enter the hotkey you want to use to toggle pause or resume capturing
F10
Stop capturing
enter the hotkey you want to use to stop capturing
F9
Focus/Unfocus capturing panel
enter the hotkey you want to use to toggle focus or unfocus the capturing panel During the capturing process, pressing the configured hotkey makes the capturing panel become focused/opaque and the capturing pauses automatically. When pressing the hotkey again, the capturing panel becomes unfocused/transparent and the recording is resumed.
F8
Restore Defaults
revert to the default settings. The Restore Defaults button is only enabled if you have changed one or more keyboard settings.You must select a different key or key combination for each setting. If you set a value that is already used for a setting an error message will be displayed. You can use a key combination like Alt + C, or Ctrl + P. The hotkey cannot contain just one of the Alt, Ctrl, Shift or Window keys.
### Changing the value of a key setting
Follow these steps to change the value of an hotkey.
1. Select the setting you want to change.
2. Press the key (or key combination) you want to use for the selected setting.
The pressed key or key combination is displayed in the setting field.
### Clearing the value of a key setting
Follow this step to clear a key setting.
1. Select the clear icon  next to the hotkey for which you want to clear the value.
The value is removed and the setting field becomes empty.
## Connection settings
The settings on the **Connections** tab enable you to verify if you are connected and using the proper settings to record to a specific project.
The following table describes the settings on the **Connection settings** tab.
Setting
Description
Service URL
the address where the recorder connects to the server where the projects are. Important: Do not change the Service URL , unless specifically asked to be changed.
Organization name
The organization you are connected to. Enables you to check if the recorder is connected to the same organization as your project or tenant.
Tenant name
The name of tenant you are connected to. If you want to select a different tenant for the recording, select Sign out. You will return to the login screen where you can select a different tenant.
Status
The current status of your connection.
Proxy settings
Enables you to edit the settings for the proxy connection. Select the Edit button to edit the proxy settings.
### Configuring the proxy
You can edit the proxy settings from the **Connection** settings tab of the recorder **Preferences**. Refer to [Editing preferences](https://docs.uipath.com/task-mining/automation-cloud/latest/user-guide/recorder-settings#editing-preferences) for details. Follow these steps below to configure the recording application proxy.
1. Select the **Edit** Proxy settings button on the **Connection settings** tab of the recorder **Preferences**. The Proxy Settings window is displayed.
2. If you want to use a proxy .pac script to apply proxy settings from a central location, enable the **Use .pac script** option and enter the script location.
:::note
This assures you have the correct and most updated configuration of the proxy settings.
:::
3. If you want to manually enter the proxy settings, enable the **Use proxy server** option.
4. Enter the **Proxy Address (Host)** IP address and the **Port** number.
5. Select **Save.**
To find out how to configure the proxy settings via Command Line Parameters, refer to [Command line parameters](https://docs.uipath.com/task-mining/automation-cloud/latest/user-guide/command-line-parameters#command-line-parameters "You can also install the extension for Chrome or the extension for Edge by using Group Policies. This method silently installs the extension and enables it, without requiring user confirmation.").
#### Setting the IP address and port number (Windows 10)
1. Open the Windows Start menu.
2. Go to **Settings -> Network & Internet**
3. In the left-hand pane, select **Proxy**.
4. Retrieve the **IP Address** and **Port Number**.
## Extensions
The **Extensions** tab enables you to install the same extensions used by [UiPath® Studio](https://docs.uipath.com/studio/standalone/latest/user-guide/about-extensions) and [Assistant](https://docs.uipath.com/robot/standalone/latest/user-guide/about-uipath-assistant) to improve the precision of captured selectors. These are available for different browsers, virtual desktops and clients, and also Java-based applications.
:::note
To work correctly, installed browser extensions also need to be enabled in their respective browsers.
:::
### Installing an extension
Follow these steps to install an extension.
1. Locate the extension you want to install.
2. Select the **Install** button for the extension.
### Uninstalling an extension
Follow these steps to uninstall an extension.
1. Locate the extension you want to install.
2. Select the **Uninstall** button for the extension.
:::note
The **Uninstall** button is only available for installed extensions.
:::
## Customize service URL
Use **Customize Service URL** during the Sign In to change how the recording application reaches to Admin Console.
Type in the URL you want to connect the recording application and select **Sign In** to proceed.

## Troubleshooting
The **Troubleshooting** settings enable you to view the progress of your Task Mining project and to define specific selector configuration settings.
The following table describes the **Selector configuration** settings.
| **Setting** | **Description** |
| --- | --- |
| Optimize selector quality | Enables you to select whether you want to improve the selector quality by generating unique identifier during the capturing. |
| Disable selectors for apps with configuration issues | Enables you to disable selectors for applications specified in a list, during export to Studio. |
### Disable selectors for specific apps
It is possible to disable selector generation for specified applications. This way you can edit the list of the applications for which Task Mining Application will not generate selectors that might cause some applications to crash.
Follow these steps to set up this configuration.
1. On the **Advanced settings** tab, select **Disable selectors for apps with compatibility issues**.
2. Select the **Edit list** button that opens a text file containing the list of applications for which selectors are disabled.
3. Edit the list of applications as desired.
:::note
Use this option in case you notice crashes of the applications while you capture them. When the **Disable selectors for apps with compatibility issues** option is selected, Task Mining will not generate selectors for the applications in the list and this way you should avoid crashes. Keep in mind that during export to Studio, selectors for actions performed for the applications that were excluded will remain empty.
:::
## Help
The **Help** tab provides different options for getting product information or providing troubleshooting details, for example to UiPath® support.
### Extensions errors
A warning message appears during the capturing process if:
* There's an issue with the extension.
* The extension for the captured app isn't installed.
* The extension for the captured app is disabled.
### Product documentation
Select **Product documentation** to find out more about how to use the recorder by browsing through our documentation guide.
### Report an issue
Select **Report an issu**e to open the Contact Technical Support page in your browser, where you can request assistance if issues occur with the product.
### Open logs folder
The **Open logs folder** option lets you open the logs folder of Task Mining application from where you can grab specific logs or data that might be requested from the support team.
### Save logs
Saving logs helps you gather information to share with the support team if needed.
You can select the **Save logs** option to save a.zip file with data for application troubleshooting. A dialog box opens and you can select where to save the file.
### Extracting logs from your Task Mining recorder
If you need technical support from UiPath®, you may need to provide Task Mining log files.
Follow these steps to extract log files from the Task Mining Recorder.
1. Open the Recorder Settings. Refer to [Editing preferences](https://docs.uipath.com/task-mining/automation-cloud/latest/user-guide/recorder-settings#editing-preferences) for details.
2. Go to the **Help** tab in the **Preferences** window.
3. Select **Save logs**.
4. In the **Save logs** file explorer dialog, select the location where you want to save the .zip file that contains the **Task Mining** log files.
5. Select **Save**.
You can send the.zip file for example, in an email or via SharePoint.