# About Automation Projects
> An automation project is a sequence of activities that a Robot can execute to automate a series of tasks you perform on your computer. You create and view the automation project in the Designer tab of StudioX.
An automation project is a sequence of activities that a Robot can execute to automate a series of tasks you perform on your computer. You create and view the automation project in the Designer tab of StudioX.
When you create a project in StudioX, the project files are saved in a folder with the project name to a location of your choice. By default, projects are saved in the `%USERPROFILE%\Documents\UiPath` directory.
By default, the project folder includes the following files and subfolders:
* **Files**
+ a `Main.xaml` file that contains your main workflow.
+ a `project.json` file that contains information about your automation project.
+ an Excel file, by default `Project_Notebook.xlsx`, if you did not configure your project to use a different Project Notebook.
* a `GlobalHandlerX.xaml` file that contains a workflow designed to determine the project’s behavior when an execution error is encountered.
* a `RuntimeExecutionError_Template.html` file that contains a template for the error message to display when an execution error is encountered.
* **Subfolders**
+ `.local` - Contains data cached locally for the project.
+ `.screenshots` - Contains informative screenshots generated in UI automation activities, if any are used in the project.
+ `.settings` - Contains activity project settings used at runtime.
## Setting the Project Compatibility
When you create a new project, select the compatibility based on the applications to automate and the environment on which the project will run:
* **Windows** - Select this option for automations that involve Windows applications such as Microsoft Office for desktop. Automations can run on Windows computers. This is the default option.
* **Cross-platform** - Select this option for automations that involve online applications such as Microsoft Office 365 for web and Google Workspace. Automations can run on Windows and Unix-like operating systems like Linux and macOS. To find out more about designing cross-platform projects, see [Cross-platform Projects](https://docs.uipath.com/studio/standalone/2024.10/user-guide/designing-automations#cross-platform-projects) in the Studio guide.
* **Windows - Legacy** - Similar to Windows but based on legacy technology that is being phased out. This is the compatibility used in StudioX projects created in previous releases. For information on how to convert existing projects to the newer Windows compatibility, see [Converting Windows-Legacy Projects to the Windows Compatibility](https://docs.uipath.com/studio/standalone/2024.10/user-guide/deprecation-of-the-windows-legacy-compatibility#converting-windows-legacy-projects-to-the-windows-compatibility)
## StudioX Projects for Unattended Use
StudioX projects are designed for attended use only and we do not recommend using StudioX when developing projects intended for unattended use. You can update a StudioX project for unattended use in the **Studio** profile by removing the GEH. We recommend having an RPA developer review the project before publishing it for unattended use as they might want to add extra logging and error handling and to check for hard-coded values that should be stored as assets.
## Adjusting Project Settings
To configure the settings of each project, select **Project** > **Project Settings** in the StudioX ribbon.
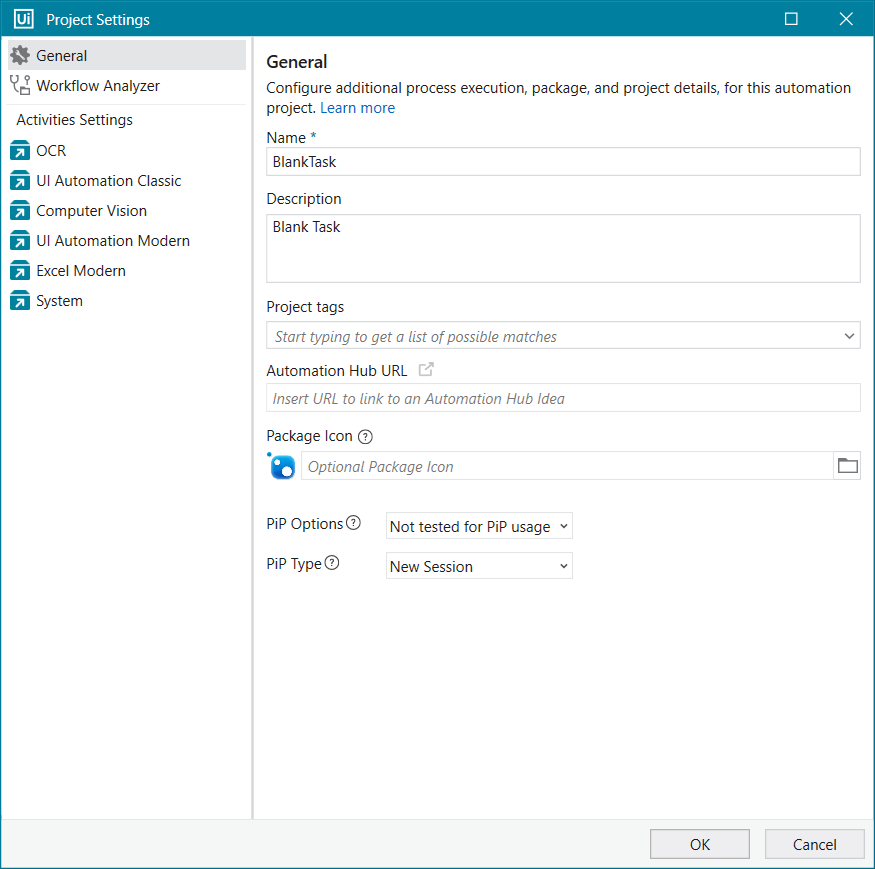
### Field Description for the Settings Window
Field
Description
Name
Change the name of the project. Such names may contain whitespace characters. When naming projects, keep in mind that whitespace characters are removed at publish time. This field accepts up to 128 characters.
Description
Change the project description. This field accepts up to 500 characters.
Project tags
You can add one or more tags to the project, either by creating new ones or by reusing tags already defined in Orchestrator. There are two types of tags: labels and properties (key-value pairs). Tags are included in the published package and they help describe and categorize projects. For example, they can refer to the automated application (an Excel label) or the department (a department:accounting key-value property). When you start typing, possible matches are suggested from already defined tags, and you can reuse one by selecting it from the list of matches. For a property match, the key followed by the : (colon) character is displayed first, and the associated values are displayed after you select the key. To add a new tag, after you enter the name, click the entry with the plus sign next to the name. Separating strings with the : (colon) character enables you to add properties, while entries that don't contain a : add labels. Labels and key-value properties are limited to 256 characters. Tag names can't contain these characters: < , > , % , & , \ , ? , / , : . Project tags can be automatically applied to processes in Orchestrator. For more information about using tags, see Organizing resources with tags in the Orchestrator guide.
Automation Hub URL
URL of an Automation Hub idea linked to the project. For more information, see Linking a Project to an Idea in Automation Hub .
Package Icon
Optionally, define a custom icon for the project. You can browse to and select a file, or enter a path or public URL to a jpeg , jpg , or png file up to 1MB in size. After the project is published, the icon is displayed as follows:
For task automations, in the Assistant next to the process name, making it easier to identify it in the list of processes.
For templates, next to the template in Home (Studio Backstage View) > Templates .
Note: The icon is not visible in Manage Packages if a local file is used for a library published to Orchestrator or a feed that does not support embedded icons, In this case, specify the icon using a URL.
PiP Options
Indicate whether the project was tested using Picture in Picture (PiP) and whether it should start in PiP by default.
Tested for PiP usage; Starting in PiP - The automation has been approved to run in PiP mode. When run, it starts in PiP by default.
Tested for PiP usage; Not starting in PiP by default - The automation has been approved to run in PiP mode. When run, it starts in the main session or desktop by default.
Not tested for PiP usage - The automation has not been approved to run in PiP mode. When run, it starts in the main session or desktop by default. If run in PiP, a dialog informs the user it was not tested using this feature and prompts for confirmation before proceeding.
PiP Type
Select how to isolate the automation from the user session when running the project in PiP: New Session (child session on the machine) or New Desktop (virtual desktop in the user session).
## Publishing Automation Projects
**Publishing** an automation project means archiving the workflow and all the other files in the project folder so that it can be sent to Robots and then executed.
If the Robot is connected to Orchestrator, you can publish StudioX projects to Orchestrator and run them from Assistant. If the Robot is not connected to Orchestrator, you can publish your projects to the Robot Defaults and run them from Assistant.
The publishing process for StudioX is the same as the one for Studio. For more information, see [About Publishing Automation Projects](https://docs.uipath.com/studio/standalone/2024.10/user-guide/about-publishing-automation-projects) in the Studio guide.
## Managing Activities Packages
Information on managing activities packages is available in the [UiPath Studio Guide](https://docs.uipath.com/studio/standalone/2024.10/user-guide/managing-activities-packages).