# The User Interface
> The UiPath® StudioX interface contains multiple panels for easy access to specific functionalities. Panels can be docked, set to float so that they can be moved anywhere, or they can be set to auto-hide.
The UiPath® StudioX interface contains multiple panels for easy access to specific functionalities. Panels can be docked, set to float so that they can be moved anywhere, or they can be set to auto-hide.
## Home (Backstage View)
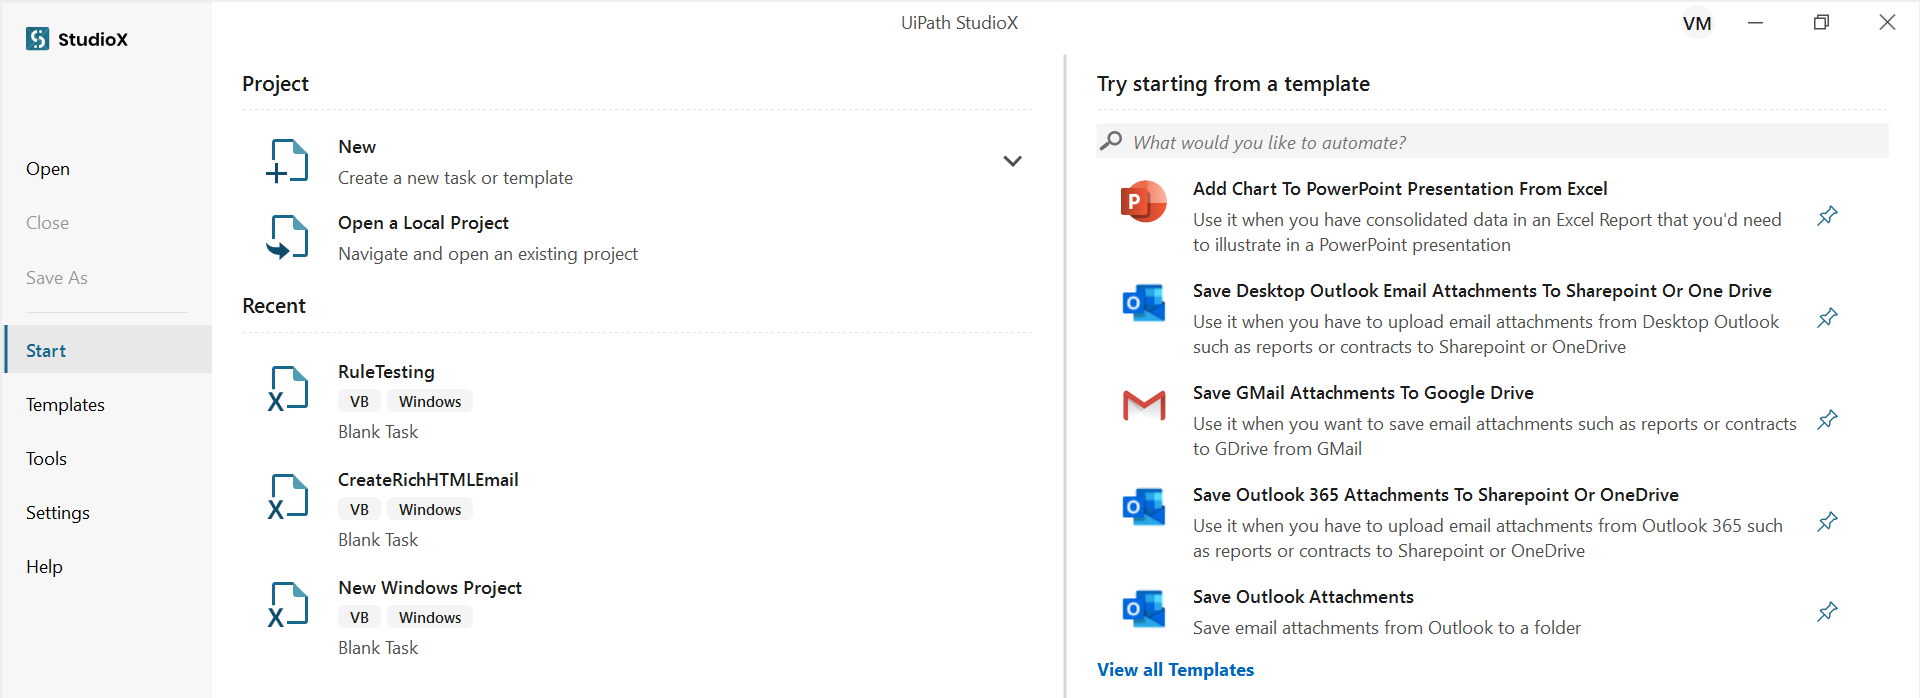
This is the view you see when you first open StudioX. You can also get here by clicking **Home** in the upper-left corner of the **Design View.** You can access your projects, configure StudioX settings, or access help and license information. The following buttons and tabs are available in this view:
* **Open** - Browse to an automation project and open it.
* **Close** - Close the automation project that is currently open.
* **Save as** - Save the automation project and create a copy of it in a different location. You can use this option to copy local automation projects to [source control](https://docs.uipath.com/studiox/standalone/2023.10/user-guide/managing-projects-with-git) by selecting a repository as the location or convert a project into a template.
* **Start** - Create a new task automation project or open recently accessed projects, or start from a template.
* **Templates** - Create a new project based on a template. In this tab, you can view all available project templates, search and filter them by source. For more information, see [Project Templates](https://docs.uipath.com/studiox/standalone/2023.10/user-guide/project-templates#project-templates).
* **Team** - Manage [source control integration](https://docs.uipath.com/studiox/standalone/2023.10/user-guide/managing-projects-with-git) for the automation project.
* **Tools** - Install the Excel Add-in, extensions for web browsers and other applications that allow StudioX to capture actions you perform in them, and the [Repair Tool for Microsoft Office](https://docs.uipath.com/studio/standalone/2023.10/user-guide/microsoft-office-interop-issues). For more information on extensions, see [Extensions](https://docs.uipath.com/studio/standalone/2023.10/user-guide/about-extensions) in the Studio Guide.
* **Settings** - Change the look and feel of StudioX, set global preferences, and manage activities packages sources. For more information, see [Configuring StudioX Settings](https://docs.uipath.com/studiox/standalone/2023.10/user-guide/configuring-studiox-settings).
* **Help** - Directs you to product documentation, release notes, online resources, the [Community Forum](https://forum.uipath.com/) and the [RPA Academy](https://www.uipath.com/rpa-academy). Information regarding product version and installation, license availability, update channel and device ID is also found in the **Help** tab, together with a **Copy Info** button for quickly copying the details to the clipboard.
## Design View
This is the view where you create, execute, and publish your automation project.
### The Ribbon
The ribbon at the top of the window can be minimized or expanded by clicking the **Minimize / Expand** button . It contains the following buttons:
* **Save** - Saves the automation project.
* **Cut / Copy / Paste** - Use these buttons to cut, copy, or paste activities in the Designer panel.
* **Project** - Select **Project Settings** if you want to edit the name and the description of the project, Workflow Analyzer rules, or global activities settings. Select **Open Project Folder** to open the project folder in the Windows file explorer. Select **Convert to Windows** in a Windows - Legacy or cross-platform project to convert the project to the Windows compatibility.
* **Project Notebook** - Opens the Excel file you defined as the Project Notebook for the automation project. To edit its settings, click the arrow next to this button, and then select **Configure Project Notebook**.
* **Manage Packages** - Opens the Manage Packages window where you can configure the activities packages and sources for the project.
* **App/Web Recorder** - Opens the UiPath Recorder that captures your actions on the screen and automatically generates a sequence of activities based on them. For more information, see [App/Web Recorder](https://docs.uipath.com/activities/docs/app-web-recorder).
* **Table Extraction** - Opens the Extract wizard that enables you to extract structured data from an application or a web page. For more information, see [Extract Table Data](https://docs.uipath.com/activities/docs/n-extract-data).
* **Analyze** - Checks the project for validation errors and Workflow Analyzer rule violations. The results are displayed in the **Error List** panel. To edit Workflow Analyzer settings, click the arrow next to this button, and then select **Workflow Analyzer Settings**.
* **Export to Excel** - Exports the automation project to an Excel file.
* **Publish** - Archives the project and all the other files in the project folder so that it can be sent to Robots and then executed.
* **Run** - Executes the automation project. If you want to continue your work uninterrupted while the project is executed, click the arrow next to this button, and then select **Run in PiP**. The project is executed in a new session that is launched in a floating window.

:::note
Files that are not created during the execution of the automation project become read-only when published to [Orchestrator](https://orchestrator.uipath.com/). If your business process requires you to write in a specific file at some point, be sure to create it while designing the project.
:::
### Add Activity Search Bar
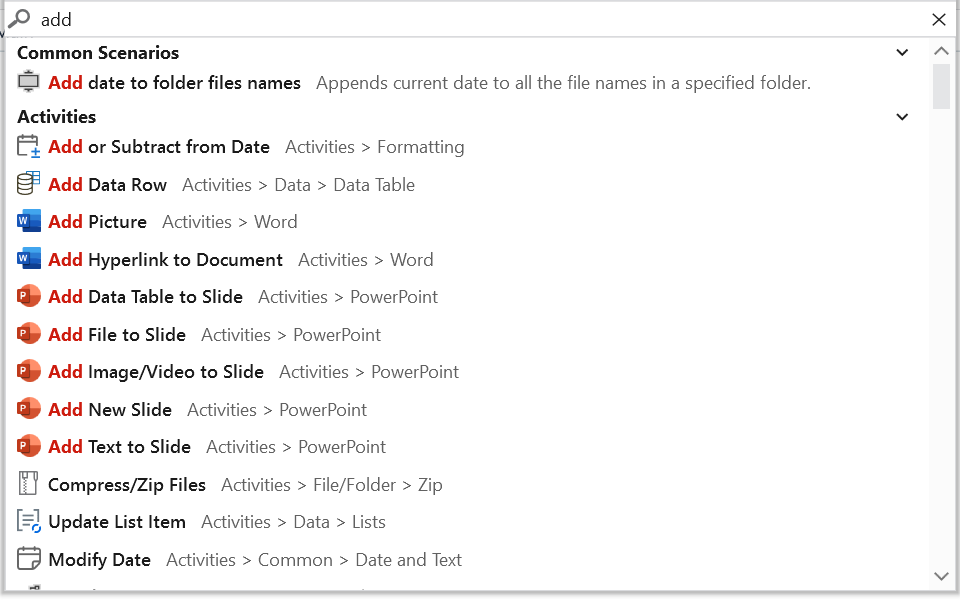
In the Add Activities search bar you can quickly search through activities and add them to the automation project.
You can open the **Add activity** search bar by clicking the **Add activity**  icon above or below any activity added to your project. or by using the **Ctrl + Shift + T** keyboard shortcut.
The bar is split into three sections:
* A group of suggested activities that are predicted by an AI to be the most likely ones you need to add next. You can opt out of this feature by deselecting the **Enable AI activity suggestions** option in the Design tab of the Settings menu.
* [Common Scenarios](https://docs.uipath.com/studiox/standalone/2023.10/user-guide/automation-basics#common-scenarios) lists different common activities and preconfigured pieces of automation based on where in the project workflow you clicked **Add activity** . This gives you quick access to the most relevant results in every context.
* In Windows and cross-platform projects, **Activities** lists all the activities in installed and installable packages (in Windows - Legacy projects, **Activities** only lists the activities in installed packages). Searching for installable activities is only available for packages from the **Official** and **Orchestrator Tenant** feeds. You can opt out of this feature by deselecting the **Show activities available for install** option in the Design tab of the Settings menu.
### Send Feedback
There are two types of feedback that you can send directly from within StudioX: **Submit an idea** or **Report a bug**. Both are accessible by clicking  on the title bar.
In the **Help us to improve** window, provide the following information, and then click **Send**:
* From the **I want to** drop-down menu, select either **Submit an idea for the product** or **Report a Bug**.
* From the **For** drop-down menu, select the product for which to send feedback. StudioX is selected by default.
* From the **How important is this to you** field, select **Nice to have**, **Important**, or **Critical**.
* In the **Subject** field, enter a subject for the message.
* In the **Steps to Reproduce** / **Description** field, enter a detailed description.
* Click **Add** if you want to attach files. You can attach up to 6 images, videos, or text files, each with a size smaller than 10MB.
Please note that you cannot send more than 3 posts in a time frame of 5 minutes.
:::note
The **Activities** panel and the **Add Activity** search bar support fuzzy search, which means that a list of results is returned even if the search terms don't match exactly. The search terms could be slightly incomplete, misspelled or include only the first letter of each word.
:::
### The Designer Panel
The **Designer** panel is the canvas on which you create your automation. This is where you add the activities you want to automate, view and edit their properties, and define the workflow by ordering activities. Your automation project is represented by a diagram that gives you a visual representation of the sequence of activities it contains.
You can add activities from the **Activities** panel by double-clicking or dragging and dropping them, or by clicking the **Add activity**  button above and below an already added activity and then selecting them from the Add Activity search bar. For every activity added to the panel you can see details such as the name, key activity properties, buttons and links that help you configure it, or an informative screenshot. To help you identify different types of activities, the left border of each activity has the color of the application it applies to. For example, Excel activities have a green left border, while mail activities have a blue left border.
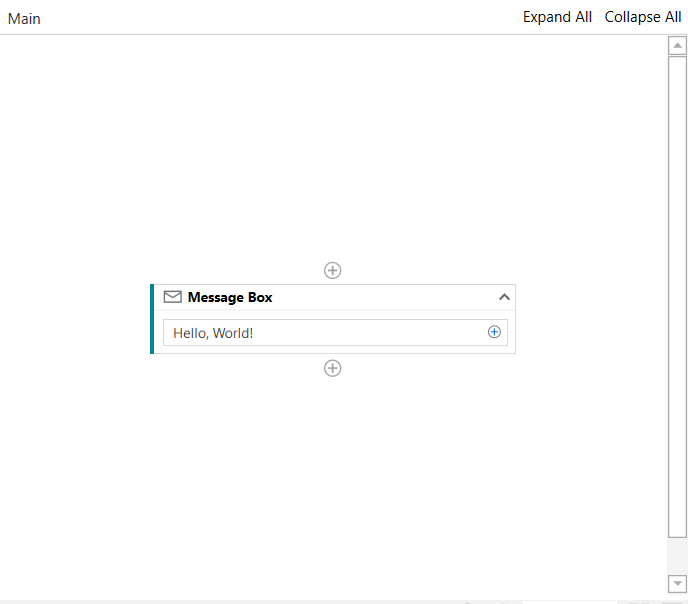
Activate Pan Mode by clicking the  icon, holding the Space key or pressing the middle mouse button. Use the zoom drop-down to change the zoom level and click the  icon to reset it back to 100%.
The **Fit to Screen**  icon changes the zoom in such a way that the whole workflow fits in the **Designer** panel. Click the  icon to get an overview of the whole project and navigate through sections by adjusting the focus.
### The Context Menu
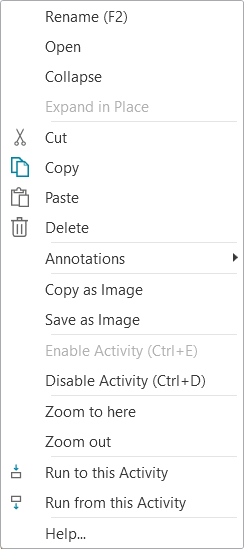
The context menu enables you to perform several operations on the activities in your project. You can display it by right-clicking any activity inside your project.
#### Field Descriptions for the Context Menu
Option
Description
Rename
Edit the name of the activity.
Open
Opens the selected activity in the Designer panel.
Collapse
Collapses the activity thus reducing the displayed details to "Double-click to view". You can achieve the same result by clicking the Collapse button .
Expand in Place
Expands the content of the activity, displaying its detailed content. You can achieve the same result by clicking the Expand button .
Cut
Removes the selected activity and places it onto the Clipboard.
Copy
Copies the selected activity and places it onto the Clipboard.
Paste
Inserts the content of the Clipboard at the current location.
Delete
Deletes the target activity. Note: Since the Context menu is only displayed for a one-activity selection, you can use this command for more activities with the corresponding keyboard shortcut, Delete.
Annotations
Add, edit, delete, show and hide annotations added to activities in the workflow.
Copy as Image
Makes a screenshot of the content displayed in the Designer panel. Note: If you want to make a screenshot of a child activity, make sure to firstly open it in the Designer panel.
Save as Image
Makes a screenshot of the content displayed in the Designer panel and prompts the user to set the details for saving it (Name, Type, Destination). Supported formats: JPG, PNG, GIF, XPS.
Enable Activity
Enables a previously disabled activity.
Disable Activity
Disables an activity, which is then grayed out and placed inside a Comment out activity.
Zoom to here
Navigate within the diagram to view only this activity. The path is displayed as breadcrumbs in the header of the Designer panel.
Zoom out
View the entire diagram of the project in the Designer panel.
Run to this Activity
Executes the project from the start and stops after this activity is executed.
Run from this Activity
Executes the project starting with this activity.
Help
Opens the help page about the activity type in the Activities guide.
### The Activities Panel
The Activities panel shows available activities that can be added to the current project. You can search for activities by name or description using the search box at the top of the panel. Read more about the Activities Panel in our [Automation Basics](https://docs.uipath.com/studiox/standalone/2023.10/user-guide/automation-basics#automation-basics) guide.
### The Data Manager Panel
The **Data Manager** panel displays data currently added to your automation project such as resources added to the project, variables and arguments used in the automation. For more information about the Data Manager panel, see [Managing your Project Data](https://docs.uipath.com/studiox/standalone/2023.10/user-guide/managing-your-project-data#using-the-data-manager).
### The Properties Panel
The **Properties** panel is contextual and enables you to view and edit advanced properties for a selected activity. Read more about the Properties panel in [Automation Basics](https://docs.uipath.com/studiox/standalone/2023.10/user-guide/automation-basics#automation-basics).
In projects with the cross-platform compatibility, all activity properties are available in the activity card in the **Designer** panel. This also applies to some activities in projects using the Windows compatibility.
### The Output Panel
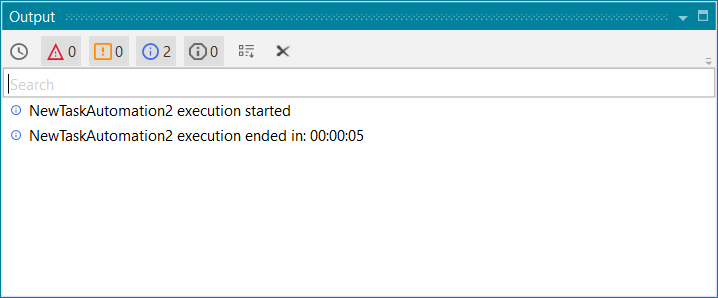
The **Output** panel enables you to display the output of the **Write Line** activity, displays status information regarding the execution of your projects, and errors generated by activities packages.
From the **Output** panel, you can show or hide messages that have different log levels (errors, warnings), or export the contents of the panel to a text file by clicking the buttons in the panel’s header. Double-clicking a message displays further details about it, with the option to copy information.
The **Clear All** button erases all info displayed in the **Output** panel. Logs and other data stored in this panel are erased when a workflow is run. The **Output** panel displays up to 2,000 lines at a time.
The **Error List** panel next to the Output panel displays errors found in the project during validation and workflow analysis. For more information, see [About Workflow Analyzer](https://docs.uipath.com/studiox/standalone/2023.10/user-guide/about-workflow-analyzer).
## The Status Bar
In the status bar, you can view status information and access options related to Orchestrator. This is where you can also view which language is used for expressions in the project (VB or C#).
* **Orchestrator/Cloud Connection** - Click  to access Orchestrator options: sign in to your cloud account, disconnect from Orchestrator (if connected with a machine key), and refresh resources.
* **Orchestrator Status** - Displays the Orchestrator connection status. When connected to Orchestrator, the currently selected folder is displayed. You can click the name of the current folder to view a list of available folders and select another folder from which to sync resources.
* **Source Control** - Depending on whether the project is connected to a source control repository, different options are available to help you manage source control integration. For more information, see [Managing Projects with GIT](https://docs.uipath.com/studiox/standalone/2023.10/user-guide/managing-projects-with-git).
* **Cloud Project** - For cross-platform projects that use the VB language, a menu is available with options related to editing the project in Studio Web. If a project is not already synced with Studio Web, the label **Cloud Compatible** is displayed. If the project is already synced with Studio Web, the label **Cloud Project** is displayed. For more information, see [Designing Cross-platform Projects](https://docs.uipath.com/studio/standalone/2023.10/user-guide/designing-automations#cross-platform-projects).
* **Project Language** - Displays the language used for expressions in the project, **VB** or **C#**.
* **Project Compatibility** - Displays the compatibility of the project, **Windows - Legacy**, **Windows**, or **Cross-platform**