# UiPath Proprietary Variables
> The GenericValue variable is a type of variable that can store any kind of data, including text, numbers, dates, and arrays, and is particular to Studio.
## GenericValue Variables
The GenericValue variable is a type of variable that can store any kind of data, including text, numbers, dates, and arrays, and is particular to Studio.
GenericValue variables are automatically converted to other types, in order to perform certain actions. However, it is important to use these types of variables carefully, as their conversion may not always be the correct one for your project.
UiPath Studio has an automatic conversion mechanism of GenericValue variables, which you can guide towards the desired outcome by carefully defining their expressions. Take into account that the first element in your expression is used as a guideline for what operation Studio performs. For example, when you try to add two GenericValue variables, if the first one in the expression is defined as a String, the result is the concatenation of the two. If it is defined as an Integer, the result is their sum.
### Supported .NET Methods
Name/Syntax
Description
CompareTo
Function GenericValue.CompareTo(other As GenericValue) As Integer
Function GenericValue.CompareTo(obj As Object) As Integer
Click here for details.
Contains
Function GenericValue.Contains(other As String) As Boolean
Click here for details. Used to check whether a string variable contains a certain substring or not. For example, if you want to check if a sentence contains a specific word, the expression should be [SentenceVariable].Contains("term") , where [SentenceVariable] is the GenericValue variable containing the sentence and "term" is the word to be searched for. When using this method with a GenericValue variable of data type Int, Float or Boolean, the data is automatically converted to String and handled accordingly.
Equals
Function GenericValue.Equals(other As GenericValue) As Boolean
Function GenericValue.Equals(obj As Object) As Boolean
Click here for details.
GetHashCode
Function GenericValue.GetHashCode() As Integer
Click here for details.
GetType
Function Object.GetType() As Type
Click here for details.
GetTypeCode
Function GenericValue.GetTypeCode() As TypeCode
Click here for details.
IndexOf
Function GenericValue.IndexOf(value As String) As Integer
Function GenericValue.IndexOf(value As String, comparisonType As StringComparison) As Integer
Function GenericValue.IndexOf(value As String, startIndex As Integer) As Integer
Function GenericValue.IndexOf(value As String, startIndex As Integer, comparisonType As StringComparison) As Integer
Click here for details. Used to return the index of a substring contained inside a string variable. For example, if you want to find the index of the word "locate" inside the sentence "Find 'locate' in this sentence", the expression should be [SentenceVariable].IndexOf("locate") , where [SentenceVariable] is the GenericValue variable containing the sentence and "locate" is the term to be searched for. When using this method with a GenericValue variable of data type Int, Float or Boolean, the data is automatically converted to String and handled accordingly.
Length
Function GenericValue.Lenght() As Integer
Click here for details. Used to return the number of characters in a string variable. For example, if you want to find out how many letters a word has, the expression should be [WordVariable].Length , where [WordVariable] is the GenericValue variable containing the word. When using this method with a GenericValue variable of data type Int, Float or Boolean, the data is automatically converted to String and handled accordingly.
Replace
Function GenericValue.Replace(oldValue As String, new value As String) As String
Click here for details. Used to replace data contained inside a string variable. For example, if you want to change a local file path C:\ExampleFolder\Main.xaml into the corresponding server file path C:/ExampleFolder/Main.xaml , the expression should be [PathVariable].Replace("\","/") where [PathVariable] is the GenericValue variable containing the file path, "\" is the character to be replaced and "/" is the character used as replacement. When using this method with a GenericValue variable of data type Int, Float or Boolean, the data is automatically converted to String and handled accordingly.
Split
Function GenericValue.Split(ParamArray separator As Char()) As String()
Function GenericValue.Split(ParamArray separator As String()) As String()
Function GenericValue.Split(separator As Char(), options As StringSplitOptions) As String()
Function GenericValue.Split(separator As String(), options As StringSplitOptions) As String()
Click here for details. Used to return individual components from a string variable. For example, if you want to extract the year from a MM.DD.YYYY date format, the expression should be [DateVariable].Split(".".ToCharArray)(2) , where [DateVariable] is the GenericValue variable containing the date, "." is the character used as a separator, .ToCharArray is a method that creates an array with the elements delimited by the separator and (2) represents the index of the element to be returned, in our case, the year. When using this method with a GenericValue variable of data type Int, Float or Boolean, the data is automatically converted to String and handled accordingly.
Substring
Function GenericValue.Substring(startIndex As Integer) As String
Function GenericValue.Substring(startIndex As Integer, length As Integer) As String
Click here for details. Used to return a substring contained in a string variable. For example, if you want to extract a word from the "There are 100 machines available" sentence, the expression should be [SentenceVariable].Substring(10,3) , where [SentenceVariable] is the GenericValue variable containing the sentence, 10 is the index of the first character to be returned, and 3 is the length of the substring starting from the first character. In this example, the resulted substring would be "100". When using this method with a GenericValue variable of data type Int, Float or Boolean, the data is automatically converted to String and handled accordingly.
ToBoolean
Function GenericValue.ToBoolean(provider As IFormatProvider) As Boolean
Click here for details.
ToByte
Function GenericValue.ToByte(provider As IFormatProvider) As Byte
Click here for details.
ToChar
Function GenericValue.ToChar(provider As IFormatProvider) As Char
Click here for details.
ToDecimal
Function GenericValue.ToDecimal(provider As IFormatProvider) As Decimal
Function GenericValue.ToDecimal(format As NumberStyles) As Decimal
Click here for details.
ToDouble
Function GenericValue.ToDouble(provider As IFormatProvider) As Double
Function GenericValue.ToDouble(format As NumberStyles) As Double
Click here for details.
ToInt
Function GenericValue.ToInt(culture As IFormatProvider) As Integer?
Function GenericValue.ToInt() As Integer?
Used to convert a specified value to a nullable integer. When using this method with a GenericValue variable of data type Boolean, the "True" and "False" values are converted to 1 and 0, respectively.
ToInt16
Function GenericValue.ToInt16(provider As IFormatProvider) As Short
Click here for details. When using this method with a GenericValue variable of data type Boolean, the "True" and "False" values are converted to 1 and 0, respectively.
ToInt32
Function GenericValue.ToInt32(provider As IFormatProvider) As Integer
Click here for details. When using this method with a GenericValue variable of data type Boolean, the "True" and "False" values are converted to 1 and 0, respectively.
ToInt64
Function GenericValue.ToInt64(provider As IFormatProvider) As Long
Click here for details. When using this method with a GenericValue variable of data type Boolean, the "True" and "False" values are converted to 1 and 0, respectively.
ToLower
Function GenericValue.ToLower() As String
Click here for details. When using this method with a GenericValue variable of data type Int, Float or Boolean, the data is automatically converted to String and handled accordingly.
ToLowerInvariant
Function GenericValue.ToLowerInvariant() As String
Click here for details. When using this method with a GenericValue variable of data type Int, Float or Boolean, the data is automatically converted to String and handled accordingly.
ToSByte
Function GenericValue.ToSByte(provider As IFormatProvider) As SByte
Click here for details.
ToSingle
Function GenericValue.ToSingle(provider As IFormatProvider) As Single
Click here for details.
ToString
Function GenericValue.ToString(formatProvider As IFormatProvider) As String
Function GenericValue.ToString(format As String, formatProvider As IFormatProvider) As String
Function GenericValue.ToString() As String
Click here for details.
ToType
Function GenericValue.ToType(conversionType As Type, provider As IFormatProvider) As Object
Click here for details.
ToUInt16
Function GenericValue.ToUInt16(provider As IFormatProvider) As UShort
Click here for details. When using this method with a GenericValue variable of data type Boolean, the "True" and "False" values are converted to 1 and 0, respectively.
ToUInt32
Function GenericValue.ToUInt32(provider As IFormatProvider) As UInteger
Click here for details. When using this method with a GenericValue variable of data type Boolean, the "True" and "False" values are converted to 1 and 0, respectively.
ToUInt64
Function GenericValue.ToUInt64(provider As IFormatProvider) As Ulong
Click here for details. When using this method with a GenericValue variable of data type Boolean, the "True" and "False" values are converted to 1 and 0, respectively.
ToUpper
Function GenericValue.ToUpper() As String
Click here for details. When using this method with a GenericValue variable of data type Int, Float or Boolean, the data is automatically converted to String and handled accordingly.
ToUpperInvariant
Function GenericValue.ToUpperInvariant() As String
Click here for details. When using this method with a GenericValue variable of data type Int, Float or Boolean, the data is automatically converted to String and handled accordingly.
Trim
Function GenericValue.Trim(ParamArray trimChars As Char()) As String
Function GenericValue.Trim() As String
Click here for details. When using this method with a GenericValue variable of data type Int, Float or Boolean, the data is automatically converted to String and handled accordingly.
TrimEnd
Function GenericValue.TrimEnd(ParamArray trimChars As Char()) As String
Click here for details. When using this method with a GenericValue variable of data type Int, Float or Boolean, the data is automatically converted to String and handled accordingly.
TrimStart
Function GenericValue.TrimStart(ParamArray trimChars As Char()) As String
Click here for details. When using this method with a GenericValue variable of data type Int, Float or Boolean, the data is automatically converted to String and handled accordingly.
When using Ctrl + K, Ctrl + M, or Ctrl + Shift + M directly in the **Format Value** activity body, the created variable or argument is of type **GenericValue**. For other activities, the created type is the same as the required type of the activity.
### Example of Using a GenericValue Variable
To demonstrate how a GenericValue variable works, let us create an automation that performs different operations whose results depend on the way we define their expressions. We create two GenericValue variables of different data types and display the results in the **Output** panel.
1. Create a new blank project.
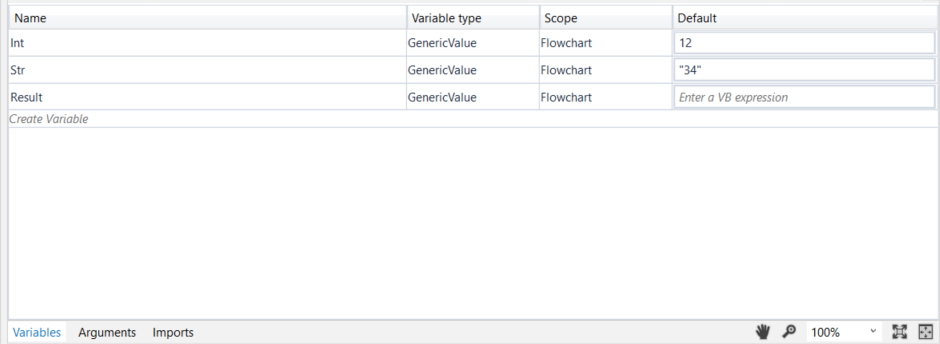
2. Create three GenericValue variables: `Int`, `Str`, and `Result`.
3. In the **Default** column for the `Int` variable, type 12, and for the `Str` variable, type "34". The first variable is interpreted as an integer, while the second one is interpreted as a string.
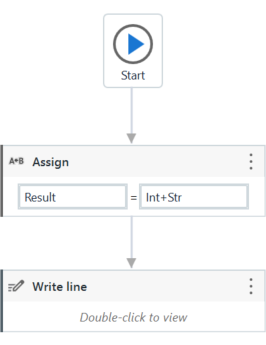
4. Add an [Assign](https://docs.uipath.com/activities/docs/assign) activity to the **Designer** panel and connect it to the **Start** node.
5. In the **Properties** panel, in the **To** field, enter the `Result` variable.
6. In the **Value** field, type `Int` + `Str`.
7. Add a [Write Line](https://docs.uipath.com/activities/docs/write-line) activity and connect it to the **Assign** one.
8. Double click the activity card and in the **Text** field, enter the `Result` variable.
The project should look as in the following screenshot.
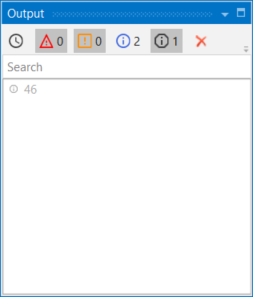
9. Press F5 to execute your automation. Note that, in the **Output** panel, the sum of the two numbers is displayed.
10. Go back to the previously added [Assign](https://docs.uipath.com/activities/docs/assign) activity and change the **Value** field to `Str` + `Int`, to reverse the order of the variables. The project should look as in the following screenshot.
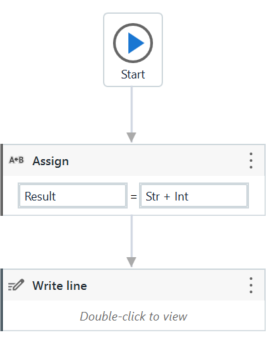
11. Press F5 to execute your automation. Note that, in the **Output** panel, the concatenation of the two numbers is displayed.
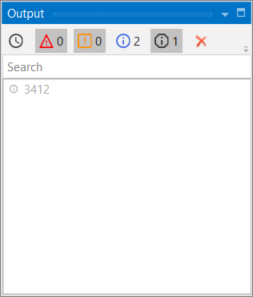
This means that UiPath Studio takes the first element defined in your expression as a guideline for what operation to perform. If the first element in your expression is an integer or a GenericValue variable filled in as integer, UiPath Studio will perform the sum of the elements.
If the first element in your expression is a string or a GenericValue variable filled in as string, UiPath Studio will perform the concatenation of the elements.
[Download example](https://documentationexamplerepo.blob.core.windows.net/examples/Studio_v2022.10/GenericValueVariable.zip)
## QueueItem Variables
We recommend that you read the [About Queues and Transactions](https://docs.uipath.com/orchestrator/automation-cloud/latest/user-guide/about-queues-and-transactions) page, for an overview on queues and transactions, before further proceeding to the QueueItem variable.
Before getting into an in-depth detailing of the subject, make sure you understand the distinction between queue items (items stored in a queue in Orchestrator) and QueueItem variables (variables used in Studio to process queue items). We refer to them exactly like that: “QueueItem variables” and “queue items”.
Broadly, as the name says, the QueueItem variable stores an item which has been extracted from a container of items, a queue. This extraction is generally made with the purpose of further using the queue items in various scenarios. Let’s say you represent a banking institution and you have a deposits’ report of 50 clients. You want to process the data of each client who had previously deposited an On-Us Check smaller than $5000, using a third-party financial application. In this regard, you can make a workflow in which the QueueItem variable stores, by turn, the information of each client. Each entry read by the QueueItem variable is stored in a queue item and added to the designated queue in Orchestrator. The result of this whole process is a queue which contains the clients' information, each in the corresponding queue item.
To further process the data which meets the condition, you must create another workflow which extracts from the previously created queue, the items with a corresponding On-Us Check value smaller than $5000. A step-by-step procedure on how to create such a project is provided at the end of this topic.
### Supported .NET Methods
Name/Syntax
Description
Equals
Function Object.Equals(obj As Object) As Boolean
Click here for details.
GetHashCode
Function Object.GetHashCode() As Integer
Click here for details.
GetType
Function Object.GetType() As Type
Click here for details.
ToString
Function Object.ToString() As String
Click here for details.
### Supported Properties
Name/Syntax
Description
AssignedTo
Property QueueItem.AssignedTo As String
Click here for details.
DueDate
Property QueueItem.DueDate As Date?
The latest date and time at which the item should be processed. If empty, the item can be processed at any given time.
DeferDate
Property QueueItem.DueDate As Date?
The earliest date and time at which the item is available for processing. If empty, the item can be processed as soon as possible.
Id
Property QueueItem.Id As Long?
Click here for details.
ItemKey
Property QueueItem.ItemKey As Guid
The unique identifier of the item. For example, 1bf829e1-cd6b-4275-a364-19db3cfe09c7 .
Priority
Property QueueItem.Priority As QueueItemPriority
The priority of the queue item as defined in Studio in the Priority field on the Properties panel.
ProcessingException
Property QueueItem.ProcessingException As ProcessingException
The processing exception of a failed item.
Progress
Property QueueItem.Progress As String
Custom progress information about a queue item whose status is InProgress.
QueueDefinitionId
Property QueueItem.QueueDefinitionId As Long
The unique identifier of the queue under which a queue item/transaction has been created.
QueueName
Property QueueItem.QueueName As String
The name of the queue containing the processed items.
Reference
Property QueueItem.Reference As String
A user-specified value for easier queue item identification.
RetryNo
Property QueueItem.RetryNo As Integer
The number of times the item has been retried.
ReviewStatus
Property QueueItem.ReviewStatus As String
The revision status of the queue item as retrieved from Orchestrator.
RowVersion
Property QueueItem.RowVersion As Byte()
An internal field used for version stamping. It gets updated whenever a property of the current transaction is changed.
SpecificContent
Property QueueItem.SpecificContent As Dictionary(Of String, Object)
A collection of key value pairs containing custom data associated with the current transaction, as configured in the Add Queue Item activity.
StartTransactionTime
Property QueueItem.StartTransactionTime As Date?
The time and date the transaction processing began.
Status
Property QueueItem.Status As QueueItemStatus
The status of the queue item as retrieved from Orchestrator.
### Example of Using a QueueItem Variable
Due to the nature of this example, we have split this section in two parts, each representing one of the two main workflows to be used when working with queues and queue items:
* [Uploading items into a queue](https://docs.uipath.com/studio/standalone/2025.10/user-guide/uipath-proprietary-variables#uploading-items-into-a-queue)
* [Processing the transactions from a queue](https://docs.uipath.com/studio/standalone/2025.10/user-guide/uipath-proprietary-variables#processing-the-transactions-from-a-queue)
#### Uploading Items Into a Queue
To demonstrate how to add items into a queue, let us create an automation that processes entries contained in a `.xlsx` file. Let’s say you represent a banking institution and you have a deposits’ report of 50 clients. You want to process the data of each client that previously deposited an On-Us Check smaller than $5000, using a third-party financial application. The report contains the name of the client, the On-Us Check value, and two other additional values, let’s say Cash In and Not On-Us Check. We create a workflow in which the QueueItem variable stores, by turn, the information of each client. Each entry read by the QueueItem variable is then stored in a queue item and added to the designated queue in Orchestrator. The result of this whole process is a queue which contains each clients’ specific information. Before proceeding to the actual workflow, you might want to take a look at the clients’ report [here](https://www.uipath.com/hubfs/Documentation/WorkflowExamples/QueueItem_Example_Reports.xlsx). We are going to work with the "July Reports" sheet.
Without further ado:
1. Create a new sequence.
2. Add an [Excel Process Scope](https://docs.uipath.com/activities/docs/excel-process-scope-x) activity inside the sequence.
3. Add a [Use Excel File](https://docs.uipath.com/activities/docs/excel-application-card) activity and define the location of the workbook in the **Excel file** field of the activity.
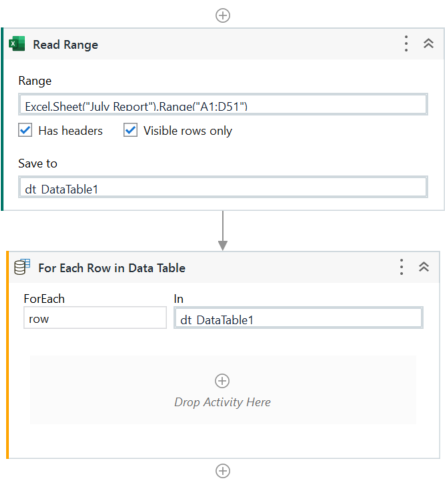
4. Add a [Read Range](https://docs.uipath.com/activities/docs/read-range-x) activity to read the desired range of values from the report and store them in a [DataTable](https://docs.uipath.com/studio/standalone/2025.10/user-guide/types-of-variables#data-table-variables) variable.
5. On the right side of the **Range** field, select **Plus**  > **Excel** > **Indicate in Excel** and select a range of cells (for example, **A1**:**D51**).
6. In the **Save to** field, press Ctrl + K to create a new DataTable variable which stores the previously read data range. Name it `dt_DataTable1` or similar. The **Variables** pane should also display the newly created variable as follows:

7. Next, add a [For Each Row in Data Table](https://docs.uipath.com/activities/docs/for-each-row) activity to the **Designer** panel and fill in the blank fields with “row” and the name of the DataTable variable, `dt_DataTable1`, respectively. This activity performs the action defined within it for each row in the data table. The sequence should look similar to the following screenshot so far:
8. Add an **Add Queue Item** activity in the **For Each Row in Data Table** activity. This adds an item to a queue (defined below at steps 8 and 12), for each row in the spreadsheet.
9. In the **Queue name** field, type the name of the queue you want your items to be stored in, let's say `ReportQueue`.
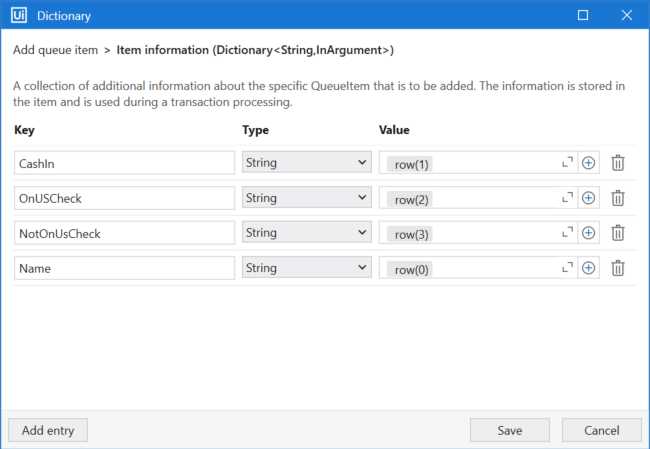
10. Click the field under **Item information** to open the **Dictionary Builder** window. Create 4 arguments, each corresponding to a column from the report. Define them as follows:
* `Name`, keeping the default values for **Direction** and **Type**, and with **Value** set to `row(0).ToString`. This retrieves the value from the column with the counter 0 for each row in the workbook, in our case the name of the client.
* `CashIn`, keeping the default values for **Direction** and **Type**, and with **Value** set to `row(1).ToString`. This retrieves the value from the column with the counter 1 for each row in the workbook, in our case the Cash In value.
* `OnUsCheck`, keeping the default values for **Direction** and **Type**, and with **Value** set to `row(2).ToString`. This retrieves the value from the column with the counter 2 for each row in the workbook, in our case the On-Us Check value.
* `NotOnUsCheck`, keeping the default values for **Direction** and **Type**, and with **Value** set to `row(3).ToString`. This retrieves the value from the column with the counter 3 for each row in the workbook, in our case the Not On-Us Check value.
11. The **Dictionary Builder** window should look similar to the following screenshot:
12. Connect Studio’s Robot to Orchestrator. For details on how to do it, click [here](https://docs.uipath.com/orchestrator/automation-cloud/latest/user-guide/connecting-robots-to-orchestrator).
13. Navigate to https://cloud.uipath.com, log in using your credentials, and then [create a queue](https://docs.uipath.com/orchestrator/automation-cloud/latest/user-guide/managing-queues-in-orchestrator), ReportQueue, to store the items. Make sure that, whatever name you used above (step 8), you use the same here.
14. Go back to Studio. At this point your workflow should be error-free and functional, so the next step is to make it available to Orchestrator. In this regard click **Design** > **Publish**.
15. To run the process, click **Design** > **Run**.
:::note
Take into account that, after being processed, queue items become transactions, and are further handled as such.
:::
16. Navigate to https://cloud.uipath.com again and [display the transactions](https://docs.uipath.com/orchestrator/automation-cloud/latest/user-guide/managing-queues-in-orchestrator).
#### Processing the Transactions From a Queue
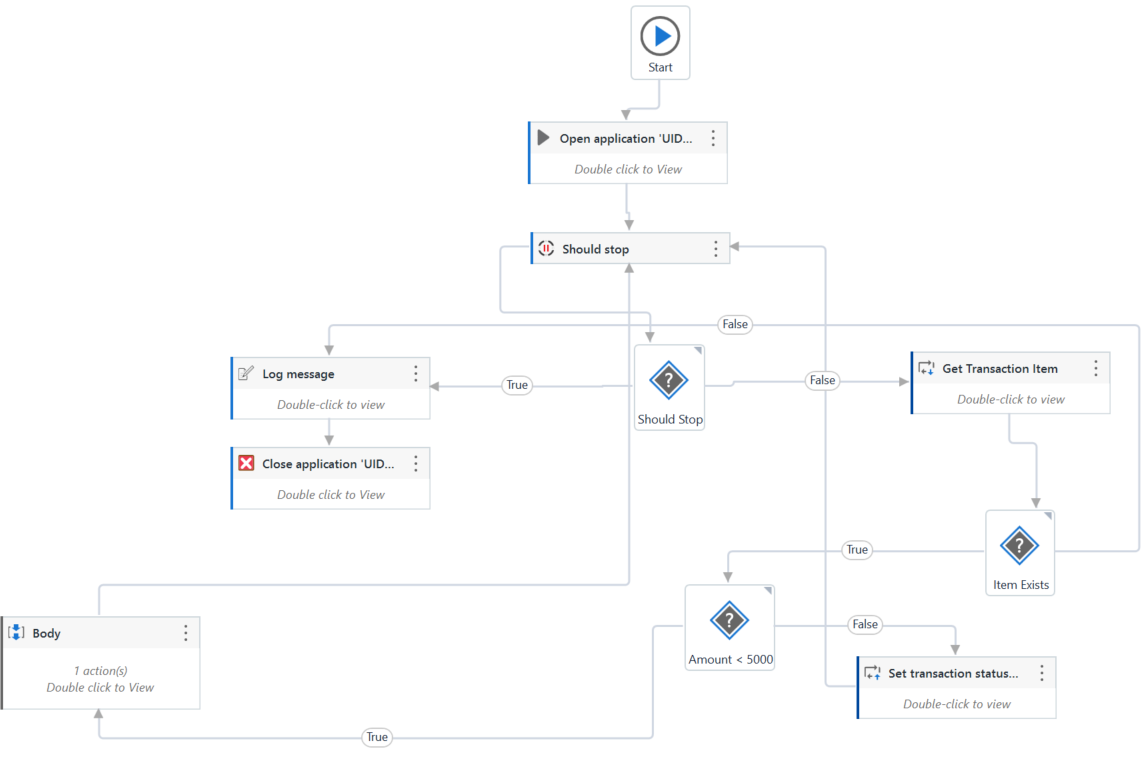
To demonstrate how to further process transactions from a queue, we are going to create a second workflow which retrieves from the appropriate queue, the transactions with an On-Us Check value smaller than $5000. For each transaction that meets the condition, the values are collected and introduced into a third-party dummy application. The other ones are labeled as business exceptions.
1. Go to **Design** > **New** > **Flowchart** to create a new file in the project initiated above.
2. Add an [Use Application/Browser](https://docs.uipath.com/activities/docs/n-application-card) activity to open the third-party dummy application. Connect it to the **Start** node.
3. Fill in the required details (**Display Name**, **File path**, **Selector**) on the **Properties** panel, and configure the activity to log in with the corresponding credentials. Use `admin` for the **Username** field, and `password` for the **Password** field.
4. In the **File path** field, fill in the path of the application.
5. In the **Selector** field, using Selector Editor, define a selector for UIDemo.
6. Add a [Should Stop](https://docs.uipath.com/activities/docs/should-stop) activity to the **Designer** panel and connect it to the **Open Application** activity.
7. Add a [Flow Decision](https://docs.uipath.com/activities/docs/flow-decision) activity to the **Designer** panel and connect it to the **Should Stop** activity. These last two activities check if you stopped the job while it was still running. This gives you the possibility to further configure the workflow to perform various safety routines after the stop is triggered. See below an example of such a routine:
* Add a [Log Message](https://docs.uipath.com/activities/docs/log-message) activity and connect it to the **True** branch of the previously added flow decision.
* In the **Properties** panel, in the **Message** field, type “Stop process required” or something similar to be displayed if the stop is triggered.
* Add a [Close Application](https://docs.uipath.com/activities/docs/close-application) activity and connect it to the **Log Message** activity previously added.
* In the **Properties** panel, in the **DisplayName** field, after **Close application**, type `UIDemo.exe UIDemo`.
8. Add a [Get Transaction Item](https://docs.uipath.com/activities/docs/get-queue-item) activity to the **False** branch of the flow decision added previously (step 7). This activity retrieves the transaction items from the queue and stores them, by turn, with each iteration of the loop, in a QueueItem variable.
9. In the **Properties** pane, in the **QueueName** field, type the name of the queue which stores your items. In our case, as defined in the **Uploading Items into a Queue** section, the name is "ReportQueue".
10. In the **TransactionItem** field, press Ctrl+K to create the QueueItem variable which stores each transaction item. Name it "TransItem" or similar.
11. Add a **Flow Decision** activity to the **Designer** panel and connect it to the **Get Transaction Item** activity.
12. In the **Properties** pane, in the **Condition** field, type `TransItem isNot Nothing`. This activity checks the value of each item to determine if the end of the queue has been reached.
13. Connect the **False** branch of the flow decision to the **Log Message** activity created in step 7. This ensures the job stops when the end of the queue is reached.
14. Add another **Flow Decision** activity to the **Designer** panel and connect it to the **True** branch of the flow decision created in step 11.
15. In the **Properties** pane, in the **Condition** field, type `cint(TransItem.SpecificContent("OnUSCheck").ToString) < 5000`. The expression converts the OnUSCheck value in each QueueItem variable into a string variable, which is then further converted into an integer. The value thus obtained is checked for compliance with the condition.
* `cint` converts a variable of type string to one of type integer.
* `TransItem` is the QueueItem variable (step 18) used to store the items.
* `SpecificContent("OnUSCheck")` retrieves the content of the On US Check argument in each item.
* `.ToString` converts the content of the QueueItem variable into a variable of type string.
* `< 5000` is the condition to be checked against.
16. Add a [Set Transaction Status](https://docs.uipath.com/activities/docs/set-transaction-status) activity to the **Designer** panel, and connect it to the **False** branch of the previous flow decision (step 13).
17. In the **Properties** pane, make sure the **Status** field is set to **Failed**, and **ErrorType** to **Business**. This way, if the value of On US Check is bigger or equal to 5000, the transaction is marked as failed with a business exception.
18. In the **TransactionItem** field add the `TransItem` variable.
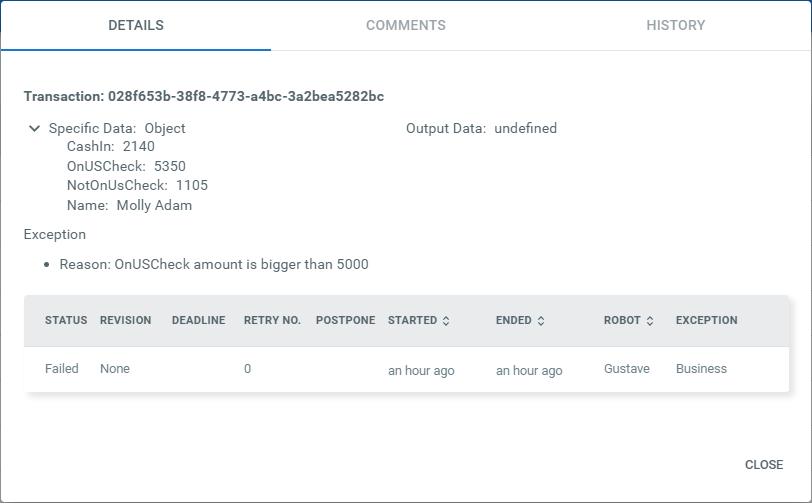
19. In the **Reason** field, type "OnUSCheck amount is bigger than 5000" or similar, to display for a failed transaction.
20. Connect the **Set Transaction Status** activity to the **Should Stop** activity (step 6), to create a loop and process the next transaction in the queue.
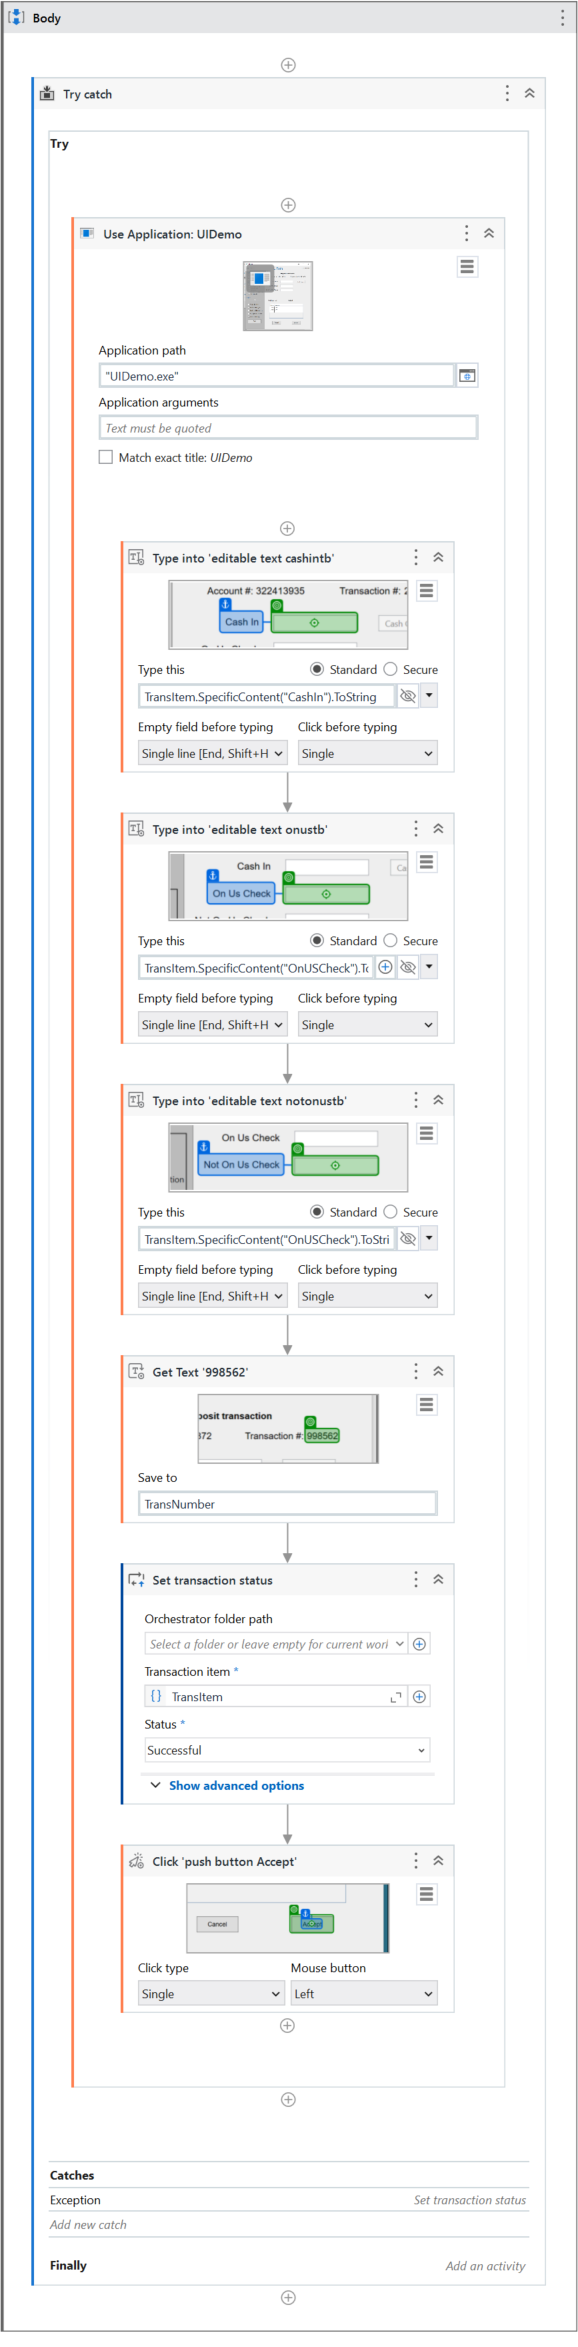
21. Add a **Sequence** activity to the **Designer** panel, and connect it to the **True** branch of the previous flow decision (step 13). Inside the sequence, add a [Try Catch](https://docs.uipath.com/activities/docs/try-catch) activity and configure it such that any potential errors are correctly labeled as application errors when processing the items.
22. Open the UIDemo application, and log in with the username `admin` and the password `password`.
23. Perform the following series of activities for each of the **Cash In**, **On Us Check** and **Not On Us Check** fields in the UIDemo application:
* Into the previous **Try Catch** activity, add an [Use Application/Browser](https://docs.uipath.com/activities/docs/n-application-card) activity to open the application.
* Add a [Type Into](https://docs.uipath.com/activities/docs/n-type-into) activity.
* Click **Indicate target on screen** and select from the UIDemo interface the blank field corresponding to Cash In.
* In the **Type this** field, type `transItem.SpecificContent("CashIn").ToString`. Each term in the expression is explained above (step 15). This expression converts the value in each QueueItem variable into a string variable.
24. Add a [Get Text](https://docs.uipath.com/activities/docs/n-get-text) activity after the previous **Type Into** activities and select "Indicate target on screen" from the options menu.
25. Point at the transaction number in the UIDemo application and click **Confirm**.
26. Set the **Text** field to a new variable, say `TransNumber`. This retrieves the transaction number for each queue item that meets the initial condition.
27. Add a **Set transaction status** activity after the **Get Text** activity.
28. Make sure the **Status** field is set to **Successful** and the **ErrorType** is set to **Application**. This way, if the set of values is successfully introduced in the application, the status of the transaction is set to **Successful**, or else labeled as an application exception.
29. In the **Output** window, define a new argument and add the previously created variable, `TransNumber` (step 25) as value.
30. In the **Transaction item** field, add the `TransItem` variable.
31. Add a **Click** activity after the **Set transaction status** activity.
32. Click **Indicate target on screen** and select the **Accept** button from the UIDemo interface.
33. The **Try Catch** activity should look similar to the following screenshot:
34. Return to the flowchart and connect the previous **Sequence** activity (step 21) to the **Should Stop** activity (step 6) to create a loop and process the next transaction in the queue.
35. The flowchart should look similar to the following screenshot:
36. To run the process, click **Design** > **Run**.
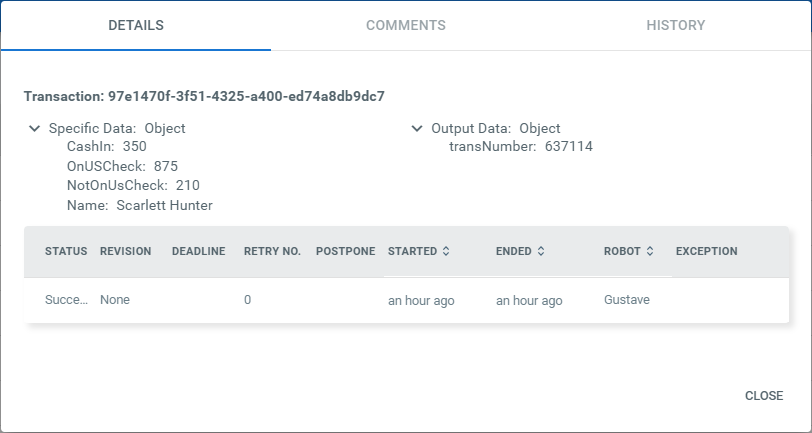
37. After the execution has ended, you may navigate to https://cloud.uipath.com and [display the processed transactions](https://docs.uipath.com/orchestrator/automation-cloud/latest/user-guide/managing-queues-in-orchestrator) with the corresponding processing details:
* Successful Transaction
* Failed Transaction
[Download example](https://documentationexamplerepo.blob.core.windows.net/examples/Studio_v2022.10/QueueItemVariables.zip)