# The User Interface
> Studio contains multiple panels for easier access to specific functionalities. They can be docked, act as floating windows, or the **Auto Hide** option can be enabled from the drop-down list.
Studio contains multiple panels for easier access to specific functionalities. They can be docked, act as floating windows, or the **Auto Hide** option can be enabled from the drop-down list.
## Overview
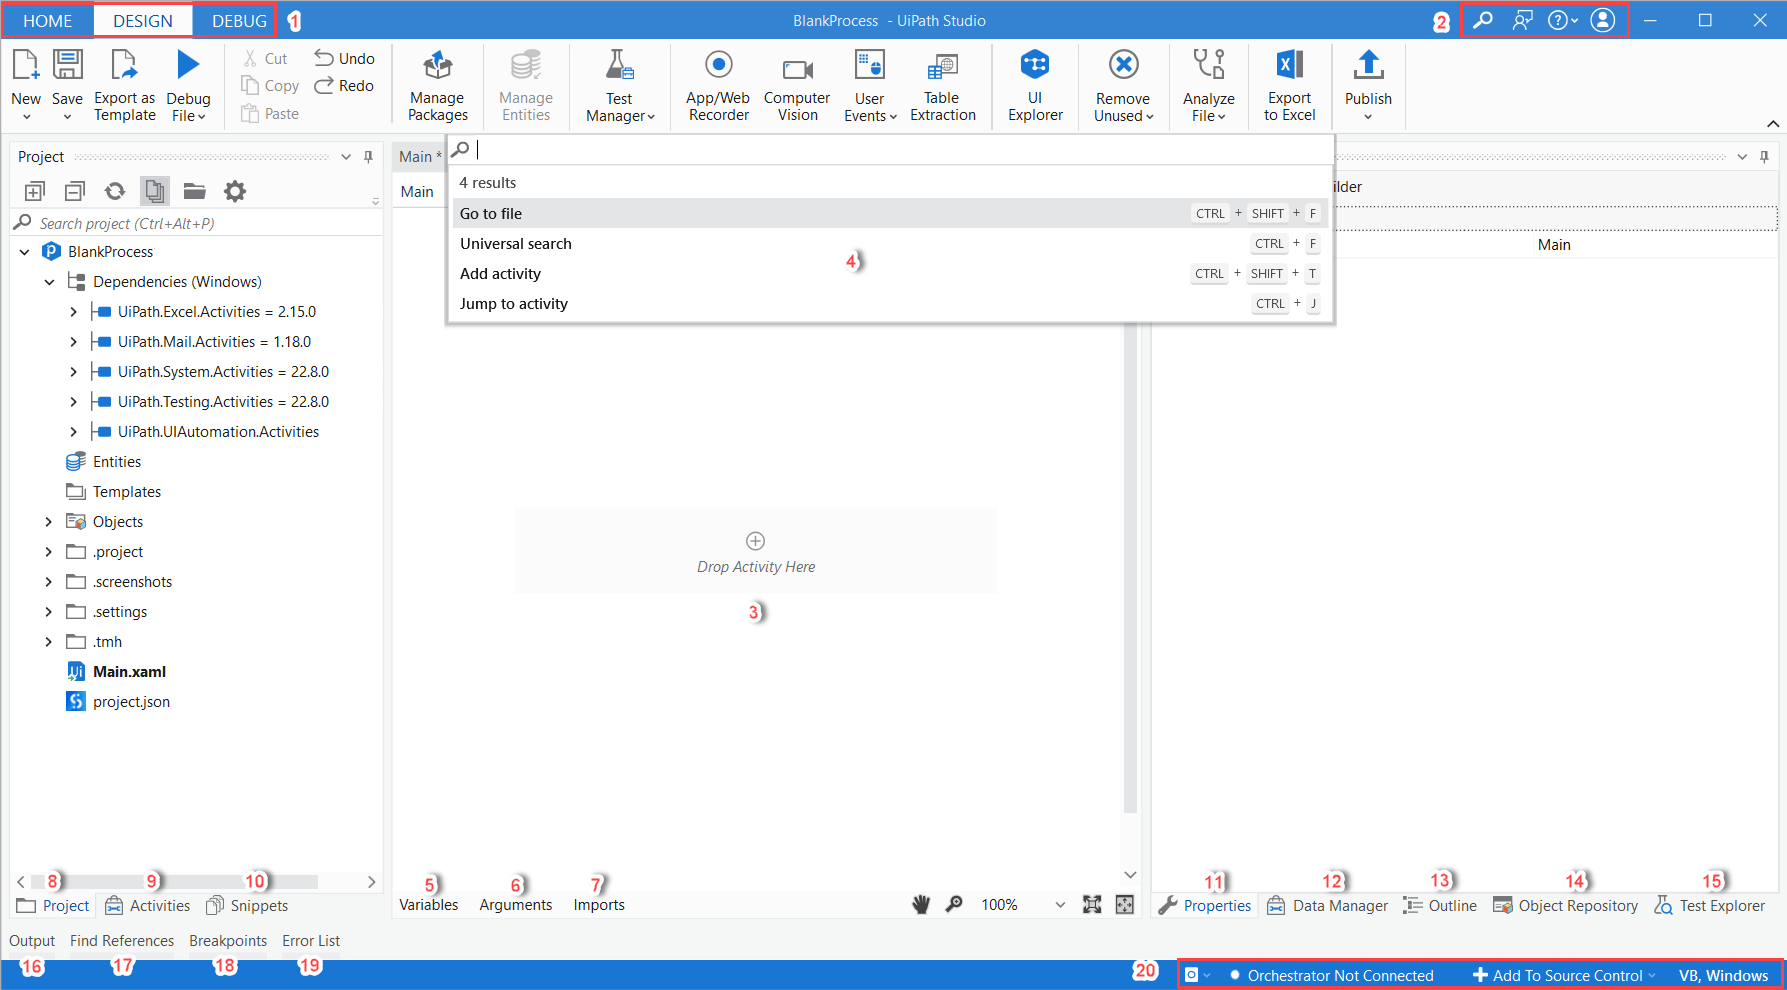
No.
Name
Description
1
Ribbon Tabs
Home - Go to the Studio Backstage View where you can open and create projects, configure Studio, and more.
Design - Build automations using the tools available in the Command Palette , and Studio panels .
Debug - Use a comprehensive set of tools to debug your workflows. For more information, see About Debugging .
2
Title Bar
Open the Command Palette .
Send Feedback .
Access Help resources .
Sign in to your account .
3
Designer Panel
Build your automation by managing the activities added to the current workflow file.
4
Command Palette
Add activity
Universal search
Go to File
Jump to activity
5
Variables Panel
Manage variables.
6
Arguments Panel
Manage arguments.
7
Imports Panel
Manage imported namespaces.
8
Project Panel
View the contents of your current project, manage files, folders, and dependencies, and adjust project settings.
9
Activities Panel
View all available activities and add activities to your automation.
10
Snippets Panel
Use pre-built workflows and add your own reusable automations.
11
Properties Panel
View and configure the properties of a selected activity.
12
Data Manager Panel
Manage the data in your project.
13
Outline Panel
View the hierarchy of the current workflow and all available nodes.
14
Object Repository Panel
Create and reuse UI taxonomies inside and across projects.
15
Test Explorer
View information related to test automation.
16
Output Panel
View the output of the Log message and Write Line activities, status information regarding the execution of your project, errors generated by activities packages, and more.
17
Find References Panel
View all the places where an element is referenced in your project.
18
Error List Panel
View all the errors generated when running the Workflow Analyzer.
19
Breakpoints Panel
Manage breakpoints added to the project.
20
Status Bar
View status information and manage the Orchestrator connection and source control integration.
## The Ribbon
### Ribbon Tabs
The ribbon is straightforward and can be minimized or expanded by clicking the **Minimize / Expand** button . It consists of the following three tabs:
* **Home** - create and open projects, configure Studio, or access help and license information from the Studio [Backstage View](https://docs.uipath.com/studio/standalone/2023.10/user-guide/the-user-interface#backstage-view).
* **Design** - add sequences, flowcharts and state machines to your project, install and manage activities packages, build interactions with UI elements, export workflows to Excel, and then publish your work to Orchestrator or custom feeds. Keep in mind that wizards and **UI Explorer** aren't visible in the **Ribbon** unless you install the `UiPath.UIAutomation.Activities` package.

* **Debug** - debug your workflow, while using debugging tools to set breakpoints, monitor the execution of activities step by step, and adjust the debugging speed. Open logs to view details regarding execution and any changes made to the project. For more information on debugging, check the [About Debugging](https://docs.uipath.com/studio/standalone/2023.10/user-guide/about-debugging) page.

:::note
Files that are not created during the execution of the automation project become read-only when published to [Orchestrator](https://orchestrator.uipath.com/). If your business process requires you to write in a specific file at some point, be sure to create it while designing the project.
:::
### The Title Bar
#### Send Feedback
There are two types of feedback that you can send directly from within Studio: **Submit an idea for the product** or **Report a bug**. Both are accessible from the ribbon by clicking the  icon.
The **Send Feedback** feature must be used only for sending anonymous feedback to the product team. To contact our tech support team, please use the [Contact Technical Support](https://customerportal.uipath.com/support/add-case) form.
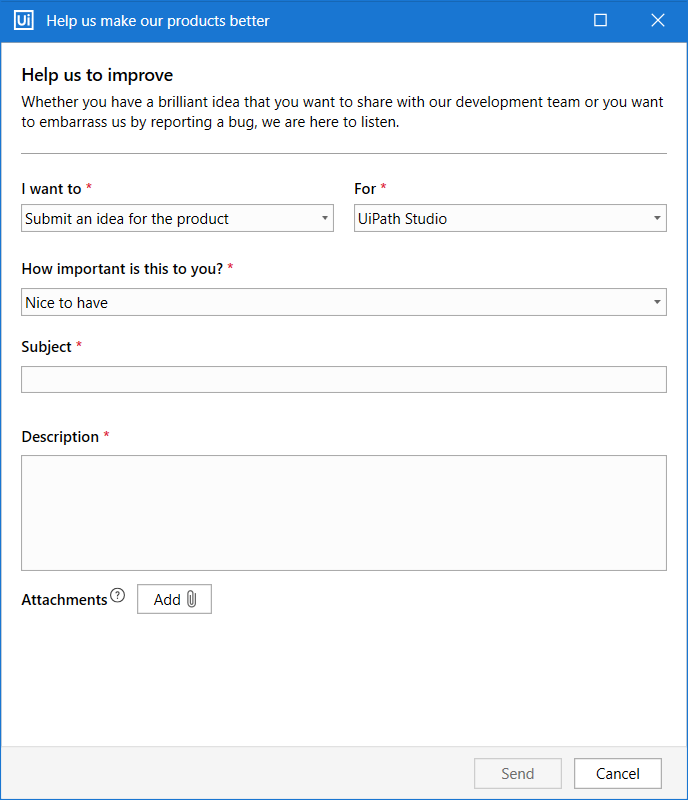
Provide the following information, and then click **Submit**:
* From the **I want to** drop-down menu, pick either **Submit an idea for the product** or **Report a bug**.
* From the **For** drop-down menu, pick either **UiPath Activities**, **UiPath Studio**, **UiPath Robot**, **UiPath Orchestrator** or **UiPath Assistant**.
* From the **How important is this to you** drop-down menu, pick **Nice to have**, **Important**, or **Critical**.
* In the **Subject** field, add a short title.
* Add a detailed description and attach up to 6 images, videos, or text files, each with a size smaller than 10MB. The threshold for sending feedback is 3 posts in a timeframe of 5 minutes.
#### Help
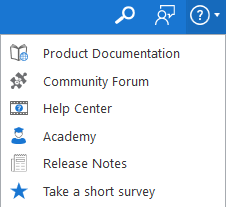
Click the Help icon to quickly access the resources that are also available in the **Help** tab in [Backstage View](https://docs.uipath.com/studio/standalone/2023.10/user-guide/the-user-interface#backstage-view), as illustrated below:
## Backstage View
This is the view you see when you first open Studio. You can also get here by clicking **Home** in the upper-left corner of the window. Here you can create and open projects, configure Studio, or access help and license information.
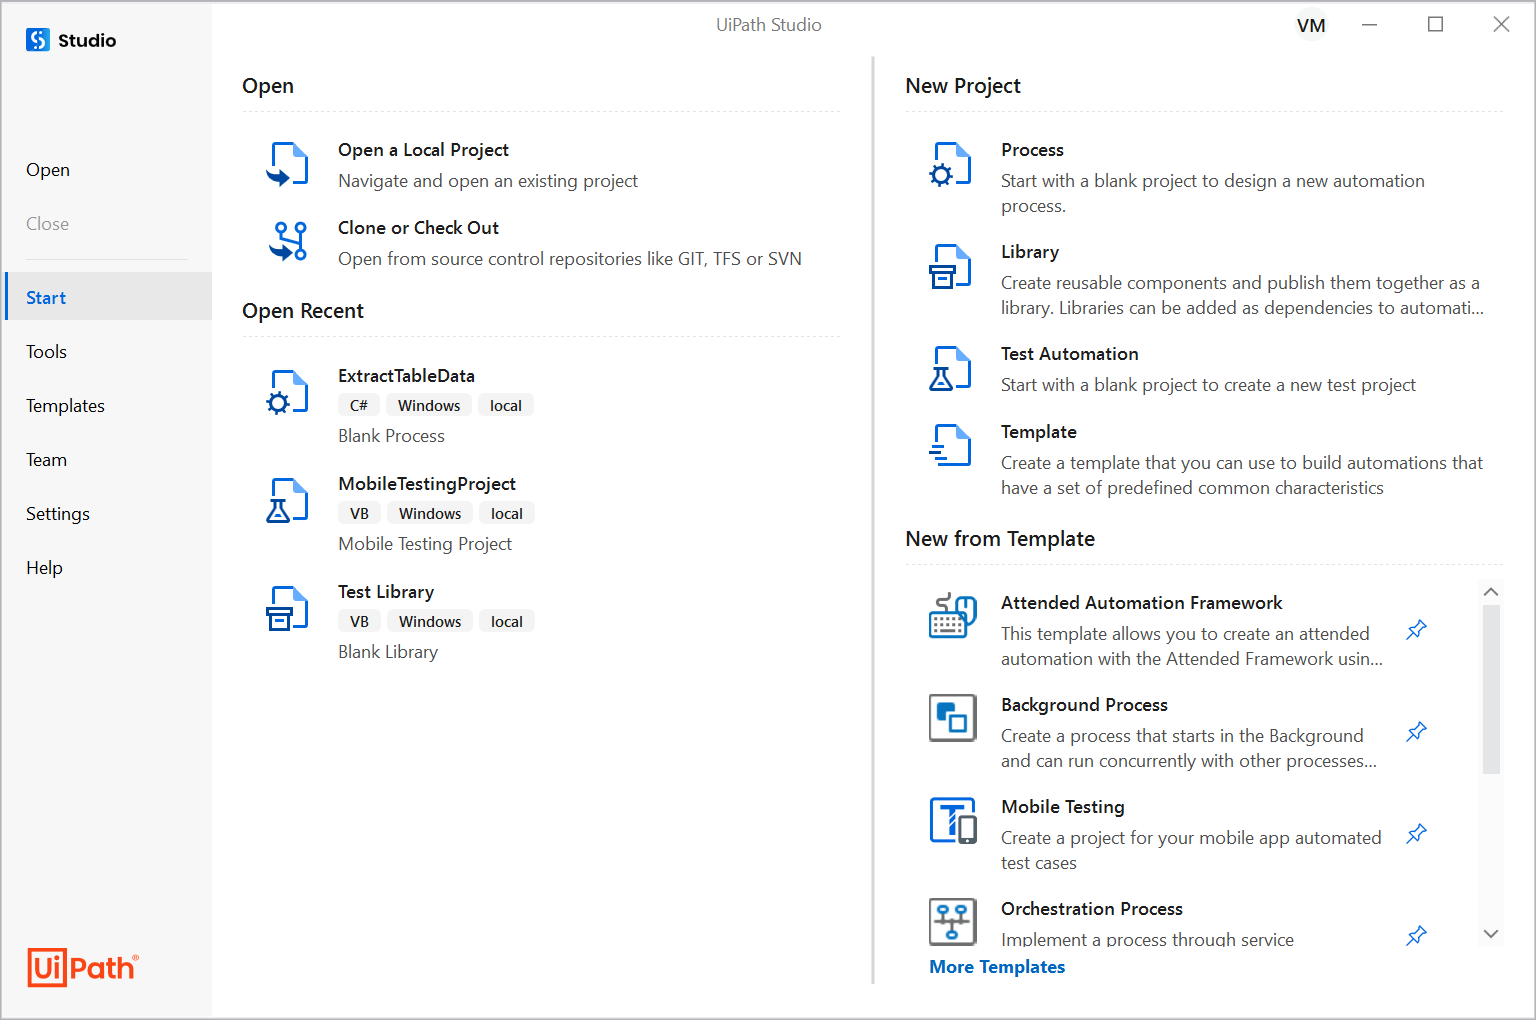
The following buttons and tabs are available in this view:
* **Open** - Browse to a local automation project and open it. By default, projects are created in C:\Users\<current_user>\Documents\UiPath.
:::note
Projects located on network folders where your user only has read permissions cannot be opened in Studio. We recommend using [source control](https://docs.uipath.com/studio/standalone/2023.10/user-guide/about-version-control) systems to collaborate on projects.
:::
* **Close** - Close the automation project that is currently open.
* **Start** - Create a new automation project or open recently accessed projects. You can create a new project from predefined templates or open a project you recently worked on. Projects can be pinned or removed from the Open Recent list, which displays the description, target framework, language used for expressions, and project source (local, Studio Web, or GIT/SVN/TFS repository) for each project. Hovering over an entry in the Open Recent list displays the path to the `project.json` file and when the project was last opened.
* **Templates** - Create a new project based on a template. In this tab, you can view all available project templates, search and filter them by source. For more information, see [Project Templates](https://docs.uipath.com/studio/standalone/2023.10/user-guide/project-templates#project-templates).
* **Team** - Manage [source control integration](https://docs.uipath.com/studio/standalone/2023.10/user-guide/about-version-control) for the automation project.
* **Tools** - Access tools that enhance your experience with Studio.
+ Select the **Apps** tab for the , [Project Dependencies Mass Update Tool](https://docs.uipath.com/studio/standalone/2023.10/user-guide/project-dependencies-mass-update#project-dependencies-mass-update), and the [Repair Tool for Microsoft Office](https://docs.uipath.com/studio/standalone/2023.10/user-guide/microsoft-office-interop-issues#microsoft-office-issues).
+ Select the **UiPath Extensions** tab to install or uninstall the following [extensions](https://docs.uipath.com/studio/standalone/2023.10/user-guide/about-extensions): Chrome, Firefox, Edge, Java, Silverlight, Citrix, Windows Remote Desktop, VMware Horizon, Excel Add-in, and SAP Solution Manager.
+ Select the **Plugins** tab to enable or disable [source control](https://docs.uipath.com/studio/standalone/2023.10/user-guide/about-version-control) and [test automation](https://docs.uipath.com/studio/standalone/2023.10/user-guide/introduction-studiopro) plugins.
* **Settings** - Change the look and feel of Studio, set global preferences, and manage activities package sources. For more information, see [Configuring Studio Settings](https://docs.uipath.com/studio/standalone/2023.10/user-guide/configuring-studio-settings).
* **Help** - Directs you to product documentation, release notes, online resources, the [Community Forum](https://forum.uipath.com/) and the [RPA Academy](https://www.uipath.com/rpa-academy). This is where you can also access a quick tutorial that helps you learn the basics of creating, publishing, and running an automation.
:::note
To ensure the tutorial is completed successfully, we recommend that you pause the tutorial before making any changes to the workflow outside of those highlighted in the tutorial steps.
:::
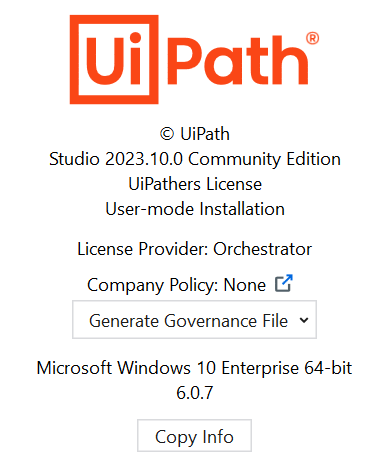
Information regarding product version and installation, license availability, and device ID is also found in the **Help** tab, together with a **Copy Info** button for quickly copying the details to the clipboard.
## The Command Palette
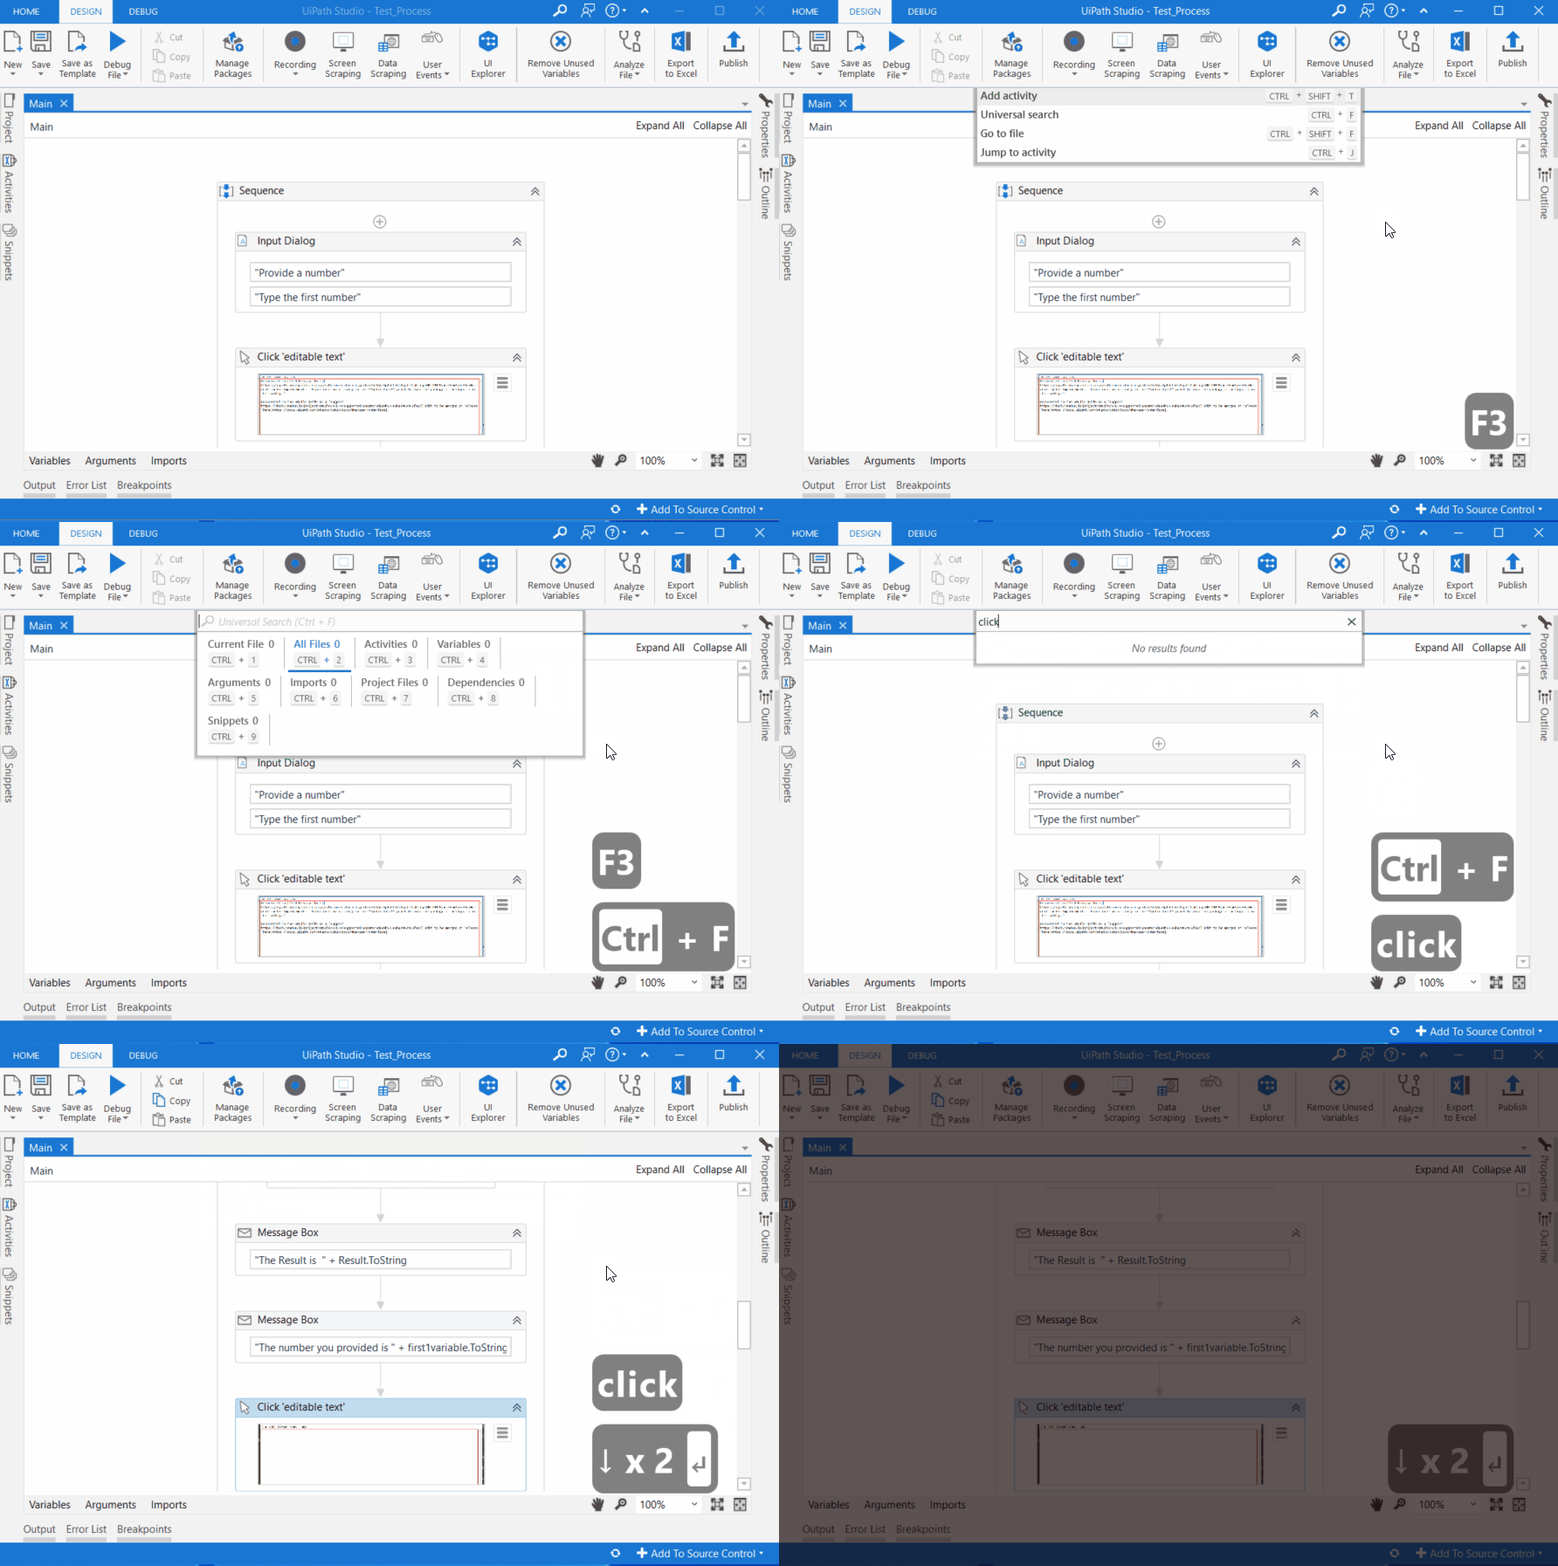
The **Command Palette** is opened by using the **Ctrl + Shift + P**, **F3** keyboard shortcuts, or by clicking the search button. It incorporates the **Add activity**, the **Universal search**, the **Go to file**, and **Jump to activity** search bars.
:::note
Studio supports prioritizing activities by scope. Click the  icon inside an activity scope and notice that the Command Palette offers suggestions of activities which fit the current scope. Support for this feature is rolling out in stages in official activities packages, check [release notes](https://docs.uipath.com/releasenotes) periodically.
:::
### Add Activity
The **Add activity** search bar is opened using the **Ctrl + Shift + T** keyboard shortcut. You can search for activities in installed and installable packages, and add them after the selected activity in the file. The bar automatically assigns keyboard shortcuts to the first five results, and remembers your previous findings.
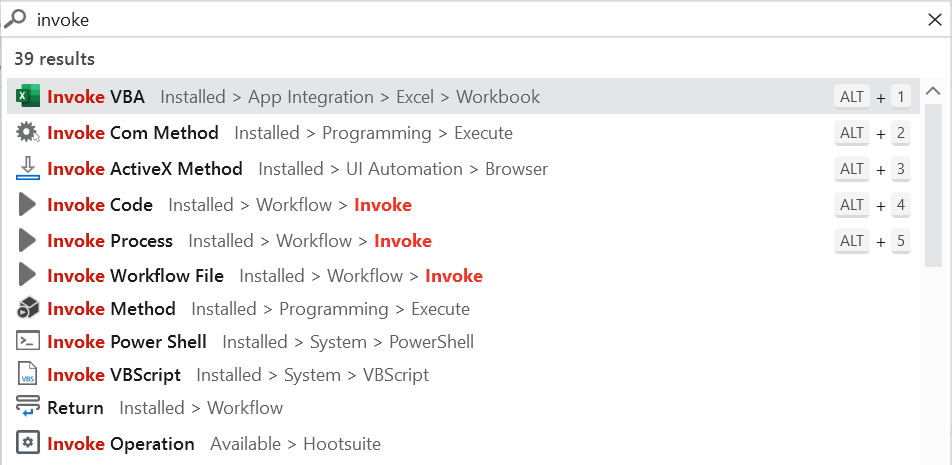
Click the  icon at the top or bottom of an activity from a sequence to open the **Add activity** search bar.
If the [Enable AI activity suggestions](https://docs.uipath.com/studio/standalone/2023.10/user-guide/configuring-studio-settings) option in the Studio design settings is selected, a UiPath AI service analyzes the location in the workflow where you opened the Add activity search bar and suggests activities that you may want to add next based on the current context. If there is no context (for example, you press **Ctrl + Shift + T** when no activity is selected in the Designer panel) activity suggestions are not provided.
If the [Show activities available to install](https://docs.uipath.com/studio/standalone/2023.10/user-guide/configuring-studio-settings) option in the Studio design settings is selected, you can search for activities that are not included in your installed packages. Searching for available activities is only possible for packages from the **Official** and **Orchestrator Tenant** feeds. Adding an available activity also installs its corresponding activity package. Selecting the installation  button installs the package without adding the activity to the workflow.
### The Universal Search
The **Universal search** bar enables you to find snippets, activities, variables, arguments, imports, project dependencies, and files in your current project. Searches return results from all workflow files, including files that are closed.

| Option | Shortcut | Description |
| --- | --- | --- |
| **Current File** | **Ctrl + 1** | Lists results from the currently opened file that match the search query. |
| **All Files** | **Ctrl + 2** | Lists results found in all files part of the current project that match the search query. |
| **Activities** | **Ctrl + 3** | Lists results from activities that match the search query. |
| **Variables** | **Ctrl + 4** | Finds variables in the current project that match the search query. |
| **Arguments** | **Ctrl + 5** | Finds arguments defined in the project that match the search query. |
| **Imports** | **Ctrl + 6** | Finds imported namespaces in the project that match the search query. |
| **Project Files** | **Ctrl + 7** | Finds files part of the current project that match the search query. |
| **Dependencies** | **Ctrl + 8** | Lists results found in dependencies installed to the project. |
| **Snippets** | **Ctrl + 9** | Finds snippet files that match the search query. |
Search results persist until the next time you open the search bar if you use **Universal search** or **Add activity**. For **Go to file** and **Jump to activity** the previous search query is not persisted.
Double-click an activity or press **Enter** to add it to the currently opened file. Using the same commands, you can open files from under the **All Files** or **Project Files** category, or focus on the desired search result.
Default values of arguments from a process inside the **Invoke Workflow** activity are not searchable with the **Universal Search**.
### Go to File
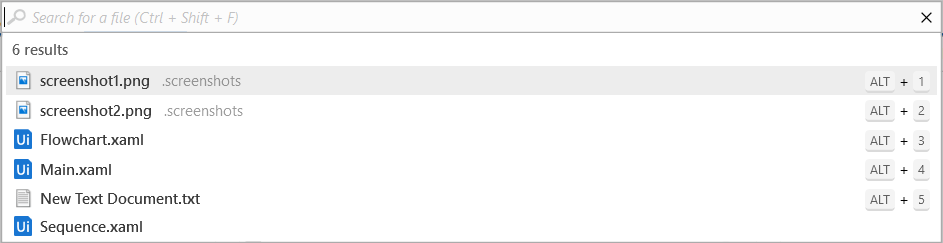
The **Go to file** bar searches and opens files part of the current project folder. `.xaml` files are opened in the **Designer** panel in Studio, while other files, such as screenshots or Excel files, are opened with their respective default application on your machine. Double-click or press **Enter** to open a file.
:::note
The **Activities**, **Project** panels, and the **Command Palette** support fuzzy search, which means that a list of results is returned even if the search terms don't match exactly. The search terms could be slightly incomplete, misspelled or include only the first letter of each word. For example, if you type `dci` in the **Activities** bar, it returns the **Double Click Image** activity.
:::
### Jump to Activity
The **Jump to activity** search bar part of **Command Palette** helps find and focus specific activities in large workflows. It is accessed by using the **Ctrl + J** keyboard shortcut, or by opening using the **F3** or **Ctrl + Shift + P** shortcuts, and selecting **Jump to activity**.
When opened, the **Jump to activity** bar displays the list of all activities in the `.xaml` file currently focused in the **Designer** panel.
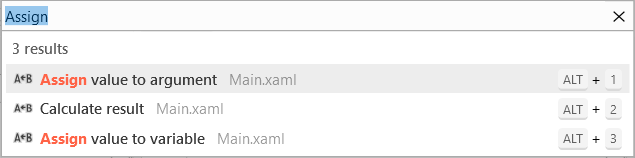
Type the display name or the namespace of an activity, for example **Assign**. Use the keyboard arrows to select the activity and press Enter to focus it in the **Designer** panel.
Activities in the **Jump to activity** bar are arranged in the following order: container, parent, and child activities.
## The Panels
### The Designer Panel
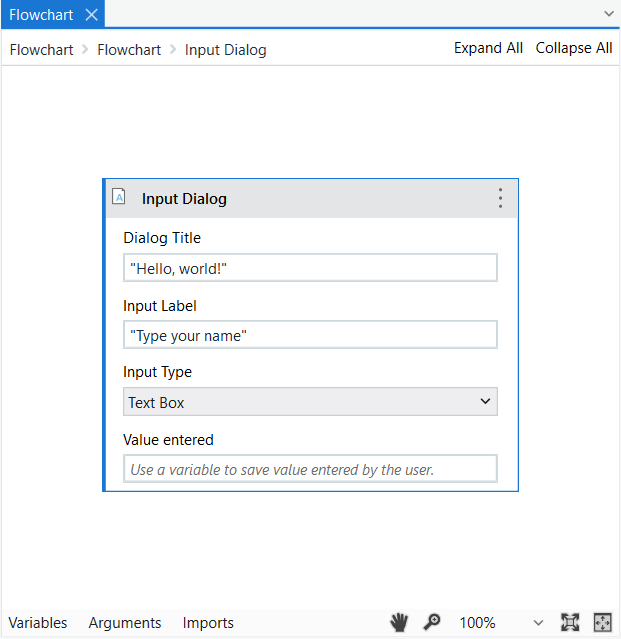
The **Designer** panel displays your current automation project, enables you to make changes to it, and provides quick access to [variables](https://docs.uipath.com/studio/standalone/2023.10/user-guide/managing-variables#managing-variables), [arguments](https://docs.uipath.com/studio/standalone/2023.10/user-guide/managing-arguments#managing-arguments) and [imports](https://docs.uipath.com/studio/standalone/2023.10/user-guide/about-imported-namespaces).
It is possible to navigate within a diagram by double-clicking the activity you want to view. The path is displayed as breadcrumbs in the header of the **Designer** panel. Please note that when using multiple displays scaled differently the text in the input field part of some activities might be improperly shown.
Activities can be copied using **Ctrl + C** shortcut or the context menu, to a text editor, receive changes, and then copied back to the **Designer** panel. You can undo / redo an action you performed in the panel using the buttons in the Studio ribbon or by pressing **Ctrl + Z** / **Ctrl + Y**.
If an activity has validation errors, an error icon  is displayed on the right side of the activity title bar in the Designer panel and a warning icon  is displayed for all its parent activities. The error message is also displayed at the top of the [Properties panel](https://docs.uipath.com/studio/standalone/2023.10/user-guide/the-user-interface#the-properties-panel) for the activity affected by the issue.
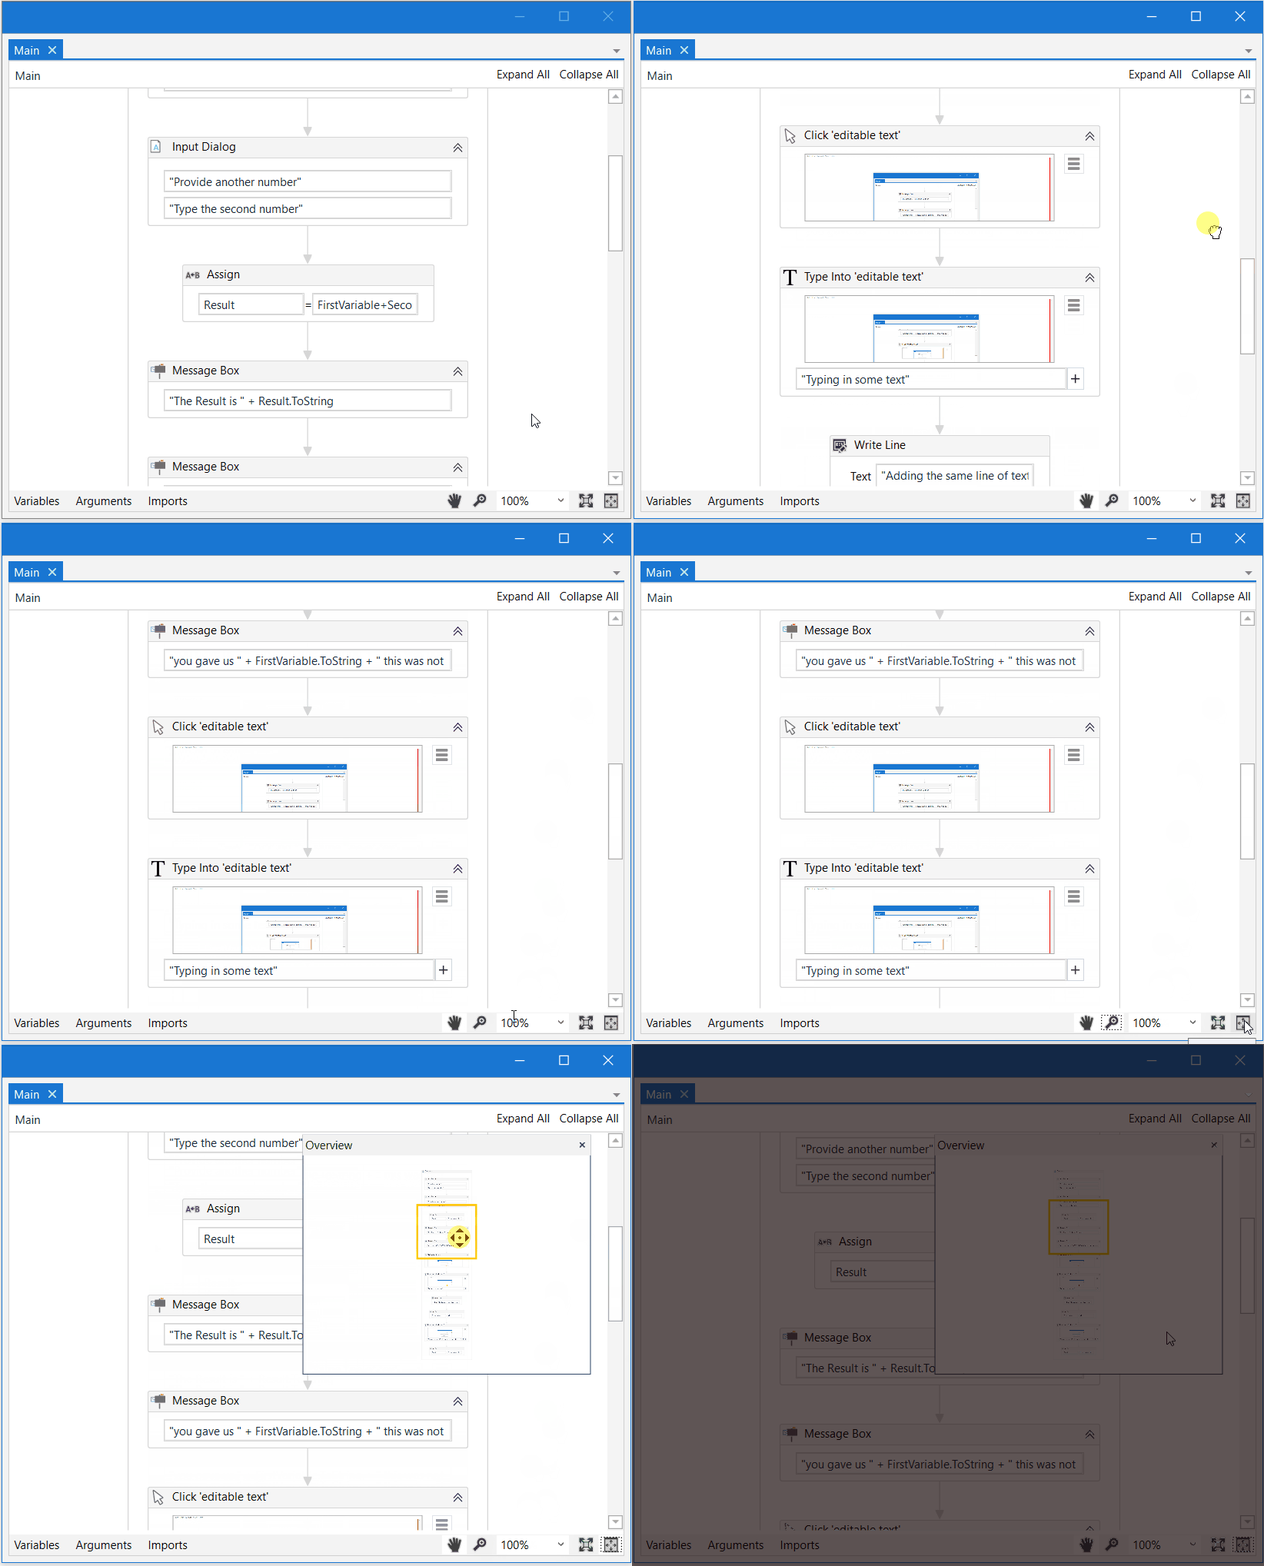
Activate Pan Mode by clicking the  icon, holding the Space key or pressing the middle mouse button. Use the zoom drop-down to change the zoom level and click the  icon to reset it back to 100%.
The **Fit to Screen**  icon changes the zoom in such a way that the whole workflow fits in the **Designer** panel. Click the  icon to get an overview of the whole project and navigate through sections by adjusting the focus.
#### The Context Menu
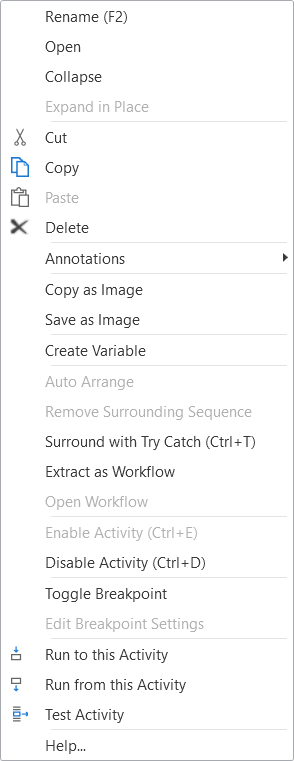
The context menu enables you to perform several operations on your workflow, be it a sequence or a flowchart. You can display it by right-clicking an activity inside your workflow.
:::note
If you select more activities, the menu is not displayed at all.
:::
#### Field Descriptions for the Context Menu
Option
Description
View Parent
Displays the parent of the target activity in the Designer panel. Note: This option is only displayed for child-activities, if they are opened in the Designer panel.
Open
Opens the selected activity in the Designer panel. Has the same result as double-click.
Collapse
Collapses the activity thus reducing the displayed details to "Double-click to view". You can achieve the same result by clicking the Collapse button . Note: Only displayed for sequences.
Expand in Place
Expands the content of the activity, displaying its detailed content. You can achieve the same result by clicking the Expand button . Note: Only displayed for sequences.
Cut
Removes the selected activity and places it onto the clipboard.
Copy
Copies the selected activity and places it onto the clipboard. Activities from read-only files can be copied to another workflow or a .txt file. When copying multiple activities to the clipboard, their order is reversed. :warning: Copying an activity to a project with a different compatibility (e.g. from Windows - Legacy to cross-platform) can cause the execution of the destination workflow to fail.
Paste
Inserts the content of the Clipboard at the current location.
Delete
Deletes the target activity. Note: Since the Context menu is only displayed for a one-activity selection, you can use this command for more activities with the corresponding keyboard shortcut, Delete.
Annotations
Add, edit, delete, show and hide annotations added to activities in the workflow.
Copy as Image
Makes a screenshot of the content displayed in the Designer panel. Note: If you want to make a screenshot of a child activity, make sure to firstly open it in the Designer panel.
Save as Image
Makes a screenshot of the content displayed in the Designer panel and prompts the user to set the details for saving it (Name, Type, Destination). Supported formats: JPG, PNG, GIF, XPS.
Create Variable
Creates a variable in the Variable panel.
Auto Arrange
Automatically arranges activities in a flowchart.
Remove Surrounding Sequence
Removes the selected Sequence activity from the Designer panel. The activities that it contains are moved to the parent sequence.
Surround with Try Catch (Ctrl + T)
Inserts the activity in a Try Catch statement. A Try Catch statement is used for handling exceptions caused by data or coding errors. The Try clause encloses the activity to be checked for exceptions. The Catches clause is the exception handler. The Finally clause is used for executing an activity regardless of the status of the first two clauses.
Extract as Workflow
Creates a new workflow containing the targeted activity with the purpose of breaking down a large project into smaller ones. In the place of the extracted activity an Invoke<new> workflow activity is created which enables you to edit and import arguments from the newly created workflow. The arguments are created automatically from the variables used in that activity. The Invoke<new> workflow activity automatically maps the local variables to invoke arguments for the extracted workflow. Please note that this applies only to variables you create, arguments are not created from variables created implicitly by parent activities such as For Each .
Open Workflow
Opens a workflow created using the above option.
Enable Activity
Enables a previously disabled activity.
Disable Activity
Disables an activity, which is then placed inside a Comment out activity.
Toggle Breakpoint
Marks the selected activity as a breakpoint for debugging. Breakpoints can also be toggled by clicking the Breakpoint button in the Execute tab. You can trigger a breakpoint for one activity at a time.
Edit Breakpoint Settings
Opens the Breakpoint Settings window.
Run to this Activity
Debugs the project and stops before this particular activity is executed.
Run from this Activity
Starts debugging from this activity.
Show All Conditions
Displays all conditions defined in your project ( Properties panel > Conditions ). Note: This option is only displayed for flowcharts when you right-click an empty space inside the project; it is not displayed if you right-click an activity in your flowchart.
Hide All Conditions
Hides all displayed conditions. Note: This option is only displayed for flowcharts when you right-click an empty space inside the project; it is not displayed if you right-click an activity in your flowchart.
Set as Start Node
Connects the selected activity with the Start node. Only displayed for flowcharts.
Set as Initial State
Connects the State Machine specific activity with the Start node. Only displayed for state machines.
The context menu is also displayed for tabs in the **Designer** panel. The following options are available:
Option
Description
Close
Closes the active tab.
Close Others
Closes all tabs but the active one.
Close All Documents
Closes all tabs.
Float
Undocks the target tab and changes it to a floating state.
Pin Tab
Pins the target tab in the Designer panel. The tab pinned last is always moved in front of all other existing tabs (pinned or not). The position of a pinned tab can only be changed relative to other pinned tabs.
New Horizontal Tab Group
Splits the screen horizontally, enabling you to see two or more instances of the Designer panel within the same screen. The target project is moved onto the panel on the right. Only displayed when your project contains two or more tabs and, implicitly, workflows.
New Vertical Tab Group
Splits the screen vertically, enabling you to see two or more instances of the Designer panel within the same screen. The target project is moved onto the panel at the bottom. Only displayed when your project contains two or more tabs and, implicitly, workflows.
Move to Previous Tab Group
Moves the target tab onto the previous Designer panel displayed. Only displayed if you had used the New Vertical Tab Group or New Horizontal Tab Group options before.
Move to Next Tab Group
Moves the target tab onto the next Designer panel displayed. Only displayed if you had used the New Vertical Tab Group or New Horizontal Tab Group options before.
### The Project Panel
The Project panel enables you to manage project files, dependencies, and configure project settings. For more information, see [Managing Projects](https://docs.uipath.com/studio/standalone/2023.10/user-guide/about-automation-projects#managing-projects).
### The Data Manager Panel
The Data Manager panel enables you to manage data such as variables, arguments, constants, entities, Orchestrator resources, connections, and namespaces from a centralized location. For more information, see [Using the Data Manager](https://docs.uipath.com/studio/standalone/2023.10/user-guide/managing-your-project-data#using-the-data-manager).
### The Activities Panel
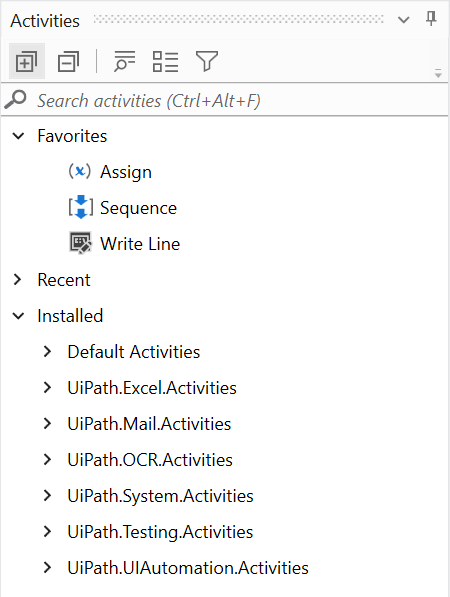
The [Activities](https://docs.uipath.com/activities) panel shows activities that can be added to the current workflow. In Windows and cross-platform projects, you can see both installed and available activities, while in Windows - Legacy projects only installed activities are visible. Installed refers to activities from packages that are already added as project dependencies, while available refers to activities from packages that are not installed, but are available for installation from the **Official** and **Orchestrator Tenant** feeds.
You can search for activities by name and optionally by description using the search box at the top of the panel, navigate through them using navigation keys, and press **Enter** to add the selected activity to the currently opened file.
:::note
The search box can be used for finding activities by their class name, regardless of the interface language set in Studio.
:::
Hovering over an activity in the panel displays the package it belongs to and its description. To add an activity to the list of favorites, right-click it and select **Add to favorites**.
Right-click an activity in the panel and select **Create Test Bench** to test out one or more activities before adding them to a project. Read more about this [here](https://docs.uipath.com/studio/standalone/2023.10/user-guide/debugging-actions).
#### Adding Available Activities
In Windows and cross-platform projects, you can quickly find and add activities from official UiPath packages that are not installed in your projects using the **Available** category in the Activities panel and the **Add activity** search bar.
To add an available activity to your project, double-click it or drag and drop it in your workflow. When you add an available activity to a project, the package that contains it is installed as a project dependency. You can also add an available package to your project by right-clicking its name and selecting **Install**.
#### Adding Integration Service Activities
Most Integration Service activities can be added only from the Available category. The activities are included in a single package, **UiPath Integration Service Activities**, enabling you to quickly add multiple activities for different connectors. The activities in this package are not displayed in the **Installed** section of the Activities panel.
When an update is available for an activity that is already added to a project, it is automatically updated whenever you add a new Integration Service activity or reopen a project.
To add Integration Service activities to a project:
1. Add an available Integration Service activity, or right click the name of the category in the Available section and select **Install** to add the UiPath Integration Service Activities package as a project dependency.
2. Add other Integration Service activities from the Available category, without installing additional packages. The available activities included in the Integration Service package are added to your workflow instantly.
For more information about working with Integration Service activities, see the [Integration Service activities guide](https://docs.uipath.com/activities/other/latest/integration-service/about-the-integration-service-activities).
:::note
Integration Service activities are not available in the **Available** section when Studio is accessed through an [Orchestrator troubleshooting session](https://docs.uipath.com/orchestrator/automation-cloud/latest/user-guide/managing-robots-modern-folders#enabling-a-troubleshooting-session-for-unattended-processes). To work with Integration Service activities, open Studio with your standard user account outside of a troubleshooting session.
:::
#### Customizing the Activities Panel
Click the **Search by description** button at the top of the panel to search for keywords in the activities' descriptions.
Click the **Group by** button to group available activities by the category they belong to or by the package they belong to. You can also clear the two options to see an ungrouped list of activities arranged alphabetically.
Click the ****Filter by****  button to filter activities based on the options below.
#### For cross-platform projects
* **Filter by availability**:
+ **Installed** - Show activities that are part of packages installed in your project (this filter cannot be deactivated)
+ **Available** - Show activities that are part of uninstalled packages that you can add to you project
+ **Windows** - Show activities that are only available in Windows projects
* **Filter by type**:
+ **Activities** - Show activities
+ **Triggers** - Show triggers
#### For Windows projects
* **Filter by availability**:
+ **Installed** - Show activities that are part of packages installed in your project (this filter cannot be deactivated)
+ **Available** - Show activities that are part of uninstalled packages that you can add to you project
* **Filter by type**:
+ **Activities** - Show activities
+ **Triggers** - Show triggers
* **Filter by category:**
+ **Classic** - Show classic activities in projects using the modern experience
#### For Windows - Legacy projects
* **Filter by type**:
+ **Activities** - Show activities
+ **Triggers** - Show triggers
* **Filter by category:**
+ **Classic** - Show classic activities in projects using the modern experience
### The Components Panel
The Components panel is a contextual panel that appears when you create or open a form in Studio. The panel contains UI components that you can drag and drop into the Designer panel to build custom forms. For more information, see [Form components](https://docs.uipath.com/activities/other/latest/workflow/form-components).
### The Snippets Panel
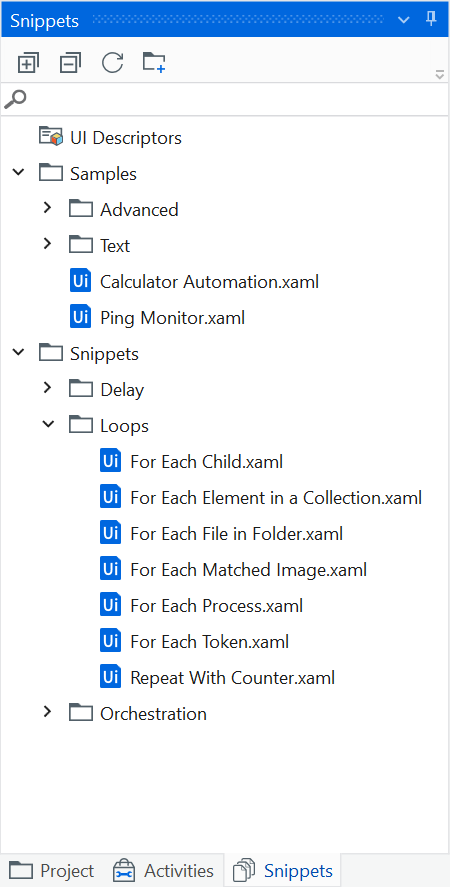
The **Snippets** panel enables you to easily reuse automations. It includes, by default, multiple samples and snippets.
You can add your own by clicking the **Add Folder** button and selecting a directory from your hard drive. Empty folders are not displayed.
To remove a folder, right-click it and select **Remove**.
### The Properties Panel
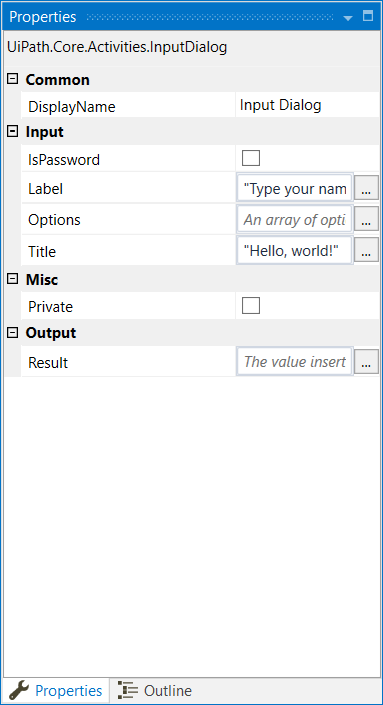
The **Properties** panel is contextual and enables you to view and change the properties of a selected activity. When selecting two activities in the same workflow, common properties can be modified from the **Properties** panel.
In projects with the cross-platform compatibility, all activity properties are available in the activity card in the **Designer** panel if the **Show activity properties inline** [design setting](https://docs.uipath.com/studio/standalone/2023.10/user-guide/configuring-studio-settings) is enabled. This also applies to some activities in projects using the Windows compatibility.
#### The Expression Editor
The **Expression Editor** is accessible with the **Ctrl + Shift + E** keyboard shortcut when used inside activity input fields. It is also available from the **Properties** panel, from fields that require inputting text, and from the body of an activity, by adding text directly in the required fields.
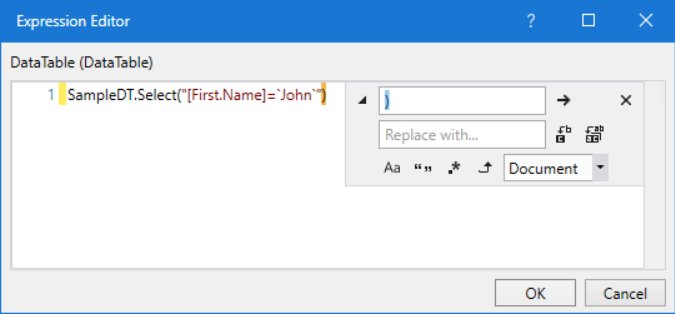
The Expression Editor includes intelligent code completion features. Expressions can be written on multiples lines. [Keyboard shortcuts](https://docs.uipath.com/studio/standalone/2023.10/user-guide/keyboard-shortcuts) for creating variables and arguments directly in expressions are available.
Use Ctrl + F inside the editor to open the search and replace capabilities. Select part of an expression and press Ctrl + F3 to add the text to the search field. Hold the Ctrl key to make the search pane semi-transparent and see the text behind it.
When you close the editor, its position on the display, window size, and text zoom level are saved and applied the next time you open it.
### The Outline Panel
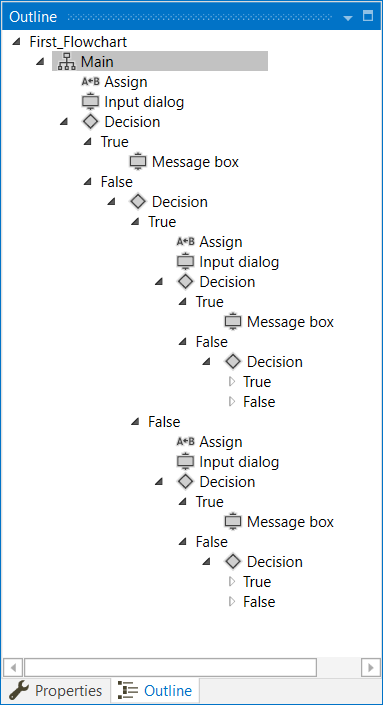
The **Outline** panel displays the project hierarchy, and all available nodes. You can highlight activities in this panel by selecting them in the **Designer** panel, or you can go to a specific activity by selecting it in the **Outline** panel.
### The Output Panel
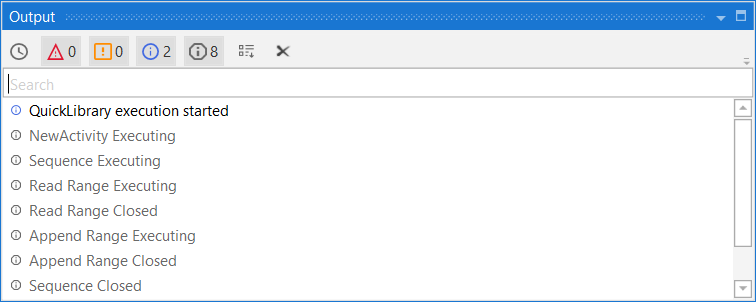
The **Output** panel enables you to display the output of the **Log Message** or **Write Line** activities, among other things. Exceptions for packages are also displayed in this panel.
From the **Output** panel, you can show or hide messages that have different log levels (errors, warnings) by clicking the buttons in the panel’s header. Double-clicking a message displays further details about it, with the option to copy information.
When searching for a log in the **Output** panel and selecting an item from the search results list, the log is highlighted.
The **Export Logs** button is used for exporting logs into a `.txt` file. It exports timestamps and error message details as well. Exporting filtered logs is available. For example, if you want to export only trace level logs, filter the list and then use the **Export Logs** button.
When debugging, the **Output** panel shows logs for when an activity starts executing and until it ends. This can be enabled from the **Log Activities** option in the **Debug** tab.
The **Error List** panel displays errors found in the file or project during the validation process, together with errors generated by [Workflow Analyzer](https://docs.uipath.com/studio/standalone/2023.10/user-guide/about-workflow-analyzer) rules.
The **Clear All** button erases all info displayed in the **Output** panel. Logs and other data stored in this panel are erased when a workflow is run. The **Output** panel displays up to 2,000 lines at a time.
The **Output** panel is not intended for production monitoring and should only be used when developing automations. Events might not be displayed as expected if, for example, a large number of **Log Message** activities are used. To monitor production runs, use the [Orchestrator logs](https://docs.uipath.com/orchestrator/automation-cloud/latest/user-guide/about-logs).
### The Find References Panel
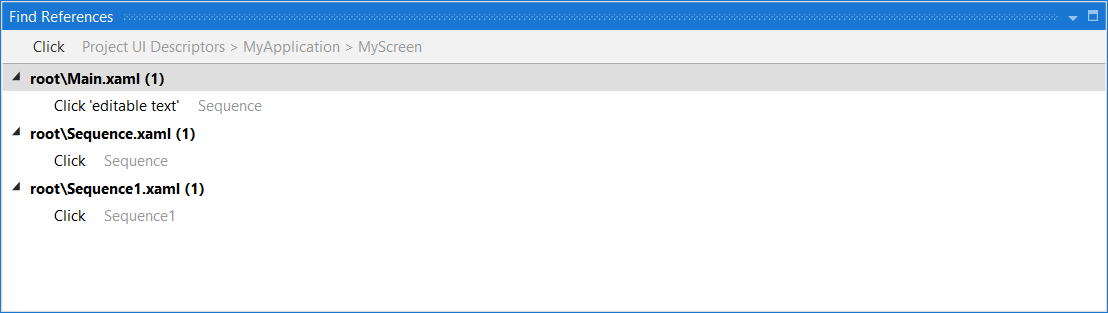
The **Find References** panel displays results for references you search for in your project. To find every place in the project where an element is referenced, right-click it and select **Find References**. This works for the following:
* Files in the **Project** panel
* Activities in the **Activities** panel
* Variables in the **Variables** and **Data Manager** panels
* Arguments in the **Arguments** and **Data Manager** panels
* Descriptors in the **Object Repository** panel
### Debugging Panels
The following panels are available to help you [debug](https://docs.uipath.com/studio/standalone/2023.10/user-guide/about-debugging) your projects: [Breakpoints](https://docs.uipath.com/studio/standalone/2023.10/user-guide/the-breakpoints-panel), [Call Stack](https://docs.uipath.com/studio/standalone/2023.10/user-guide/the-call-stack-panel), [Locals](https://docs.uipath.com/studio/standalone/2023.10/user-guide/the-locals-panel), [Watch](https://docs.uipath.com/studio/standalone/2023.10/user-guide/the-watch-panel), and [Immediate](https://docs.uipath.com/studio/standalone/2023.10/user-guide/the-immediate-panel).
## The Status Bar
In the status bar, you can view status information and access options related to Orchestrator and source control:
* **Orchestrator/Cloud Connection** - Click  to access Orchestrator options: sign in to your cloud account, disconnect from Orchestrator (if connected with a machine key), and refresh resources.
* **Orchestrator Status** - Displays the Orchestrator connection status. When connected to Orchestrator, the currently selected folder is displayed. You can click the name of the current folder to view a list of available folders and select another folder from which to sync resources.
* **Source Control** - Depending on whether the project is connected to a source control repository, different options are available to help you manage source control integration. For more information, see [About Version Control](https://docs.uipath.com/studio/standalone/2023.10/user-guide/about-version-control).
* **Cloud Project** - For cross-platform projects that use the VB language, a menu is available with options related to editing the project in Studio Web. If a project is not already synced with Studio Web, the label **Cloud Compatible** is displayed. If the project is already synced with Studio Web, the label **Cloud Project** is displayed. For more information, see [Designing Cross-platform Projects](https://docs.uipath.com/studio/standalone/2023.10/user-guide/about-automation-projects#designing-cross-platform-projects).
* **Project Language** - Displays the language used for expressions in the project, **VB** or **C#**.
* **Project Compatibility** - Displays the compatibility of the project, **Windows - Legacy**, **Windows**, or **Cross-platform**.
