# Set up single sign-on through SAML for Microsoft Active Directory
> This page describes how to set up single sign-on based on SAML for Microsoft Active Directory.
## Introduction
This page describes how to set up single sign-on based on SAML for Microsoft Active Directory.
## Identity Provider
To enable single sign-on based on SAML, both **UiPath Process Mining** and ADFS must be properly configured so that they can communicate with each other. See also [Configuring ADFS](https://docs.uipath.com/process-mining/standalone/2021.10/user-guide/process-mining-configuring-adfs#configuring-adfs).
Refer to the official Microsoft documentation, and make sure to configure the authentication using the response elements as described below.
### Subject
* `nameID`: A persistent identifier for the user (`urn:oasis:names:tc:SAML:2.0:nameid-format:persistent`).
### Attribute Statements ("claims")
* `http://schemas.xmlsoap.org/ws/2005/05/identity/claims/name`: The user's full name.
* `http://schemas.xmlsoap.org/ws/2005/05/identity/claims/emailaddress`: The user's email address.
* `http://schemas.xmlsoap.org/claims/Group`: Either a single group identifier, or an array of group identifiers.
:::note
**Process Mining** only supports Service Provider Initiated (SP-initiated) SSO for which the Identity Provider is required to support the `RelayState` parameter. This means that the user navigates to the Process Mining login page, from which the user will be redirected to the Identity Provider to login.
:::
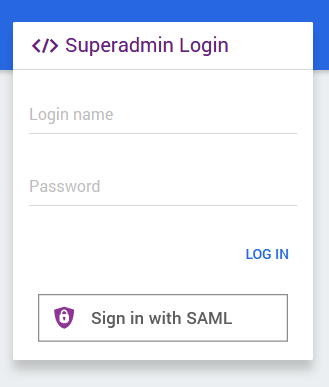
If SAML is enabled and correctly configured, a button is displayed at the bottom of the Login page. See the illustration below.
If multi-factor authentication is used, the user needs to comply with the corresponding rules as well in order to successfully log in.
## Configuring UiPath Process Mining for Single Sign-On
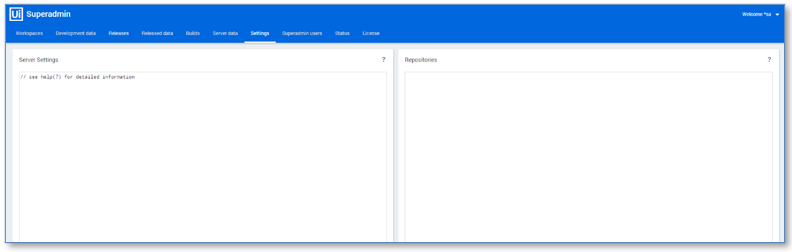
1. Go to the **Settings** tab of the **Superadmin** page of your **UiPath Process Mining** installation to configure the **Server Settings**. See illustration below.
2. Add the required SAML settings in the `ExternalAuthenticationProviders` setting of the **Server Settings**. Below is a description of the JSON keys of the `saml` object.
Key
Description
Mandatory
entrypoint
Specify the URL to the remote Identity Provider.
Yes
issuer
Enables you to specify the issuer string to supply to the Identity Provider. The default value is set to the Process Mining URL.
No
authnContext
Enables you to specify the authentication method to request from Identity Provider. By default no authentication context is requested.
No
cert
Enables you to specify the signing certificate to validate the Identity Provider's responses, as a single line PEM-encoded X.509 format with newlines replaced by ‘\)) ’.
No
privateKey
Enables you to specify the key to sign requests sent to the remote Identity Provider, as a single line PEM-encoded X.509 format with with newlines replaced by ‘\)) ’.
No
signatureAlgorithm
Enables you to specify the signature algorithm used when signing requests. Possible values are: • sha1; • sha256; • sha512.
No
identifierFormat
Name identifier format to request from Identity Provider. Defaults to "urn:oasis:names:tc:SAML:2.0:nameid-format:persistent".
No
validateInResponseTo
When set to "true", validates "InResponseTo" from incoming SAML responses. Defaults to "true".
No
loggingLevel
Enables you to specify whether you want to add information regarding the login process to the log in the [PLATFORMDIR]/logs/iisnode folder. Possible values: • info; • warn; • error. Note: It is recommended to enable this only when you experience problems with logging in.
No
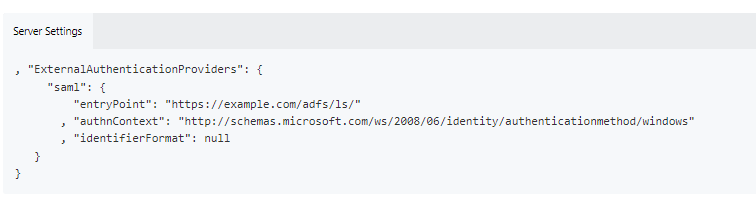
Below is an example of the Server Settings with the `ExternalAuthenticationProviders` setting with the `saml` object for a basic ADFS configuration.
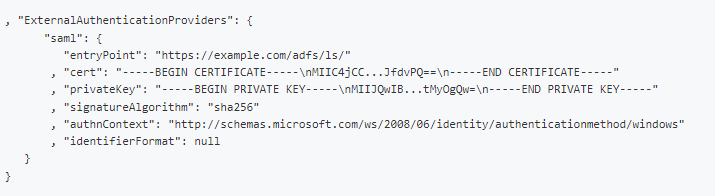
Below is an example of the Server Settings with the `ExternalAuthenticationProviders` setting with the `saml` object for an ADFS configuration with two-way certificate checking.
3. Click on **SAVE** to save the new settings.
4. Press **F5** to refresh the **Superadmin** page. This loads the new settings and enables SAML groups to be created based on these settings.
### Auto-login
:::important
Make sure Single Sign-on works correctly before enabling autologin. Enabling autologin when SSO is not set up correctly can make it impossible for users affected by the autologin setting to log in.
:::
With the `AutoLogin` Server Setting, the user will be automatically logged in using the current active SSO method.
By default, `AutoLogin` is set to `none`. If you want to enable auto-login for end-users and/or Superadmin users, you can specify this in the `AutoLogin` in the **Superadmin Settings** tab. See [The Settings Tab](https://docs.uipath.com/process-mining/standalone/2021.10/user-guide/the-settings-tab#the-settings-tab).
:::note
When logging in via **localhost**, auto-login will always be disabled for Superadmin users.
:::
## Troubleshooting
### Example SAML response
Note especially the contents of the `saml:AttributeStatement` element.
Click [here](https://documentationpicturerepo.blob.core.windows.net/files/Example%20SAML%20response.xml) to see how the expected response should look like for the `saml:AttributeStatement`, which can help in configuring the Identity Provider.
### Log Files
When the user login fails after setting up the communication between the Identity Provider and Process Mining, you are advised to check the log files in the `[INSTALLDIR]/logs` folder.
Below is an example logline from a denied access.
`[2021-08-03T16:45:25.291Z] STDERR: Log: failed Superadmin login for 'Jim Jones' (JJones@company.com) from '10.11.22.33'. Member-of: ["Admins"]. Valid groups: ["CN=Admins,OU=Company,OU=Applications,OU=Groups,DC=abc,DC=DEF,DC=CompanyName,DC=Com"].`
The **Valid groups** list contains the set of groups received from the Identity Provider for the user ‘Jim Jones’. ‘Jim Jones’ is a member of one group, “Admins”. In Process Mining only the group with the long Distinguished Name is configured. ‘Jim Jones’ is denied access because “Admins” is not listed in the **Valid groups**.
#### Solution
You should either configure the Identity Provider to send the full distinguished name, or configure the “Admins” group in Process Mining to only reference the common name.
## Next Steps
To use authentication using SAML, you must create one or more AD groups to allow members to log in. For Superadmin users, or app developers you can create AD groups on the **Superadmin users** tab. See [Adding Superadmin AD Groups](https://docs.uipath.com/process-mining/standalone/2021.10/user-guide/adding-superadmin-ad-groups#adding-superadmin-ad-groups).
For end user authentication, AD groups can be created on the **End user administration** page. See [Adding end user AD Groups](https://docs.uipath.com/process-mining/standalone/2021.10/user-guide/adding-end-user-ad-groups#adding-end-user-ad-groups).