# Set up single sign-on through Azure Active Directory
> This page describes how to set up Single Sign-on through Microsoft Azure Active Directory.
## Introduction
This page describes how to set up Single Sign-on through Microsoft Azure Active Directory.
If Single Sign-On through Azure Active Directory is enabled and correctly configured, a button is displayed at the bottom of the Login page. See the illustration below.

## Step 1: Configure Azure Active Directory to Recognize a UiPath Process Mining Instance.
:::note
For a detailed description on how to set up Azure Active Directory authentication, visit the official [Microsoft Documentation](https://docs.microsoft.com/en-us/azure/app-service/configure-authentication-provider-aad).
:::
Follow these steps to register and configure your app in the Microsoft Azure Portal.
Step
Action
1
Go to the Microsoft Azure App Registrations page and click New Registration .
2
• In the Register an application page, fill the Name field with the desired name of your Uipath Process Mining instance. • In the Supported account types section, select which accounts can use UiPath Process Mining . • Set the Redirect URI by selecting Web from the drop-down and filling in the URL of the UiPath Process Mining instance plus the suffix /auth/signin-aad/ . For example, https://example.com/auth/signin-aad/ . • Click on Register to register your UiPath Process Mining instance in Azure AD. The app is added to the list of applications.
3
Locate the app in the applications list. Click on the app to open the settings page.
4
Click on Authentication in the Manage menu. • Locate the Implicit grant and hybrid flows section. • Select the ID tokens (used for implicit and hybrid flows) option.
5
Click on Token configuration in the Manage menu. • Use + Add groups claim to add a groups claim. • Select the appropriate options in the Select group types to include in Access, ID, and SAML tokens options list. Note: this determines which groups to include in the list of groups sent to Process Mining . You can choose to sent all Security groups , all Directory roles , and/or All groups . You can also choose to send just a specific set of groups. • In the Customize token properties by type options make sure that the Group ID setting is is selected since Process Mining expects Azure groups to always be a GUID.
6
Click on API permissions in the Manage menu. • Click on + Add a permission and add the User.Read permission.
## Step 2: Configure UiPath Process Mining for Single Sign-On
### Configure Server Settings
1. Go to the **Settings** tab of the **Superadmin** page of your **UiPath Process Mining** installation. See illustration below.
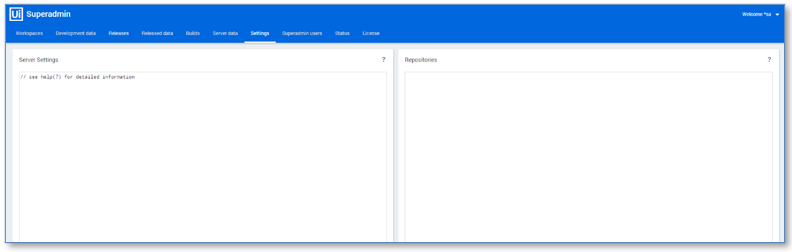
2. Add the required Azure AD settings in the `ExternalAuthenticationProviders` setting of the **Server Settings**. Below is a description of the JSON keys of the `azureAD` object.
Key
Description
Mandatory
clientIdentifier
The Application (client) ID as displayed in the Essentials section on the app Overview page in Microsoft Azure Portal. See illustration below.
Yes
tenant
The Directory (tenant) ID as displayed in the Essentials section on the app Overview page in Microsoft Azure Portal.
Yes
loggingLevel
Enables you to specify whether you want to add information regarding the login process to the log in the [PLATFORMDIR]/logs/iisnode folder. Possible values: • info; • warn; • error. Note: It is recommended to enable this only when you experience problems with logging in.
No

See illustration below for an example of the Server Settings with the `ExternalAuthenticationProviders` setting with the `azureAD` object.
```
, "ExternalAuthenticationProviders": {
"azureAd": {
"clientIdentifier": "d1a1d0f4-ce09-4232-91b9-7756d613b78a"
, "tenant": "f636b271-d616-44d1-bb23-43a73b6eb571"
}
}
```
3. Click on **SAVE** to save the new settings.
4. Press **F5** to refresh the **Superadmin** page. This loads the new settings and enables Azure AD groups to be created based on these settings.
#### Auto-login
:::important
Make sure Single Sign-on works correctly before enabling autologin. Enabling autologin when SSO is not set up correctly can make it impossible for users affected by the autologin setting to log in.
:::
With the `AutoLogin` Server Setting, the user will be automatically logged in using the current active SSO method.
By default, `AutoLogin` is set to `none`. If you want to enable auto-login for end-users and/or Superadmin users, you can specify this in the `AutoLogin` in the **Superadmin Settings** tab. See [The Settings Tab](https://docs.uipath.com/process-mining/standalone/2021.10/user-guide/the-settings-tab#the-settings-tab).
:::note
When logging in via **localhost**, auto-login will always be disabled for Superadmin users.
:::
## Additional Steps
In order to use Integrated Azure Active Directory authentication, you must create one or more AD groups to allow members to login. For Superadmin users, or app developers you can create AD groups on the **Superadmin users** tab. See [Adding Superadmin AD Groups](https://docs.uipath.com/process-mining/standalone/2021.10/user-guide/adding-superadmin-ad-groups#adding-superadmin-ad-groups).
For end-user authentication, AD groups can be created on the **End user administration** page. See [Adding End-user AD Groups](https://docs.uipath.com/process-mining/standalone/2021.10/user-guide/adding-end-user-ad-groups#adding-end-user-ad-groups).