# Adding End-user AD Groups
> :::important
To enable Single Sign-on for end-users the latest version of the Dispatcher build must be used. (At least v2021.4)
:::
## Introduction
:::important
To enable Single Sign-on for end-users the latest version of the Dispatcher build must be used. (At least v2021.4)
:::
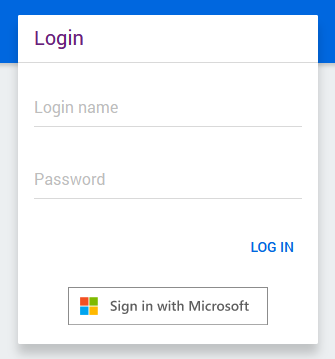
When setting the `ExternalAuthenticationProviders` setting of the **Server Settings** the **Groups** tab becomes available in the **End-user administration** window. Here you can add new AD user groups. End-users who are a member of a group defined in the **Groups** tab can log in the **UiPath Process Mining** with their Microsoft account using single sign-on. Depending on the authentication provider that is used for Single Sign-on, a **Sign in with Microsoft** button or **Sign in with your Windows domain** button will be present on the **Login** dialog. See the illustration below for an example.
## Adding Azure AD Groups
:::note
When creating a new Azure AD Group in **End-user Administration** you must provide the **Identifier** of the Azure AD group. You can find this Azure AD group identifier in the **Groups** settings in [Microsoft Azure Portal](https://portal.azure.com/#blade/Microsoft_AAD_IAM/GroupsManagementMenuBlade/AllGroups).
:::
Follow these steps to add an AD group.
Step
Action
1
Log in the application as a user with Admin permissions.
2
Click on User Settings . Click on the small down-arrow icon in the upper-right corner and select Administration from the drop-down menu. Note: When you are a Superadmin user you can also configure end user access rights by impersonating an end user administrator. See End User Administration .
3
In the user administration page, go to the Groups tab and click on NEW GROUP .
4
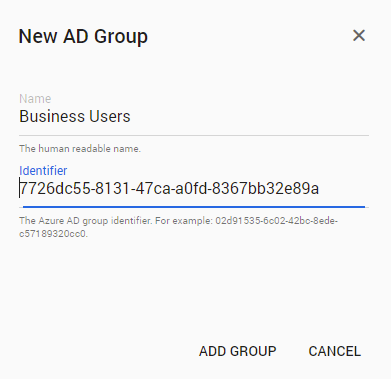
In the New AD Group dialog click on Name and enter a descriptive name for the new user group.
5
Click on Identifier and enter the Azure AD group identifier.
6
Click on ADD GROUP .
See illustration below below for an example.
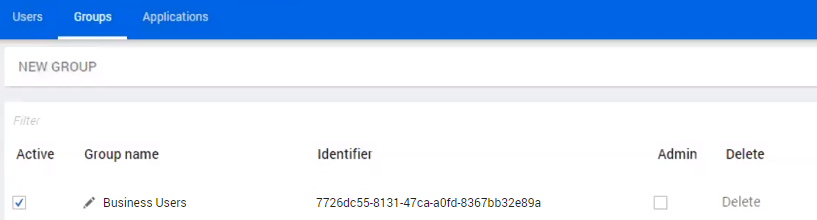
The new group is created and displayed in the list of groups. See illustration below.
End-users who are a member of a group defined in the **Groups** tab can now log in the application with their Microsoft account using **Sign in with Microsoft** button on the **Login** dialog.
## Adding AD Groups for Integrated Windows Authentication
Follow these steps to add an AD group.
Step
Action
1
Log in the application as a user with Admin permissions.
2
Click on User Settings . Click on the small down-arrow icon in the upper-right corner and select Administration from the drop-down menu. Note: When you are a Superadmin user you can also configure end user access rights by impersonating an end user administrator. See End User Administration .
3
In the user administration page, go to the Groups tab and click on NEW GROUP .
4
In the New AD Group dialog click on Name and enter a descriptive name for the new user group.
5
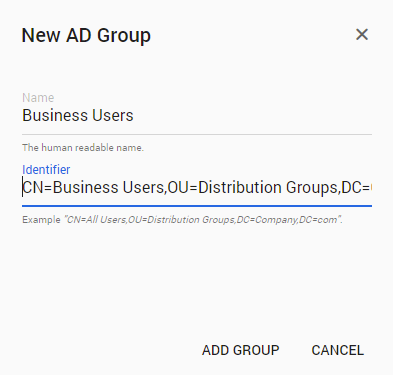
Click on Identifier and enter the Full Name of IWA group of users that are allowed to login. Note: you must use the format CN=All Users,OU=Distribution Groups,DC=Company,DC=com .
6
Click on ADD GROUP .
:::important
AD groups are case-sensitive.
:::
See illustration below for an example.
The new group is created and displayed in the list of groups. See illustration below.
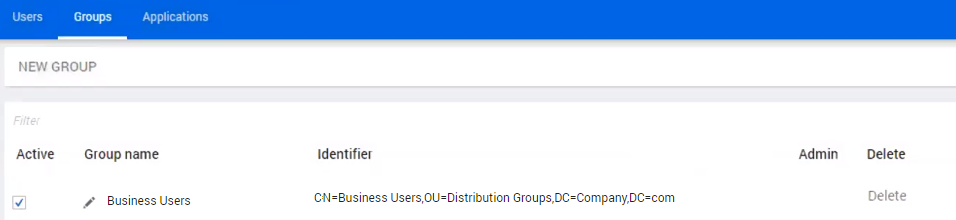
End-users who are a member of a group defined in the **Groups** tab can now log in the application with their Microsoft account using **Sign in with your Windows domain** button on the **Login** dialog.
## End-user Login
When an end-user logs in using single sign-on a new user is created automatically in the **Users** tab. See illustration below for an example.
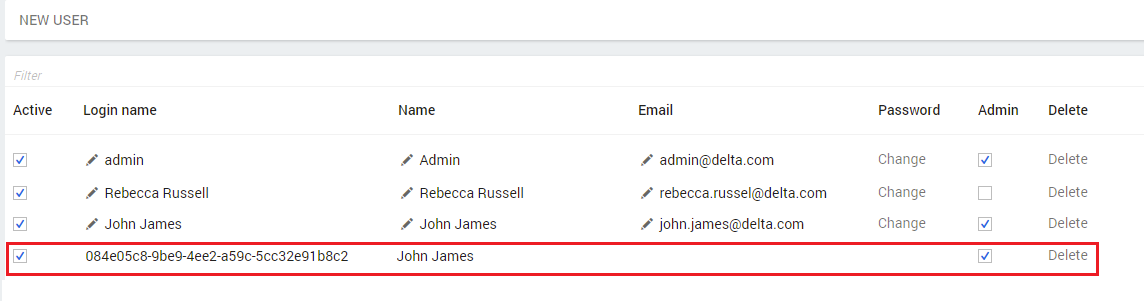
:::note
Single sign-on access is provided through AD groups, not through the auto-provisioned user entry. This is only used to preserve individual settings, for example, Favorites. The entry is read-only, so you cannot change the user settings.
:::
### Managing Account Activation
End-user accounts can be disabled by deactivating an AD group. When an AD group is deactivated, the accounts that are assigned to the group will no longer be able to log in.
Follow this step to disable authorization for all end-user accounts of an AD group.
| Step | Action |
| --- | --- |
| 1 | Click on the check box in the **Active** column of the AD group. |
This is a toggle check box. This means the user can log in if the check box is checked or is restricted from logging in if it is unchecked.
### License
Although the users are authenticated via an AD group, a license is allocated by each individual user that logs in to **UiPath Process Mining**. Note that when a group is deactivated or deleted, users can no longer log in but still have a license slot allocated until the user is actually deactivated or deleted.
### Managing End User Admin Rights
End user accounts from an AD group can be assigned admin rights. Doing so gives them access to the user administration page.
Follow these steps to assign admin rights to all members of an AD group.
| Step | Action |
| --- | --- |
| 1 | Click on the check box in the **Admin** column of the AD Group. |
This is a toggle check box. This means users have admin rights if the check box is checked, or are no longer an admin, if it is unchecked.
:::note
* A user will have admin rights if he is a member of at least one group which has admin access rights assigned.
* A user’s entry is updated only on login. This implies that if, for example, the **Admin** option is toggled on the group entry, the user will have admin rights after the next login.
:::
### Deleting AD Groups
Existing AD groups can be deleted. Users of a deleted users will no longer be able to log in, unless they are a member of a different AD group.
Follow these steps to remove an AD group.
| Step | Action |
| --- | --- |
| 1 | Click on the **Delete** button in the column of the AD group you want to delete. |
| 2 | Click on **YES**. |
The deleted AD group is no longer in the list.
:::note
Users are not automatically deleted when removing a group. A user will not be able to log in anymore, but will continue to take up a license slot until the user entry is also deleted.
:::
## Managing End User App Access for AD Groups
Only the apps to which users have access can be opened by users. In this way end user accounts can also be limited from accessing certain apps. It is possible to assign all users of an AD group rights to open a specific app.
Follow these steps to assign end user rights to a specific app.
| Step | Action |
| --- | --- |
| 1 | Go to the **Applications** tab in the user administration page. Groups can be recognized by the Groups icon. |
| 2 | Click on the check box in the **[app name]** column of the AD group. See illustration below for an example. |
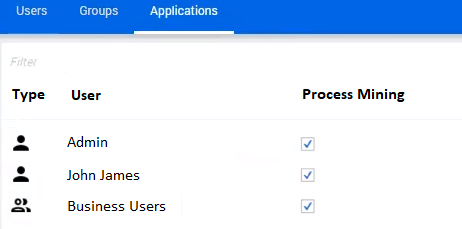
This is a toggle check box. This means the users can access this specific app if the check box is checked, or that access is revoked if the check box is no longer checked.
## Combining Access Rights
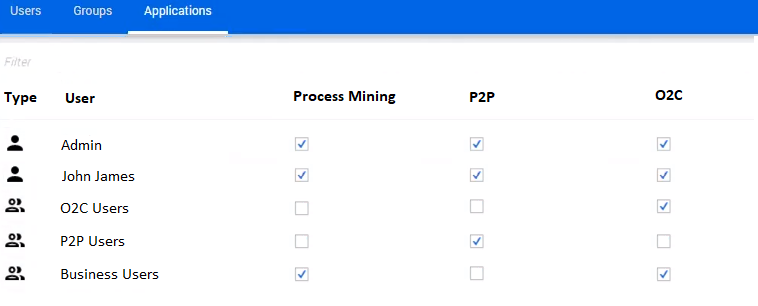
Access rights for a user who logs in using single sign-on are determined by combining all rights granted for each group that the user is a member of. For example, if the group *O2C Users* is granted access to the *O2C* app and the group **P2P Users** is granted access to the *P2P* app, then a user who is a member of both groups is granted access to both the *O2C* app and the *P2P* app. A user who is a member of only the *P2P Users* group has access to the *P2P* app only. See illustration below for an example.
:::note
This also applies to admin rights. A user will have admin rights if he is a member of at least one group for which the **Admin** property is selected.
:::
## Sync-endusers Script
The `sync-endusers` script that can be used in a connection string when setting the **driver** parameter of the connection string to `{mvscript}` and the **script** parameter to `sync-endusers`
also allows syncing of groups.

To sync a group the `login` and `email` fields should be omitted. Instead use the `externalLogin` field to
describe the group. See below for the required formatting.
| Authentication method | Format |
| --- | --- |
| Azure AD | `"aadgroup:{[guid]}"` |
| Integrated Windows Authentication | `"iwagroup:{[Distinguished Name]}"` |
:::note
It is also possible to synchronize the `"isAdmin"` flag to grant end user accounts from an AD group admin rights.
:::
See the Table Help on `mvscript: sync-endusers` for more information.