# Loading data using direct connection
> :::note
The **Upload data using direct connection** option is available for process-specific app templates that use a ServiceNow source system or a Salesforce source system, as well as for the generic app templates **Event log** and **Custom Process** if you want to set up a direct connection to ServiceNow or Salesforce. It is the default option for app templates that use a source system for which a direct connection is available.
:::
:::note
The **Upload data using direct connection** option is available for process-specific app templates that use a ServiceNow source system or a Salesforce source system, as well as for the generic app templates **Event log** and **Custom Process** if you want to set up a direct connection to ServiceNow or Salesforce. It is the default option for app templates that use a source system for which a direct connection is available.
:::
## Prerequisites
**Upload data using a direct connection** uses **Integration Service** connections. This implies that you need to have:
* a license for **Integration Service**;
* **Integration Service** enabled on your tenant;
* access to **Orchestrator** and **Orchestrator folders**.
**Integration Service** connections are restricted by folder. If you want to use a connection from a specific folder, you need to have access to that folder in **Orchestrator** to see it in **Process Mining**. If you create a new connection from **Process Mining**, this connection is created in your personal workspaces in **Orchestrator**.
Refer to the [Integration Service](https://docs-dev.uipath.com/integration-service/automation-cloud/latest/user-guide/introduction#connections) guide for more information on **Integration Service** licensing and **Integration Service** connections.
## Setting up a direct connection
You can set up using a direct connection to your source system from the **Selecting the data source step** instead of setting up a connection using CData Sync.
The **Upload data using direct connection** option loads data in to your process app directly from the source system.
Follow these steps to set up a direct connection to the source system:
1. Select the **Upload data using direct connection** option. The source system used for the app template displayed.
2. Select **Connect**. A new browser tab is opened where you can enter the authentication details for the connection.
:::note
If you are using a process specific app template, make sure the user credentials have access to the default list of tables and fields specified in the app template. Refer to [App Templates](https://docs.uipath.com/process-mining/automation-cloud/latest/user-guide/app-templates#app-templates) for details.
:::
## Mapping input tables
1. A table is added in the **Source tables** section for each extracted table and is automatically mapped to the related input table in the **Target tables** section.
2. Make sure each table is mapped to the correct target table. If required, select a different table from the **Target tables** list to correct the mapping.
3. Select **Next**.
If you upload a table that is not listed as a required table, a new table is automatically added in the **Source tables** section for each uploaded file and a corresponding input table is created in the **Target tables** section. By default, the file name of the uploaded file is used as the name of the tables.
:::note
A warning message is displayed indicating the table needs configuration before data can be uploaded for the table. When a new table is uploaded, it becomes available in data transformations. However, further steps are required to make this data visible on the dashboards. First, the table data must be loaded using a SQL query. Then, the table should be incorporated into the data model of the process app. Refer to [Data models](https://docs.uipath.com/process-mining/automation-cloud/latest/user-guide/data-models#data-models) for more information on how to add a table in the data model.
:::
### Configuring input tables
The settings for the target input table are automatically detected and you just need to check them.
Follow these steps to edit the settings for an input table.
1. Locate the table you want to configure and select the Edit table icon to open the **Edit table** panel for the selected table.
2. Edit the settings as desired and select **Save**.
The following table describes the table settings.
Setting
Description
Table name
The name of the input table in Data transformations.
Mandatory
Option to define the table as mandatory. If TRUE , the table will be required later when publishing or importing the process app. If the table is not uploaded then, an error is thrown. If FALSE , the table is considered as Optional ., when publishing or importing the app. If the table is not uploaded then, an empty table will be created such that subsequent SQL queries will not fail.
Autodetect
Enables you to identify field types in the input file and automatically apply the detected field types to the corresponding fields in the target table.
Encoding
The encoding used in the file.
Delimiter
The delimiter separating the different fields.
Line ending
The character that is used to denote the end of a line and the start of a new one.
Quote character
The quote character used in case fields are wrapped within quotes.
Escape character
The escape character used to correctly interpret characters that would otherwise be treated as special control characters (such as quotes or delimiters). Note: By default, the selected Quote character is used as the escape character. Alternatively, you can select the backslash (\) as the escape character.
Load type
The load type for the table. Note: If you select Incremental as the Load type , you must specify additional settings to configure incremental load for the table.
### Incremental data load
With a full load, all data is extracted from the source and loaded into the target system, regardless of whether the data has changed or remained the same since the last load. An incremental load only extracts data that has changed (added or updated) since the last load. An incremental loads is typically faster and less resource-intensive than a full load, especially when dealing with large volumes of data where only a small subset may change frequently.
To enable incremental data load for a table, you must set the **Load type** for the table to **Incremental**. Incremental load requires a unique identifier to ensure that the data is loaded correctly, and a field (such as a timestamp or a version) to track changes in the source data.
The following table describes the additional settings required for **Incremental** load.
| | |
| --- | --- |
| **Setting** | **Description** |
| Primary keys | The primary key field or fields that uniquely identify each record in the data source. |
| Timestamp field | The field that is used to track when each record was last updated or added. |
| Timestamp format | The format of the timestamp value used in the **Timestamp** field. |
:::important
The extraction method used for loading data may require additional or specific configuration for incremental extraction. Check out [Loading data using CData Sync](https://docs.uipath.com/process-mining/automation-cloud/latest/user-guide/incremental-extraction-cdata-sync#incremental-extraction) for more information on how to set up incremental extraction for **CData Sync**. Check out [Loading data using Theobald Xtract Universal](https://docs.uipath.com/process-mining/automation-cloud/latest/user-guide/incremental-extraction-theobald#incremental-extraction) for more information on how to set up incremental extraction for **Theobald Xtract Universal**. Check out [Loading data using DataUploader](https://docs.uipath.com/process-mining/automation-cloud/latest/user-guide/loading-data-using-datauploader-steps#incremental-extraction) for more information on how to set up **DataUploader** for incremental extraction. If you switch back the **Load type** to **Full**, make sure to configure the extraction method used accordingly.
:::
### Removing a source file
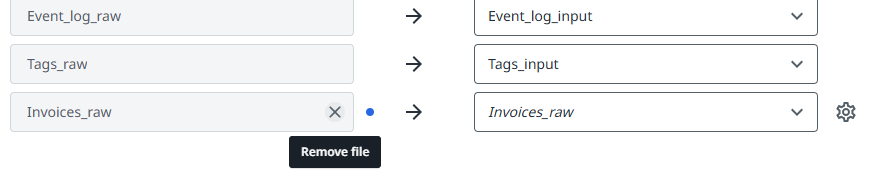
If you accidentally select a source file while uploading source data, you can remove it from the Input data screen.
:::note
A source file can only be removed if no data has been uploaded for it.
:::
Follow these steps to remove a source file.
1. Locate the source file you want to remove in the **Source tables** list.
2. Hover your mouse over the table, and select **Remove file**.
The input file is removed.
### Deleting an input table
You can delete an input table you previously uploaded, directly from the mapping tables page in Input data screen. Deleting an input table removes the data for your process app. If you want to use the data in your process app at a later stage, you must re-upload the input table.
:::important
Deleting a table may cause data transformations to fail.
:::
Follow these steps to delete a table.
1. Locate the table you want to delete and select the Delete table icon. A confirmation message is displayed.
2. Select **Delete**.
## Mapping input fields
:::note
For the selected table, the required input fields for the table are displayed in the Required fields section on the **Fields** page.
:::
The source fields detected in the input table are automatically mapped to the corresponding fields in the target table.
1. Make sure each field is mapped to the correct target field. If required, select a different field from the **Target fields** list to correct the mapping.
2. Select **Next** to continue.
### Configuring input fields
The settings for the target input fields are automatically detected and you just need to check them.
Follow these steps to edit the settings for an input field.
1. Locate the field you want to configure and select the Edit field icon to open the **Edit field** panel for the selected field.
2. Edit the settings as desired and select **Save**.
The following table describes the table settings.
Setting
Description
Name
The name of the field. Note: Name is a mandatory field.
Autodetect
Allows you to identify the field type in the input file and automatically apply the detected field type for the field in the target table.
Type
The data type of the field.
Text
Integer
Decimal
Boolean
Date
Datetime
Note: Depending on field type you must specify parse settings to configure the field.
Mandatory
Option to define the field as mandatory. If selected, the field is required when publishing or importing the process app. An error is thrown then if the field is missing. If not selected, the field is considered optional. When it is missing, the field will be added with NULL values, such that subsequent SQL queries will not fail.
Unique
Option to define the field value have a distinct or unique value for each record.
Not NULL
Option to define that the field must have a value for each record. The field cannot be left empty or filled with a NULL value.
### Parse settings for field types
The following table describes the available parse settings for the different field types.
Field type
Parse settings
Integer
Thousand separator
None
Dot (.)
Comma (,)
Decimal
Decimal separator Dot (.)
Comma (,)
Thousand separator None
Dot (.)
Comma (,)
Boolean
True value: TRUE or 1
False value FALSE or 0
Note: True value and False value are mandatory settings and must be different.
Date
Date format (Check out Example parse settings for Date formats ).
Datetime
Date time format Date format (Check out Example parse settings for Datetime formats .)
#### Example parse settings for Date formats
| **Format** | **Example** |
| --- | --- |
| `yyyy-mm-dd` | `2025-04-05` `2025-4-5` |
| `mm/dd/yy` | `04/05/25` `4/5/25` |
| `mm/dd/yyyy` | `04/05/2025` `4/5/2025` |
| `mm-dd-yyyy` | `04-05-2025` `4-5-2025` |
| `dd-mm-yyyy` | `05-04-2025` `5-4-2025` |
| `yyyy/mm/dd` | `2025/04/05` |
#### Example parse settings for Datetime formats
| **Format** | **Example** |
| --- | --- |
| `yyyy-mm-dd hh:mm:ss[.nnn]` | `2025-04-05 14:30:45.123` `2025-4-5 14:30:45.123` |
| `yyyy/mm/dd hh:mm:ss[.nnn]` | `2025/04/05 14:30:45.123` `2025/4/5 14:30:45.123` |
| `mm/dd/yyyy hh:mm:ss[.nnn]` | `04/05/2025 14:30:45.123` `4/5/2025 14:30:45.123` `04/05/2025 14:30:45` `4/5/2025 14:30:45` |
| `yyyy-mm-ddThh:mm:ss[.nnn]` | `2025-04-05T14:30:45.123` `2025-4-5T14:30:45.123` |
| `mm-dd-yyyy hh:mm:ss[.nnn]` | `04-05-2025 14:30:45.123` `4-5-2025 14:30:45.123` `04-05-2025 14:30:45` `4-5-2025 14:30:45` |
| `dd-mm-yyyy hh:mm:ss[.nnn]` | `05-04-2025 14:30:45.123` `5-4-2025 14:30:45.123` `05-04-2025 14:30:45` `5-4-2025 14:30:45` |
| `yyyy-mm-ddThh:mm:ss[.nnn]+00:00`* | `2025-04-05T14:30:45.123+02:00` `2025-04-05T14:30:45-03:00` `2025-04-05T14:30:45` `2025-4-5T14:30:45.123+02:00` `2025-4-5T14:30:45-03:00` `2025-4-5T14:30:45Z` |
| `yyyy-mm-ddThh:mm:ss[.nnn]+0000`* | `2025-04-05T09:30:00+0000` `2025-04-05T09:30:00.123+0000` |
| `yyyy-mm-dd hh:mm:ss[.nnn]+00:00`* | `2025-04-05 09:30:00+00:00` `2025-04-05 09:30:00.123+00:00` |
| `yyyy-mm-dd hh:mm:ss[.nnn]+0000`* | `2025-04-05 09:30:00+0000` `2025-04-05 09:30:00.123+0000` |
| `dd/mm/yyyy hh:mm:ss[.nnn]` | `05/04/2025 14:30:45.123` `5/4/2025 14:30:45.123` |
| `mm/dd/yy hh:mm:ss[.nnn] AM/PM` | `04/05/25 02:30:45 PM` `4/5/25 02:30:45 PM` |
*) Timestamps that include time zone information are automatically converted to UTC during data ingestion.