# Managing Jobs
> :::note
Feature availability depends on the cloud offering that you use. For details, refer to the [Feature availability page](https://docs.uipath.com/orchestrator/automation-cloud/latest/user-guide/orchestrator-feature-availability#orchestrator-feature-availability).
:::
## Starting a Job
:::note
Feature availability depends on the cloud offering that you use. For details, refer to the [Feature availability page](https://docs.uipath.com/orchestrator/automation-cloud/latest/user-guide/orchestrator-feature-availability#orchestrator-feature-availability).
:::
Before going through the steps below, you need to [create a process](https://docs.uipath.com/orchestrator/automation-cloud/latest/user-guide/managing-processes#managing-processes).
1. From the folder that the process resides in, select **Automations**, then navigate to **Jobs** and select **Start**. Alternatively, you can start a job using one of the following options:
* Under **Automations**, select **Processes**, then locate the relevant process in the list and select **Start a Job** at the end of the row.
* Under **Automations**, select **Triggers**, then locate the relevant trigger in the list and select **Start a Job Now** at the end of the row.
2. In the **Start Job** page, use the **Process** drop-down to select a process that has been previously deployed to the current folder.
:::note
* If you selected **Start a Job**
in the process list, the underlying process is pre-selected in the **Process** drop-down.
* If you selected **Start a Job
Now** in the trigger list, the process associated with the underlying trigger is pre-selected in the **Process** drop-down.
:::
3. Configure the required fields, as outlined in the sections below.
4. Select **Start**. The **Start Job** window closes and, if there are available runtimes on the currently active folder, the job starts on a Robot according to the settings you made. The **State** of the job is displayed in real-time on the **Jobs** page.
### Setting the job priority
From the **Job Priority** drop-down, select the [priority](https://docs.uipath.com/orchestrator/automation-cloud/latest/user-guide/about-jobs#execution-priority) of the job to be executed, if you want it to be different from the priority set at the process level. This field is automatically populated with the priority inherited from the package.
### Selecting the execution runtime
From the **Runtime type** drop-down, select the runtime type used to execute the job.
The number of available and connected runtimes is displayed below the drop-down.
* **_ Available** - The number of available runtimes, calculated as the total number of runtimes minus the number of running jobs.
* **_ Connected** - The total number of runtimes, calculated as the sum of runtimes on all machines connected to Orchestrator that is associated with the active folder.
Runtime type
Description
Production (Unattended)
The job is executed in unattended mode consuming an Unattended runtime.
Testing
The job is executed in unattended mode consuming a Testing runtime.
App Testing
The job is executed in unattended mode, consuming an App Testing runtime.
Important: The App Testing runtime can execute
only the following:
Application test cases
from test automation projects.
Non-production processes
for app testing, created with an App Test Developer license.
If you select any other type of process, you cannot select the
App
Testing
option in the
Runtime type
drop-down menu.
App Test Robot
The job is executed in unattended mode, consuming an App Test Robot
runtime.
Important: The App Test Robot runtime can
execute only the following:
Application test cases
from a package of project type
Test Automation
.
RPA workflows for app
testing (created project with App Test Developer license).
If you select any other type of process, you cannot select the
App
Test Robot
option in the
Runtime type
drop-down menu.
NonProduction
The job is executed in unattended mode consuming a NonProduction runtime.
Cloud - Serverless Testing
The job is executed in unattended mode, on a serverless robot machine that
was configured to run in a testing environment. The amount of required robot
units is specific to testing environments and depends on the size of the
serverless robot machine and the number of minutes it takes to execute a
job.
See
Robot units -
Consumption
for more details.
Cloud - Serverless
The job is executed in unattended mode, on a serverless robot machine that
was configured to run in a production environment. The amount of required
robot units is specific to production environments and depends on the size of
the serverless robot machine and the number of minutes it takes to execute a
job.
See
Robot units -
Consumption
for more details.
Cloud - VM Testing
The job is executed in unattended mode, on a cloud VM that was configured to run in a testing or non-production environment.
Running the VM consumes the robot units for testing environments.
See
Robot units - Consumption
for more details.
Cloud - VM
The job is executed in unattended mode, on a cloud VM that was configured to run in a production environment. Running the
VM consumes the robot units for production environments.
See
Robot units - Consumption
for more details.
**Example**: Say you have 2 NonProduction runtimes and 1 Unattended runtime on machine template A, and 3 NonProduction runtimes, and 2 Unattended runtimes on machine template B. Both are associated with one folder. On each template, you connect one host machine. The resulting runtime state is the following:
* Unattended: `3 Available, 3 Connected`
* NonProduction: `5 Available, 5 Connected`
A running job occupying a runtime subtracts 1 from the number of available runtimes for that type.
:::note
At publish time, Orchestrator chooses from the available personal workspace runtimes to execute the job. The runtime precedence is the following:
* Production (Unattended)
* Nonproduction
For example, if no Production runtime exists, Orchestrator uses an available **NonProduction** runtime. If none exists, the job fails. If the selected runtime becomes unavailable between job executions, the upcoming job execution fails, since Orchestrator does not look for the next available one.
:::
**Configuring the execution target**
Configure your execution target by setting the options in the **Execution Target** section of the **Start Job** window as desired.
**Allocate Dynamically**
Selecting **Dynamic Allocation** with no explicit account and machine selection allows you to execute a foreground process multiple times under the account and machine that become available first. Background processes get executed on any account, regardless if it's busy or not, as long as you have sufficient runtimes.
Using this option you can execute a process up to 10000 times in one job.
### Account
You can choose one of these approaches:
* Specifying an account means the process is executed under that specific user or robot account.
* Specifying both the account and the machine means the job launches on that specific account-machine pair. Only [valid account-machine pairs](https://docs.uipath.com/orchestrator/automation-cloud/latest/user-guide/configuring-account-machine-mappings#configuring-account-machine-mappings) are available for selection.
* Specifying no account results in Orchestrator allocating the account dynamically.
:::note
* If you attempt to run a job with no suitable account assigned to the folder, you
receive an error message explaining the issue. Also, the **Assign an account to the folder** button is highlighted. By selecting the button, you can either assign an existing account to the folder or create a new one on the fly, then resume the **Start Job** workflow.
* If only robot account groups are assigned to a folder, the individual robot accounts
within those groups cannot be used to run jobs. To allow a robot account to execute jobs in a folder, the individual Robot account must be explicitly assigned to that folder.
:::
**Machine**
You can choose one of these approaches:
* Specifying a machine object means the process is executed on one of the host machines attached to the selected machine template. Select a specific host machine from the pool of connected host machines in the dropdown.
* Specifying both the account and the machine means the job launches on that specific account-machine pair. Only [valid account-machine pairs](https://docs.uipath.com/orchestrator/automation-cloud/latest/user-guide/configuring-account-machine-mappings#configuring-account-machine-mappings) are available for selection.
* Specifying no machine results in Orchestrator allocating the host machine dynamically.
Make sure that runtimes matching the job type are allocated to the associated machine template. Only connected host machines associated with the active folder are displayed.
**Select valid account - machine mappings**
Choose which specific account-machine pair will run the job. You can select **Add Account-Machine mapping** if you want your job to run on multiple such pairs. If you do so, a **Pending** job is created for each account-machine pair.
:::note
This only works if the **Enable user-machine mapping** option on the **General** tab of your tenant settings is selected.
:::
### Enable Healing Agent
To receive suggestions and debugging information on how to fix issues that may arise during job execution, turn on the **Enable Healing Agent** toggle. Additionally, you can allow Healing Agent to independently fix job execution issues by selecting the **Enable Healing Agent self-healing** option. For detailed information on Healing Agent and its capabilities, refer to the [Healing Agent documentation](https://docs.uipath.com/agents/automation-cloud/latest/user-guide-ha/what-is-healing-agent).
### Keep Account/Machine allocation on job resumption
This setting allows you to configure whether the different fragments of a [long-running job](https://docs.uipath.com/orchestrator/automation-cloud/latest/user-guide/about-jobs#about-jobs) are executed on the same account-machine pair.
By default, a suspended job is resumed on any available robot on any available machine.
Based on your license or resource requirements, you have the option to resume a job on the same machine and in the same account context that started the job.
Say you need an SAP license to execute a job. Instead of installing an SAP license on every available machine (increased costs), you can install it on a single machine and use that machine to start and resume the job. The same strategy may apply to user licenses. You can allocate only one user license and use it to execute the job.
### Schedule ending of job execution
The process execution may sometimes be faulty, causing the job to remain in the pending state. Turning on the toggle allows you to (click to expand):
* Select **Stop** from the drop-down menu - this attempts to gracefully end the execution after the defined time interval has passed since the job is stuck in a pending state (set the time to a minimum of 1 minute, maximum of 10 days, 23 hours and 59 minutes).
* Select **Kill** from the drop-down menu - this attempts to forcefully end the execution after the defined time interval has passed since the job is stuck in a pending state (set the time to a minimum of 1 minute, maximum of 10 days, 23 hours and 59 minutes).
* Select **Stop** from the drop-down menu and turn on the **Schedule automatic "Kill", if the job does not stop** option - this attempts to gracefully end the execution after the defined time interval has passed since the job is stuck in a pending state and then attempts to forcefully end it after the defined time interval has passed since the job is stuck in a stopping state (set the time to a minimum of 1 minute, maximum of 10 days, 23 hours and 59 minutes).
**Generate an alert if the job is stuck in pending or resumed status**
By turning on the toggle, you activate alerts about jobs that remain in the pending or resumed status longer than the specified duration.
The configurable duration is minimum one minute and maximum eleven days.
If the job exceeds the configured duration, an "Error" severity alert pop-up informs you about it with the following text:
"N jobs for #process {process_number} have been pending or resumed for more than X hours and Y minutes.", where:
* N - is the number of jobs that triggered the alert
* {process_number} - the process identifier
* X - the configured number of hours the job exceeded while having the pending or resumed status. Days are converted to hours.
* Y - the configured number of minutes the job exceeded while having the pending or resumed status.
**Generate an alert if the job started and has not completed**
By turning on the toggle, you activate alerts about jobs that do not complete in the specified duration.
The configurable duration is minimum one minute and maximum eleven days.
If the job exceeds the configured duration, an "Error" severity alert pop-up informs you about it with the following text:
"Job for #process {process_number} has been running for more than X hours and Y minutes.", where:
* {process_number} - the process identifier
* X - the configured number of hours the job exceeded while trying to complete. Days are converted to hours.
* Y - the configured number of minutes the job exceeded while trying to complete.
Orchestrator prevents starting jobs on invalid configurations. Trying to start a job in an invalid setup results in a descriptive error message providing you with details about how to fix your configuration.
Starting a job using [dynamic allocation](https://docs.uipath.com/orchestrator/automation-cloud/latest/user-guide/about-jobs#about-jobs), i.e. no machine or account specified, with an incompatible folder setup, results in an error. Make sure to correct the setup, otherwise, jobs stay pending indefinitely. For example, trying to run a.NET Framework 4.6.1 background job when there are only cross-platform templates in the folder does not work, as jobs stay pending until the configuration is fixed.
**Configuring environment variables**
:::note
Environment configuration is only applied for Robot version 2025.10 and above.
:::
To specify environment variables for a job, use the **Environment Configuration** text field.
You can use the **Environment Configuration** field to reference secrets, such as API keys, using one of the following methods:
* Enter the secret value directly in the **Environment Configuration** field, as shown in the following example:
```
SECRET=Abc@123
```
You can enhance the security of secrets by having asterisks displayed instead of the secret value in the following scenarios:
+ Starting a job with the environment configuration inherited from the underlying process.
+ Restarting a job.To enable this behavior, ensure that the name of the secret key ends in one of the following strings:
+ `ACCESS_KEY`
+ `API_KEY`
+ `AUTH`
+ `CREDENTIALS`
+ `PASSWORD`
+ `PRIVATE_KEY`
+ `SECRET`
+ `SESSION`
+ `TOKEN`To update the secret value, you can delete the asterisks and enter the new string.
* Reference a secret-type asset located in the same folder as the job, as in the following example:
```
MySecret=%ASSETS/SECRET%
```
:::note
* Typing `=%` after the secret key displays an
`ASSETS/` autocompletion suggestion. Accepting the suggestion displays a drop-down list of assets from which you can select the desired item.
* You cannot retrieve secrets from external credential stores when using a
disconnected credential proxy.
:::
**Adding arguments**
In the **Runtime Arguments** section of the **Start Job** window, configure the following settings:
* Select the entry point. If the process does not support multiple entry points, Orchestrator displays **Default** in the **Entry point** dropdown, and you cannot make a selection. For more information, see [Entry points](https://docs.uipath.com/orchestrator/automation-cloud/latest/user-guide/about-processes#entry-points).
* Provide input arguments for the selected process. The table is automatically populated with all the input arguments accepted by the selected process, and the corresponding values inherited from the package.
:::note
Job arguments may not exceed 10,000 characters.
:::
:::note
If the `Robots without credentials cannot run processes that require an interactive session.` error is displayed, and no UI interaction is necessary, you can use the **Starts in background** option in the Studio project settings.
:::
### Starting an agent job
:::note
Feature availability depends on the cloud offering that you use. For details, refer to the [Feature availability page](https://docs.uipath.com/orchestrator/automation-cloud/latest/user-guide/orchestrator-feature-availability#orchestrator-feature-availability).
:::
Before going through the following steps, you need to [create a process](https://docs.uipath.com/orchestrator/automation-cloud/latest/user-guide/managing-processes#managing-processes).
1. Navigate to **Automations**, then **Jobs** from the folder that the process resides in.
2. Click **Start**. The **Start Job** window is displayed.
3. From the **Process Name** drop-down, select a process that has been previously deployed to the current folder. To display only agents in the drop-down, use the **Filter types** filter and select **Agent**.
4. Configure the required fields, as outlined in the sections below.
5. Click **Start**. The **Start Job** window closes and the job starts according to the settings you made. The **State** of the job is displayed in real-time on the **Jobs** page.
**Configuring the execution target**
Configure your execution target by setting the options as desired in the **Execution Target** tab of the **Start Job** window.
**Schedule ending of job execution**
The process execution may sometimes be faulty, causing the job to remain in the pending state. Turning on the toggle allows you to:
* Select **Stop** from the drop-down menu - this attempts to gracefully end the execution after the defined time interval has passed since the job is stuck in a pending state (set the time to a minimum of 1 minute, maximum of 10 days, 23 hours and 59 minutes).
* Select **Kill** from the drop-down menu - this attempts to forcefully end the execution after the defined time interval has passed since the job is stuck in a pending state (set the time to a minimum of 1 minute, maximum of 10 days, 23 hours and 59 minutes).
* Select **Stop** from the drop-down menu and turn on the **Schedule automatic "Kill", if the job does not stop** option - this attempts to gracefully end the execution after the defined time interval has passed since the job is stuck in a pending state and then attempts to forcefully end it after the defined time interval has passed since the job is stuck in a stopping state (set the time to a minimum of 1 minute, maximum of 10 days, 23 hours and 59 minutes).
**Generate an alert if the job started and has not completed**
By turning on the toggle, you activate alerts about jobs that do not complete in the specified duration.
The configurable duration is minimum one minute and maximum eleven days.
If the job exceeds the configured duration, an "Error" severity alert pop-up informs you about it with the following text:
"Job for #process {process_number} has been running for more than X hours and Y minutes.", where:
* {process_number} - the process identifier
* X - the configured number of hours the job exceeded while trying to complete. Days are converted to hours.
* Y - the configured number of minutes the job exceeded while trying to complete.
Orchestrator prevents starting jobs on invalid configurations. Trying to start a job in an invalid setup results in a descriptive error message providing you with details about how to fix your configuration.
#### Account
You can choose one of the following approaches:
* Specifying an account means the process is executed under that specific user or robot account.
* Specifying no account results in Orchestrator allocating the account dynamically.
**Defining the environment configuration for coded agent jobs**
To specify environment variables for a coded agent job, use the **Environment Configuration** text field. Coded agents are indicated as **(Agent - <programming language>)** in the user interface.
You can use the **Environment Configuration** field to reference secrets, such as API keys, using one of the following methods:
* Enter the secret value directly in the **Environment Configuration** field, as shown in the following example:
```
SECRET=Abc@123
```
You can enhance the security of secrets by having asterisks displayed instead of the secret value in the following scenarios:
+ Starting a job with the environment configuration inherited from the underlying process.
+ Restarting a job.To enable this behavior, ensure that the name of the secret key ends in one of the following strings:
+ `ACCESS_KEY`
+ `API_KEY`
+ `AUTH`
+ `CREDENTIALS`
+ `PASSWORD`
+ `PRIVATE_KEY`
+ `SECRET`
+ `SESSION`
+ `TOKEN`To update the secret value, you can delete the asterisks and enter the new string.
* Reference a secret-type asset located in the same folder as the agent, as shown in the following example:
```
MySecret=%ASSETS/SECRET%
```
:::note
* Typing
`=%` after the secret key displays an `ASSETS/` autocompletion suggestion. Accepting the suggestion displays a drop-down list of assets from which you can select the desired item.
* You cannot retrieve
secrets from external credential stores when using a disconnected credential proxy.
:::
**Adding arguments**
If the package has input and/or output arguments, they are displayed in the **Runtime Arguments** section, under the **Input** and **Output** tabs. Argument values are inherited from the package, but you can edit them as necessary.
:::note
Job arguments may not exceed 10,000 characters.
:::
To toggle between the arguments and a view of the underlying JSON schema, select **JSON schema**.
Figure 1. JSON schema

### Starting an agentic process job
:::note
Feature availability depends on the cloud offering that you use. For details, refer to the [Feature availability page](https://docs.uipath.com/orchestrator/automation-cloud/latest/user-guide/orchestrator-feature-availability#orchestrator-feature-availability).
:::
Before going through the following steps, you need to [create a process](https://docs.uipath.com/orchestrator/automation-cloud/latest/user-guide/managing-processes#managing-processes).
1. Navigate to **Automations**, then **Jobs** from the folder that the process resides in.
2. Click **Start**. The **Start Job** window is displayed.
3. From the **Process Name** drop-down, select a process that has been previously deployed to the current folder. To display only agentic processes in the drop-down, use the **Filter types** filter and select **Agentic process**.
4. Configure the required fields, as outlined in the sections below.
5. Click **Start**. The **Start Job** window closes and the job starts according to the settings you made. The **State** of the job is displayed in real-time on the **Jobs** page.
**Configuring the execution target**
Configure your execution target by setting the options as desired in the **Execution Target** tab of the **Start Job** window.
**Schedule ending of job execution**
The process execution may sometimes be faulty, causing the job to remain in the pending state. Turning on the toggle allows you to (click to expand):
* Select **Stop** from the drop-down menu - this attempts to gracefully end the execution after the defined time interval has passed since the job is stuck in a pending state (set the time to a minimum of 1 minute, maximum of 10 days, 23 hours and 59 minutes).
* Select **Kill** from the drop-down menu - this attempts to forcefully end the execution after the defined time interval has passed since the job is stuck in a pending state (set the time to a minimum of 1 minute, maximum of 10 days, 23 hours and 59 minutes).
* Select **Stop** from the drop-down menu and turn on the **Schedule automatic "Kill", if the job does not stop** option - this attempts to gracefully end the execution after the defined time interval has passed since the job is stuck in a pending state and then attempts to forcefully end it after the defined time interval has passed since the job is stuck in a stopping state (set the time to a minimum of 1 minute, maximum of 10 days, 23 hours and 59 minutes).
**Generate an alert if the job started and has not completed**
By turning on the toggle, you activate alerts about jobs that do not complete in the specified duration.
The configurable duration is minimum one minute and maximum eleven days.
If the job exceeds the configured duration, an "Error" severity alert pop-up informs you about it with the following text:
"Job for #process {process_number} has been running for more than X hours and Y minutes.", where:
* {process_number} - the process identifier
* X - the configured number of hours the job exceeded while trying to complete. Days are converted to hours.
* Y - the configured number of minutes the job exceeded while trying to complete.
Orchestrator prevents starting jobs on invalid configurations. Trying to start a job in an invalid setup results in a descriptive error message providing you with details about how to fix your configuration.
#### Account
You can choose one of these approaches:
* Specifying an account means the process is executed under that specific user or robot account.
* Specifying no account results in Orchestrator allocating the account dynamically.
**Adding arguments**
If the package has input and/or output arguments, they are displayed in the **Runtime Arguments** section, under the **Input** and **Output** tabs. Argument values are inherited from the package, but you can edit them as necessary.
:::note
Job arguments may not exceed 10,000 characters.
:::
To toggle between the arguments and a view of the underlying JSON schema, select **JSON schema**.
Figure 2. JSON schema

### Starting a job through an API trigger
You can start a job via an API trigger from your third-party application of choice. Follow these steps:
1. Create an API trigger based on the process that you want to run. This generates the necessary URL for starting the job. Follow the instructions in the [Creating an API trigger](https://docs.uipath.com/orchestrator/automation-cloud/latest/user-guide/managing-api-triggers#creating-an-api-trigger) topic to achieve this.
2. [Create a dedicated personal access token](https://docs.uipath.com/automation-cloud/automation-cloud/latest/api-guide/personal-access-tokens#generating-a-token) and grant it access to the necessary resources. This is done at the organization level, from the **Preferences** > **Personal Access Token** page. Once saved, make sure to copy the PAT at once, as it will not be displayed again.
3. Paste the personal access token in the bearer token field to authorize your request.
4. Get the job URL by clicking the **Copy full slug URL** option next to the desired tenant in the triggers list, then paste it in your tool.
5. Configure your arguments as needed.
You can enter arguments as:
**Query string parameters**
For a job with the `hw-process` slug and with the `files` and `folders` arguments, the cURL that you can use in the command line will look like this:
```
curl --location --request POST '{AutomationCloudURL}/{organizationName}/{tenantName}/orchestrator_/t/6ea73196-ca89-446c-81e1-5279bdd36dc2/hw-process?argument1=files&argument2=folders' \
--header 'Cookie: __cf_bm=_5E_r3oulk6zLCr6.CUij.RFN4lCeTgYMR31gradWtI-1697542233-0-AdP+xhO+SE5PQ6wnoEum5qRu4wzUgGgOrezRhHrR4dcVvhsvl9yV/V3KAFhi/TmomqMtmxc426WT83lDMoL1seQ='
```
#### Form data
For a job with the `hw-process` slug and with the `files` and `folders` arguments, the cURL that you can use in the command line will look like this:
```
curl --location '{AutomationCloudURL}/{organizationName}/{tenantName}/orchestrator_/t/6ea73196-ca89-446c-81e1-5279bdd36dc2/hw-process' \
--header 'Cookie: __cf_bm=_5E_r3oulk6zLCr6.CUij.RFN4lCeTgYMR31gradWtI-1697542233-0-AdP+xhO+SE5PQ6wnoEum5qRu4wzUgGgOrezRhHrR4dcVvhsvl9yV/V3KAFhi/TmomqMtmxc426WT83lDMoL1seQ=' \
--form 'argument1="files"' \
--form 'argument2="folders"'
```
#### JSON body text
For a job with the `hw-process` slug and with the `files` and `folders` arguments, the cURL that you can use in the command line will look like this:
```
curl --location '{AutomationCloudURL}/{organizationName}/{tenantName}/orchestrator_/t/6ea73196-ca89-446c-81e1-5279bdd36dc2/hw-process' \
--header 'Content-Type: application/json' \
--data '{
"argument1" : "files",
"argument2" : "folders"
}
'
```
Arguments can also be entered through a combination of the aforementioned methods.
:::note
Job arguments may not exceed 10,000 characters.
:::
6. Run the job.
Depending on the call mode you selected in the trigger definition, the job will run as follows:
* **Async polling**
* **Async fire & forget**
* **Sync (long-polling)**
Note that the call mode can be overriden in the query string or body using the `$callMode` parameter.
For details on these options, see the [Call modes explained](https://docs.uipath.com/orchestrator/automation-cloud/latest/user-guide/call-modes-explained#call-modes-explained) section.
#### Rate limiting
The number of requests that can be made to the status endpoint is limited to 10 per every 10 seconds for every started job.
#### Pending jobs limit
The maximum number of pending jobs started through API triggers is 100. This can be changed using the **Triggers - API Triggers - Maximum pending jobs limit** tenant-level setting, which has a default value of 10.
## Stopping a Job
From the **More actions** menu for the job, select **Stop**. Orchestrator marks the status of the job as **Stopping** and sends a notification to the robot, but the execution of the automation project continues.
If a **Should Stop** activity is encountered, it returns `true` as a result. You can use the result as a marker for determining when to call a **Stop Job** activity, to initiate a graceful shutdown process.
If a **Stop Job** activity is not found, the job execution does not stop until it reaches the end of the project. The final job status is **Successful**.
:::note
* A job started from Orchestrator can be **stopped** only from Orchestrator.
* A job started from the Assistant can be **stopped** both in Orchestrator, from the **Jobs** page, and using the UiPath® Assistant.
* Once a job has been stopped, the job ending schedules are lost and you need to reconfigure **Schedule ending of job execution** options at job restart.
:::
## Resuming a Job
Click the corresponding **More Actions** button, and then **Resume**.
## Killing a Job
Click the corresponding **More Actions** button, and then **Kill**. The automation project is forcefully stopped, the job is marked as **Stopped**, and "Job canceled" is displayed in the **Job Details** window.
:::note
* A job started from Orchestrator can be **killed** both in Orchestrator, from the **Jobs** page, and using the UiPath Assistant.
* A job started from the Assistant can be **killed** both in Orchestrator, from the **Jobs** page, and using the UiPath Assistant.
* Once a job has been killed, the job ending schedules are lost and you need to reconfigure **Schedule ending of job execution** options at job restart.
:::
## Duplicating a Job
To quickly start a new job using the configuration of an existing one, you can duplicate any job directly from the Jobs list.
Select the corresponding **More Actions** button, and then select **Duplicate job**.
This action opens the Start Job form pre-filled with the original job’s configuration, allowing you to review or modify the settings before starting the job. After opening the Start Job form, you can adjust any settings as needed before launching the new job.

## Viewing job details
:::note
* While the side panel is open, you can select any job in the list to display its particular
details, for all tabs included in the panel. You can scroll the jobs list grid horizontally, with the **Process** column remaining fixed if needed for your particular screen size and resolution. Note that you can increase the size of some columns, which will cause a scroll bar to be displayed for easier access.
* You can select the expand icon in the upper-most corner of any tab to open it as a full-sized
window, with the name of the underlying process in the breadcrumbs. The **Collapse** button in the same corner brings the window back to its side panel state.
* Job details do not include licensing considerations for jobs failing. Use the monitoring functionality for details on licensing.
:::
To view details about a specific job, select the corresponding **Details** button. This displays a side panel which includes the **Job Details** section, providing you with various information:
* **Graph**: you can toggle the graph view on or off using the **Graph**  button. The graph provides a visualization of related job executions (parent, child, sblings as applicable), complementing the **Trace tree** view.
* **Error**: error information generated during job execution.
* **Resume conditions**: conditions and triggers configured for job resumption.
* **Autopilot Healing**: information related to Autopilot Healing actions applied to the job.
* **Job information**: core job metadata and execution status details. When applicable, this card displays pending reasons, explaining why a job is waiting or blocked.
* **Environment Variables**: environment variables available at job execution time.
* **Input**: the input arguments of the job.
* **Output**: the output arguments of the job.
* **Raw message**: unprocessed message that the job emitted before formatting.
* **Runtime details**: runtime-related information for the job execution. Some fields and actions are displayed conditionally, depending on job type and status.
+ **Start time**: the date and time when the job execution started.
+ **End time**: the date and time when the job execution ended.
+ **Duration**: the total execution time of the job.
+ **Creation time**: the date and time when the job was created.
+ **Consumption**: the number of consumed units for the job execution, when applicable.
+ **Actions**: applicable to video recordings, this section includes:
- **Open**, to open the video recording.
- **Delete**, to delete the video recording.
* **Execution environment**: execution information:
+ **Package**: the name and version of the package used to execute the job.
+ **Compatibility**: the compatibility type of the job’s execution environment.
+ **Host identity**: the identity under which the job was executed.
+ **Machine**: the machine template assigned to the job execution.
+ **Robot**: the robot used to execute the job.
+ **Account/Identity**: the account under which the robot executed the job.
+ **Hostname**: the name of the machine where the job was executed.
+ **Healing agent**: indicates whether Autopilot Healing is enabled for the job.
+ **Healing agent self-healing**: indicates whether self-healing actions are enabled for the healing agent.
* **Job state history**: a chronological timeline of the job states and the duration spent in each state.
* **Additional information**: additional job details:
+ **Job key**: a unique identifier assigned to the job.
+ **Entry point**: the workflow or process entry point used to start the job.
+ **Type**: the type of job executed, such as an agentic process.
+ **Runtime type**: displayed for certain job types, provides additional classification of the runtime used to execute the job.
+ **Source**: the trigger or source that initiated the job execution.
+ **Priority**: the priority level assigned to the job.
+ **User interaction**: describes if user interaction is **Required** or **Not required**.
+ **Healing agent status**: the current status of the healing agent for the job.
+ **Machine size**: the machine size used for the job execution, when available.
+ **Screenshots**: screenshots associated with the job execution, when available.
* **Attachments**: files associated with the job execution.
* **Human review**: information related to human review activities linked to the job.
When the content of the **Input** and **Output** arguments of a job is large, only a portion of it is shown by default.
If the argument exceeds this size, the complete content is backed by remote storage as a file and can be loaded or downloaded as needed:
* **Expand** - loads the full file in the editor, up to a certain size limit.
* **Download** - downloads the full file when the argument size exceeds the limit.
* **Copy** - for improved performance, available only for arguments within a certain limit.
:::note
If Healing Agent is enabled and detects issues during job execution, a **Healing Agent** tab appears in the job details panel. The tab allows you to download the debug file or open it in Studio, and provides you with information on the issues that occurred during job execution. In addition to the issue description, you can view screenshots and suggestions on how to address each issue. If you selected **Enable Healing Agent self-healing**, the **Healing Agent** tab also provides details on how Healing Agent addressed the issues it identified. For more information on Healing Agent and its capabilities, refer to the [Healing Agent documentation](https://docs.uipath.com/agents/automation-cloud/latest/user-guide-ha/what-is-healing-agent).
:::
 In the context of an SAP tenant, you can use the **Back to SAP** button to return to the process in SAP Build Process Automation.
### Viewing job traces
:::note
Feature availability depends on the cloud offering that you use. For details, refer to the [Feature availability page](https://docs.uipath.com/orchestrator/automation-cloud/latest/user-guide/orchestrator-feature-availability#orchestrator-feature-availability).
:::
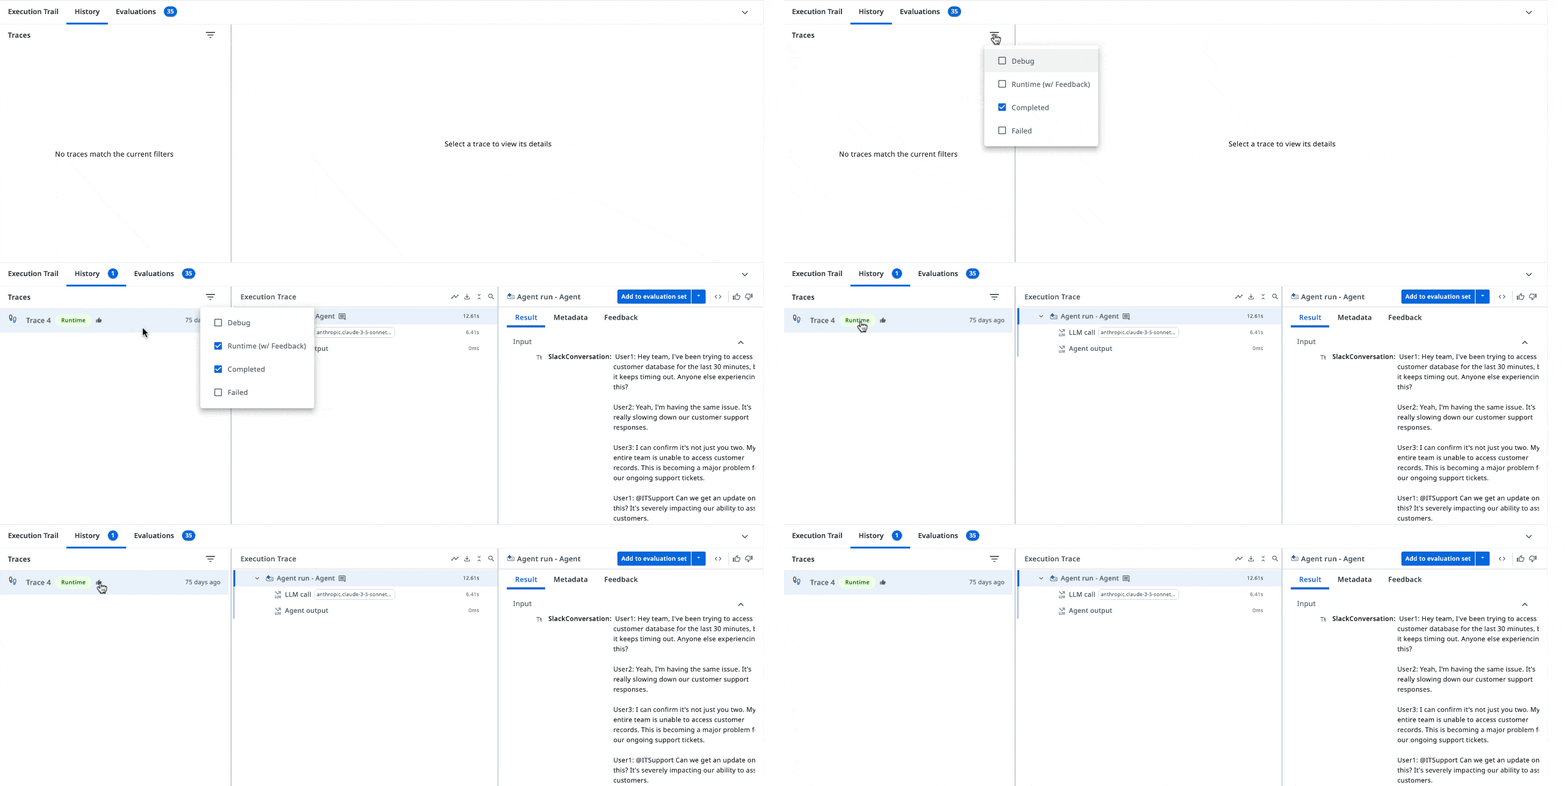
For agent and agentic process jobs, the job details panel includes a **Trace** tab. The trace provides a comprehensive, hierarchical view of the job run, its input and output, as well as any other resources invoked or jobs executed in connection with the run. The trace view also allows you to provide positive or negative feedback, as well as comments, on any of the trace items.
In the trace view, when you toggle the **Display raw data** option, you can collapse or expand a section by using keyboard shortcuts:
* To collapse a section, use the `Ctrl` + `Shift` + `[` shortcut on a Windows or Linux computer, or the `Cmd` + `Option` + `[` shortcut on a macOS computer.
* To expand a section, use the `Ctrl` + `Shift` + `]` shortcut on a Windows or Linux computer, or the `Cmd` + `Option` + `]` shortcut on a macOS computer.
For agent jobs, feedback added in the Trace view is automatically available in the Agents Evaluations panel during design time, allowing you to create evaluations from job runs, edit them, and refine your agent based on manually entered feedback. Read more about [Evaluations](https://docs.uipath.com/agents/automation-cloud/latest/user-guide/agent-evaluations).
Figure 3. Agent runtime traces
## Viewing job logs
To view the logs for a specific job, click the corresponding **Details** button. This displays a side panel which includes the **Logs** section, with data regarding the selected job.
To refresh the logs for a job manually, select the **Refresh** button in the **Logs** section of the job side panel.
For jobs that are not either in a **Pending** state or a final state, you have the option to auto-refresh job logs at a ten-second interval. To enable the option, select the dropdown next to **Refresh** in the **Logs** section of the job side panel, then select **Enable auto-refresh**. The **Refresh** button changes appearance to confirm your selection. The option persists for future jobs, even if you refresh your browser window.
Logs for a job are auto-refreshed until one minute after the job has reached a final state. At this point, you can no longer select **Enable auto-refresh**, and manual refreshing of logs becomes the only available option.
:::note
Logs generated for jobs started through remote debugging sessions are not available on the **Job logs** page. Find them on the global **Logs** page.
:::
## Viewing the video timeline
:::note
If a job was suspended and later resumed, the video timeline displays only the execution that occurred after the job resumed.
:::
To view a video recording of a job execution, along with the underlying logs, select the corresponding **Details** button. This displays a side panel which includes the **Video timeline** tab, with a video pane on top, and a logs list at the bottom.
You can also access this tab by selecting **Open recording** on the **Details** tab of the same panel.
For details, check the topics dedicated to [video recording](https://docs.uipath.com/orchestrator/automation-cloud/latest/user-guide/about-recording#video).
## Downloading Execution Media
To download the recording for a faulted job, click **More Options** > **Download Recording**. Execution media is downloaded according to your [settings](https://docs.uipath.com/orchestrator/automation-cloud/latest/user-guide/about-recording#recording).