# The User Interface
> Studio interface panels, docking options, and layout controls that provide access to designer, activities, project, and debugging tools.
Studio contains multiple panels for easier access to specific functionalities. They can be docked, act as floating windows, or the **Auto Hide** option can be enabled from the drop-down list.
## Overview
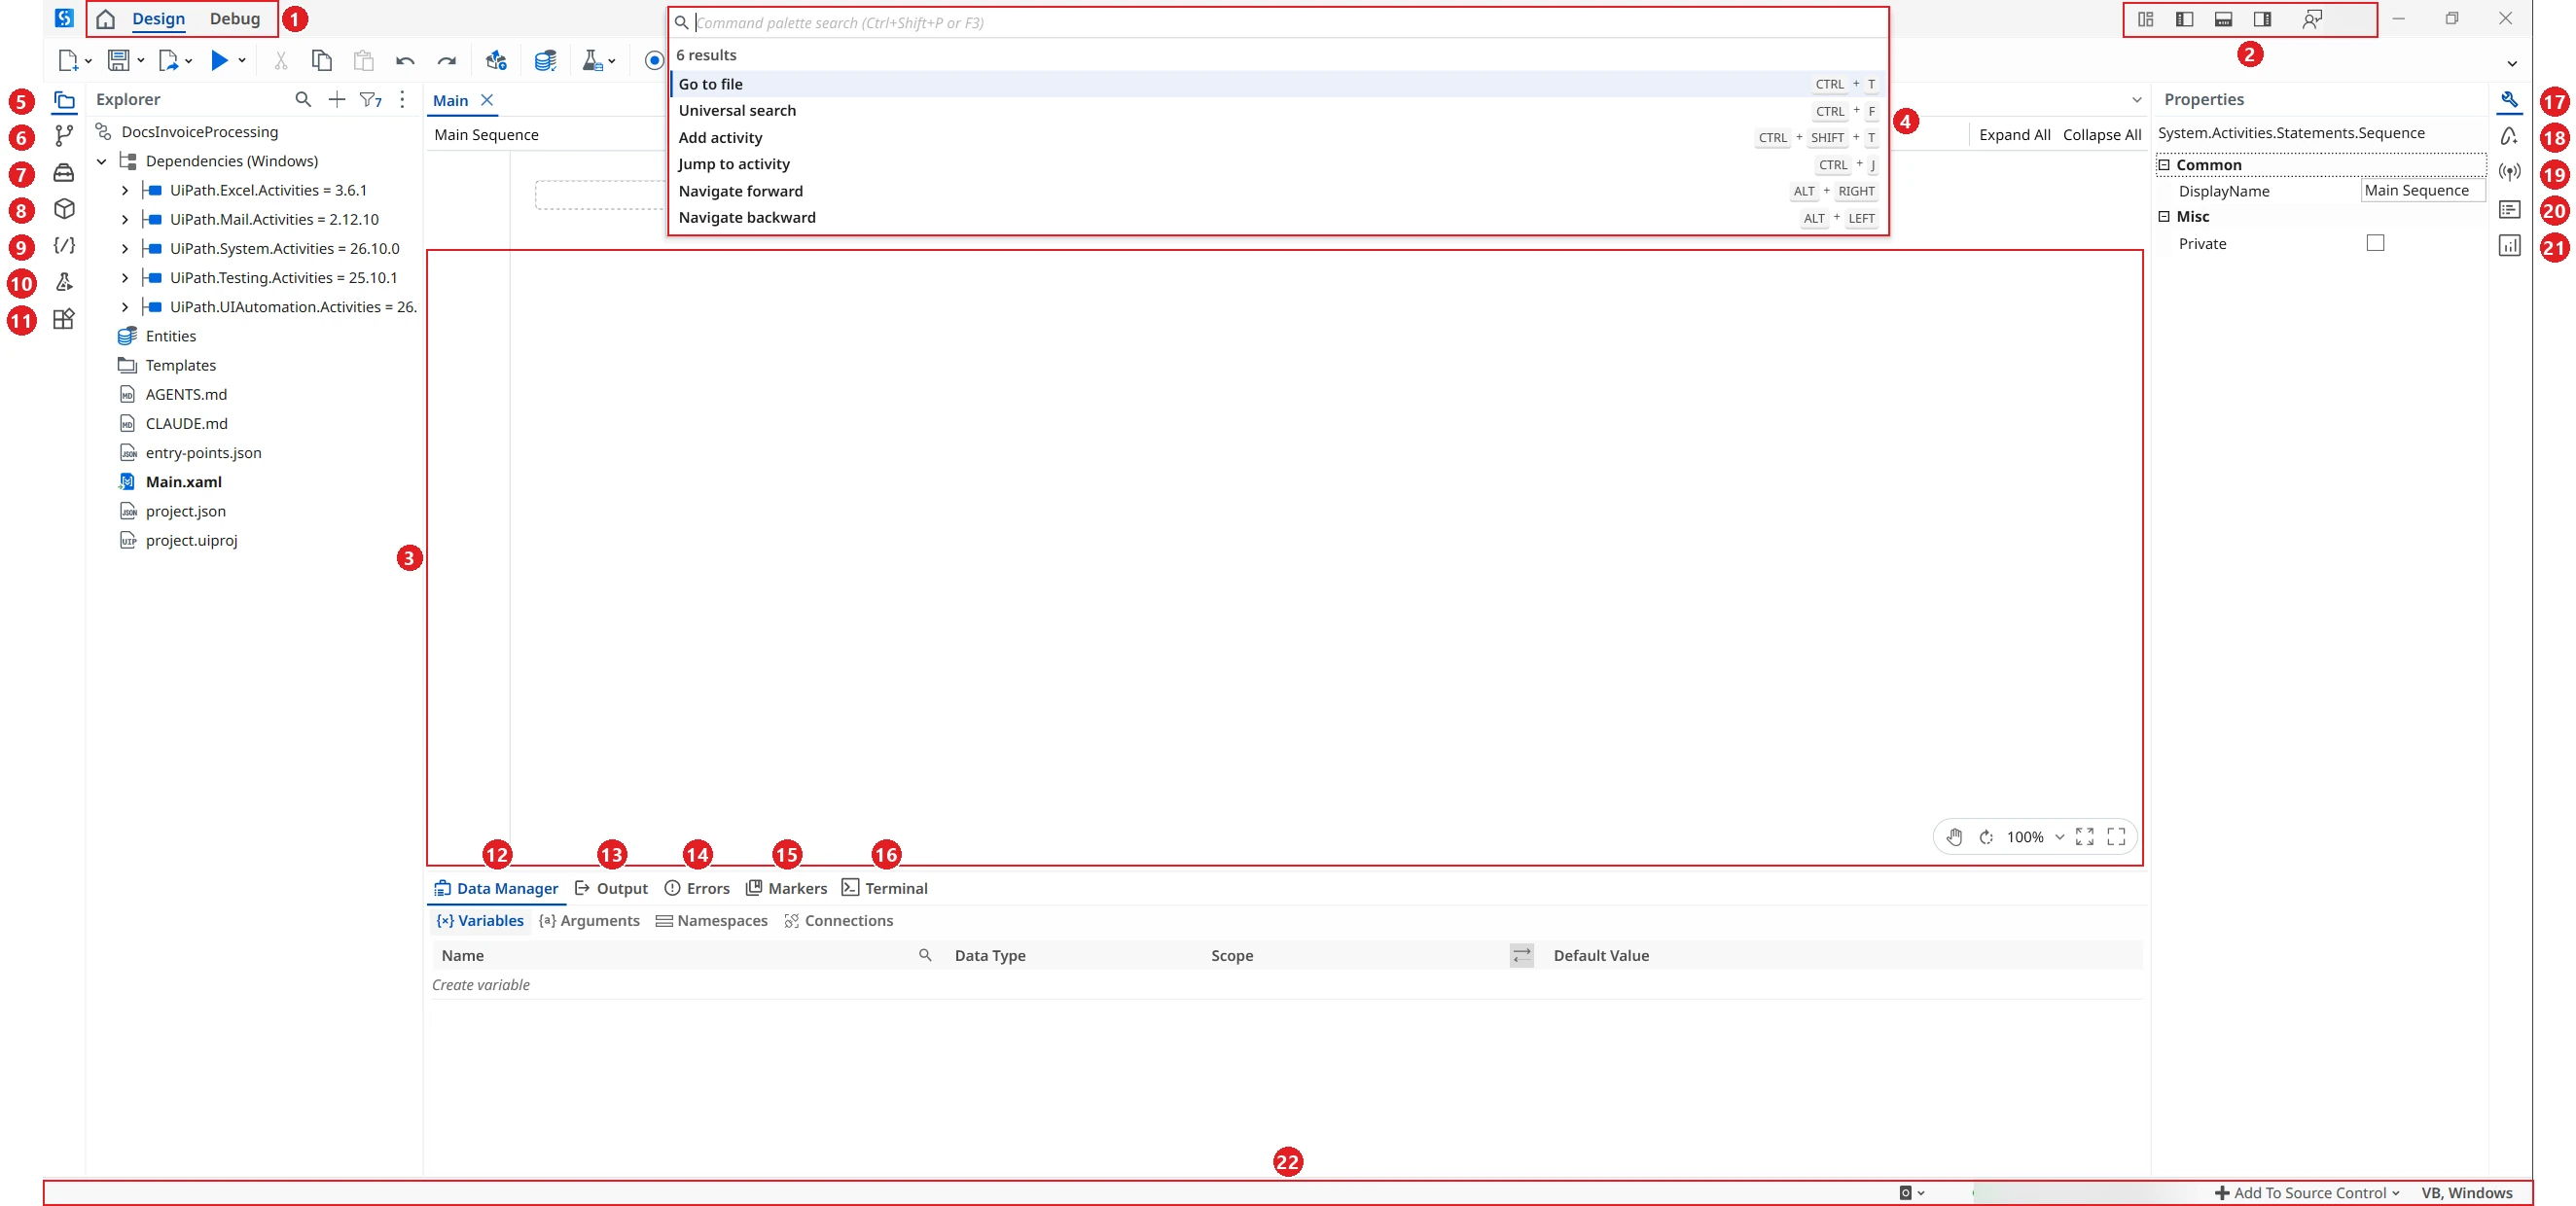
No.
Name
Description
1
Ribbon Tabs
Access the three main areas of Studio:
Home - Go to the Studio Backstage View where you can open and create projects, configure Studio, and more.
Design - Build automations using the tools available in the Command Palette , and Studio panels .
Debug - Use a comprehensive set of tools to debug your workflows. For more information, see About Debugging .
2
Title Bar
Show/hide groups of panels .
Open Universal search from the search box.
Send Feedback .
Sign in to your account .
3
Designer Panel
Build your automation by managing the activities added to the current workflow file.
4
Command Palette
Search within your project using the available search bars:
Add activity
Universal search
Go to File
Jump to activity
Navigate forward
Navigate backward
5
Explorer Panel
View the contents of your current project, manage files, folders, and dependencies, and adjust project settings.
6
Source Control Panel
Access source control operations.
7
Activities Panel
View all available activities and add activities to your automation.
8
Object Repository Panel
Create and reuse UI taxonomies inside and across projects.
9
Snippets Panel
Use pre-built workflows and add your own reusable automations.
10
Test Explorer
View information related to test automation.
11
Extensions Panel
Install and manage extensions that bring tools such as document viewers and coding agents into Studio.
12
Data Manager Panel
Manage the data in your project. Contains the following panels:
Variables - Manage variables.
Arguments - Manage arguments.
Namespaces - Manage imported namespaces.
Connections - Manage Integration Service connections.
13
Output Panel
View the output of the Log message and Write Line activities, status information regarding the execution of your project, errors generated by activities packages, and more.
14
Errors Panel
View all the errors generated when running the Workflow Analyzer.
15
Markers Panel
Manage breakpoints and bookmarks added to the project.
16
Terminal Panel
Use a command line interface directly in Studio.
17
Properties Panel
View and configure the properties of a selected activity.
18
Autopilot Panel
Use Autopilot functionalities.
19
Observability Panel
Review and apply the selector changes that Healing Agent suggests.
20
Outline Panel
View the hierarchy of the current workflow and all available nodes.
21
Profiling Panel
Enable or disable profiling and view Profile Execution results.
22
Status Bar
View status information and manage the Orchestrator connection and source control integration.
## The Ribbon
### Ribbon Display Options
The ribbon supports three display states, chosen from a **Ribbon display** section in the panel menu, opened from the layout icon:
* **Compact** - Hides the ribbon tabs and displays the commands as a single row of icons in the title bar. Commands that belong together are combined into drop-down menus. This leaves the most space for the **Designer** panel.
* **Minimal** - Shows command icons without their text labels. This is the default.
* **Expanded** - Shows the full ribbon, with icons and text labels.
Selecting a state applies it immediately, with no reload, and your choice persists across sessions. **Reset layout** returns the ribbon to **Minimal**.
:::note
This picker replaces the previous **Ribbon** on/off toggle, the ribbon's own pin button, the **Ctrl + F1** shortcut, and double-clicking a tab, which independently changed the ribbon's display state in earlier versions.
:::
### Ribbon Tabs
The ribbon consists of the following three tabs:
* **Home** - create and open projects, configure Studio, or access help and license information from the Studio [Backstage View](https://docs.uipath.com/studio/standalone/2026.10/user-guide/the-user-interface#backstage-view).
* **Design** - add sequences, flowcharts, state machines, and long running workflows to your project, install and manage activities packages, build interactions with UI elements, export workflows to Excel, and then publish your work to Orchestrator or custom feeds. After you install the `UiPath.UIAutomation.Activities` package, the **Design** tab also displays the **App/Web Recorder**, **Computer Vision**, **User Events**, **Table Extraction**, and **UI Explorer** buttons. The **User Events** menu offers **On Click Element**, **On Keypress Element**, and **On Application Event**. In the **Compact** ribbon display, these buttons are combined into one menu, and the **User Events** options are listed in their own section.

* **Debug** - debug your workflow, while using debugging tools to set breakpoints, monitor the execution of activities step by step, and adjust the debugging speed. Open logs to view details regarding execution and any changes made to the project. In the **Compact** ribbon display, the **Debug Settings** menu shows the active state of the settings that you turn on or off, and lists them separately from one-time actions. For more information on debugging, refer to [About Debugging](https://docs.uipath.com/studio/standalone/2026.10/user-guide/about-debugging).

:::note
Files that are not created during the execution of the automation project become read-only when published to [Orchestrator](https://orchestrator.uipath.com/). If your business process requires you to write in a specific file at some point, be sure to create it while designing the project.
:::
### The Title Bar
#### Show/hide groups of panels
You can show or hide a panel or groups of stacked panels by using one of the three buttons:
*  for left panels.
*  for bottom panels.
*  for right panels.
#### Send Feedback
There are two types of feedback that you can send directly from within Studio: **Submit an idea for the product** or **Report a bug**. Both are accessible from the ribbon by clicking the  icon.
The **Send Feedback** feature can be used for sending anonymous feedback to the product team, but you can also include your email address to further discuss your feedback. To contact our tech support team, please use the [Contact Technical Support](https://customerportal.uipath.com/support/add-case) form.
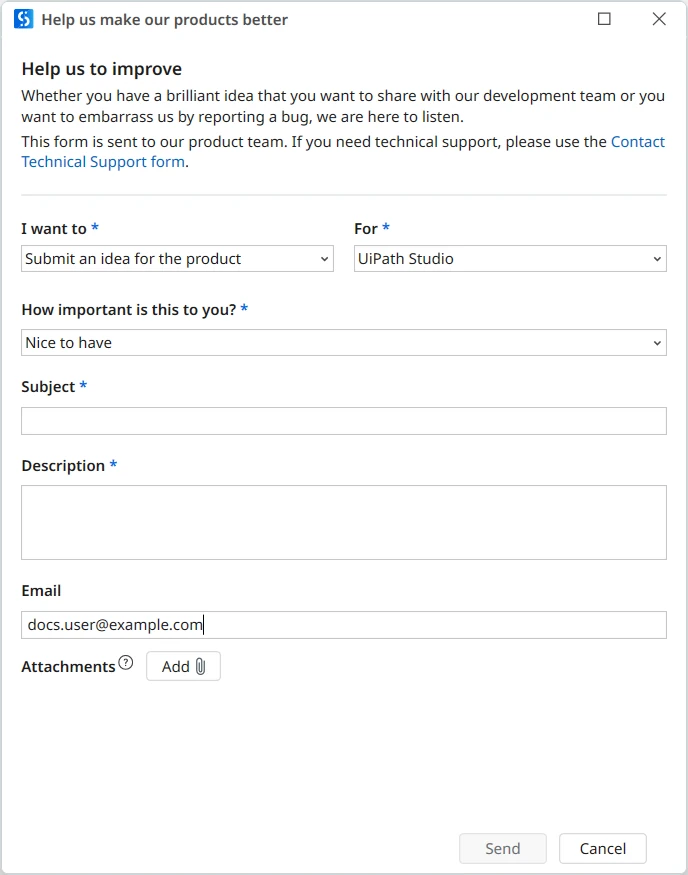
Provide the following information, and then click **Send**:
* From the **I want to** drop-down menu, pick either **Submit an idea for the product** or **Report a bug**.
* From the **For** drop-down menu, pick either **UiPath Activities**, **UiPath Studio**, **UiPath Robot**, **UiPath Orchestrator** or **UiPath Assistant**.
* From the **How important is this to you** drop-down menu, pick **Nice to have**, **Important**, or **Critical**.
* In the **Subject** field, add a short title.
* Add a detailed description and attach up to 6 images, videos, or text files, each with a size smaller than 10MB. The threshold for sending feedback is three posts in a timeframe of five minutes.
## Backstage View
This is the view you see when you first open Studio. You can also get here by clicking **Home** in the upper-left corner of the window. Here you can create and open projects, configure Studio, or access help and license information.
The project types available under **New Project** depend on your license. For example, **Test Automation** is listed only if your license includes Test Automation. For details, refer to [About Unified Pricing Licensing](https://docs.uipath.com/studio/standalone/2026.10/user-guide/about-licensing-unified-pricing) and [About Flex Licensing](https://docs.uipath.com/studio/standalone/2026.10/user-guide/about-flex-licensing).
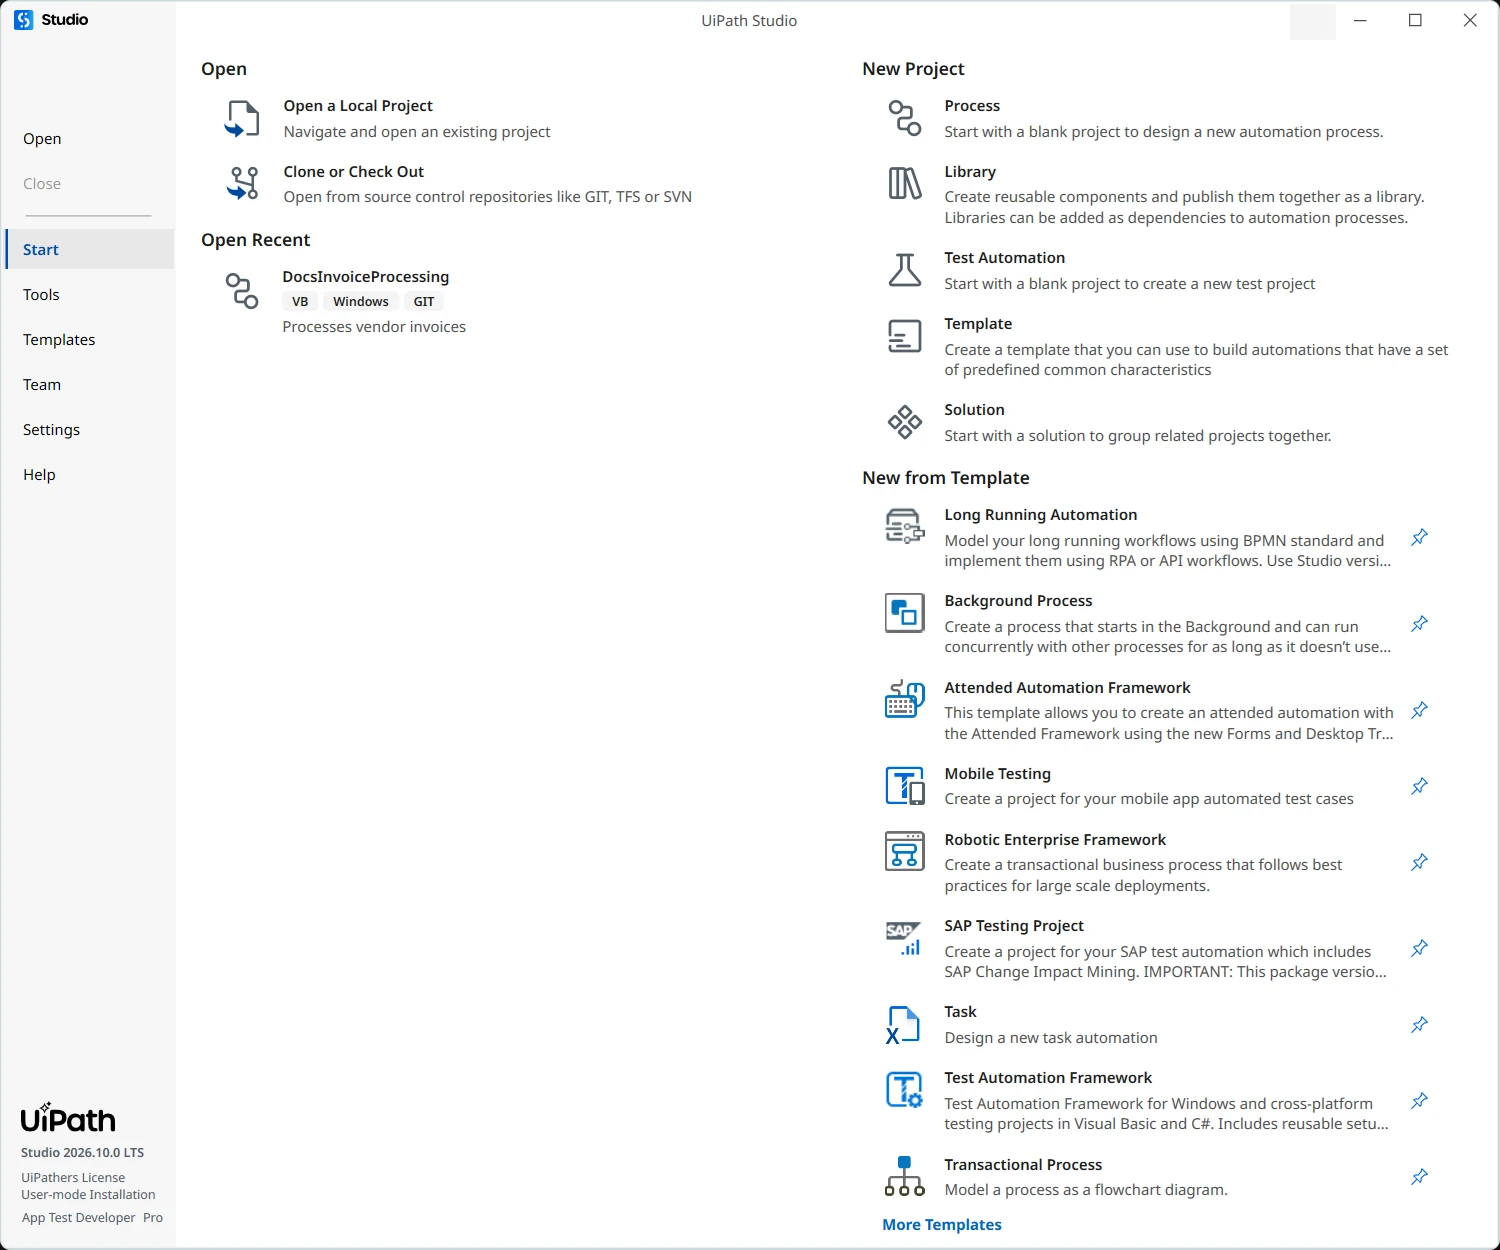
The following buttons and tabs are available in this view:
* **Open** - Browse to a local automation project and open it. By default, projects are created in C:\Users\<current_user>\Documents\UiPath.
:::note
Projects located on network folders where your user only has read permissions cannot be opened in Studio. We recommend using [source control](https://docs.uipath.com/studio/standalone/2026.10/user-guide/about-version-control) systems to collaborate on projects.
:::
* **Close** - Close the automation project that is currently open.
* **Start** - Create a new automation project or open recently accessed projects.
+ Create from predefined templates or open recent projects
+ Pin or remove projects from the Open Recent list
+ View project description, target framework, language, and source (local, Studio Web, or Git/SVN/TFS)
+ Hover over entries to see the `project.json` path and last opened date
* **Templates** - Create a new project based on a template. In this tab, you can view all available project templates, search and filter them by source. For more information, see [Project Templates](https://docs.uipath.com/studio/standalone/2026.10/user-guide/project-templates#project-templates).
* **Team** - Manage [source control integration](https://docs.uipath.com/studio/standalone/2026.10/user-guide/about-version-control) for the automation project.
* **Tools** - Access tools that enhance your experience with Studio.
+ Select the **Apps** tab for the [UI Explorer](https://docs.uipath.com/activities/other/latest/ui-automation/ui-explorer), [Project Dependencies Mass Update Tool](https://docs.uipath.com/studio/standalone/2026.10/user-guide/project-dependencies-mass-update#project-dependencies-mass-update), and the [Repair Tool for Microsoft Office](https://docs.uipath.com/studio/standalone/2026.10/user-guide/microsoft-office-interop-issues#microsoft-office-issues).
+ Select the **UiPath Extensions** tab to install or uninstall the following [extensions](https://docs.uipath.com/studio/standalone/2026.10/user-guide/about-extensions): Chrome, Firefox, Edge, Java, Silverlight, Citrix, Windows Remote Desktop, VMware Horizon, Excel Add-in, and SAP Solution Manager.
+ Select the **Plugins** tab to enable or disable [source control](https://docs.uipath.com/studio/standalone/2026.10/user-guide/about-version-control) and [test automation](https://docs.uipath.com/studio/standalone/2026.10/user-guide/introduction-studiopro) plugins.
+ Select the **Coding Agents** tab to manage the UiPath CLI and give coding agents the skills and Studio extension they need to work with UiPath projects. For more information, see [Coding Agents](https://docs.uipath.com/studio/standalone/2026.10/user-guide/coding-agents#coding-agents).
* **Settings** - Change the look and feel of Studio, set global preferences, and manage activities package sources. For more information, see [Configuring Studio Settings](https://docs.uipath.com/studio/standalone/2026.10/user-guide/configuring-studio-settings).
* **Help** - Directs you to product documentation, release notes, online resources, the [Community Forum](https://forum.uipath.com/) and the [RPA Academy](https://www.uipath.com/rpa-academy). This is where you can also access a quick tutorial that helps you learn the basics of creating, publishing, and running an automation.
:::note
To ensure the tutorial is completed successfully, we recommend that you pause the tutorial before making any changes to the workflow outside of those highlighted in the tutorial steps.
:::
Information regarding product version and installation, license availability, and license details, such as the license provider or the activation ID, is also found in the **Help** tab, together with a **Copy Info** button for quickly copying the details to the clipboard.

## The Command Palette
The **Command Palette** is opened by using the **Ctrl + Shift + P** or **F3** keyboard shortcuts. Clicking the search box in the title bar opens the **Universal search** bar. The **Command Palette** incorporates the **Add activity**, the **Universal search**, the **Go to file**, and **Jump to activity** search bars, as well as the **Navigate forward** and **Navigate backward** file navigation options.
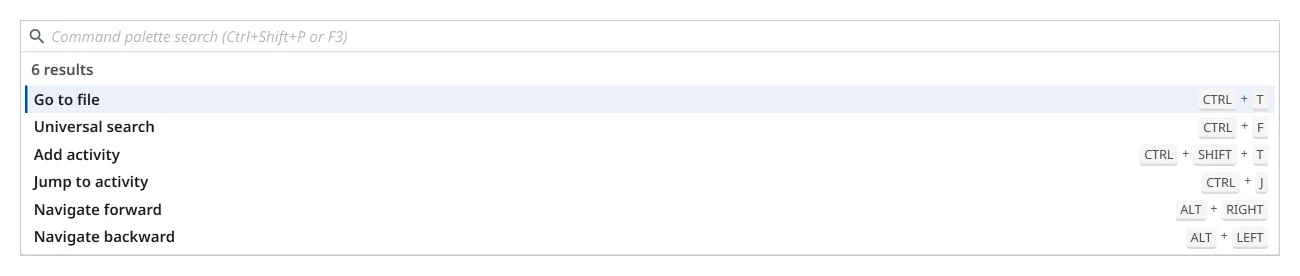
:::note
Studio supports prioritizing activities by scope. Click the  icon inside an activity scope and notice that the Command Palette offers suggestions of activities which fit the current scope. Support for this feature is rolling out in stages in official activities packages, check [release notes](https://docs.uipath.com/releasenotes) periodically.
:::
### Add Activity
The **Add activity** search bar is opened using the **Ctrl + Shift + T** keyboard shortcut. You can search for activities in installed and installable packages, and add them after the selected activity in the file. The bar automatically assigns keyboard shortcuts to the first five results, and remembers your previous findings.
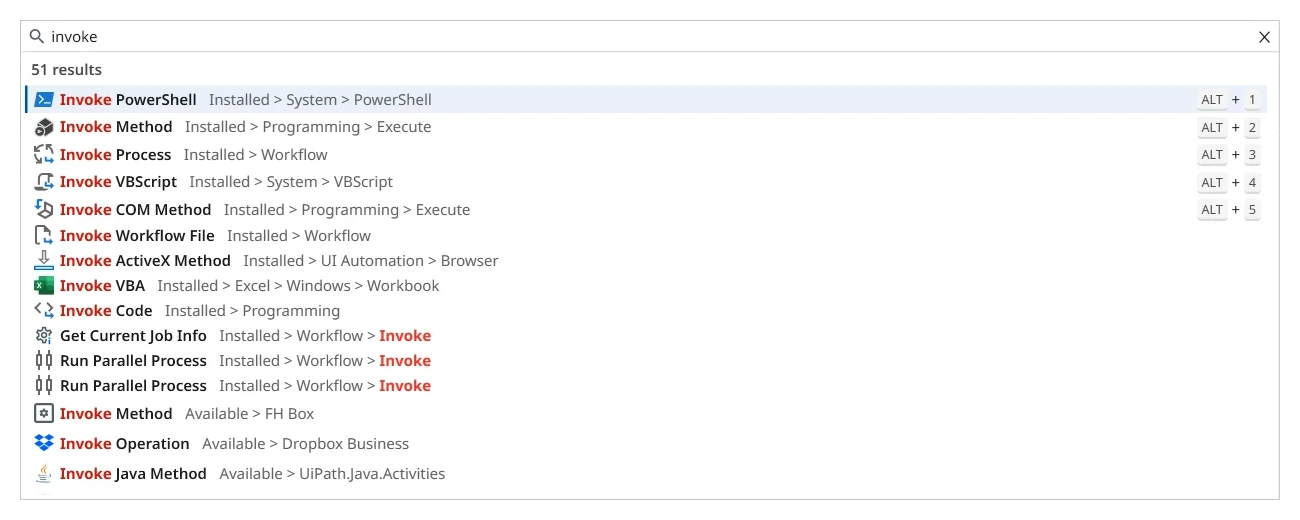
Click the  icon at the top or bottom of an activity from a sequence to open the **Add activity** search bar.
If the [Enable AI activity suggestions](https://docs.uipath.com/studio/standalone/2026.10/user-guide/configuring-studio-settings) option in the Studio design settings is selected, a UiPath AI service analyzes the location in the workflow where you opened the Add activity search bar and suggests activities that you may want to add next based on the current context. If there is no context (for example, you press **Ctrl + Shift + T** when no activity is selected in the Designer panel) activity suggestions are not provided.
If the [Show activities available to install](https://docs.uipath.com/studio/standalone/2026.10/user-guide/configuring-studio-settings) option in the Studio design settings is selected, you can search for activities that are not included in your installed packages. Searching for available activities is only possible for packages from the **Official** and **Orchestrator Tenant** feeds. Adding an available activity also installs its corresponding activity package. Selecting the installation  button installs the package without adding the activity to the workflow.
#### Generate workflows with Autopilot
With Autopilot generative capabilities, you can use natural language to describe the structure and outcome of a workflow. To automatically generate a workflow, simply type in the search bar what your workflow should do and double-click the **Generate with Autopilot** option. Autopilot will then analyze your instructions, identify relevant activities, and add them in a logical sequence. If the instructions are not valid, you are asked to try a different description.
After processing your instructions, a preview of the proposed workflow is created inside a new sequence. The preview contains the activities that will be used in your automation. Hovering over an activity reveals the activity package to which it belongs.
#### Refining and confirming
Your instructions are also added as an annotation that can be used to edit the proposed workflow. If you are not satisfied with the structure created by Autopilot, you can refine your initial instructions by selecting **Edit Annotation** (the pencil icon) in the annotation, editing the description, and selecting the **Generate** button, which will create a new workflow preview.
After ensuring the workflow works as expected, select the **Confirm** button to have Autopilot build the workflow. You can also choose to keep the **Sequence** activity surrounding the resulting workflow by selecting the **Keep surrounding sequence** option, enabling you to further edit the generated workflow. Otherwise, select the **Cancel** button to discard the preview.
After the workflow is generated, you can modify your instructions by clicking inside the sequence's annotation. After selecting the **Generate** button this time, a message window informs you that all the current activities and their configurations will be lost and ask you to confirm the generation. Select **OK** to proceed with generating a new workflow based on your updated instructions or **Cancel** to keep the current workflow.
:::note
* You can generate workflows from any sequence, including sequences placed inside another workflow.
* An Automation Cloud™ connection is required to access Autopilot functionalities.
* Workflows generated with Autopilot may contain activities that are restricted by Automation Ops policies.
:::

### The Universal Search
The **Universal search** bar enables you to find snippets, activities, variables, arguments, imports, project dependencies, and files in your current project. Searches return results from all workflow files, including files that are closed.

| Option | Shortcut | Description |
| ------------------- | -------------- | ------------------------------------------------------------------------------------------- |
| **Current File** | **Ctrl + 1** | Lists results from the currently opened file that match the search query. |
| **All Files** | **Ctrl + 2** | Lists results found in all files part of the current project that match the search query. |
| **Activities** | **Ctrl + 3** | Lists results from activities that match the search query. |
| **Variables** | **Ctrl + 4** | Finds variables in the current project that match the search query. |
| **Arguments** | **Ctrl + 5** | Finds arguments defined in the project that match the search query. |
| **Imports** | **Ctrl + 6** | Finds imported namespaces in the project that match the search query. |
| **Project Files** | **Ctrl + 7** | Finds files part of the current project that match the search query. |
| **Dependencies** | **Ctrl + 8** | Lists results found in dependencies installed to the project. |
| **Snippets** | **Ctrl + 9** | Finds snippet files that match the search query. |
Search results persist until the next time you open the search bar if you use **Universal search** or **Add activity**. For **Go to file** and **Jump to activity** the previous search query is not persisted.
Double-click an activity or press **Enter** to add it to the currently opened file. Using the same commands, you can open files from under the **All Files** or **Project Files** category, or focus on the desired search result.
Default values of arguments from a process inside the **Invoke Workflow** activity are not searchable with the **Universal Search**.
### Go to File
The **Go to file** bar searches and opens files part of the current project folder. `.xaml` files are opened in the **Designer** panel in Studio, while other files, such as screenshots or Excel files, are opened with their respective default application on your machine. Double-click or press **Enter** to open a file.

:::note
The **Activities** panel, **Explorer** panel, and the **Command Palette** support fuzzy search, which means that a list of results is returned even if the search terms don't match exactly. The search terms could be slightly incomplete, misspelled or include only the first letter of each word. For example, if you type `dci` in the **Activities** bar, it returns the **Double Click Image** activity.
:::
### Jump to Activity
The **Jump to activity** search bar part of **Command Palette** helps find and focus specific activities in large workflows. It is accessed by using the **Ctrl + J** keyboard shortcut, or by opening using the **F3** or **Ctrl + Shift + P** shortcuts, and selecting **Jump to activity**.
#### Using jump to activity
When opened, the **Jump to activity** bar displays the list of all activities in the `.xaml` file currently focused in the **Designer** panel.
Type the display name or the namespace of an activity, for example **Assign**. Use the keyboard arrows to select the activity and press Enter to focus it in the **Designer** panel.
Activities in the **Jump to activity** bar are arranged in the following order: container, parent, and child activities.

### Navigate forward and Navigate backward
The **Navigate forward** and **Navigate backward** navigation options allow you to:
* Go to the previous element inside a project file or to the previous project file or
* Go to the next element inside a project file or to the next project file.
## The Panels
### The Designer Panel
The **Designer** panel displays your current automation project, enables you to make changes to it, and provides quick access to [variables](https://docs.uipath.com/studio/standalone/2026.10/user-guide/managing-variables#managing-variables), [arguments](https://docs.uipath.com/studio/standalone/2026.10/user-guide/managing-arguments#managing-arguments) and [imports](https://docs.uipath.com/studio/standalone/2026.10/user-guide/about-imported-namespaces).
It is possible to navigate within a diagram by double-clicking the activity you want to view. The path is displayed as breadcrumbs in the header of the **Designer** panel. Please note that when using multiple displays scaled differently the text in the input field part of some activities might be improperly shown.
In flowcharts and long running workflows, double-clicking a node that has no deeper level to open, such as a trigger, gateway, or event, opens the **Properties** panel and moves the focus to it, so you can start editing the node.
Activities can be copied using **Ctrl + C** shortcut or the context menu, to a text editor, receive changes, and then copied back to the **Designer** panel. You can undo / redo an action you performed in the panel using the buttons in the Studio ribbon or by pressing **Ctrl + Z** / **Ctrl + Y**.
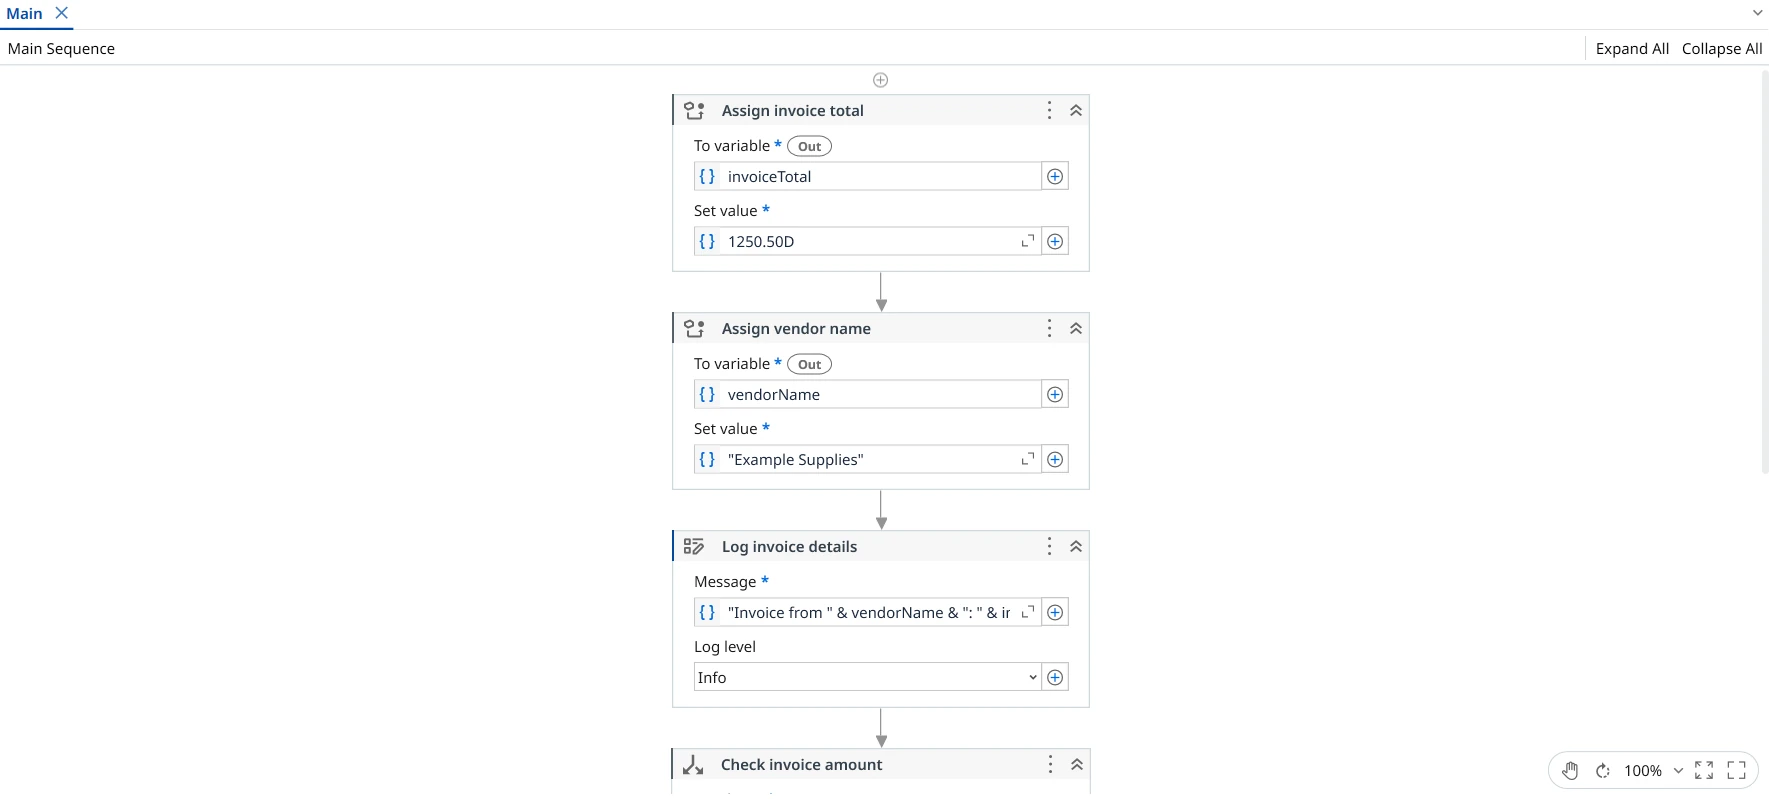
If an activity has validation errors, an error icon  is displayed on the right side of the activity title bar in the Designer panel and a warning icon  is displayed for all its parent activities. The error message is also displayed at the top of the [Properties panel](https://docs.uipath.com/studio/standalone/2026.10/user-guide/the-user-interface#the-properties-panel) for the activity affected by the issue and can be copied by selecting the clipboard icon next to the message.
#### Navigation and zoom
Activate Pan Mode by clicking the  icon, holding the Space key or pressing the middle mouse button. Use the zoom drop-down to change the zoom level and click the  icon to reset it back to 100%.
The **Fit to Screen**  icon changes the zoom in such a way that the whole workflow fits in the **Designer** panel. Click the  icon to get an overview of the whole project and navigate through sections by adjusting the focus.
#### Compact Mode
To edit property values faster, activate **Compact Mode** from **Settings** > **Design** > **Design Style** > **Compact Design Experience**. In **Compact Mode**, editable properties are displayed as pills directly on the activity:
* Selecting a pill opens the **Properties** panel with the focus on the matching field, so you can start entering a value.
* Selecting the expander in the left-hand corner of a pill runs the primary action for that property. For most properties, it opens the **Expression Editor**. On UI Automation activities, the expander of the target pill starts indicating the target on screen. For properties that do not use the **Expression Editor**, the **Properties** panel is opened with a focus on the referenced property.
* The case values of a **Switch** activity, the exception types of a **Try Catch** activity, and the conditions of an **Else If** activity are also displayed as pills. Selecting one of these pills opens the **Properties** panel for that branch.
Each branch of a **Try Catch** or **Switch** activity is displayed as a single container that combines the branch header, which holds the exception type or case value, with the branch body. This reduces the nesting depth and the length of the workflow in the **Designer** panel.
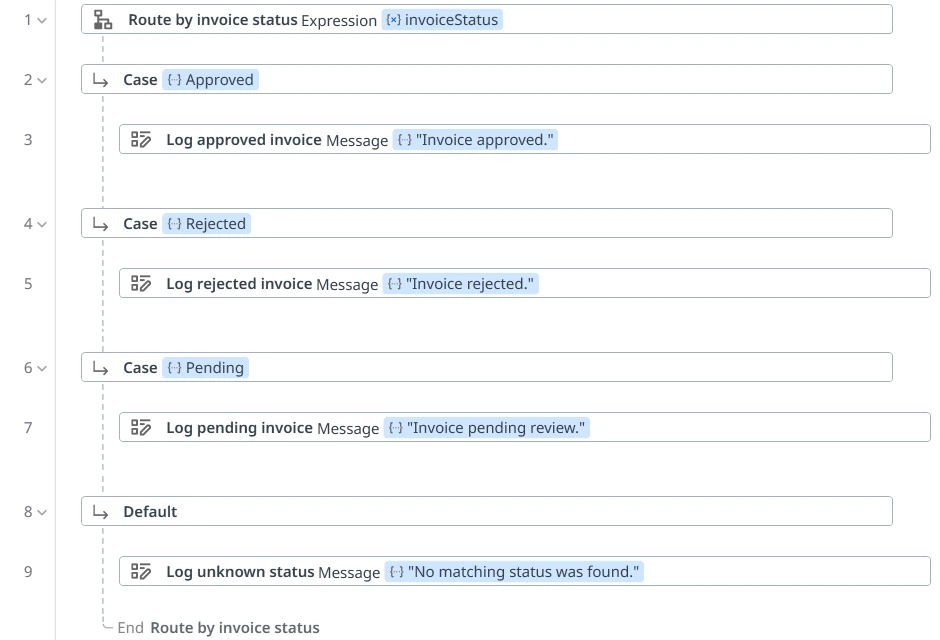
Each container activity ends with an **End** row named after the activity, such as **End If** or **End Sequence**, and the child activities in a container are not linked by connectors.
#### Activity and sequence summarization with Autopilot
Using Autopilot summarization capabilities, you can create meaningful names which clearly describe what an activity or a sequence is doing. This feature is particularly useful for improving the readability of large workflows, which can be hard to review or maintain.
To improve the clarity and consistency of activity names, Autopilot takes into account the elements that define the activity, including its description, arguments, properties, input values, and its corresponding package name and description. In the case of sequences, Autopilot creates a single-sentence summary from all the descriptions of the activities included in the sequence.
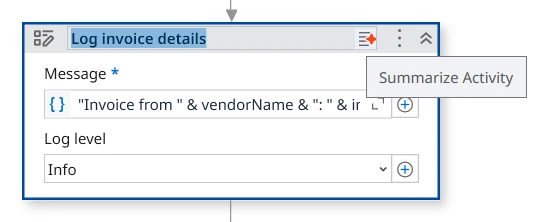
To use this feature, double-click the name of an activity or a sequence in the title bar (or select **Rename** from the activity or sequence context menu ), and then click the **Summarize Activity** button. Autopilot will then generate a unique name which describes what the activity or sequence does.
#### The Context Menu
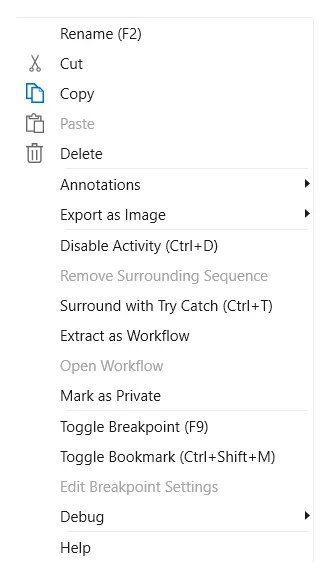
The context menu enables you to perform several operations on your workflow, be it a sequence, flowchart, state machine, or long running workflow. You can display it by right-clicking an activity inside your workflow.
When you select multiple activities, the context menu displays only the options that support a multiple selection:
* **Enable Activity** / **Disable Activity**, **Remove Surrounding Sequence**, **Surround with Try Catch**, **Extract as Workflow**, **Copy**, **Cut**, and **Delete** run on all the selected activities.
* Options that apply to a single activity, such as **Paste**, **Mark as Private** / **Mark as Public**, and the breakpoint and debugging options, are hidden.
#### Field Descriptions for the Context Menu
Option
Description
View Parent
Displays the parent of the target activity in the Designer panel. This option is only displayed for child-activities, if they are opened in the Designer panel.
Open
Opens the selected activity in the Designer panel. Has the same result as double-click.
Open with...
Allows you to open a file with its default system application or to pick a specific application.
Collapse
Collapses the activity thus reducing the displayed details to "Double-click to view". You can achieve the same result by clicking the Collapse button . Only displayed for sequences.
Expand in Place
Expands the content of the activity, displaying its detailed content. You can achieve the same result by clicking the Expand button . Only displayed for sequences.
Cut
Removes the selected activity and places it onto the clipboard.
Copy
Copies the selected activity and places it onto the clipboard. Activities from read-only files can be copied to another workflow or a .txt file. When copying multiple activities to the clipboard, their order is reversed. :warning: Copying an activity to a project with a different compatibility (e.g. from Windows - Legacy to cross-platform) can cause the execution of the destination workflow to fail.
Paste
Inserts the content of the Clipboard at the current location.
Delete
Deletes the target activity, or all the selected activities. You can also use the Delete keyboard shortcut.
Annotations
Add, edit, delete, show and hide annotations added to activities in the workflow.
Export as Image
Copy Image to Clipboard - Copies the image to the clipboard.
Save Image to File - Makes a screenshot of the content displayed in the Designer panel and prompts the user to set the details for saving it (Name, Type, Destination). Supported formats: JPG, PNG, GIF, XPS. If you want to make a screenshot of a child activity, make sure to firstly open it in the Designer panel.
Create Variable
Creates a variable in the Variable panel.
Auto Arrange
Automatically arranges activities in a flowchart, state machine, or a long running workflow either horizontally or vertically.
Import BPMN file
Import existing BPMN files into a long running workflow. Note: Only displayed for long running workflows.
Change Type
Replaces a placeholder activity with another activity. Note: Only displayed for long running workflows.
Change Color
Changes the color of activities in the Designer panel. Note: Only displayed for long running workflows.
Remove Surrounding Sequence
Removes the selected Sequence activity from the Designer panel. The activities that it contains are moved to the parent sequence.
Surround with Try Catch (Ctrl + T)
Inserts the activity in a Try Catch statement. A Try Catch statement is used for handling exceptions caused by data or coding errors. The Try clause encloses the activity to be checked for exceptions. The Catches clause is the exception handler. The Finally clause is used for executing an activity regardless of the status of the first two clauses.
Extract as Workflow
Creates a new workflow containing the targeted activity with the purpose of breaking down a large project into smaller ones. In the place of the extracted activity an Invoke Workflow activity is created which enables you to edit and import arguments from the newly created workflow. The arguments are created automatically from the variables used in that activity. The Invoke Workflow activity automatically maps the local variables to invoke arguments for the extracted workflow. Please note that this applies only to variables you create, arguments are not created from variables created implicitly by parent activities such as For Each .
Enable Activity
Enables a previously disabled activity.
Disable Activity
Disables an activity, which is then placed inside a Comment out activity.
Mark as Private / Mark as Public
Mark as Private marks the activity as private, so that its variable and argument values are not logged at the Verbose level. The display name of a private activity starts with Private:. For more information, refer to Protecting Sensitive Information. For a private activity, the menu displays Mark as Public instead, which removes the private marking.
Toggle Breakpoint
Marks the selected activity as a breakpoint for debugging. Breakpoints can also be toggled by clicking the Breakpoint button in the Execute tab. You can trigger a breakpoint for one activity at a time.
Toggle Bookmark
Places a bookmark on the selected activity or removes a bookmark placed on the activity.
Edit Breakpoint Settings
Opens the Breakpoint Settings window.
Debug
Run to this Activity - Debugs the project and stops before this particular activity is executed.
Run from this Activity - Starts debugging from this activity.
Test Activity - Debugs this activity.
Show All Conditions
Displays all conditions defined in your project ( Properties panel > Conditions ). Note: This option is only displayed for flowcharts when you right-click an empty space inside the project; it is not displayed if you right-click an activity in your flowchart.
Hide All Conditions
Hides all displayed conditions. Note: This option is only displayed for flowcharts when you right-click an empty space inside the project; it is not displayed if you right-click an activity in your flowchart.
Set as Start Node
Connects the selected activity with the Start node. Only displayed for flowcharts.
Set as Initial State
Connects the State Machine specific activity with the Start node. Only displayed for state machines.
The context menu is also displayed for tabs in the **Designer** panel. The following options are available:
Option
Description
Close
Closes the active tab.
Close Others
Closes all tabs but the active one.
Close All Documents
Closes all tabs.
Float
Undocks the target tab and changes it to a floating state.
Pin Tab
Pins the target tab in the Designer panel. The tab pinned last is always moved in front of all other existing tabs (pinned or not). The position of a pinned tab can only be changed relative to other pinned tabs.
New Horizontal Tab Group
Splits the screen horizontally, enabling you to see two or more instances of the Designer panel within the same screen. The target project is moved onto the panel on the right. Only displayed when your project contains two or more tabs and, implicitly, workflows.
New Vertical Tab Group
Splits the screen vertically, enabling you to see two or more instances of the Designer panel within the same screen. The target project is moved onto the panel at the bottom. Only displayed when your project contains two or more tabs and, implicitly, workflows.
Move to Previous Tab Group
Moves the target tab onto the previous Designer panel displayed. Only displayed if you had used the New Vertical Tab Group or New Horizontal Tab Group options before.
Move to Next Tab Group
Moves the target tab onto the next Designer panel displayed. Only displayed if you had used the New Vertical Tab Group or New Horizontal Tab Group options before.
### The Explorer Panel
The Explorer panel enables you to manage project files, dependencies, and configure project settings. For more information, see [Managing Projects](https://docs.uipath.com/studio/standalone/2026.10/user-guide/about-automation-projects#managing-projects).
### The Data Manager Panel
The Data Manager panel enables you to manage data such as variables, arguments, constants, namespaces, and connections from a centralized location. For more information, see [Using the Data Manager](https://docs.uipath.com/studio/standalone/2026.10/user-guide/using-the-data-manager).
### The Activities Panel
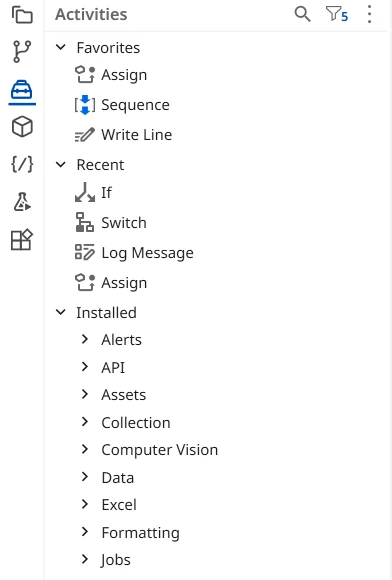
The [Activities](https://docs.uipath.com/activities) panel shows activities that can be added to the current workflow. In Windows and cross-platform projects, you can see both installed and available activities, while in Windows - Legacy projects only installed activities are visible. Installed refers to activities from packages that are already added as project dependencies, while available refers to activities from packages that are not installed, but are available for installation from the **Official** and **Orchestrator Tenant** feeds.
You can search for activities by name and optionally by description using the search box at the top of the panel, navigate through them using navigation keys, and press **Enter** to add the selected activity to the currently opened file.
:::note
The search box can be used for finding activities by their class name, regardless of the interface language set in Studio.
:::
Hovering over an activity in the panel displays the package it belongs to and its description. To add an activity to the list of favorites, right-click it and select **Add to favorites**.
Right-click an activity in the panel and select **Create Test Bench** to test out one or more activities before adding them to a project. Read more about this [here](https://docs.uipath.com/studio/standalone/2026.10/user-guide/debugging-actions).
#### Adding Available Activities
In Windows and cross-platform projects, you can quickly find and add activities from official UiPath packages that are not installed in your projects using the **Available** category in the Activities panel and the **Add activity** search bar.
To add an available activity to your project, double-click it or drag and drop it in your workflow. When you add an available activity to a project, the package that contains it is installed as a project dependency. You can also add an available package to your project by right-clicking its name and selecting **Install**.
#### Adding Integration Service Activities
Most Integration Service activities can be added only from the Available category. The activities are included in a single package, **UiPath Integration Service Activities**, enabling you to quickly add multiple activities for different connectors. The activities in this package are not displayed in the **Installed** section of the Activities panel.
When an update is available for an activity that is already added to a project, it is automatically updated whenever you add a new Integration Service activity or reopen a project.
To add Integration Service activities to a project:
1. Add an available Integration Service activity, or right select the name of the category in the Available section and select **Install** to add the UiPath Integration Service Activities package as a project dependency.
2. Add other Integration Service activities from the Available category, without installing additional packages. The available activities included in the Integration Service package are added to your workflow instantly.
For more information about working with Integration Service activities, see the [Integration Service activities guide](https://docs.uipath.com/activities/other/latest/integration-service/about-the-integration-service-activities).
:::note
Integration Service activities are not available in the **Available** section when Studio is accessed through an [Orchestrator troubleshooting session](https://docs.uipath.com/orchestrator/automation-cloud/latest/user-guide/managing-robots-modern-folders#enabling-a-troubleshooting-session-for-unattended-processes). To work with Integration Service activities, open Studio with your standard user account outside of a troubleshooting session.
:::
#### Customizing the Activities Panel
Select the **Search**  button at the top of the panel to search for activities.
Select the **More actions**  button to access additional options:
* **Expand All**: Expands all activity categories.
* **Collapse All**: Collapses all activity categories.
* **Search by description**: Enables you to search for keywords in the activities' descriptions.
* **Group by category**: Groups available activities by the category they belong to.
* **Group by package**: Groups available activities by the package they belong to.
:::note
You can clear the last two options to see an ungrouped list of activities arranged alphabetically.
:::
Select the ****Filter by****  button to filter activities based on the options below.
#### For cross-platform projects
* **Filter by availability**:
+ **Installed** - Show activities that are part of packages installed in your project (this filter cannot be deactivated)
+ **Available** - Show activities that are part of uninstalled packages that you can add to you project
+ **Windows** - Show activities that are only available in Windows projects
* **Filter by type**:
+ **Activities** - Show activities
+ **Triggers** - Show triggers
* **Filter by category:**
+ **Preview** - Show prerelease activities (this setting can be governed)
#### For Windows projects
* **Filter by availability**:
+ **Installed** - Show activities that are part of packages installed in your project (this filter cannot be deactivated)
+ **Available** - Show activities that are part of uninstalled packages that you can add to you project
* **Filter by type**:
+ **Activities** - Show activities
+ **Triggers** - Show triggers
* **Filter by category:**
+ **Preview** - Show prerelease activities (this setting can be governed)
#### For Windows - Legacy projects
* **Filter by type**:
+ **Activities** - Show activities
+ **Triggers** - Show triggers
* **Filter by category:**
+ **Preview** - Show prerelease activities (this setting can be governed)
### The Components Panel
The Components panel is a contextual panel that appears when you create or open a form in Studio. The panel contains UI components that you can drag and drop into the Designer panel to build custom forms. For more information, see [Form components](https://docs.uipath.com/activities/other/latest/workflow/form-components).
### The Snippets Panel
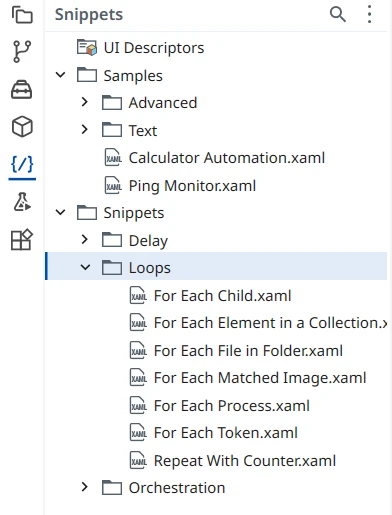
The **Snippets** panel enables you to easily reuse automations. It includes, by default, multiple samples and snippets.
You can search for snippets and select the **More actions**  button for additional options:
* **Expand All**: Expands all snippet categories.
* **Collapse All**: Collapses all snippet categories.
* **Refresh**: Reloads the panel to its default settings.
* **Add folder** - Allows you to add your own snippets by selecting a directory from your hard drive. Empty folders are not displayed.
To remove a folder, right-click it and select **Remove**.
### The Source Control Panel
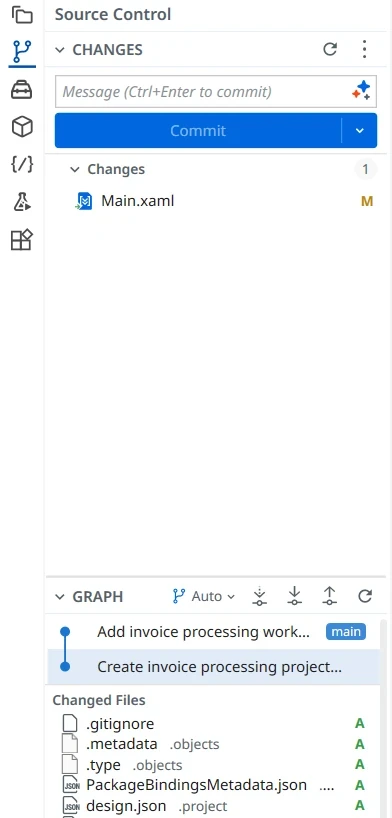
The **Source Control** panel provides a complete Git workflow directly in Studio. The panel is available whenever a project that belongs to a Git repository is open. The panel is divided into two section:
* The **Changes** section lists all files that have been modified, added, deleted, or renamed in the working tree, and hosts the commit controls.
* The **Graph** section displays the repository's commit history as an interactive visual graph.
To learn more, refer to the [The Source Control Panel](https://docs.uipath.com/studio/standalone/2026.10/user-guide/the-source-control-panel).
### The Properties Panel
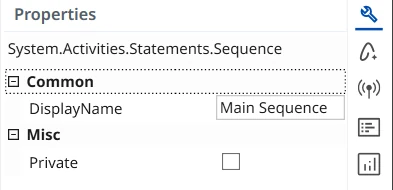
The **Properties** panel is contextual and enables you to view and change the properties of a selected activity. When selecting two activities in the same workflow, common properties can be modified from the **Properties** panel. Some activities have a newer **Properties** panel interface, so what the panel displays depends on the selected activity.
In projects with the cross-platform compatibility, all activity properties are available in the activity card in the **Designer** panel if the **Show activity properties inline** [design setting](https://docs.uipath.com/studio/standalone/2026.10/user-guide/configuring-studio-settings) is enabled. This also applies to some activities in projects using the Windows compatibility.
Read-only property fields, such as those on the canvas, in a locked designer, or in diff mode, are rendered grayed to show they can't be edited, while staying interactive in every other respect: you can scroll them, select their text, and copy it. Opening the advanced editor on a read-only property shows the expression in a selectable read-only view rather than a locked editor.
#### Catch block properties
When you select a **Catch** block of a **Try Catch** activity, the **Properties** panel displays the exception type of the block as an editable property. Changing the exception type in the **Properties** panel updates the activity in the **Designer** panel, and the reverse.
#### The Expression Editor
The **Expression Editor** is accessible with the **Ctrl + Shift + E** keyboard shortcut when used inside activity input fields. It is also available from the **Properties** panel, from fields that require inputting text, and from the body of an activity, by adding text directly in the required fields.
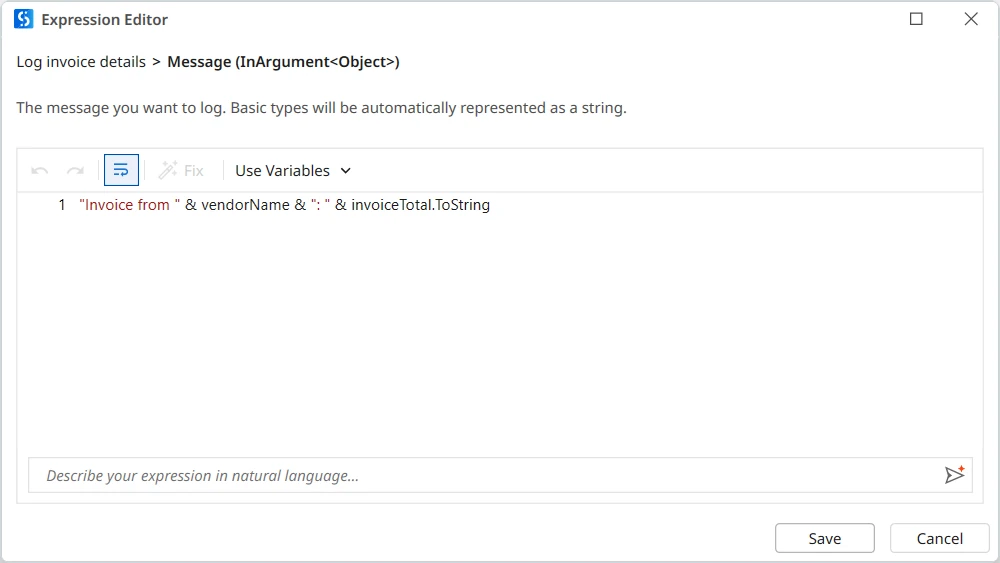
The Expression Editor includes intelligent code completion features. Expressions can be written on multiples lines. [Keyboard shortcuts](https://docs.uipath.com/studio/standalone/2026.10/user-guide/keyboard-shortcuts) for creating variables and arguments directly in expressions are available.
Use Ctrl + F inside the editor to open the search and replace capabilities. Select part of an expression and press Ctrl + F3 to add the text to the search field. Hold the Ctrl key to make the search pane semi-transparent and see the text behind it.
#### Editor settings
When you close the editor, its position on the display, window size, and text zoom level are saved and applied the next time you open it.
In **Compact Mode**, you can also open the **Expression Editor** from the expander of a property pill. For more information, refer to [Compact Mode](https://docs.uipath.com/studio/standalone/2026.10/user-guide/the-user-interface#compact-mode).
### The Autopilot Panel
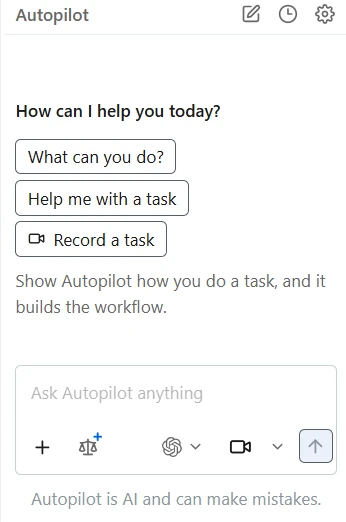
The **Autopilot** panel is a centralized AI-powered interface that simplifies the development and maintenance of your automation projects.
Autopilot is a conversational interface designed to help you interact with UiPath products. It offers you a persistent, context-aware workspace where you can build automations, explore product features, or search documentation using natural language.
#### How Autopilot works
Autopilot maintains input history, interprets intent, and responds with relevant, task-specific suggestions. You can reference earlier inputs, adjust parameters, refine prompts, and clarify intent at any point in the workflow. You can ask Autopilot to explain a suggestion, rephrase an instruction, or modify an existing step, all from within the same interface.
Autopilot evolves at the same time with your automation logic, ensuring relevant recommendations as requirements change.
Here are the main capabilities of Autopilot:
* Context retention—remembers previous inputs and decisions.
* Prompt refinement—lets you edit your prompt in real-time to improve outcomes without starting from scratch.
* Conversational experience—uses natural language to ask questions and make changes.
* Inline suggestions—offers recommendations directly in the chat, specific to your current context.
* Unified workspace—keeps all interactions, iterations, and results in one place.
* Workflow continuity—maintains the flow across steps and stages.
* Interactive debugging—helps you identify and fix issues by asking follow-up questions or clarifying intent.
* Code and logic awareness—understands the structure of your automation or code and provides relevant guidance.
Autopilot can use various Large Language Models (LLMs) to power its capabilities. The choice of LLM influences performance, reasoning depth, and speed.
The **Chat Screen** is the main screen of Autopilot, where all your interactions reside. To access the Autopilot chat screen, look for the Autopilot  icon in Studio.
On the chat screen you can perform the following actions:
* Use the chat box to interact with Autopilot by providing prompts or asking questions
* Use the dynamic prompt suggestions, which change alongside your workflow context.
* Select the language model Autopilot uses in your interaction. You can select from the available Gemini or GPT-5 instantiations, based on your needs.
* Upload files for future handling and exploration.
* Open a **New chat** , access the **Settings**  menu, or the **Chat History** .
The **New Chat** option in the Autopilot header starts a fresh conversation and saves the previous one in your chat history. Use it when you want to switch topics, so your old prompts and answers do not affect the new interaction.
The **Settings** options opens the **Settings** menu, where you can control how Autopilot behaves. You can personalize its responses, enable specific tools, or connect it to Orchestrator MCP Servers.
The available settings are:
* **Personalization**—This section focuses on customizing the chat interaction style and specific instructions:
+ **Show Follow Ups**—On by default, so Autopilot displays follow-up questions or actions after a response to help continue the conversation. Turn it off for a cleaner interaction.
+ **Custom Instructions**—A free-text field where you can write specific guidance or preferences for how Autopilot should respond. For example, preferred terminology, level of technical detail, or specific frameworks/tools you use often. A character counter (0/300) indicates the length limit for these instructions.
* **MCP Servers**—This section focuses on configuring and managing MCP servers that Autopilot can connect to, so it can generate context-aware suggestions based on structured, task-specific information.
+ **Enter server URL**—A text field to input the URL of an MCP server, then **Add** it.
+ **Current Servers**—The list the MCP servers already configured and available to Autopilot.
+ **Manage**—Provides access to the **MCP Servers** configuration page in Orchestrator.
:::important
Only MCP servers created in Orchestrator are supported.
:::
* **Tools**—The list of the capabilities and tools available to Autopilot, organized under **Framework Tools**. You can manage and configure each tool, depending on the context you use Autopilot in.
* **Save** and **Reset to Defaults** options
+ **Save**—Applies your current settings.
+ **Reset to Defaults**—Reverts all settings to their original state.
* **Download conversation**—Allows you to download the current conversation to your local device in JSON format. The file includes details about the organization, tenant, and specific conversation settings.
The **Chat History** option allows you to view and reopen past conversations with Autopilot from the last 30 days. It provides a searchable list of previous interactions. Select an entry to return to useful suggestions, troubleshooting steps, or workflow drafts. You can continue the conversation within that session and benefit from its existing context.
The Autopilot panel improves error handling and troubleshooting by providing AI-based suggestions for resolving workflow errors. Autopilot gives you detailed explanations for each error, as well as clear, context-aware recommendations that you can then apply to your workflow. These advanced capabilities also work with Workflow Analyzer errors.
To learn more, refer to the [Autopilot user guide](https://docs.uipath.com/autopilot/other/latest/overview/about-autopilot-chat).
### The Observability Panel
The **Observability** panel shows the Healing Agent data of your automation project, so you can review the selector changes that Healing Agent suggests after the project runs in Orchestrator, and apply them to your activities. To open the panel, select the **Observability** icon on the right rail. The panel is available only when the **UI Automation** activities package is installed in the project.
The panel opens on the **Runs** section. The options menu in the **Runs** section header loads Healing Agent data in one of two ways:
* **Analyze most recent healing data** - Analyzes the most recent healing data, when Studio and Orchestrator are connected to the tenant where the jobs ran.
* **Load Healing Agent data from file** - Loads a Healing Agent debug file that you downloaded from the job details in Orchestrator.

The **Runtime healing data** view shows the process details, including the process name, the run date, and how many errors were healed, and lists the **Affected activities**. Each suggestion explains why the original target failed and compares the current target and anchor with the generated ones. **Apply** updates the activity with the new target.
If the project is in your workspace and Studio is connected to the Orchestrator tenant, **Open in Studio** in the Healing Agent details of an Orchestrator job opens the debug file directly in Studio. For the steps, refer to [Applying Healing Agent suggestions in Studio](https://docs.uipath.com/agents/automation-cloud/latest/user-guide-ha/setup#applying-healing-agent-suggestions-in-studio).
### The Terminal Panel
The **Terminal** panel lets you use a fully-featured command line interface directly in Studio. The terminal is fully compatible with Claude Code and any other command-line interface (CLI) tool you are familiar with, so you can work with these tools without leaving your project. Changes made to project files through the **Terminal** panel are reflected instantly in the project.

The folder where a new terminal starts depends on what you have open:
* **A project** - The terminal starts in the project folder.
* **A solution** - The terminal starts in the solution root folder and is shared by all the projects in the solution. Changing the active project does not affect open terminals.
The terminals you open are saved and restored the next time you open the project or solution.
#### Working with multiple terminals
Each terminal opens in its own tab, with its own shell process, output, and scrollback history. To open a terminal, use one of the following options:
* **New terminal** - Opens a new terminal tab. A project without saved terminals opens with the shell you used last. If no shell was used before, the terminal opens with Command Prompt.
* **Select a different shell to open** - Lists the shells installed on your machine, so you can choose the shell for each terminal. The list includes PowerShell, Windows PowerShell, Command Prompt, Git Bash, and Windows Subsystem for Linux (WSL).
When extensions contribute terminal profiles, the **Select a different shell to open** list displays them under an **Extensions** heading.
The following actions are available for each terminal tab:
| Action | Description |
| --- | --- |
| **Change tab color** | Sets a color for the tab. The current color is marked with a check mark. |
| **Rename tab** | Changes the name of the tab. You can also press **F2** to rename the active tab. |
| **Duplicate tab** | Opens a copy of the terminal tab, which starts in the current folder of the original terminal. A number is added to the name of the copy, for example **Windows PowerShell (2)**. |
| **Export text** | Saves the full output of the terminal to a text file, including the lines that scrolled out of view. A **Save** dialog opens in the **Documents** folder and suggests the tab name as the file name. If a file with that name exists, a number is added to the suggested name. |
| **Close** | Closes several tabs at once, with the **Close tabs to the right**, **Close tabs to the left**, and **Close other tabs** options. |
| **Close tab** | Closes the terminal tab. |
You can also drag tabs to reorder them. Closing a terminal that still has a running process asks for confirmation first, so a long task or a coding agent is not ended by accident.
#### Running command-line tools and coding agents
Keystrokes reach the running program, so you can use the arrow keys to navigate the command history and move the cursor, and **Shift + Enter** to enter multi-line input. Output is rendered in full color, so modern CLI tools and full-screen text applications display correctly.
CLI tools and coding agents run as top-level sessions, with full history, persistence, and resume, the same as when you start them from a standalone terminal.
While a terminal running in the background works, a **Working** indicator is displayed on its tab and on the **Terminal** panel tab. When a longer-running command finishes, a command fails, or the terminal signals that it needs your input, the indicator changes to **Needs attention**.
#### Searching and copying output
* **Find** - Searches the output of the terminal, with the **Match case**, **Whole word**, and **Use regular expression** options. Use **Previous match** and **Next match** to move between results.
* **Links** - To open a URL or file path in the output, press **Ctrl** and select it.
* **Context menu** - Offers **Copy**, **Paste**, **Select all**, and **Clear**. **Clear** keeps the current prompt line.
* **Drag and drop** - Dropping a file onto the terminal pastes the path of the file.
The following keyboard shortcuts are available in the terminal:
| Shortcut | Action |
| --- | --- |
| **Ctrl + F** | Opens **Find**. Press **Esc** to close it. |
| **F2** | Renames the active tab. Press **Esc** to cancel. |
| **Ctrl + C** | Copies the selected text. If no text is selected, sends an interrupt to the running program, for example to stop a command. |
| **Ctrl + Shift + C** | Copies the selected text. |
| **Ctrl + V** | Pastes text from the clipboard. |
| **Ctrl + Left Arrow** / **Ctrl + Right Arrow** | Moves the cursor one word to the left or right. |
| **Ctrl + Backspace** | Deletes the previous word. |
| **Shift + Enter** / **Ctrl + Enter** / **Alt + Enter** | Inserts a new line in coding agents that support multi-line input, such as Claude Code. |
### The Outline Panel

The **Outline** panel displays the project hierarchy, and all available nodes. You can highlight activities in this panel by selecting them in the **Designer** panel, or you can go to a specific activity by selecting it in the **Outline** panel.
### The Profiling Panel
The **Profiling** panel gives you access to [Profile Execution](https://docs.uipath.com/studio/standalone/2026.10/user-guide/profile-execution) results as a dedicated side panel, instead of through a button in the **Debug** ribbon tab. The panel and its header stay visible at all times.
Use the button in the panel header to enable or disable profiling. To import a previous profiling session, use the **More actions** menu in the panel.
For details on interpreting results and the available actions, see [Analyzing profiling results](https://docs.uipath.com/studio/standalone/2026.10/user-guide/profile-execution#analyzing-profiling-results).
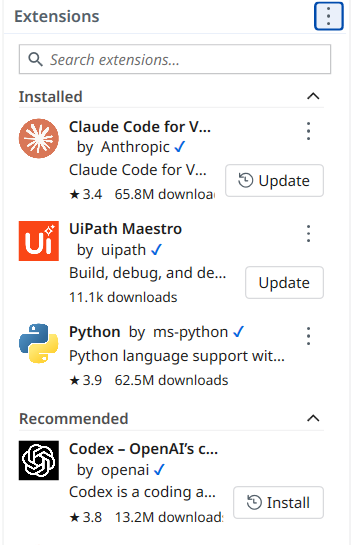
### The Extensions Panel
Building an automation means working with more than just workflows: a Process Design Document (PDD) to reference, an input spreadsheet to check, an API to test before wiring it up, or a coding agent to help with development. The **Extensions** panel brings tools like these into Studio, so you don't have to leave the project to use them.
The panel organizes extensions into four categories:
* **Recommended** - A curated set of extensions built around RPA workflows, including coding assistants such as Claude Code and OpenAI Codex, and the [Low-Code Viewer](https://docs.uipath.com/studio/standalone/2026.10/user-guide/low-code-viewer). Extensions in this category install in one click.
* **Installed** - View and manage the extensions you have active.
* **Open VSX** - Browse the full Open VSX catalog beyond the Recommended set.
* **Custom** - Install any extension directly from a local `.vsix` file.
Extensions can be removed as easily as they're installed, so you only keep what you actually use. Some examples of what you can do:
* Install a coding assistant, such as Claude Code or OpenAI Codex, to get help building, editing, and reviewing automations without leaving Studio.
* Install Postman to test an endpoint's response schema, authentication, and payload structure before wiring an activity to it.
* Install Office Viewer and PDF for VS Code to read a PDD, sample invoice, or input spreadsheet inline.
* Install Markdown Preview Mermaid Support to keep a process map, written as a Mermaid diagram, inside the project and rendered in the Markdown preview.
* Install the [Low-Code Viewer](https://docs.uipath.com/studio/standalone/2026.10/user-guide/low-code-viewer) to render a coded workflow as a visual canvas alongside its source code.
Panels introduced by an extension can be shown or hidden like Studio's built-in panels, so you can keep focus on what you're working on.
#### Extension recommendations
When you open a file type Studio doesn't render itself, Studio recognizes the file type and prompts you to install the extension for it, naming both the extension and its publisher.
* **Install** - installs the extension in one click.
* **Show Recommendations** - opens the **Extensions** panel on its **Recommended** group.
* **Don't ask again** - silences the prompt for that extension, followed by *Do you want to ignore all extension recommendations?* so you can turn off the prompt entirely from the same place.
`.cs` files suggest the [Low-Code Viewer](https://docs.uipath.com/studio/standalone/2026.10/user-guide/low-code-viewer), and `.flow` files suggest UiPath Maestro. Markdown, PDF, spreadsheet, document, archive, image, and font files point at their own viewers. A dedicated extension always wins over a general-purpose one, and when a file type has several dots — such as `.tar.gz` — the longest match decides.
Turn the whole feature on or off from **Recommend extensions when opening files** in the **Extensions** panel's header menu.
#### Extension details
Selecting an extension in the **Extensions** panel opens its details page, with the following tabs:
* **Details** - The README of the extension, which includes its description, feature list, configuration options, and screenshots.
* **Features**
* **Settings** - The settings that the extension provides. For more information, refer to [Configuring extension settings](https://docs.uipath.com/studio/standalone/2026.10/user-guide/the-user-interface#configuring-extension-settings).
* **Changelog**
* **Dependencies**
You can read the details of an extension both before and after you install it. The details page has an action bar with the same actions that are available for the extension in the panel, including installing and uninstalling it. Each extension card also has a **More actions** menu with these actions.
#### Updating extensions
When a newer version of an installed extension is available:
* The extension card displays an **Update** button.
* The `@updates` and `@outdated` search filters list every installed extension with a pending update.
* **Update all extensions** in the **More actions** menu of the panel header updates all these extensions together.
After an update completes, the card displays a **Reload** button and a *Reload to apply update* badge. Selecting **Reload** restarts the extension so that it loads the new version. Updating an extension keeps its stored data.
The auto-update setting for extensions has the following modes:
* **On** - Updates are applied automatically once they are past the [release delay](#release-delay).
* **Manual** - The default. Available updates are displayed, but they are applied only when you choose to update.
* **Disabled** - Studio doesn't check for extension updates, so available updates are not displayed.
You can also turn automatic updates on or off for a specific extension from its context menu, regardless of the global mode.
#### Release delay
The release delay holds back new extension versions for a while after they are published on Open VSX, so that a faulty or compromised version can be found and removed before Studio installs it. It applies to every install and update: first installs, recommendations, dependencies, the **Update** button, **Update all extensions**, and automatic updates.
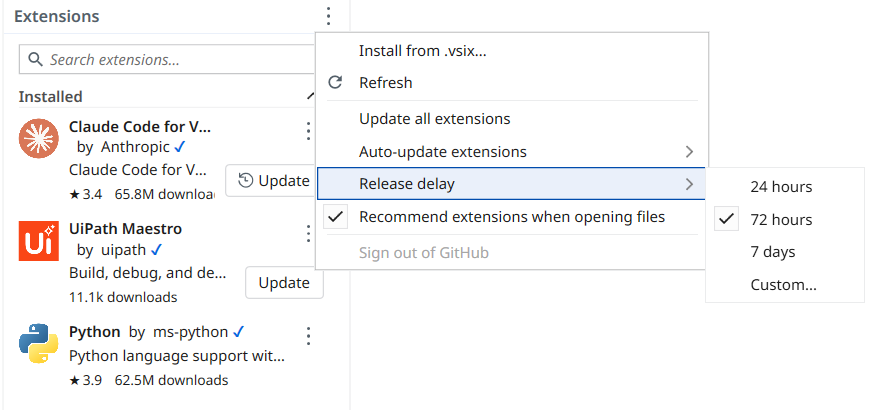
To change it, open the **More actions** menu of the panel header, select **Release delay**, and then select **24 hours**, **72 hours** (the default), **7 days**, or **Custom...**. **Custom...** accepts a whole number of hours from 0 to 8760, where 0 means no delay.
While the newest version of an extension is inside the release delay:
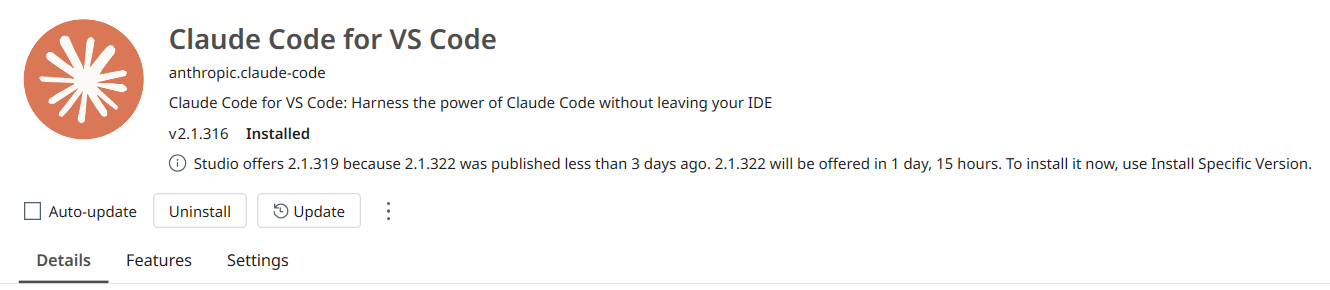
* The extension card offers the newest version that is past the delay, and its **Install** or **Update** button displays a clock icon. The card tooltip and the details page say which version is on hold and when it will be offered.
* To install the newest version anyway, use **Install Specific Version...**. If no version of the extension is past the delay yet, **Install** or **Update** offers the newest version instead. In both cases, Studio asks for confirmation before it installs a version that is inside the release delay.
* Automatic updates and **Update all extensions** skip the extension until the delay ends.
On the details page of the extension, a message says which version Studio offers instead and when the newest version will be offered.
Your organization can set the release delay in a policy. If the policy lets users change it, its value is only your default. Otherwise, the **Release delay** menu displays the value as set by your organization and can't be changed, versions inside the delay can't be installed, and the **Install** or **Update** button displays a lock icon and is disabled. For more information, refer to [Extensions Settings](governance.md#extensions-settings).
The context menu of each extension card also offers the following options:
* **Install Specific Version...** - Installs a version of your choice, including an earlier version.
* **Download VSIX** - Saves the extension package as a `.vsix` file, for example for offline installation, without installing it.
* **Download Specific Version VSIX...** - Saves a version of your choice as a `.vsix` file, without installing it.
#### Configuring extension settings
The **Settings** tab on the details page of an extension lists every setting the extension provides. You can also open it with the **Extension Settings** action.

Each setting is displayed with the control that fits its type:
* Switch
* Dropdown
* Text box
* Number box
Use the **Search settings** box to find a setting. Values are validated as you enter them. To return to the default values, use **Reset Setting** for one setting or **Reset All** for all the settings of the extension. To work with the underlying file directly, select **Open settings.json**.
The **Scope** selector controls where a value is saved:
* **User** - The default. The value applies to every project you open.
* **Workspace** - The value is saved to the `.extensions\settings.json` file in the workspace root, so it can be committed and shared through source control. The workspace root is the solution folder when the project is part of an open solution, and the project folder otherwise. This scope is available only when a project or solution is open.
Extensions pick up changed values immediately, without a restart.
### The Output Panel

The **Output** panel enables you to display the output of the **Log Message** or **Write Line** activities, among other things. Exceptions for packages are also displayed in this panel.
#### Filtering and exporting logs
From the **Output** panel, you can show or hide messages that have different log levels (errors, warnings, information, and traces) by selecting the filter button in the panel’s header. Double-clicking a message displays further details about it, with the option to copy information.
Messages in the **Output** panel are selectable text, so you can select words, ranges, or individual messages and copy them with **Ctrl + C** or the **Copy** option in the context menu of a message.
From the **Source** drop-down menu, you can filter sources that generated the logs (**General**, **Debug**, **Compile**, **Tests**). The last log pertaining to each source is preserved. The source dynamically changes to reflect the actions that are taking place.
When searching for a log in the **Output** panel and selecting an item from the search results list, the log is highlighted. Searching is done at source level.
#### Log search and export
The **Export Logs** button is used for exporting logs into a `.txt` file. It exports timestamps and error message details as well. Exporting filtered logs is available. For example, if you want to export only trace level logs, filter the list and then use the **Export Logs** button.
When debugging, the **Output** panel shows logs for when an activity starts executing and until it ends. This can be enabled from the **Log Activities** option in the **Debug** tab.
#### The Errors Panel
The **Errors** panel displays errors found in the file or project during the validation process, together with errors generated by [Workflow Analyzer](https://docs.uipath.com/studio/standalone/2026.10/user-guide/about-workflow-analyzer) rules.
#### Output panel controls
The **Clear All** button erases all info displayed in the **Output** panel. Logs and other data stored in this panel are erased when a workflow is run. The **Output** panel displays up to 2,000 lines at a time.
The **Show timestamps** button shows or hides the timestamps corresponding to each log.
The **Output** panel is not intended for production monitoring and should only be used when developing automations. Events might not be displayed as expected if, for example, a large number of **Log Message** activities are used. To monitor production runs, use the [Orchestrator logs](https://docs.uipath.com/orchestrator/automation-cloud/latest/user-guide/about-logs).
### The Find References Panel
The **Find References** panel displays results for references you search for in your project. To find every place in the project where an element is referenced, right-click it and select **Find References**. This works for the following:
* Files in the **Explorer** panel
* Activities in the **Activities** panel
* Variables in the **Variables** and **Data Manager** panels
* Arguments in the **Arguments** and **Data Manager** panels
* Descriptors in the **Object Repository** panel

### Debugging Panels
The following panels are available to help you [debug](https://docs.uipath.com/studio/standalone/2026.10/user-guide/about-debugging) your projects: [Markers](https://docs.uipath.com/studio/standalone/2026.10/user-guide/the-breakpoints-and-bookmarks-panel), [Call Stack](https://docs.uipath.com/studio/standalone/2026.10/user-guide/the-call-stack-panel), [Locals](https://docs.uipath.com/studio/standalone/2026.10/user-guide/the-locals-panel), [Watch](https://docs.uipath.com/studio/standalone/2026.10/user-guide/the-watch-panel), and [Immediate](https://docs.uipath.com/studio/standalone/2026.10/user-guide/the-immediate-panel).
## The Status Bar
In the status bar, you can view status information and access options related to Orchestrator and source control:
* **Orchestrator/Cloud Connection** - Select  to access Orchestrator options: sign in to your cloud account, disconnect from Orchestrator (if connected with a machine key), and refresh resources.
* **Orchestrator Status** - Displays the Orchestrator connection status. When connected to Orchestrator, the currently selected folder is displayed. You can click the name of the current folder to view a list of available folders and select another folder from which to sync resources.
* **Source Control** - Depending on whether the project is connected to a source control repository, different options are available to help you manage source control integration. For more information, see [About Version Control](https://docs.uipath.com/studio/standalone/2026.10/user-guide/about-version-control).
* **Cloud Project** - A menu is available with options related to editing the project in Studio Web. If a project is not already synced with Studio Web, the label **Cloud Compatible** is displayed. If the project is already synced with Studio Web, the label **Cloud Project** is displayed. For more information, see [Designing Cross-platform Projects](https://docs.uipath.com/studio/standalone/2026.10/user-guide/about-automation-projects#designing-cross-platform-projects).
* **Project Language** - Displays the language used for expressions in the project, **VB** or **C#**.
* **Project Compatibility** - Displays the compatibility of the project: **Windows - Legacy**, **Windows** or **cross-platform**.
