# Table Extraction
> Table Extraction, part of the Modern Experience in Studio, enables you to use the UI Automation activity package to automatically extract structured data from applications and save it as a `DataTable` object that can then be further used in your automation processes.
Table Extraction, part of the Modern Experience in Studio, enables you to use the UI Automation activity package to automatically extract structured data from applications and save it as a `DataTable` object that can then be further used in your automation processes.
This process can be done by using the **Table Extraction** Recorder in Studio, which can be accessed from the Ribbon if the UI Automation **v21.4** or above pack is installed in your current project, and you have selected the **Modern Experience**.
The same wizard is also used when using a [Extract Table Data](https://docs.uipath.com/activities/other/latest/ui-automation/n-extract-data) activity in your workflow.
## Using the Table Extraction Recorder
If you have the Modern Experience selected in your project, and the UI Automation activity package installed, you can find the **Table Extraction** recorder on the Ribbon in Studio.

Clicking the Table Extraction button in the Ribbon opens up the **Table Extraction wizard**.

This wizard enables you to configure the entire suite of features that the **Extract Table Data** activity offers, in a very simple manner.
To switch between the available UI frameworks (**Default**, **UIAutomation**, or **Active Accessibility**), you can select an option from the drop-down menu or hit **F4**.
Also, the **Information** section guides you through all the steps you need to take to successfully extract any structured data. The section can be collapsed to reveal more information about the step you're currently on.

To begin the process of extracting data, simply click the **Add Data** button. This starts the process of indicating a series of similar elements that can be used to identify the table you want to create. This starts the Indicate process, which highlights all the detected elements of the application you are currently working with. By selecting the  button, you can extract URLs and image sources of the extracted data, if they are present. These are added as a new column to your final table.

As you can see above, after clicking a column header, the wizard prompts you with a message, asking whether you want to extract all of the available columns, which are automatically identified. Selecting **Yes** scrapes the entire table.
If you select an element that is closer (lowest common ancestor) to only one of the elements from the first column, it is automatically considered to be the first element of a new column.
If the table spans multiple pages, you can simply click **Next Button** and select the next page navigation button or link.
Each column can be individually edited or deleted, enabling you to customize your final table however you see fit.

Once you have selected all the data you want, simply clicking the **Save and return to Studio** button automatically closes the wizard and saves everything you have done in your workflow.
### **Editing Extract Data**
You can resume editing an already scraped table by using the **Edit extract data** option in the contextual menu in the body of the **Extract Table Data** activity. Using this option reopens the wizard with all of the configurations performed earlier and enables you to pick up where you left off.

### **Editing Columns**
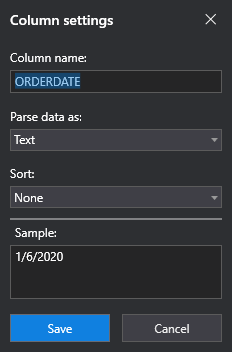
Clicking the Cogwheel icon next to the column you want to edit opens up the Column Settings window.

Here, you can edit the **Column Name**. This can be done by simply using the text box and specifying the name you want for the column in the final table.
The **Parse data as** drop-down menu enables you to select between the three main types of data you can use for the columns, **Text**, **Number**, and **Date & Time**.
The **Sample** text box displays a sample of a value in the column being parsed as the data type you chose in the **Parse data as** drop-down.
#### Text
The **Sort** drop-down menu specifies whether you want to sort the data in the column or not. By default, **None** is selected, meaning the data is not sorted in any way. If you want to sort the data in the column alphabetically, you can do so by selecting **Ascending** or **Descending**, depending on the method you prefer.
#### Number
Selecting **Number** in the **Parse data as** drop-down displays other, number-specific options.

The **Sort** drop-down menu specifies whether you want to sort the data in the column or not. By default, **None** is selected, meaning the data is not sorted in any way. If you want to sort the data in the column alphanumerically, you can do so by selecting **Ascending** or **Descending**, depending on the method you prefer.
The **Decimal separator** specifies the symbol you want to use for decimal separation in your final table. By default, this symbol is `.`.
The **Thousands separator** specifies the symbol you want to use for thousand separation in your final table. By default, this symbol is `,`.
:::note
When scraping numbers, they are parsed according to the selected options, and separators and other symbols (e.g. `$`) are removed.
:::
#### Date & Time
Selecting **Date & Time** in the **Parse data as** drop-down displays other options, specific to date and time formats.
If the column you are editing does not match the format that is specified, the **Column Settings** window lets you know in the **Sample** section.
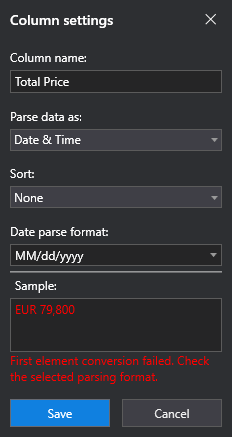
The **Sort** drop-down menu specifies whether you want to sort the data in the column or not. By default, **None** is selected, meaning the data is not sorted in any way. If you want to sort the data in the column by date, you can do so by selecting **Ascending** or **Descending**, depending on the method you prefer.
The **Data parse format** drop-down enables you to select from a multitude of date and time formats that are supported.
:::note
When selecting dates, they are formatted according to the format that is selected in your operating system. The parsing format selected in the wizard is just to identify the data you are scraping.
:::
## Settings Section
The **Settings** section lets you choose if you want to limit the extraction of elements in the table. By default, this option is set to **No limit**, which does not limit the extraction in any way, scraping the entire visible table.
The **Max rows** option limits the scraping according to the number of rows that is mentioned in the field to the right. By default, this is set to 1000 rows.
The **Max pages** option limits the scraping according to the number of pages that is mentioned in the field to the right. By default, this is set to 100 pages.
## Preview Section
The **Preview** section specifies how many columns and rows are identified for the table you have indicated. Also, by clicking the eye button, you can see a preview of the extracted table.
Preview is disabled when editing in offline mode.
## Extract Metadata
The **Extract metadata** property contains an XML definition of the path identifying the data to be extracted for each column. The path is built starting from the data extraction target (defined by your selector) to the column elements. The path uses attributes such as `tag`, `idx`, and `text`.
Example:
```
```
When the `tag`, `idx`, and `text` attributes are not enough for identifying the sample data indicated by the user, a CSS-selector is generated instead of the path. This selector uses the common class of the sample elements.
Example:
```
```
For the **Description** column, `tag` and `index` attributes are used to identify the column data.
For the **Currency** column, the elements are identified via the CSS-selector which contains the common class of the samples.
Optionally, if available, a CSS-selector can be used for the Description as well:
```
```
Row definition uses the same identification methods as the column and it is used to extract correlated data. A row contains an element from each column.
Example:
```
```
## Table Settings
This property contains an XML definition of the column settings, as they were defined in the scraping wizard. Column properties like **Name** or **Format** can be changed directly in this XML definition and will be used at runtime when building the output data table.
Example:
```
```