# Dynamic Selectors
> A dynamic selector uses a variable or an argument as a property for the attribute of your target tag. This allows the selector to easily identify a target element based on the value of the variable or argument, and not an exact string, which might change, depending on interactions inside your automation project. As such, the variable or argument can be changed to interact with a different element, without changing the selector itself. A dynamic selector has the following form, with the specifications:
A dynamic selector uses a variable or an argument as a property for the attribute of your target tag. This allows the selector to easily identify a target element based on the value of the variable or argument, and not an exact string, which might change, depending on interactions inside your automation project. As such, the variable or argument can be changed to interact with a different element, without changing the selector itself. A dynamic selector has the following form, with the specifications:
* **tag** - the target tag, such as ``
* **attribute** - the target attribute, such as `name='menuItem'`
* **\{\{Value\}\}** - the name of the variable or argument which holds the property of the element you want to interact with.
## Dynamic Selector Format
```
{{Value}} />
```
## Example of Using a Dynamic Selector
To illustrate the functionality of a dynamic selector, we create a simple automation process which performs a click on the **File** menu in Notepad. We then change the variable so that the **Format** menu is then clicked, but without modifying the selector.
:::note
The following example uses a **variable**. Please note that **arguments** are also supported.
:::
1. Create a new process in Studio, and add a **Click** activity.
2. Choose to **Indicate on screen** and select the **File** menu in Notepad. The following selector is generated:
```
```
3. Select and right-click the `File` property of the `name` attribute. A context menu with several options is displayed.
4. From the context menu, choose to **Create variable**. A couple of fields appear, allowing you to specify the variable name and value.
5. Specify a name for the new variable in the **Set Name:** field, which, in our case is **MenuOption**. Leave the **Set Value** field as is, so that the selector knows to click the attribute with the `File` property.
6. Click the **Validate** button in the **Selector Editor** window. Notice it turns green, which means our selector is valid. As such, the following dynamic selector is generated:
```
```
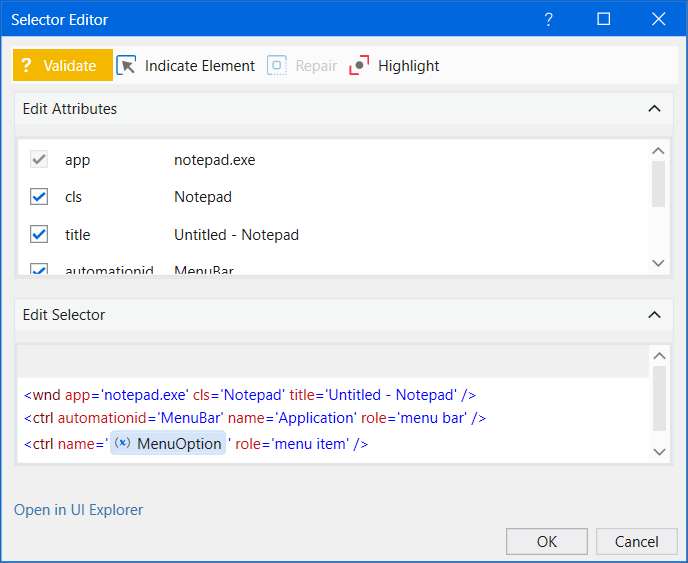
The generated selector now instructs the **Click** activity to perform the action on the **File** menu. To have it click the **Format** menu, for instance, you only need to change the default value of the variable. In this example, the operation requires a single step:
* Access the **Variables** panel in Studio and change the **Default** value of the **MenuOption** entry to **Format**. The **Click** activity now performs the action on the **Format** menu in Notepad. Note that the selector is already validated and you can start your automation process, which now clicks the **Format** menu instead of **File**.