# Setup
> To enable the Slack activities, you must enter authentication details in the [Slack Scope](https://docs.uipath.com/activities/other/latest/legacy-integrations/slack-scope) activity. These authentication details give a Robot the ability to take action on your behalf and access your permitted data.
## Introduction
To enable the Slack activities, you must enter authentication details in the [Slack Scope](https://docs.uipath.com/activities/other/latest/legacy-integrations/slack-scope) activity. These authentication details give a Robot the ability to take action on your behalf and access your permitted data.
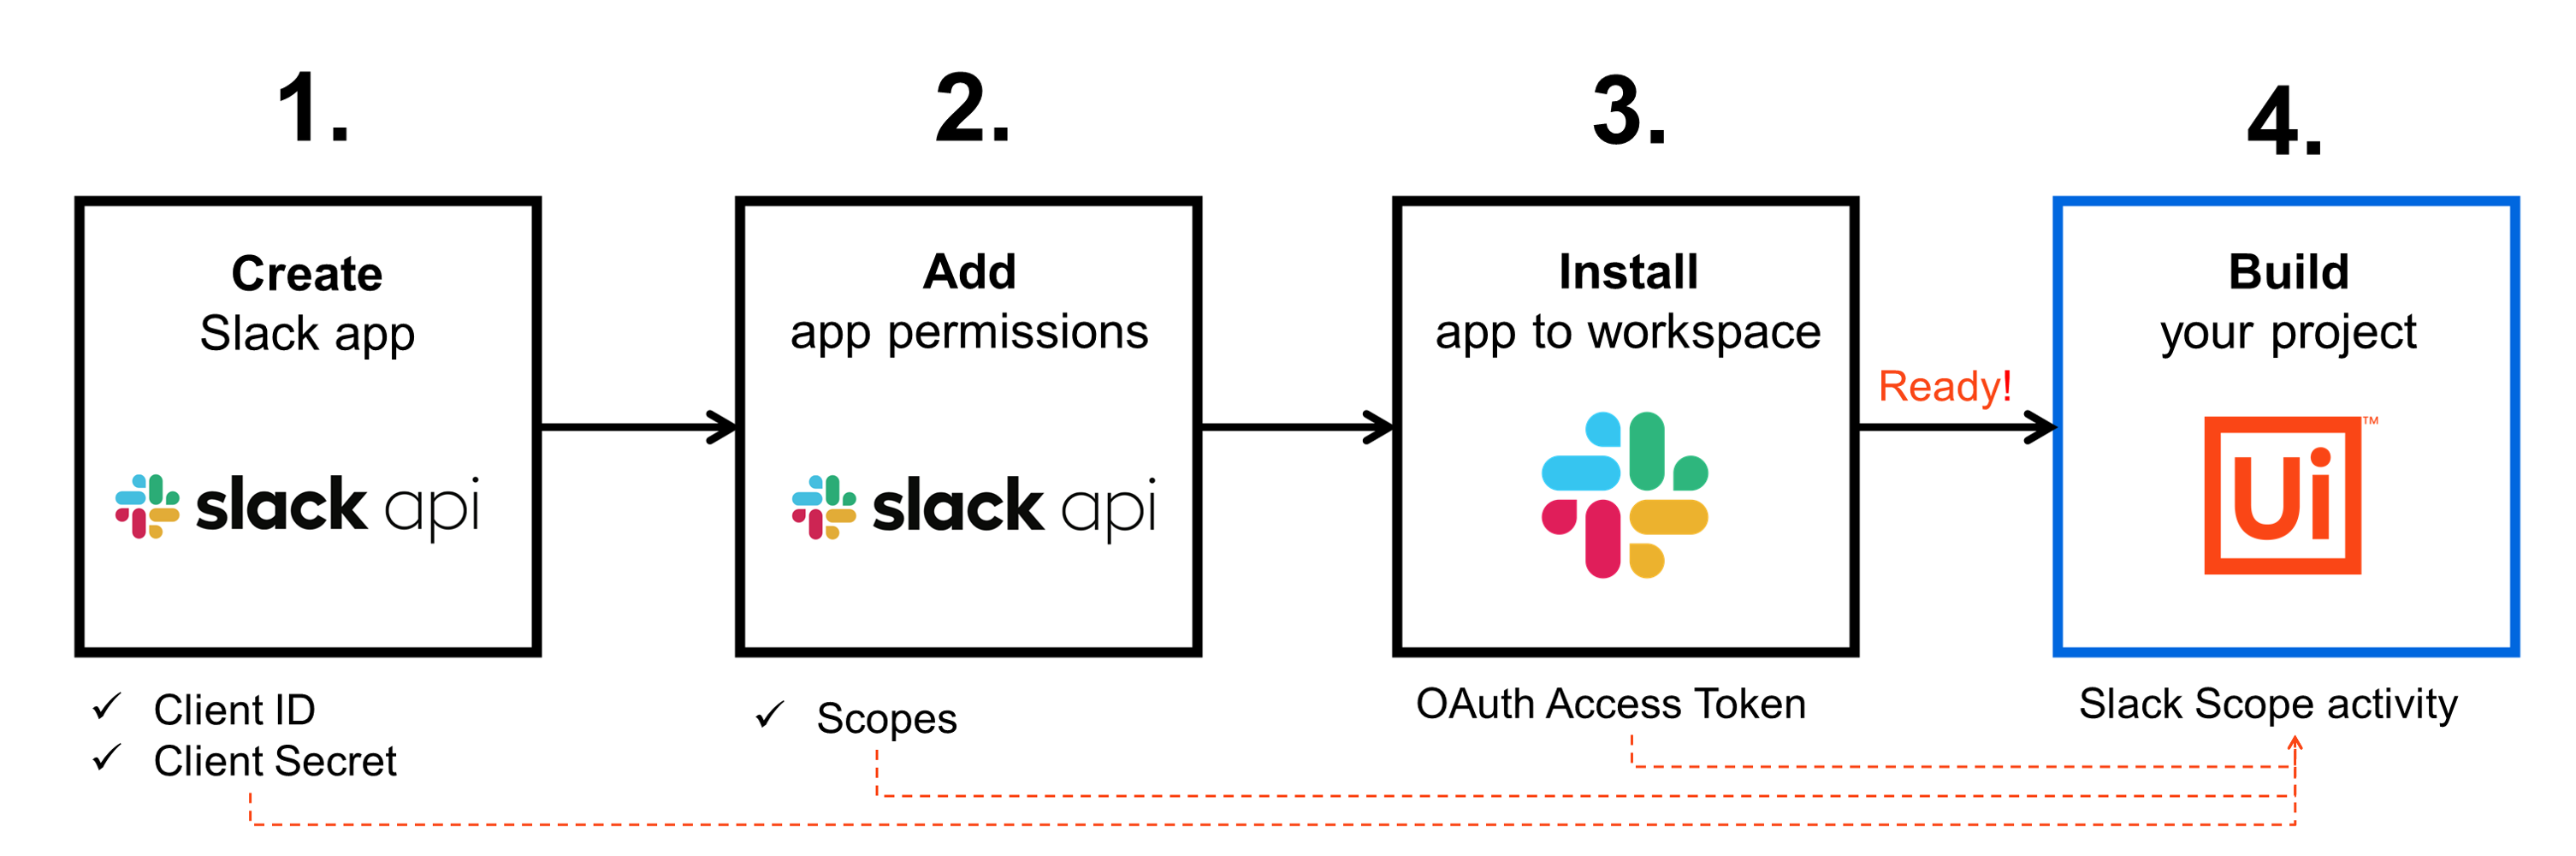
To generate and grant the authentication details, and and start building your automation project, complete the following steps:
1. [Create a new Slack App](https://docs.uipath.com/activities/other/latest/legacy-integrations/slack-setup#setup) (no coding required)
2. [Add app permissions](https://docs.uipath.com/activities/other/latest/legacy-integrations/slack-setup#setup)
3. [Install your app to your workspace](https://docs.uipath.com/activities/other/latest/legacy-integrations/slack-setup#setup)
4. [Build your project](https://docs.uipath.com/activities/other/latest/legacy-integrations/slack-setup#setup)
After creating your app, Slack assigns it a unique Client ID, Client Secret (i.e. app credentials), and an OAuth Access Token (for unattended automation) that you'll enter in the **Slack Scope** activity's authentication properties.
## Steps
Before using the Slack activities, follow the steps below to generate or collect the required input data for the **Slack Scope** activity.
### 1. Create a Slack app
To use the Slack activities, you can create a simple [Single-workspace app](https://api.slack.com/start/distributing#single-workspace_apps). The steps and example below assumes that you have, and are a member of, an existing workspace.
1. [Sign in](https://slack.com/signin) to your Slack workspace or have the Slack desktop application open.
* If you sign in using the URL above, you'll need your [workspace Slack URL](https://get.slack.help/hc/en-us/articles/221769328-Locate-your-Slack-URL).
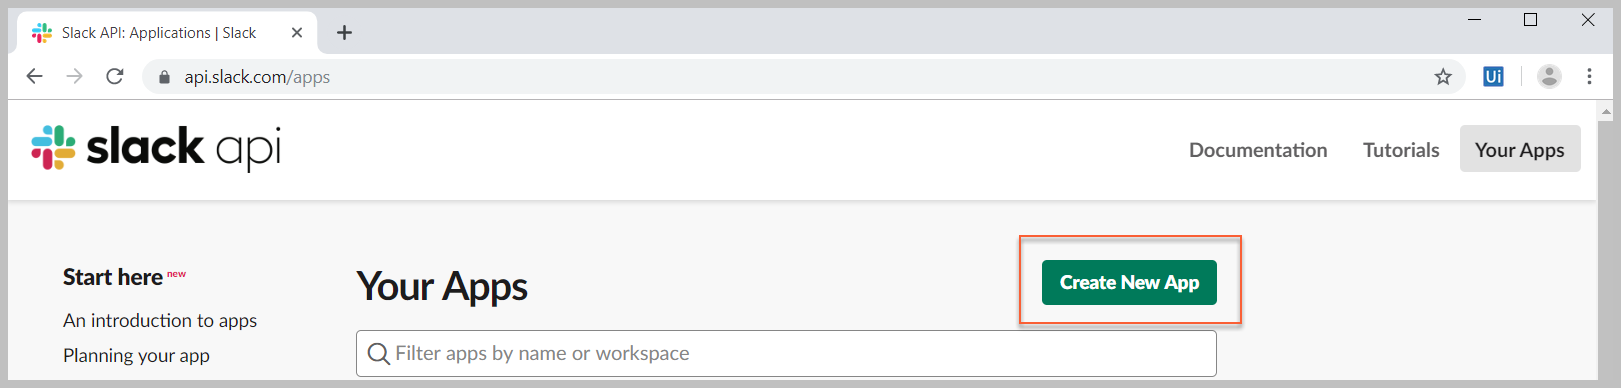
2. Go to [Your Apps](https://api.slack.com/apps) and click the **Create New App** button.
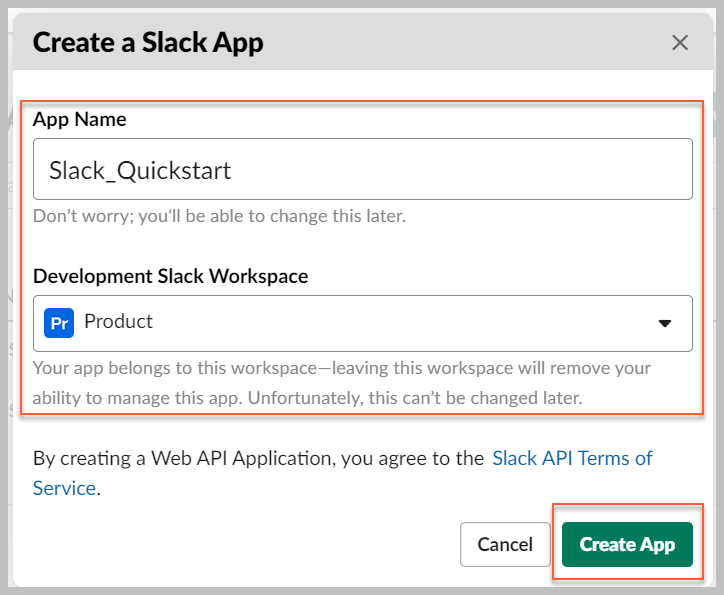
3. Enter your **App Name**, select the **Development Slack Workspace** and click the **Create App** button.
After you create your app, you're taken to the **Basic Information** page. This is where you can find the **Client ID** and **Client Secret** that you'll need for attended automation authentication in the **Slack Scope** activity.
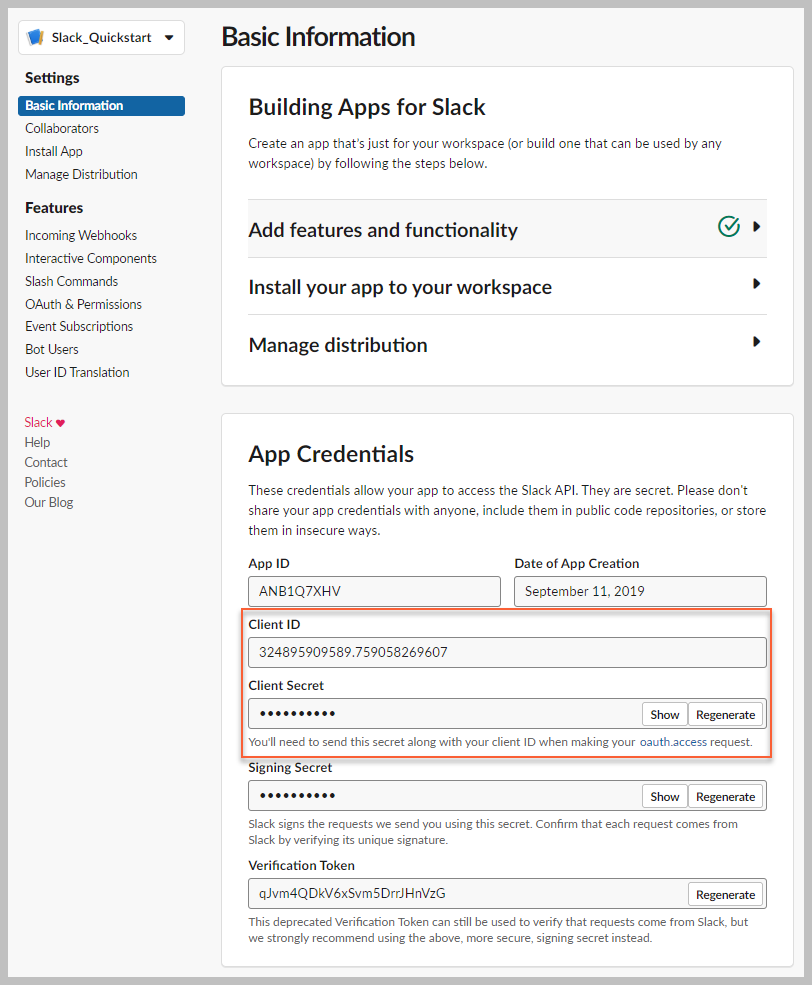
Before you copy and paste these into your activity, you should configure the **OAuth & Permissions** features by following the steps in the next section.
:::note
While you technically can, it's not recommended because you would need to share your Client Secret with them. If you're interested in sharing your app with team members, you can use the unattended automation mode because it relies on a shareable OAuth Access Token.
:::
### 2. Add app permissions
Adding permissions to your app is done using [scopes](https://api.slack.com/docs/oauth-scopes). Scopes define the API methods this app can call and the information it can access in the workspace it’s installed on. Many scopes are restricted to specific resources like channels or files.
:::note
Adding scopes directly to your app is not required if you plan to run attended automation only. If you run attended automation, you select your scopes using the **Scopes** property in the **Slack Scope** activity. Because setting scopes in your app enables both unattended and attended automation, we recommend completing the steps below before you start using the activity package; this allows you to freely switch between the modes.
:::
1. In the left-hand navigation, click the **OAuth & Permissions**.
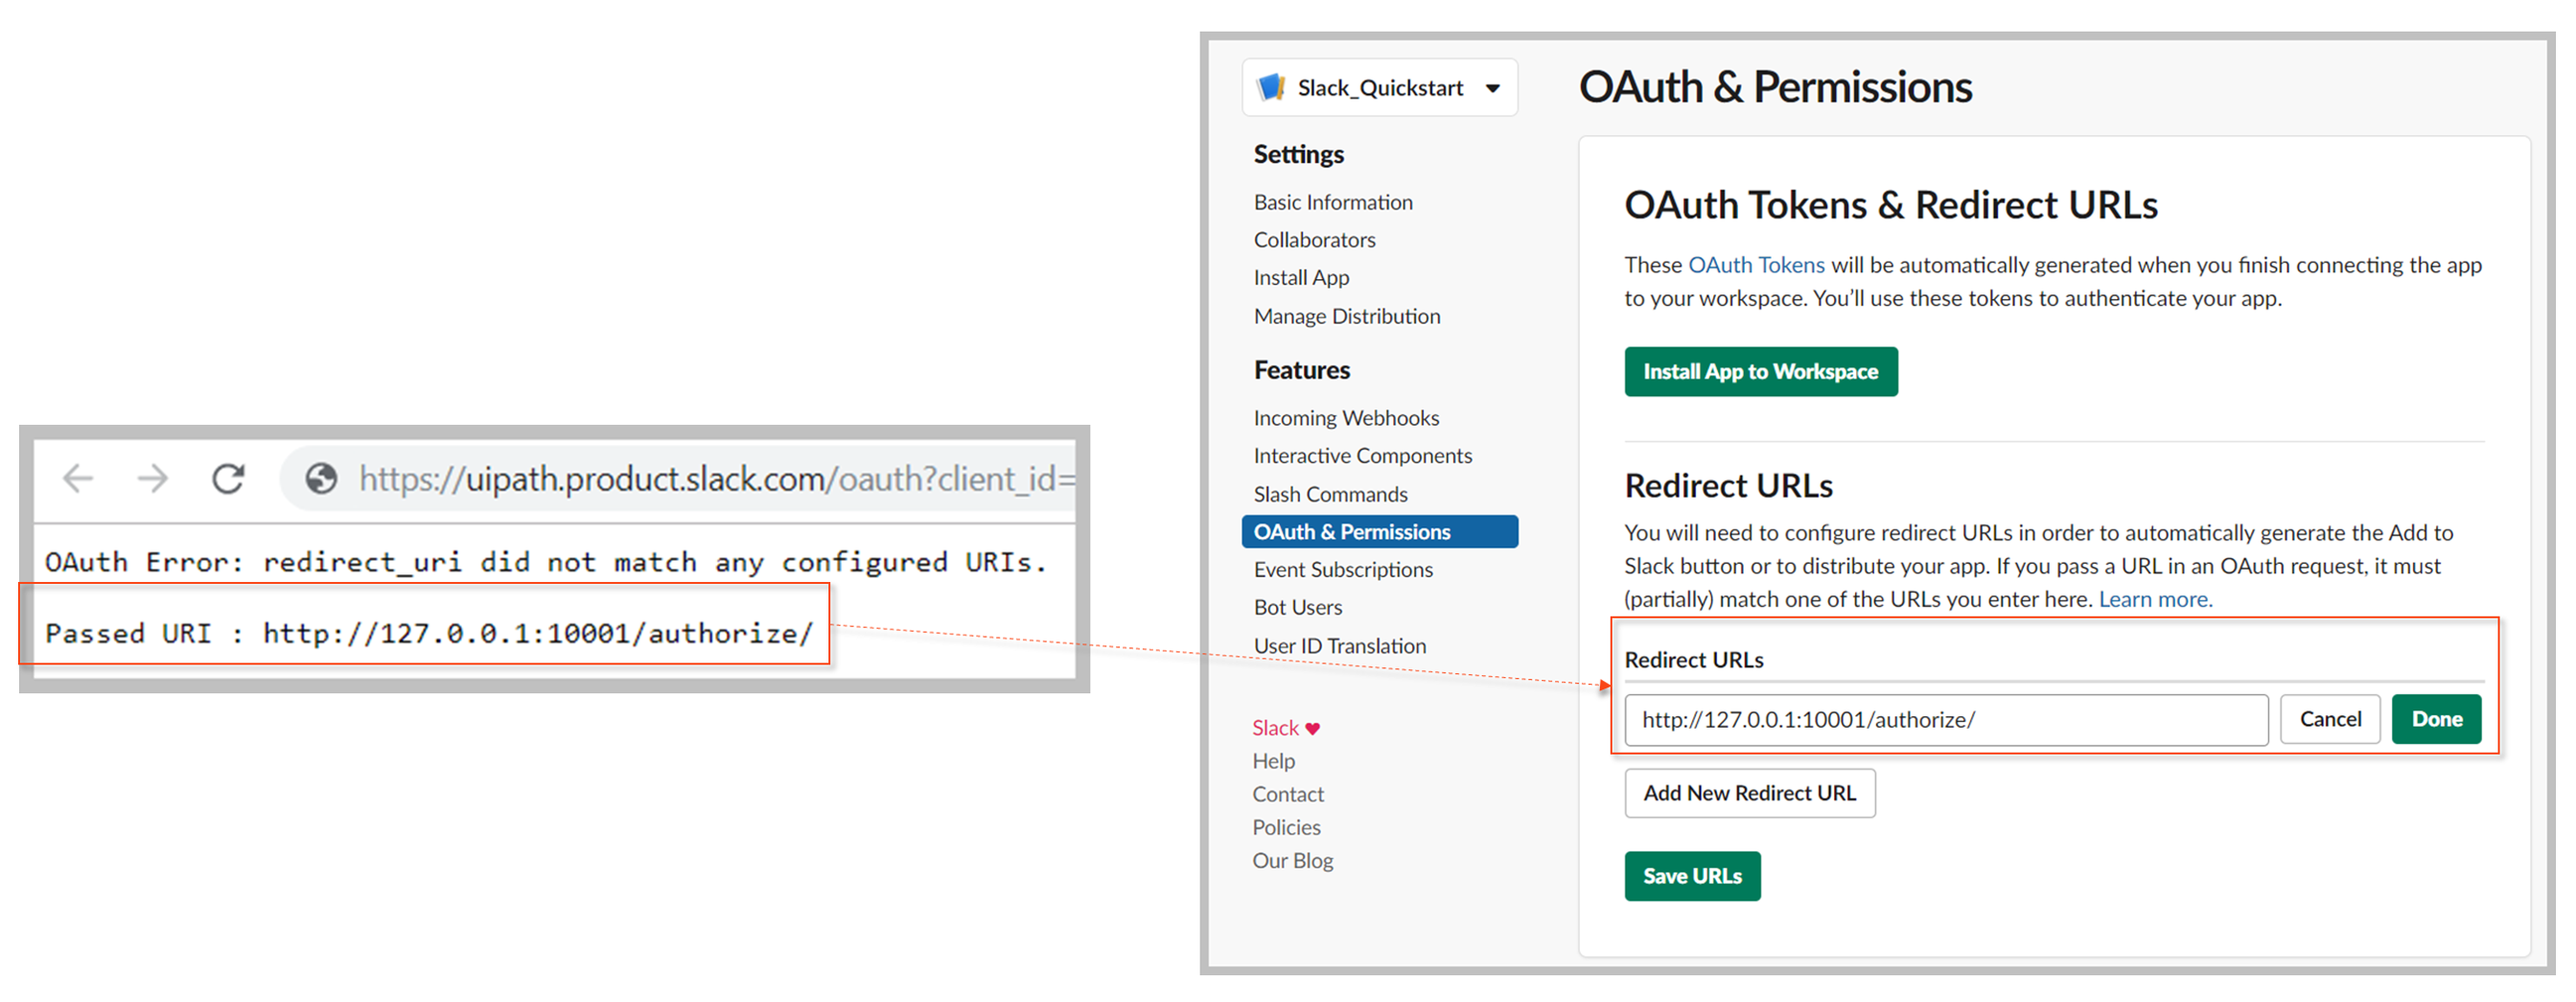
2. In the **Redirect URLs** section, click the **Add New Redirect URL** button and enter your URL.
* If you don't know the URL you should enter, you can leave it empty for now.
* When you try connecting to your app with the **Slack Scope** activity for the first time (using attended automation) the activity opens a new web page that displays an *OAuth Error*. This error includes the redirect URL (i.e., Passed URI) that your workspace is using. You can copy this URL and enter it as your Redirect URL .
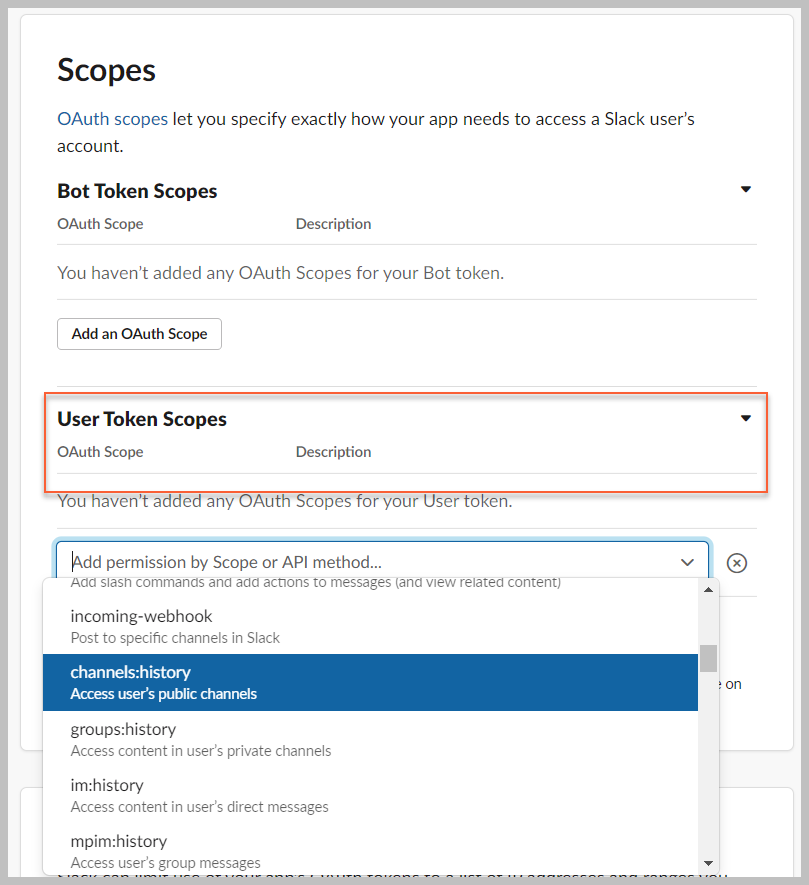
3. In the **Scopes** section, add the permission scopes that you want to assign to your app and click the **Save Changes** button (see the complete list of the [Scopes to add](https://docs.uipath.com/activities/other/latest/legacy-integrations/slack-setup#setup) in the next section).
#### Scopes to add
The following are the scopes required for the different Slack activities. Also included in the table is each scope's mapping to to the **Scopes** property values from the **Slack Scope** activity.
| Scope | Activity | Scopes property |
| --- | --- | --- |
| [channels:write](https://api.slack.com/scopes/channels:write)Modify your public channels | Create ChannelInvite to ChannelJoin ChannelLeave ChannelRemove from ChannelSend Message | PublicChannels |
| [groups:write](https://api.slack.com/scopes/groups:write)Modify your private channels | Invite to ChannelLeave ChannelRemove from ChannelSend Message | PrivateChannels |
| [im:write](https://api.slack.com/scopes/im:write)Modify user’s direct messages | Invite to ChannelLeave ChannelRemove from ChannelSend Message | DirectMessages |
| [mpim:write](https://api.slack.com/scopes/mpim:write)Make changes user’s group messages | Invite to ChannelLeave ChannelRemove from ChannelSend Message | GroupMessages |
| [files:write:user](https://api.slack.com/scopes/files:write:user)Upload and modify files as user | Send Message | Files |
| [files:read](https://api.slack.com/scopes/files:write:user)Access the workspace’s files, comments, and associated information | Download FileSend Message | Files |
| [channels:read](https://api.slack.com/scopes/channels:read)Access information about user’s public channel | Get Messages | PublicChannels |
| [groups:read](https://api.slack.com/scopes/groups:read)Access information about user’s private channels | Get Messages | PrivateChannels |
| [im:read](https://api.slack.com/scopes/im:read)Access information about user’s direct messages | Get Messages | DirectMessages |
| [mpim:read](https://api.slack.com/scopes/mpim:read)Access information about user’s group messages | Get Messages | GroupMessages |
| [channels:history](https://api.slack.com/scopes/channels:history)Access user’s public channels | Get Replies | PublicChannels |
| [groups:history](https://api.slack.com/scopes/groups:history)Access content in user’s private channels | Get Replies | PrivateChannels |
| [im:history](https://api.slack.com/scopes/im:history)Access content in user’s direct messages | Get Replies | DirectMessages |
| [mpim:history](https://api.slack.com/scopes/mpim:history)Access user’s group messages | Get Replies | GroupMessages |
| [chat:write:user](https://api.slack.com/scopes/chat:write:user)Send messages as user | ReplySend Message | Chat |
| [search:read](https://api.slack.com/scopes/search:read)Search your workspace’s content | Search | (included with DirectMessages and/or GroupMessages) |
| [users.profile:write](https://api.slack.com/scopes/users.profile:write)Modify user’s profile | Update Status | Users |
| [users:read.email](https://api.slack.com/scopes/users:read.email)View the workspace members' email addresses | Invite to ChannelRemove from Channel | Users |
| [users:read](https://api.slack.com/scopes/users:read)View the workspace's list of members and their contact information | Invite to ChannelRemove from Channel | Users |
After selecting your scopes, you're ready to install your app to your workspace by following the steps in the next section.
### 3. Install your app to your workspace
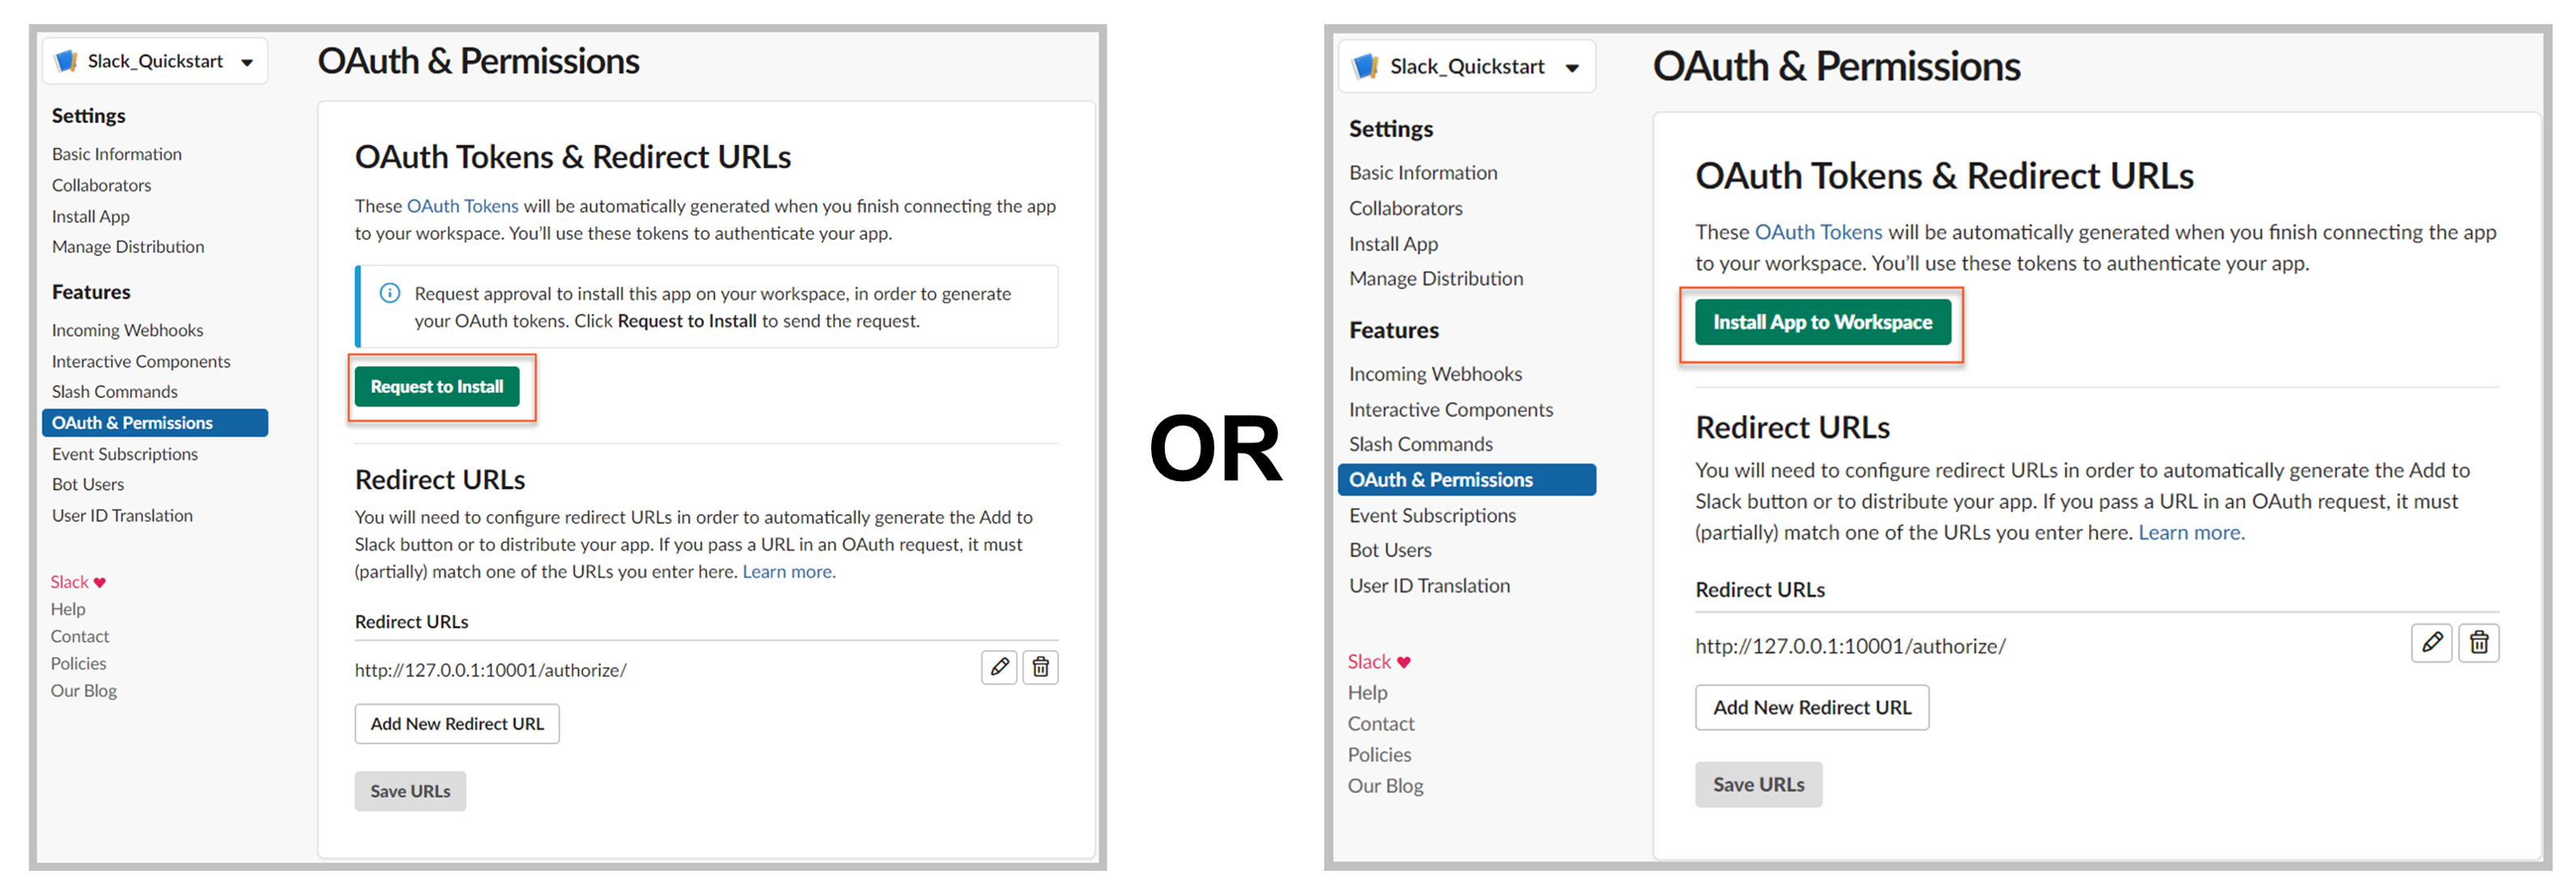
Depending on how your workspace is administered, you may need to request to install the app.
1. In the **OAuth Tokens & Redirects URLs** section, click the **Install App to Workspace** button or **Request to Install** button.
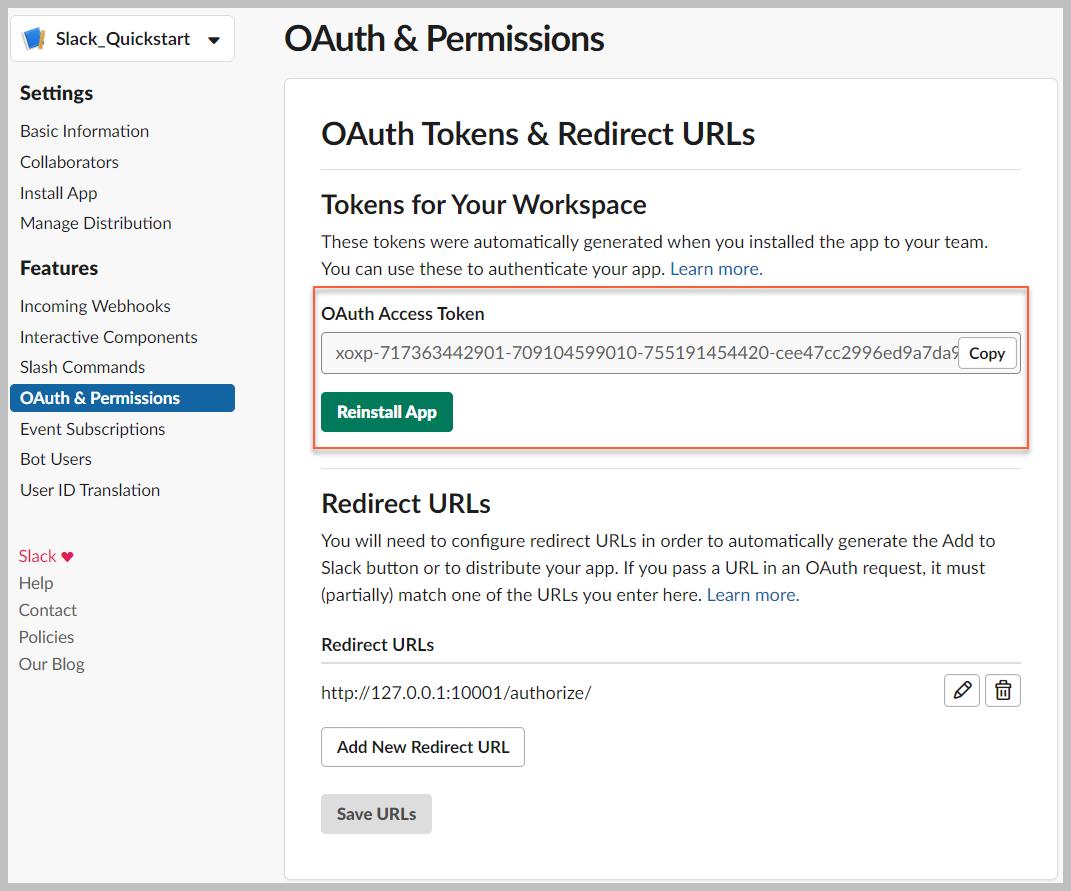
2. After the app is installed, an **OAuth Access Token** is generated.
* Similar to the **Client ID** and **Client Secret**, the **OAuth Access Token** is used for authentication purposes. The differences between the two become applicable when run your automation project.
+ If running attended automation, the **Slack Scope** activity needs values in the **Client ID**, **Client Secret**, **Scopes** properites.
+ If running unattended automation, the **Slack Scope** activity only needs a value in the OAuth Access **Token** property.
### 4. Build your project
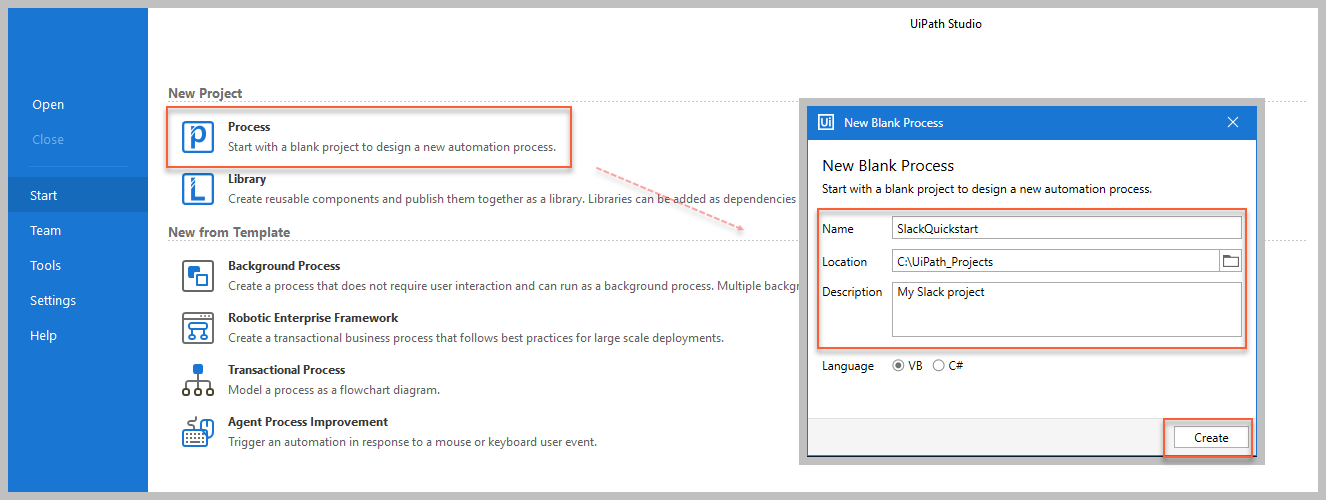
1. Create a new automation project.
1. Open UiPath Studio.
2. Under **New Project**, click **Process** (this opens a **New Blank Process** window).
3. Enter a project **Name**, **Location**, and **Description**.
4. Click **Create**.
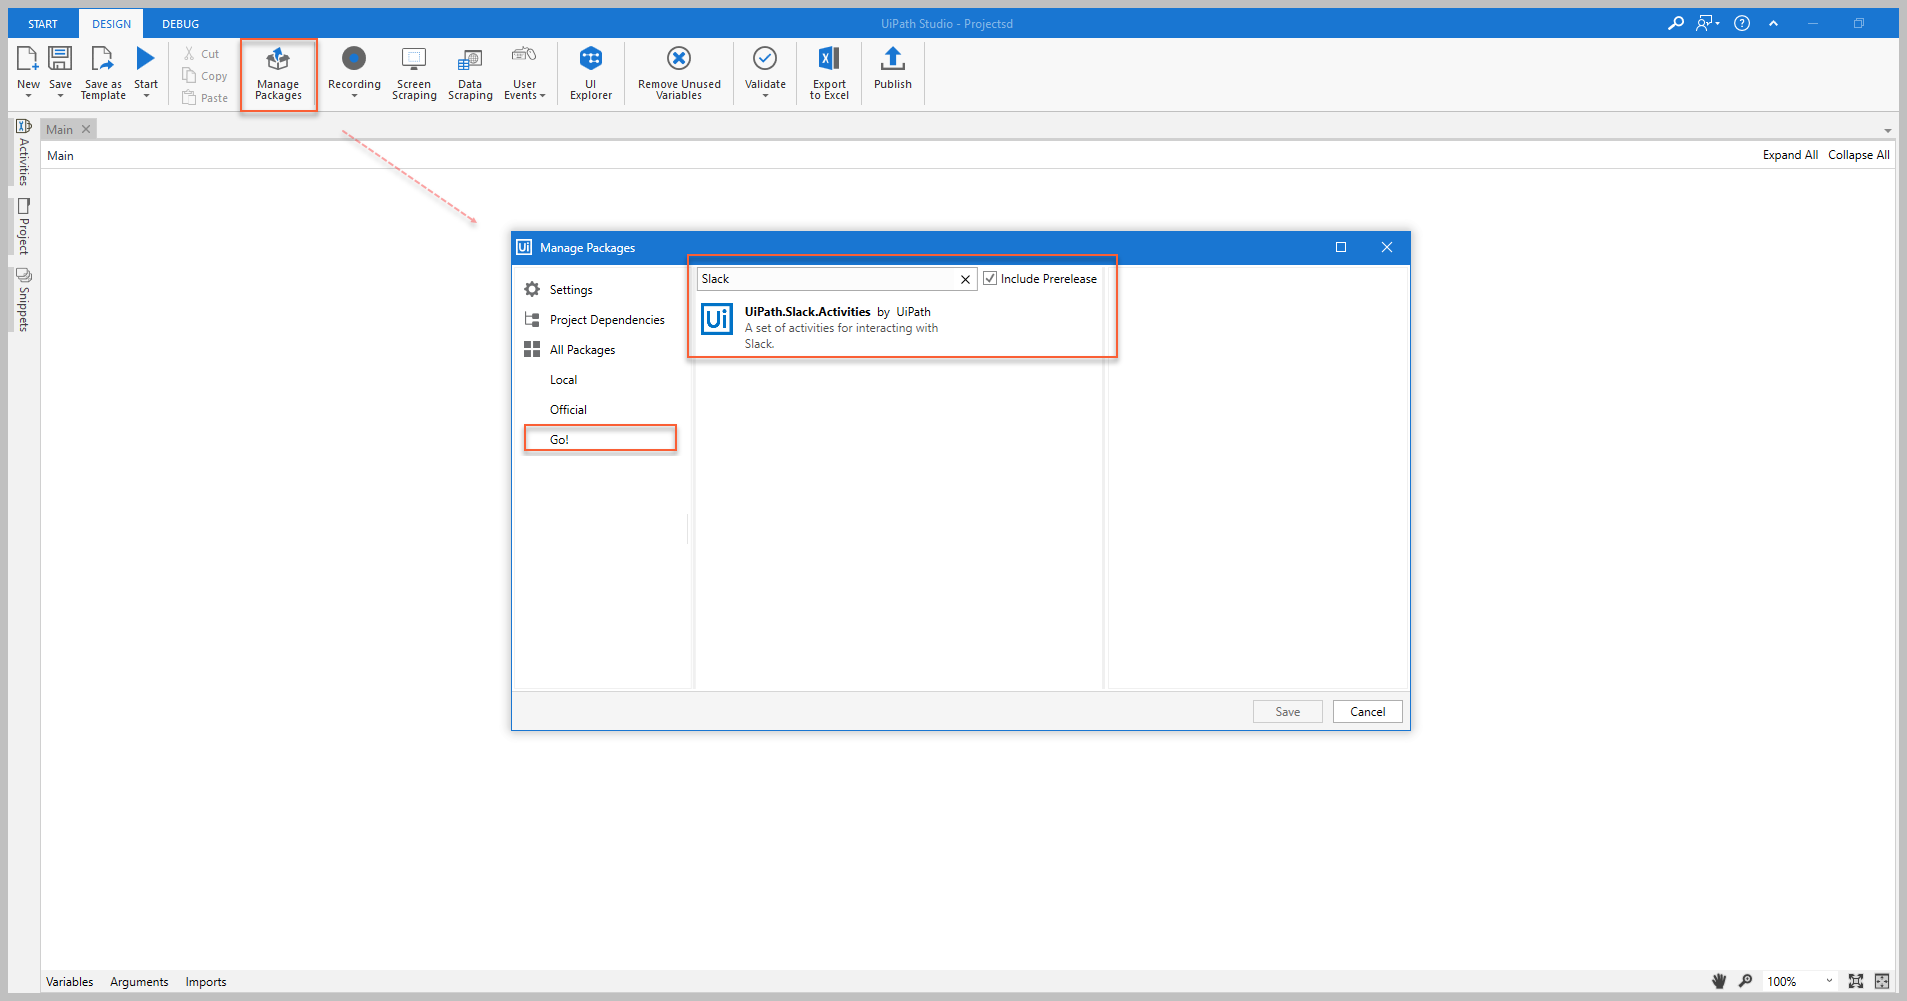
2. Install the **UiPath.Slack.Activities** package.
1. In the **Design** ribbon, click **Manage Packages** (this opens the **Manage Packages** window).
2. Under **All Packages**, click **Go!**
3. In the **Search** bar, enter *Slack*.
4. Click, install, and accept the license for the **UiPath.Slack.Activities**.
* For more information about Uipath Studio packages, see [Managing Packages](https://docs.uipath.com/studio/docs/managing-activities-packages) in the Studio Guide.
You're done!
Now that you have completed the setup, you can start adding the Slack activities to your project.
## Next steps
For a hands-on learning experience and to quickly start using the activities, see the [Quickstart](https://docs.uipath.com/activities/other/latest/legacy-integrations/slack-quickstarts) guides. These guides provide step-by-step instructions to help you create working samples of the different activities so that you can verify the connection to your Slack workspace and get familiar with the input/output properties.
To learn more about the Slack activities (including example property inputs/outputs), see the [Activities](https://docs.uipath.com/activities/other/latest/legacy-integrations/slack-activities) page for a complete activity list and links to the activity detail pages.